In this guide, I will show you how to setup Windows Autopatch in Intune step-by-step. Windows Autopatch is Microsoft’s cloud-based service that automates the deployment of Windows quality and feature updates, as well as updates for Microsoft 365 Apps, Microsoft Edge, and Microsoft Teams.
It leverages Intune policies and Autopatch groups to safely stage rollouts across different rings. As of April 2025, Microsoft has expanded Autopatch availability to include Business Premium and A3+ tenants in addition to E3/E5, allowing more organizations to onboard with minimal effort.
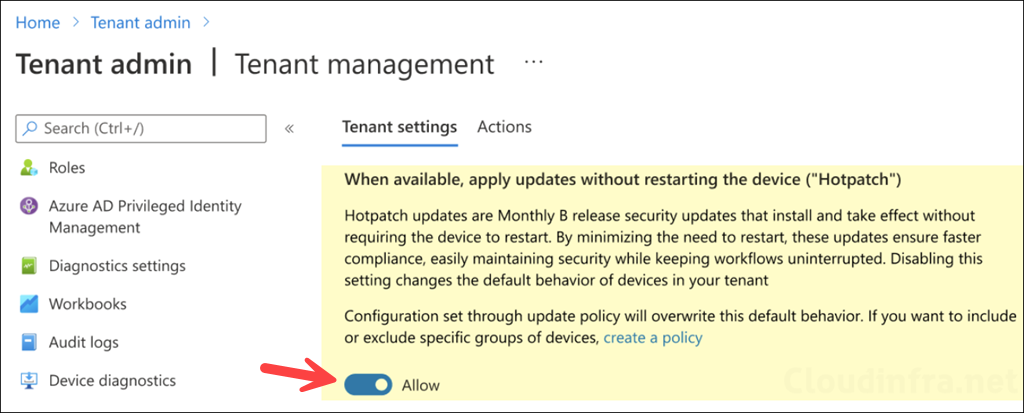
Starting May 2026, Windows Autopatch is enabling hotpatch updates by default. If you are not ready yet, then you can opt out of this by going to Microsoft Intune > Tenant administration > Windows Autopatch > Tenant management and selecting the Tenant settings tab. Switch off the toggle to opt-out.
You can still enable or disable hotpatch for specific devices using a quality update policy. Go to Devices > Manage updates > Windows updates. Select the Quality updates tab and create the policy. Select Windows quality update policy. In the Settings step, toggle the “When available, apply without restarting the device (“hotpatch”) setting to either Allow or Block and assign it to the Entra group containing devices.
Below are the licensing requirements for enabling and using the Windows Autopatch. For more details, refer to Microsoft’s Prerequisites page.
Microsoft 365 Business Premium
Windows 10/11 Enterprise E3 or E5 (also included in Microsoft 365 F3/E3/E5)
Windows 10/11 Education A3 or A5
Windows 10/11 Enterprise E3/E5 VDA (for VDI scenarios)
Windows OS Requirements
Below are the Windows OS requirements for using Windows Autopatch. For more details, refer to Microsoft’s Prerequisites page. For network requirements, refer to the page: windows-autopatch-configure-network.
Windows 10/11 Pro/Enterprise/Education/Pro Education/Pro for Workstations/and IoT Enterprise.
LTSC devices can be registered, but Autopatch only manages quality updates for LTSC. Feature updates are not offered to LTSC.
Device Requirements for AutoPatch
A device can be registered with Autopatch only if it meets the prerequisites listed below. If a device does not meet these prerequisites, its status will appear as Not registered or Not ready. For more details, refer to Microsoft learn page: Register devices with Autopatch groups | Microsoft Learn.
Device must be Intune-managed. If it is not enrolled in Intune, it cannot be registered with Autopatch.
Device must have checked in to Intune within the last 28 days.
Device must be a Windows corporate-owned device. Personal devices are not eligible.
If the device is co-managed with configuration manager, the following workloads must be enabled:
Windows Update Policies
Device Configuration
Office Click-to-Run
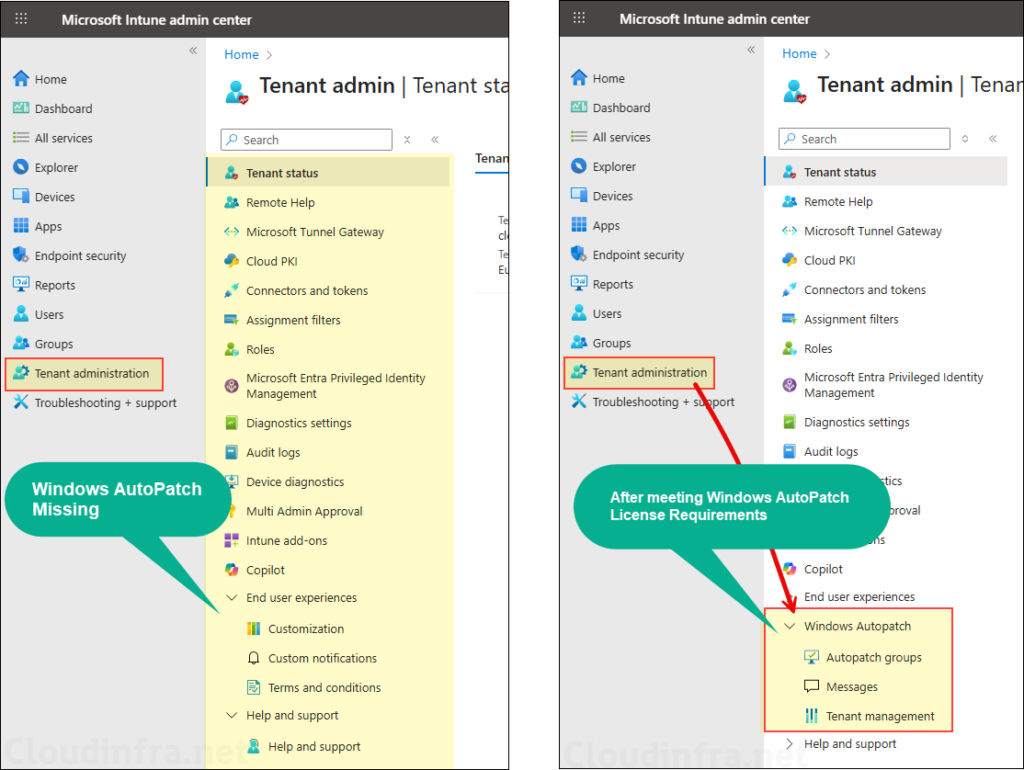
Windows AutoPatch Missing in Intune Portal
If you have not used Windows Autopatch before and do not see the Windows Autopatch section under Tenant administration in the Intune admin center, verify that your tenant meets the licensing requirements for using Windows Autopatch. Assign the required licenses and refresh the portal to confirm if the section now appears.
The screenshots below show the Intune portal before and after assigning the correct licenses. In the left screenshot, Windows Autopatch section is missing. The right screenshot, taken after assigning the appropriate licenses, shows Windows Autopatch appearing under Tenant administration.
Windows AutoPatch Groups
An Autopatch group is the core container in Windows Autopatch that ties everything together. An AutoPatch group is not an Entra group. It’s just a logical entity which:
Groups your feeder Entra device groups.
Creates Entra security assigned groups for each deployment ring.
Groups Update rings policies, feature update policies, driver update policies, Microsoft 365 app update policies and Microsoft Edge update policies.
It will also assign update ring policies to deployment rings created in the Autopatch group.
Important Points about AutoPatch Groups
Most organizations will only ever need one AutoPatch group, but depending upon your use case, you can create upto 300 Autopatch groups. If you go over this limit, you won’t be able to create any more Autopatch groups, as the button to create this will be greyed out.
Service-managed groups & policies: When you create an Autopatch group, Autopatch automatically provisions the device-based Entra groups for each ring and assigns the update policies (Update rings, Feature, Drivers, M365 Apps, Edge) based on the configured settings. Don’t modify these service groups.
One group per ring rule: A device-based Entra group can be used in only one ring at a time.
Test and Last deployment rings each support one single device-based Microsoft Entra device group assignment. The group you assign can be either an assigned membership device group or a dynamic (query-based) device group. If you need to include multiple groups, nest them under the single group assigned to the ring (one level of nesting is supported).
Conflict handling (within AutoPatch group):
Assigned group beats Dynamic group if a device falls into both.
If the types are the same (both assigned), the later ring in order wins.
If a ring has combined (Assigned+Dynamic) vs a Dynamic-only ring, the combined ring wins; between two combined rings, the later one wins.
Conflict handling (across groups): If the same device lands in rings across different Autopatch groups, it shows Not ready until you choose which group it belongs to. Overlaps before registration cause Not registered status and you must fix group overlaps.
Step 1: Create feeder Microsoft Entra Device groups
Feeder groups are your own Entra device groups (assigned or dynamic) that you map to Autopatch rings. You never add devices directly to the Autopatch service-managed ring groups. Instead, manage membership in your feeder groups, and Autopatch reads those memberships to populate its ring groups automatically. Keep these groups device-based, mutually exclusive, and Windows-only.
Define a clear device group naming convention and decide on a consistent grouping strategy. For example, grouping by device category, by Autopilot group tag, or with custom dynamic queries.
Create device-based Entra groups.
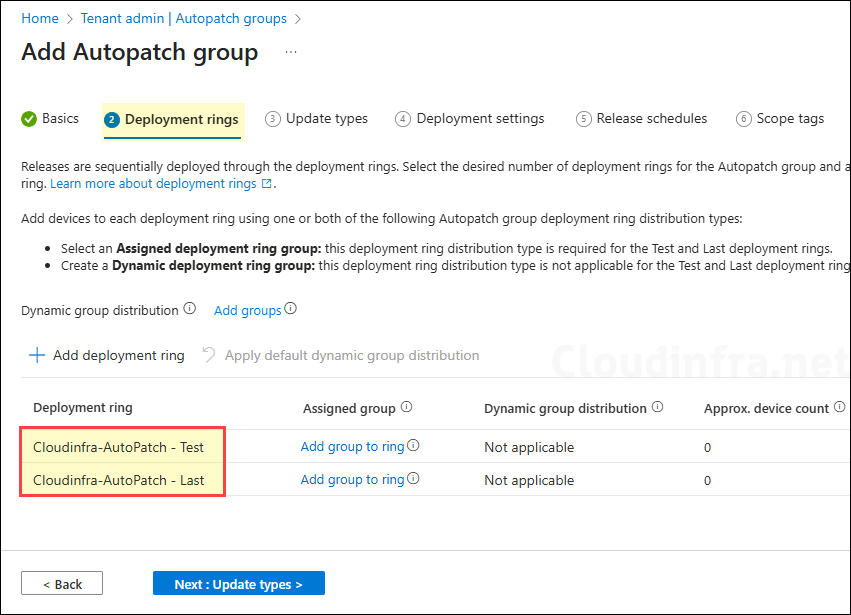
When you create a Windows Autopatch group, the service creates two rings for you: Test and Last. These default rings cannot be renamed or deleted. Create dedicated Entra security groups for your test and last devices.
Test devices are the earliest machines to receive updates. They are typically IT-owned test PCs used to validate update quality, app compatibility, policies, and user experience before a wider rollout. Your test group should cover a representative mix of hardware models, drivers, core applications, and critical user personas, and these devices should be monitored closely for any issues caused by the updates.
Last devices are intentionally updated at the very end of the rollout. This group usually includes high-risk, highly specialized, VIP users or business-critical systems where stability is more important than early adoption. Keep the Last group small, document why each device is in it, and review membership regularly, so machines do not remain “last” longer than necessary.
For Test and Last deployment rings, I have already created Entra security groups named Cloudinfra-Autopatch (Test Group) and Cloudinfra-Autopatch (Last Group). I will manually add or import the test and last devices into these groups.
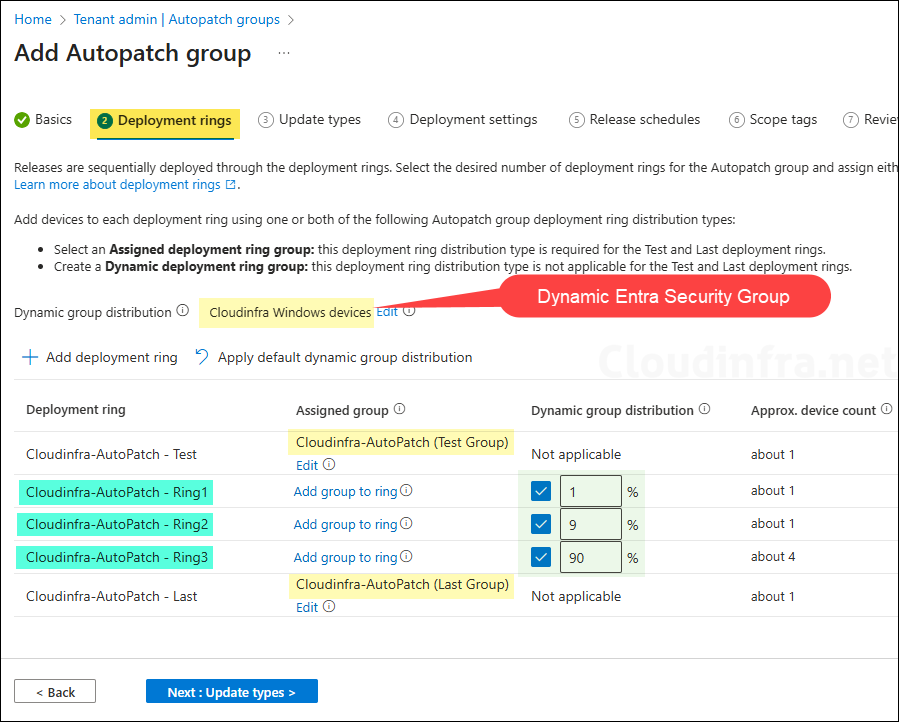
If you add additional deployment rings (Ring 1, Ring 2, Ring 3, and so on), you can use either assigned or dynamic groups. With assigned groups, create the groups yourself and assign them to the respective rings. It’s easier to work with dynamic groups for additional rings as you can simply create a dynamic group which contains all your organization’s devices and define a distribution percentage across these rings, Autopatch will automatically spread devices in those rings.
For example: I have created a dynamic group called Cloudinfra Windows devices which contain all devices in my organization except those in the Test and Last groups. You can also start with assigned group with less number of devices and later on switch to a dynamic group.
Autopatch scans the Entra groups tied to your Autopatch group hourly to discover and queue devices for registration. You can also force this scan using Discover devices option which I have shown later in the post.
Note
Since I’m using a dynamic Entra security group for all additional rings, I won’t be adding any groups under the Assigned group column. If you prefer to assign a specific group to each ring, you can create separate groups and assign them to each ring (Ring 1, Ring 2, Ring 3, and so on).
Deployment Ring
Assigned Group
Group Type
CIoudinfra-AutoPatch – Test
Cloudinfra-AutoPatch (Test Group)
Assigned or Dynamic
CIoudinfra-AutoPatch – Ring1
Not Selected
CIoudinfra-AutoPatch – Ring2
Not Selected
CIoudinfra-AutoPatch – Ring3
Not Selected
CIoudinfra-AutoPatch – Last
Cloudinfra-AutoPatch (Last Group)
Assigned or Dynamic
Step 2: Create an AutoPatch Group
Let’s move to the main task, creating an Autopatch group. Make sure you’ve already created all the required Entra groups, as you’ll need them during Autopatch group creation.
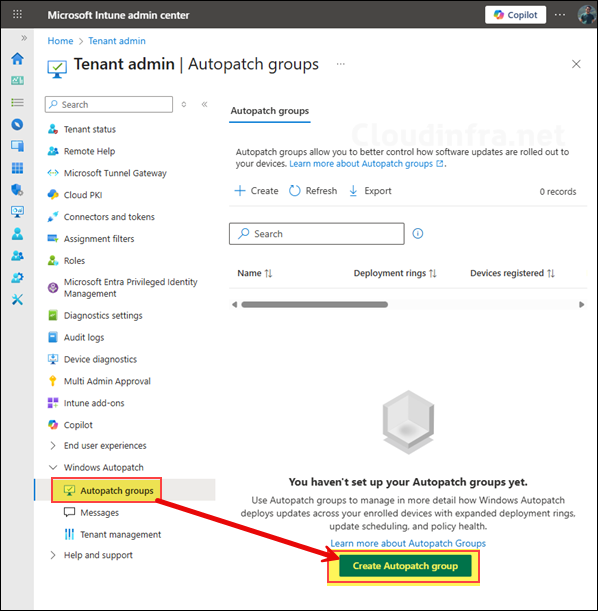
Sign in to the Intune admin center> Tenant administration > Autopatch groups. Click on Create Autopatch group.
Provide a Name and Description for the Autopatch group. The name you choose is important because the service will use it for naming the deployment rings, policies and the Entra groups for those rings. You can use your company name or any preferred prefix. For example, I have named it as Cloudinfra-Autopatch, therefore the rings will be created as Cloudinfra-Autopatch – Test, Cloudinfra-Autopatch – Ring 1, and so on, and the corresponding Entra groups, policies will use the same naming pattern.
On Deployment rings tab, you will see two rings: Test and Last. These are the minimum required for Autopatch to work and cannot be deleted. You can add more rings using the + Add deployment ring option.
Microsoft has recommended the number of devices to add into the Test ring. You can follow below guidance based on the total number of organization devices. 0–500 devices: minimum one device. 500–5000 devices: minimum five devices. 5000+ devices: minimum 50 devices.
Click + Add deployment ring to create additional rings. Deployment rings let you roll out updates in phases. Decide how many rings you need. Each click adds another ring with a suffix: Ring 1, Ring 2, Ring 3, and so on.
Since we’ve already created the Entra groups for the Test and Last rings, assign those groups to the corresponding deployment rings under the Assigned group column. In this example, I’ve added Cloudinfra-Autopatch (Test Group) and Cloudinfra-Autopatch (Last Group) to the Test and Last rings, respectively. Identify your test devices and add them to the Test group, and similarly, identify the last set of devices and add them to the Last group.
After creating additional rings, assign Entra device groups (assigned or dynamic) to each ring by clicking Add group to ring. Select the group you want for each ring. Use this approach if you prefer to control and manage device distribution manually.
A better approach is to use dynamic groups, as shown in the screenshot below. I added a dynamic Entra device group called Cloudinfra Windows Devices, that includes all devices in my organization and used the percentage-based distribution. Based on the defined percentages, Autopatch will automatically distribute devices across the deployment rings.
If you’re unsure what percentages to assign to the rings, click the Apply default dynamic group distribution option. This will automatically set the recommended percentage distribution for you.
As shown in the screenshot below, I used Apply default dynamic group distribution option to define the percentage for distributing devices across the rings. By default, it assigns Ring 1 (1%), Ring 2 (9%), and Ring 3 (90%) when three rings are present. If you add more rings and click Apply default dynamic group distribution again, the percentages will automatically recalculate and update. You can also manually adjust the distribution percentages to fit your requirements.
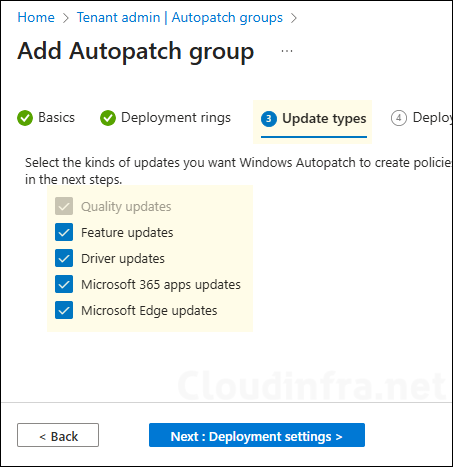
On Update types tab, select the types of updates you want Autopatch to manage. If you uncheck any option, Autopatch will not create policies for that update type. In this example, I’ve selected all options to allow Autopatch to manage all update categories.
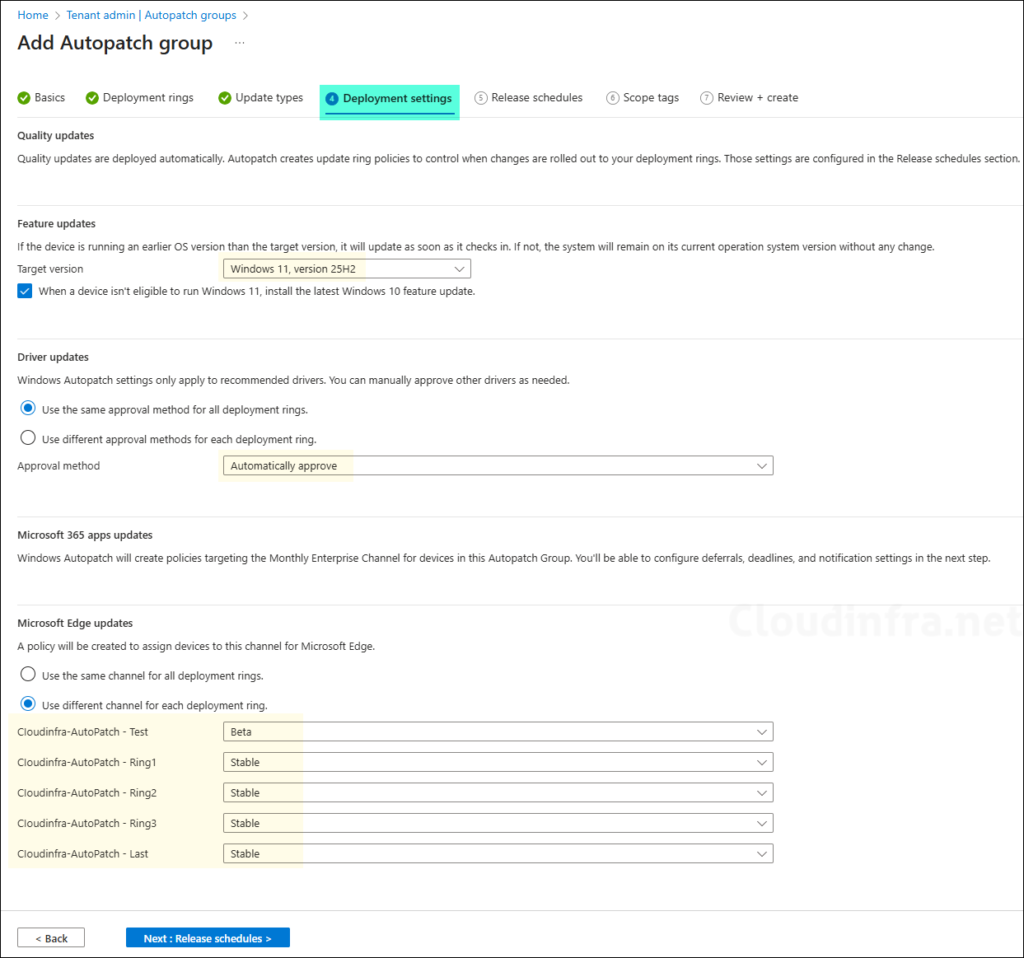
On Deployment settings tab, Configure below settings:
Feature updates: Use the drop-down to select the feature update you want for all your organization devices. Whatever you select here will be applied to all deployment rings. I have selected Windows 11, version 25H2 as I want all my devices to be at this feature update.
Driver updates: You can use the same approval method for all deployment rings or a different approval method for each ring. I will recommend the the first option with Automatically approve the recommended drivers which makes it easy to manage the driver updates without an administrator manually approving those already recommended and latest drivers.
Microsoft Edge update: Select the Edge update channel for each ring and click on Release schedules to proceed to the next step.
You won’t see any deployment settings for Quality updates and Microsoft 365 app updates, as these are deployed and managed automatically by Autopatch.
Note
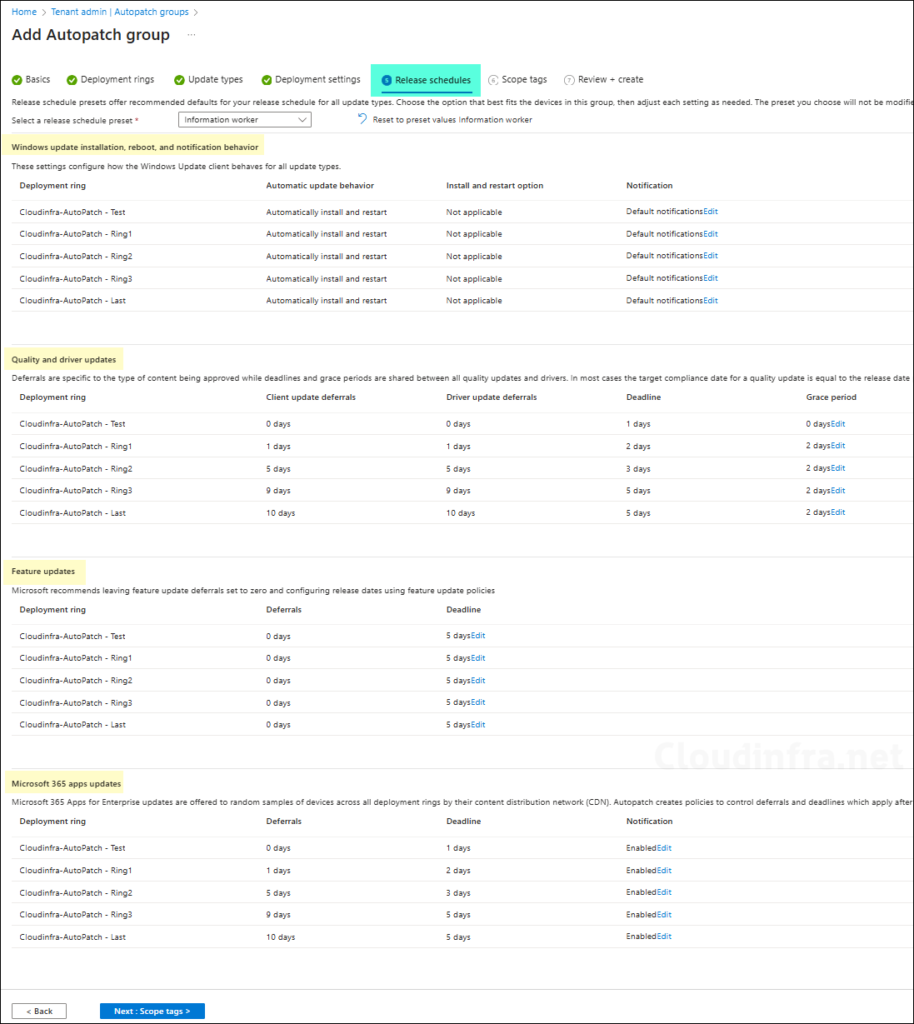
On Release schedules tab, you will find below for each deployment ring. You can click on Edit for each of these if you want to modify the detault settings.
Windows update installation, reboot and notification behevior
Quality and driver updates deferals, deadline and grace period
Feature update deferrals and deadline
Microsoft 365 app updates deferrals, deadline and notification
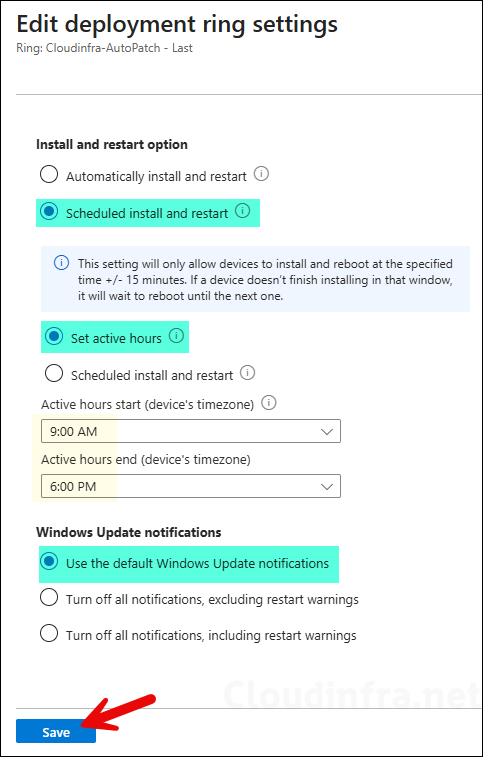
An important point to note is that the Automatic update behavior is by default set to Automatic install and restart, If you want, you can modify it for a specific or all of your deployment rings. Click on Edit under notification settings and select Scheduled install and restart. You can also set Active hours or Scheduled install and restart behavior.
Scope tags (optional): A scope tag in Intune is an RBAC label you add to resources (policies, apps, devices) to limit which admins can see and manage them. For more Information, read: How to use Scope tags in Intune.
Review + create: Review the deployment summary and click Create.
What Happens After Creating AutoPatch Group
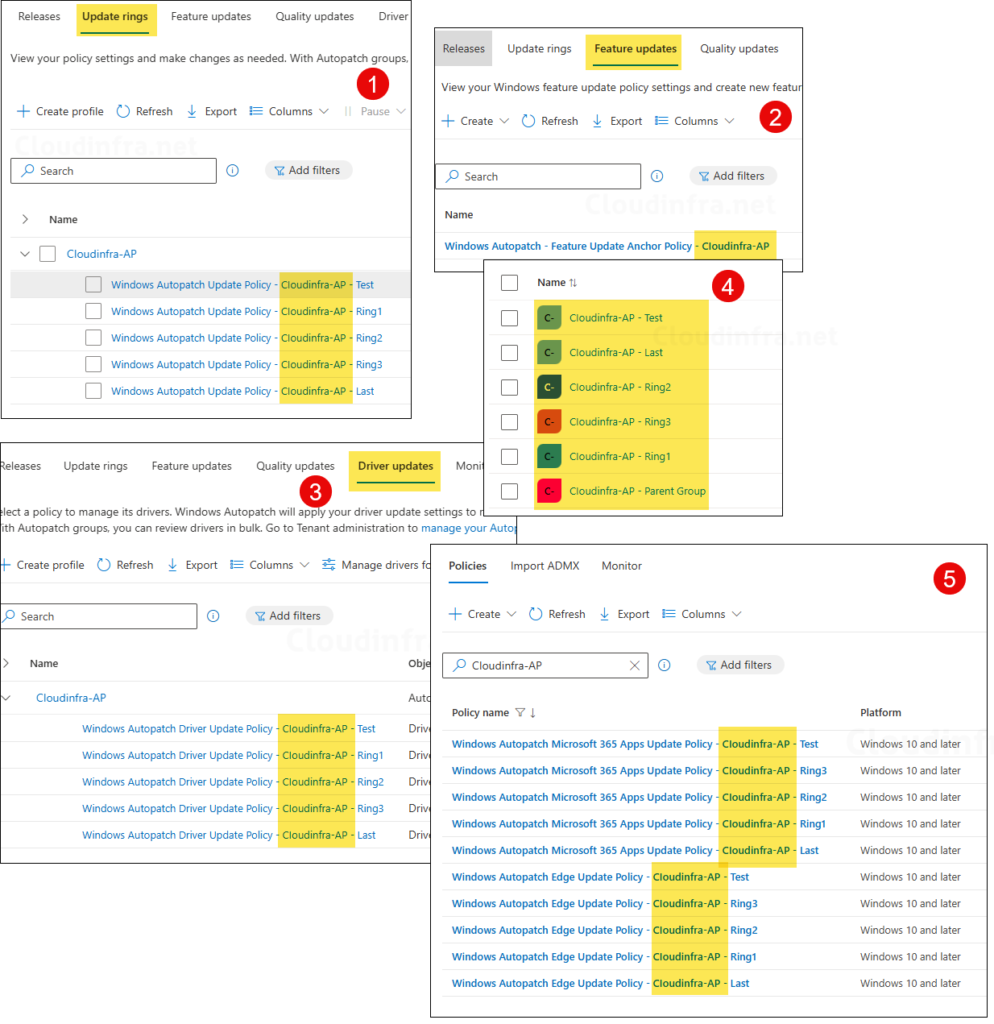
After you create an Autopatch group, the service automatically provisions update ring policies, feature update policies, driver update policies, assigned Entra security groups for each deployment ring, and the required device configuration profiles. All these configurations and policies are automatically assigned to the Entra groups created by the service. Let’s review what Autopatch service has created after setting up the Autopatch group.
Go to Intune admin center > Devices > Windows updates and go through all the tabs to find the Autopatch provisioned resources.
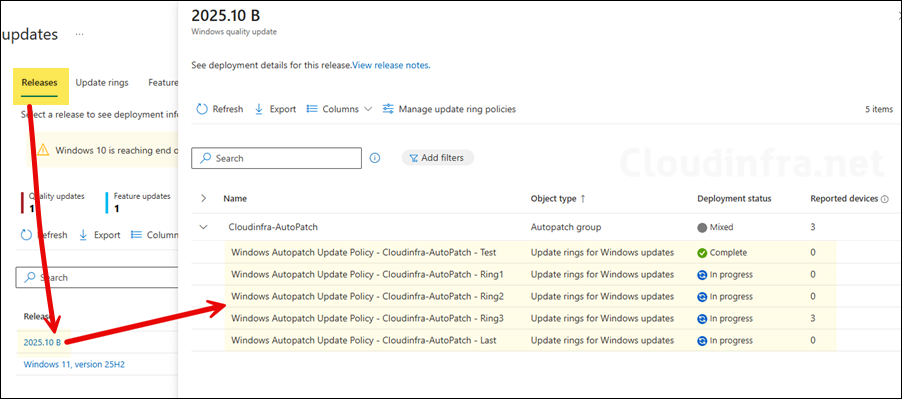
Releasses tab: This tab will show you all your releases for quality and feature updates. Clicking on it will open the AutoPatch group that contains all deployment rings and its information.
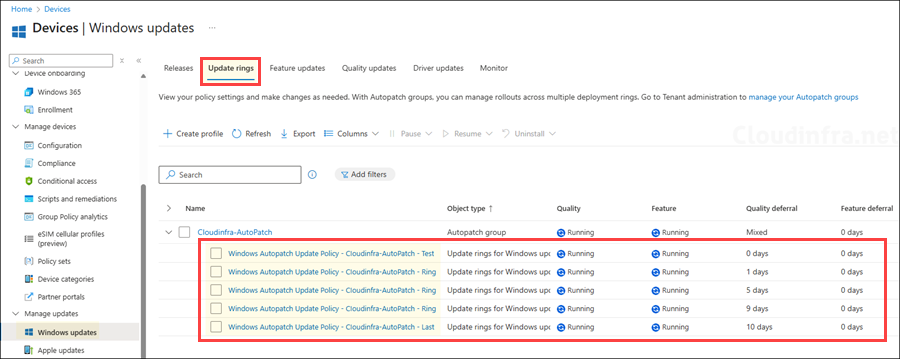
Update ringstab: As per the your defined configuration while creating Autopatch group, Update rings are provisioned with those settings.
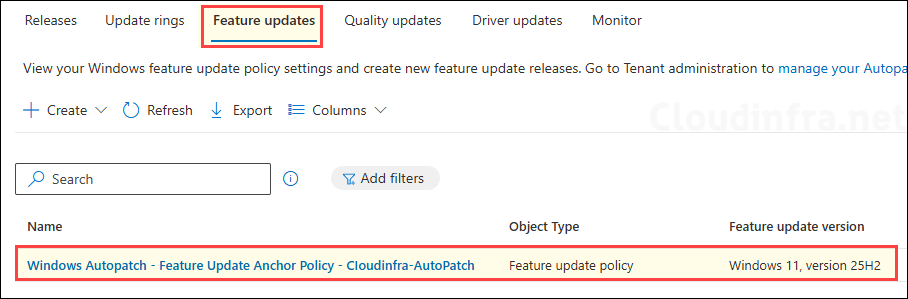
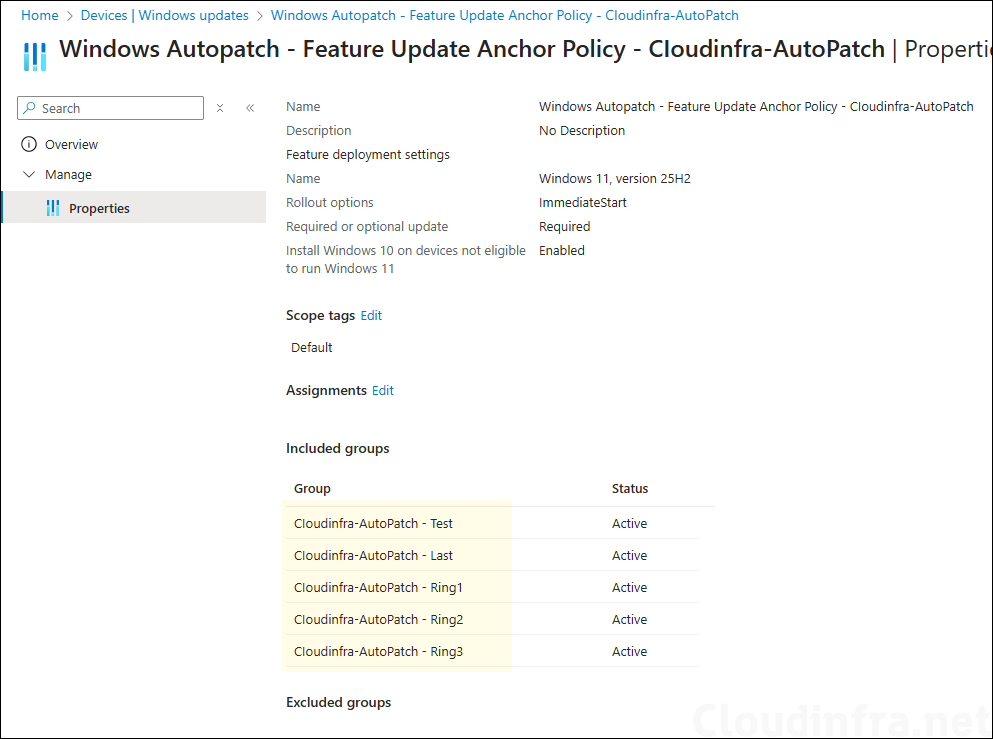
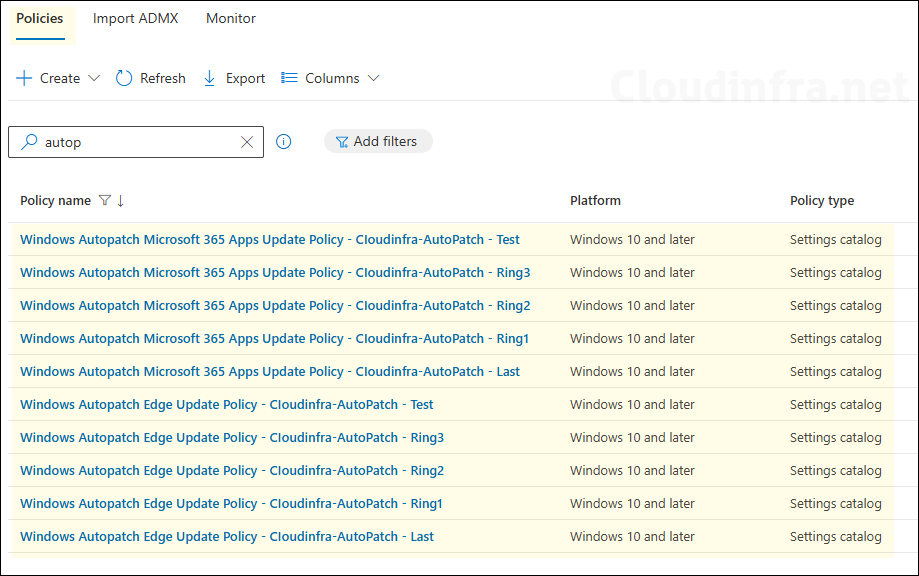
Feature udpates tab: A feature update policy will also be provisioned with the settings as defined while creating the Autopatch group. This policy will be assigned to all deployment ring entra groups. For further guidance on how feature update policy works, refer to he link: Upgrade to Windows 11 25H2 using Intune.
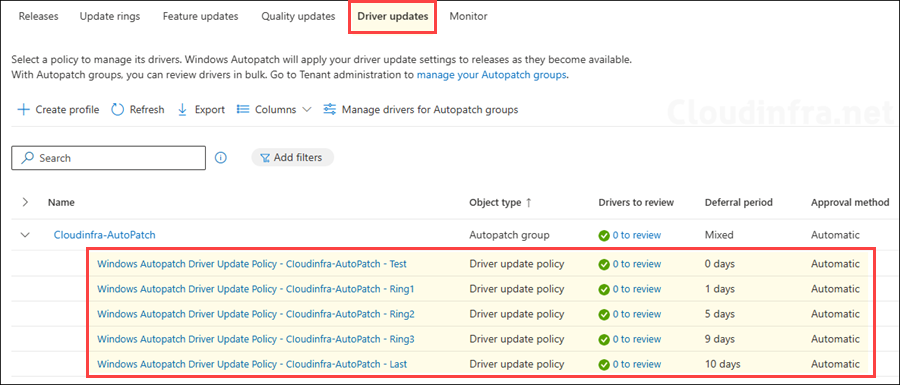
Driver updates: Driver update policies for each ring along with the Approval method as specified in the Autopatch group are also created.
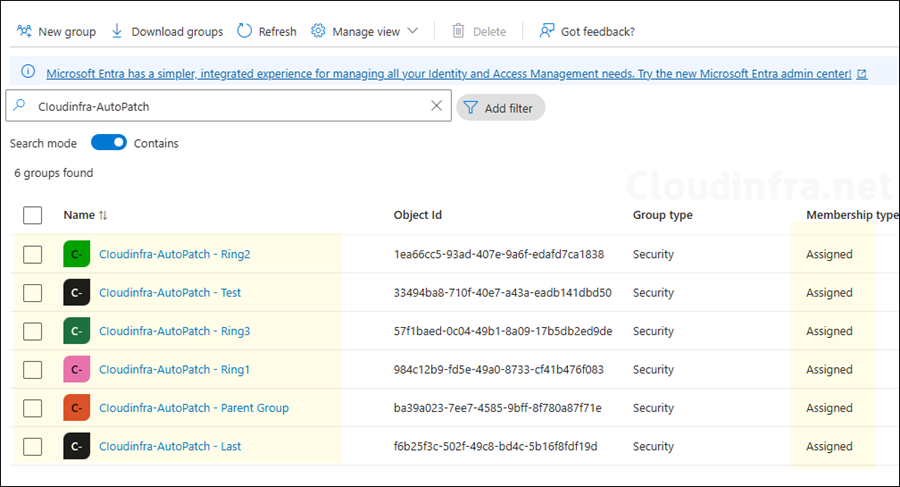
Autopatch service provisions an assigned Entra security group for each deployment ring. Below screenshot shows all these groups, each corresponding to a specific deployment ring. You’ll also notice a group named Cloudinfra-Autopatch – Parent group, this group includes all the Entra groups associated with your deployment rings.
Do not manually add any devices to these groups, these built-in groups are created and maintained by the Autopatch service. Manual modification of membership can break the intended ring distribution and device registration logic.
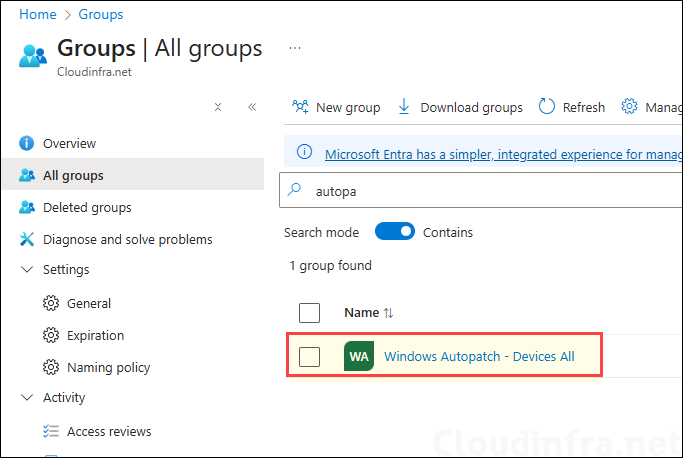
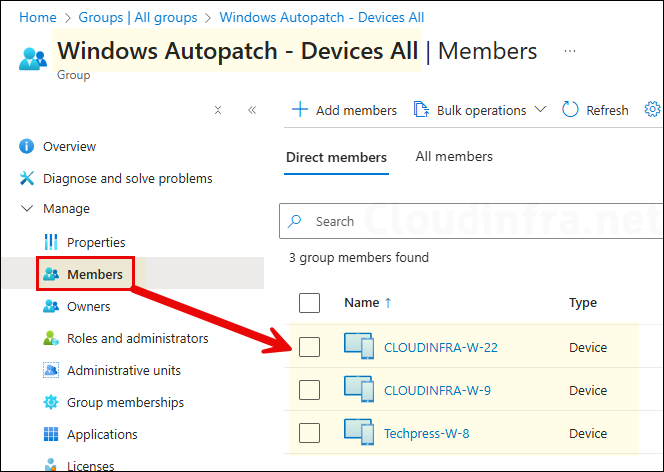
Autopatch service also creates a group named Windows Autopatch – Devices All, which contains all your Autopatch-registered devices. This group is managed and maintained by the Autopatch service, do not manually add devices to it, do not change its group type, and do not delete this group.
After devices are registered with Autopatch, they are automatically added to the Windows Autopatch – Devices All Entra group.
Autopatch service also creates device configuration policies for Microsoft 365 Apps for Enterprise and Microsoft Edge. Do not modify or delete these policies, as they are essential for the Autopatch service to function correctly.
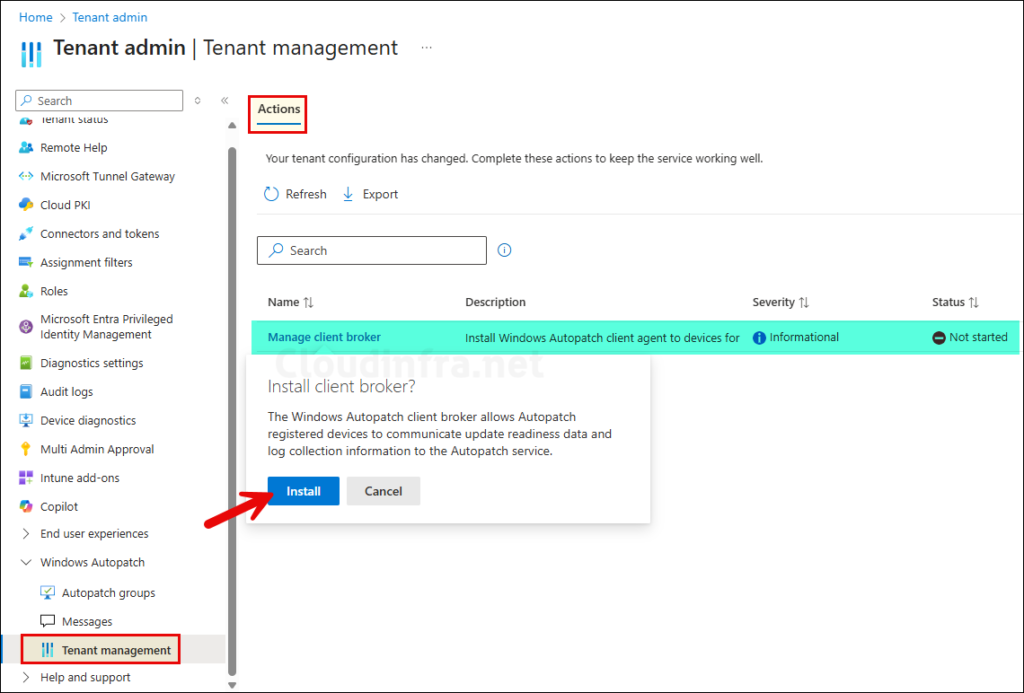
Install AutoPatch Client Broker
AutoPatch client broker is a new feature of AutoPatch service which was released in September 2025. Client broker is an optional, on-demand client that you can install on users devices. Once installed, it performs device readiness checks and simplifies log collection, making troubleshooting and support much easier. Overall it does two things:
Device readiness checks: A component of the client broker which performs device readiness checks and reports the results back to Autopatch service.
Log Collection service: Client broker can automatically collect logs to help diagnose and resolve issues more quickly. Without the broker, logs must be collected manually and shared with the support team. When the client broker is installed, the support team can access the logs more easily for troubleshooting issues.
Even though Autopatch Client Broker is an optional component of the Autopatch service, I recommend installing it on all devices. It provides several useful benefits, such as easier log collection and device readiness checks.
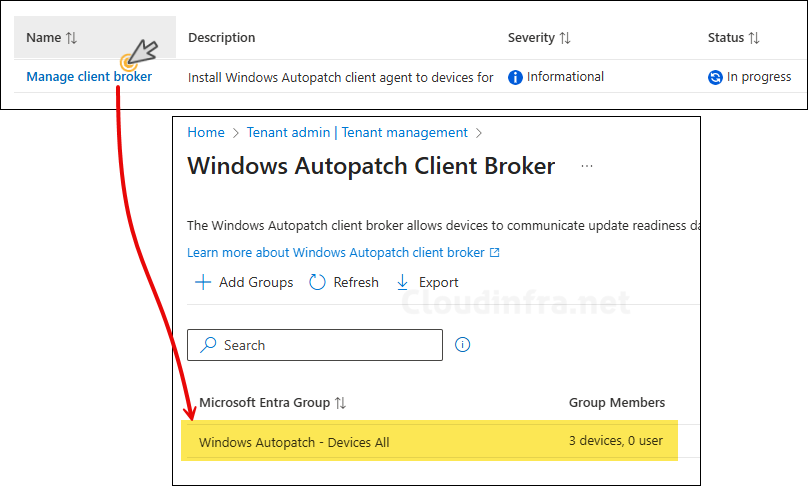
To install AutoPatch Client broker, Sign in to the Intune admin center > Tenant administration > click on Tenant management under Windows Autopatch. Under the Actions tab, you will find Manage client broker listed, click on it and then click on Install.
After you click on Install, Autopatch will automatically create a Windows app (Win32) app deployment for deploying Autopatch client broker application and target it to Windows Autopatch – Devices All which contains all Autopatch registered devices. To locate the app, Go to Intune admin center > Apps > All Apps and search for AutoPatch Client broker app.
If you are facing any issues installing the Autopatch client broker on a particular device, you can also install it manually using Microsoft provided Powershell script: Install Client broker using PowerShell script.
AutoPatch Device Registration
After you create an Autopatch group, the service automatically provisions the required update infrastructure in Intune admin center. As an administrator, your responsibility is to manage the Autopatch-associated service groups, ensuring they are not modified or deleted. Add your devices to the feeder Entra groups that you associated with the service during Autopatch group creation.
For the Test and Last deployment rings, only assigned Entra security groups are supported. You must manually identify your test devices and add them to the Test group, and do the same for the Last group.
For other rings such as Ring 1, Ring 2, Ring 3, and so on, if you’ve used a dynamic group that already includes your organization’s Intune-enrolled devices, no manual action is needed, those devices will automatically be provisioned to the Autopatch service. However, if you’ve used assigned Entra groups for these rings, you’ll need to manually add devices to each group.
It’s important to note that removing a device from any feeder group will deregister it from the Autopatch service, and it will also disappear from Autopatch reports.
Autopatch device registration involves several steps. Autopatch prerequisites functionuses the Intune Graph API to sequentially validate all required device readiness attributes. If a device passes these checks, it will appear as Registered in the Autopatch readiness status and in the Autopatch group membership report. If it fails the checks, the device will show as Not registered.
Device Registration Status
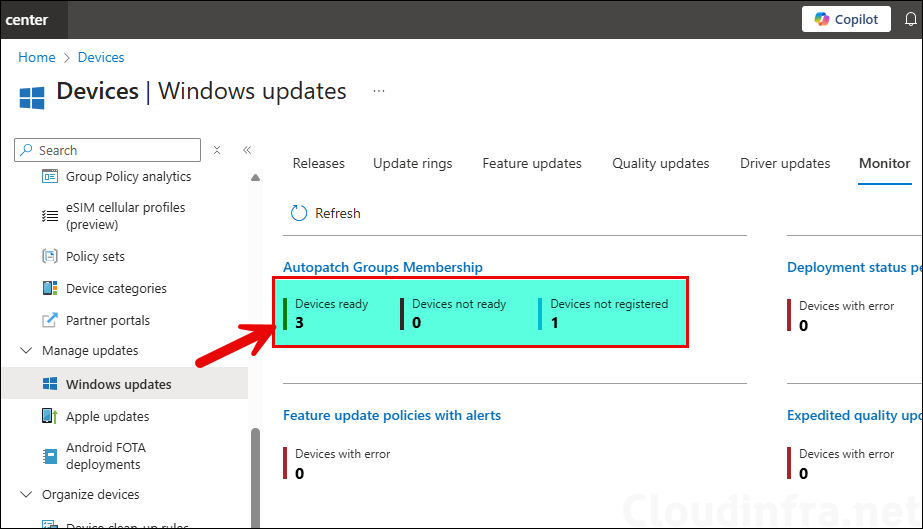
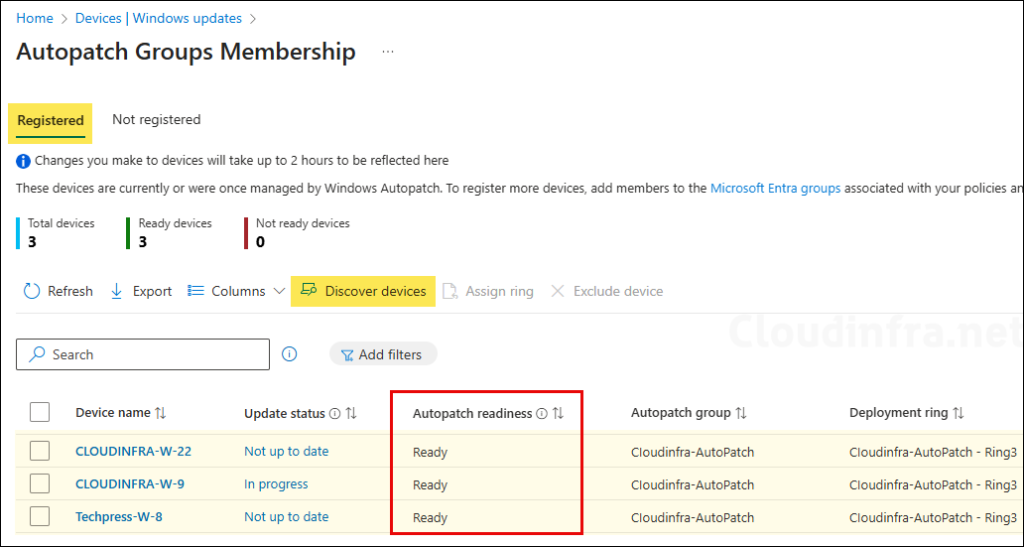
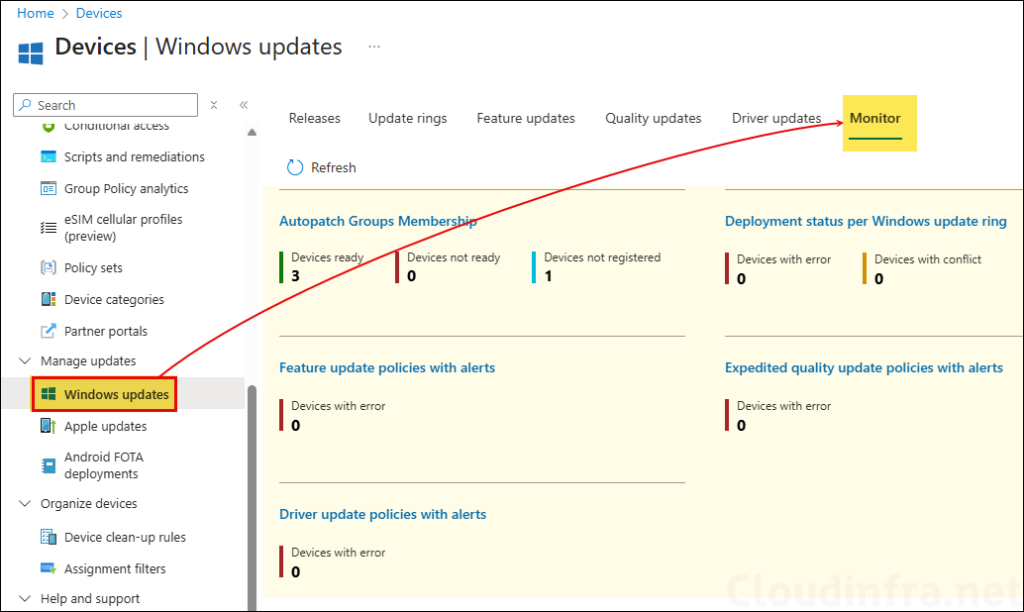
Monitor the Autopatch device registration status by going to Intune admin center > Devices > Windows updates > Monitor tab. Here you will find the Autopatch groups membership status which shows how many devices are ready, not ready and not registered.
When you click on Device ready under the Autopatch Groups Membership, you will get a list of Autopatch registered devices. Autopatch readiness status shows as Ready for these devices as they have passed all the prerequisites checks required for Autopatch device registration.
Autopatch automatically scans the feeder groups to check for new devices every hour. If you want to force the discovery now then click on Discover devices option shown in below screen.
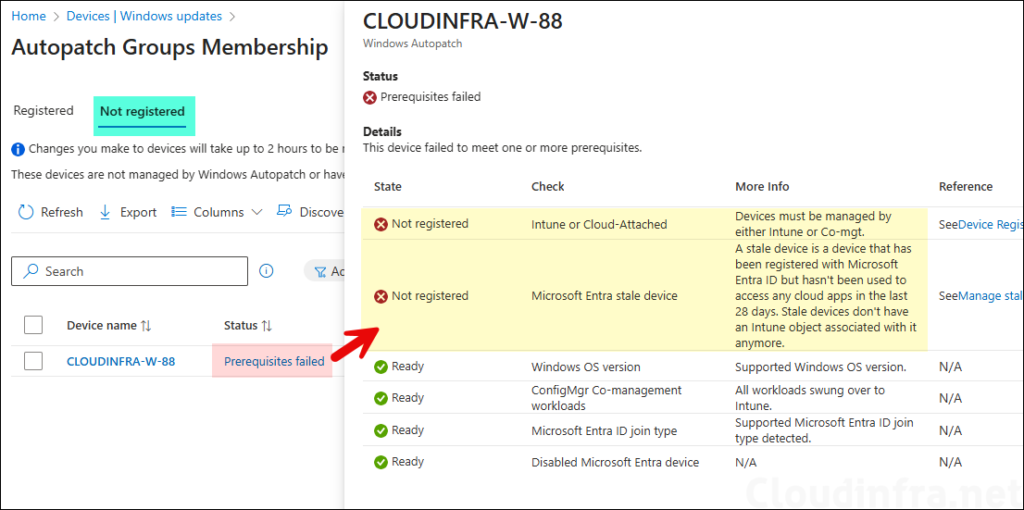
Under Not registered tab, you will find the devices which did not pass the Autopatch device readiness checks. Click on prerequisites failed link next to the device and check which specific checks are failed. For device registration to successfully complete on this device, you must fix all the highlighted issues.
Below screenshot shows a device CLOUDINFRA-W-88 failed below prerequisites checks.
Intune or Cloud-Attached: Devices must be managed by either Intune or Co-mgt.
Microsoft Entra stale device: A stale device is a device that has been registered with Microsoft Entra ID but hasn’t been used to access any cloud apps in the last 28 days. Stale devices don’t have an Intune object associated with it anymore.
Windows AutoPatch Reporting and Monitoring
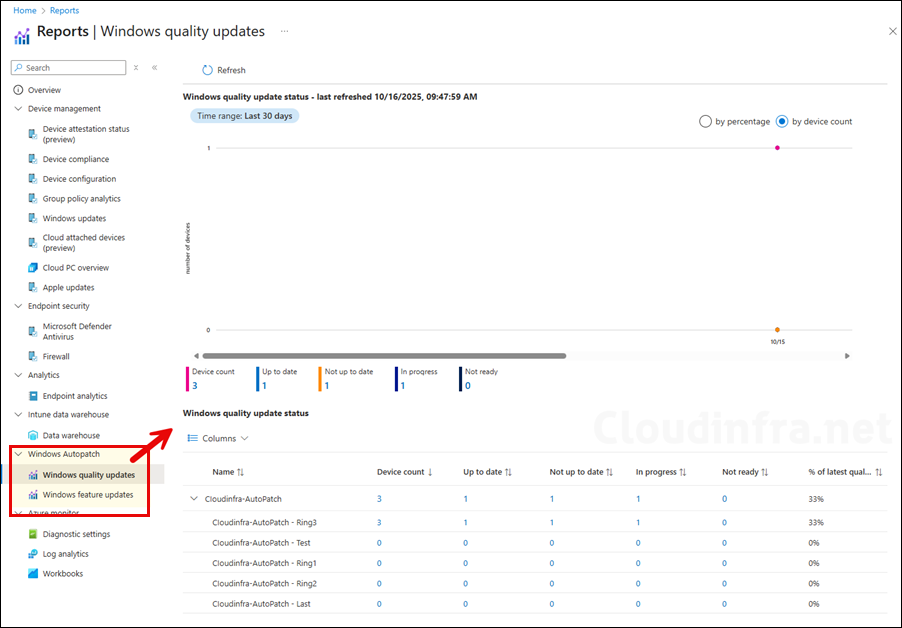
After completing the setup and registering your devices, regularly monitor the deployment rings and devices to ensure updates are being applied successfully. Intune provides several reporting capabilities to help you track update progress and identify issues. Let’s explore these reports:
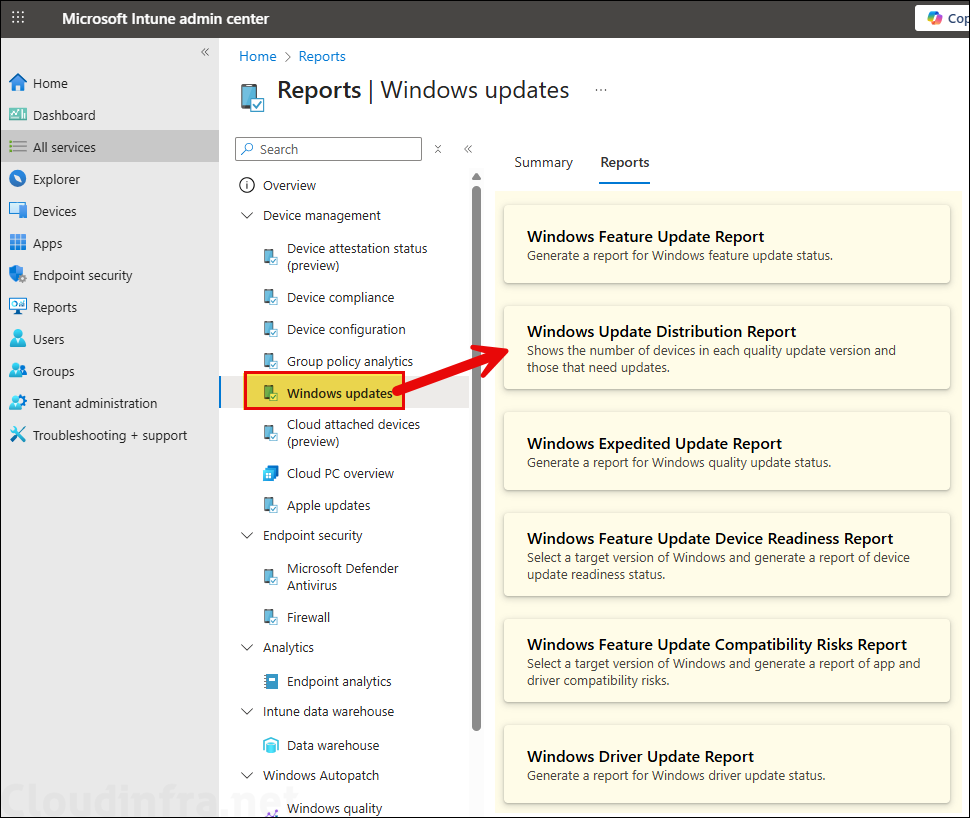
Go to the Intune admin center > Reports, and under the Windows Autopatch section, click Windows quality updates and Windows feature updates to view the update status of your devices.
Go to the Intune admin center > Reports > under Device management, click Windows updates. In the Reports tab, you can review various reports related to device updates.
Go to the Intune admin center> Devices > Windows updates > Monitor. This is another area to look the status of devices and update policies.
Rename AutoPatch Group
It’s best to avoid making changes to the Autopatch configuration once it has been set up. However, if you need to make a change, such as renaming an Autopatch group, you can do that. Autopatch supports group names of up to 255 characters.
After performing the rename operation, update rings, feature update rings, Entra groups, and policies associated with the Autopatch group will also be renamed automatically to reflect the new group name. Let’s perform this operation and see what happens.
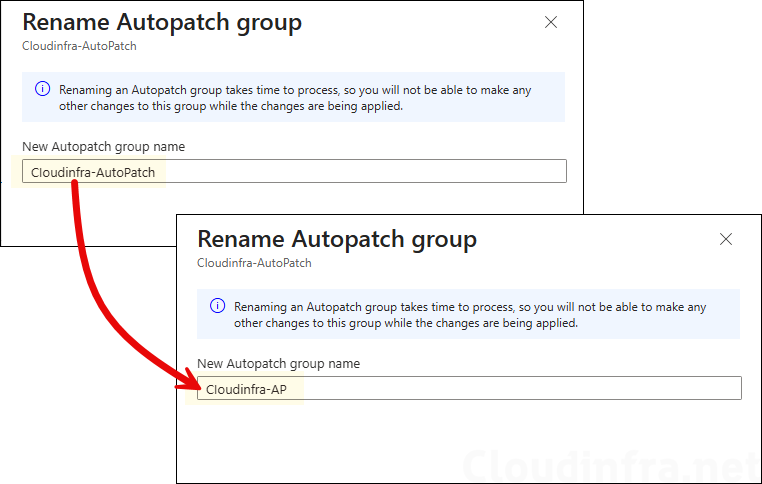
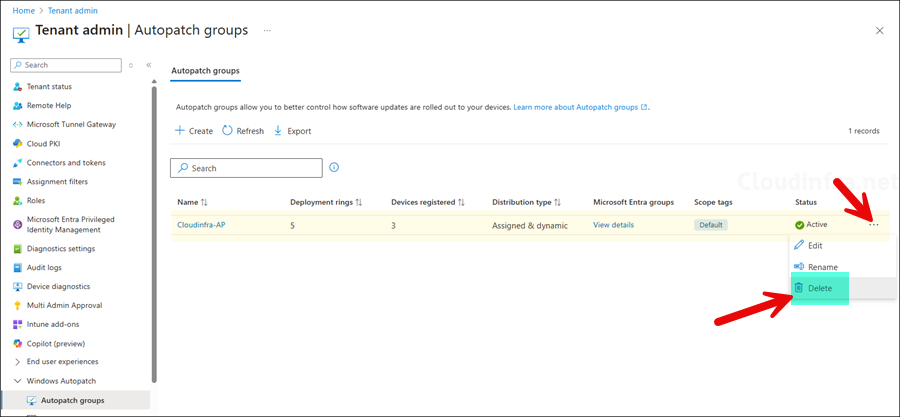
Go to Intune admin center > Tenant administration> Autopatch groups and select the group you want to rename. Click on ellipses (…) and then select Rename.
Provide a new name of the AutoPatch group. I am renaming it from Cloudinfra-AutoPatch to Cloudinfra-AP.
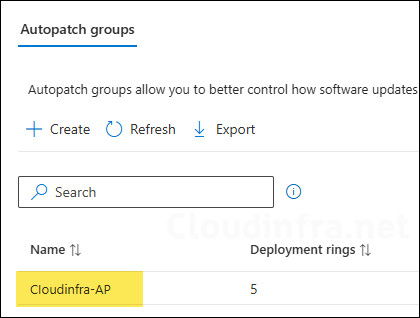
Below screenshot shows that the AutoPatch group has been renamed as per the new AutoPatch group name provided.
Once the Autopatch group is renamed, it will also automatically rename managed policies and configurations to reflect the new name.
Update rings
Feature update policies
Driver update policies
Entra groups associated with Autopatch deployment rings
Device configuration profiles managed by Autopatch
Deleting an AutoPatch Group
If you no longer work with the AutoPatch service or you simply want to remove one of the AutoPatch groups, you can perform this using below steps:
An important point to note is that once you delete an AutoPatch group, the resources and configuration provisioned and managed by AutoPatch will also be deleted automatically. Below configuration will be deleted: – Releases – Update rings – Feature update rings – Driver udpate policies – Device configuration policies – Entra groups associated with the deployment rings. Windows Autopatch – Devices All group will not be deleted, its membership will be cleared.
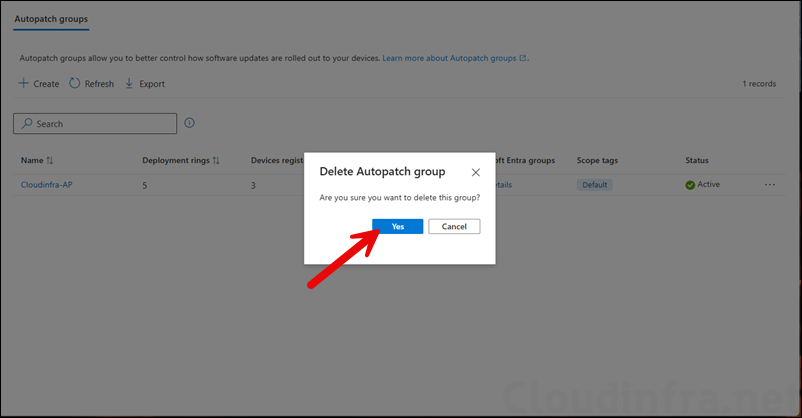
Go to Intune admin center > Tenant administration> Autopatch groups. and select the group you want to delete. Click on ellipses (…) and then select Delete.
On the confirmation prompt, Click on Yes to proceed with the deletion of the group.
You will get a notification at the top right-hand side corner about the the deletion request and in few seconds, the autopatch group will be deleted.
Conclusion
This post covered all the steps required to set up and configure Autopatch in an organization. With proper planning, the setup process becomes straightforward. Your planning should include:
Ensuring the required licenses and readiness prerequisites are met before onboarding.
Deciding how many deployment rings you need and whether to use a dynamic group or assigned group for the rings.
Defining update deployment, notification, and reboot schedules.
Choosing which feature update version your organization’s devices should target.
Determining whether to auto-approve drivers or manually approve them.
Planning how to organize devices into feeder or dynamic groups.