Remote Server Administration Tools (RSAT) are not installed by default on Windows 10 version 1809 and later version clients. However, you can easily install it on your device via Optional features and Powershell.
RSAT, or Remote Server Administration Tools, is a suite of tools for IT administrators. It includes tools for managing Active Directory, Group Policy, AD Certificate Services, Failover Clustering, and more. A complete list of tools that are included in RSAT is provided at the end of this blog post.
Starting with Windows 10 October 2018 Update, RSAT is included as a set of “Features on Demand“. There is no requirement to download RSAT separately. You can Install it using Optional features under settings app.
Note
Note that RSAT tools are not accessible on computers running Home and Standard editions of Windows. They are exclusively available for Professional and Enterprise Editions.
Method 1 – Use Optional Features to Install RSAT
To install RSAT on Windows 10/11 using Optional features, follow these steps:
- Log in to a Windows 10/11 device using an administrator account.
- Open the Settings App:
- Press the Windows key + I to open the Settings App.
- Click on Settings > Optional Features.
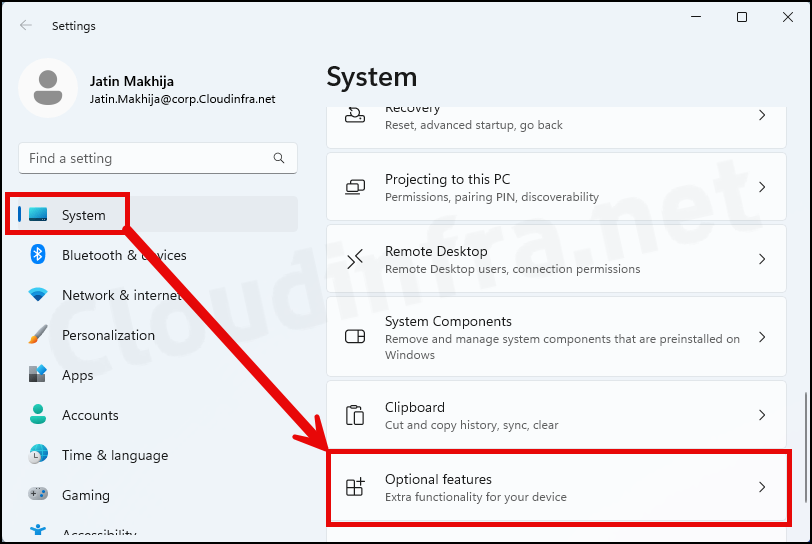
- Click on View Features.
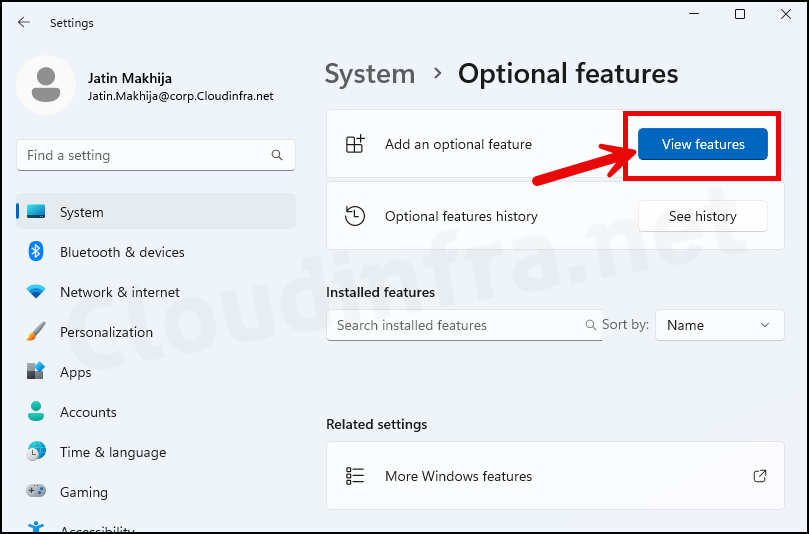
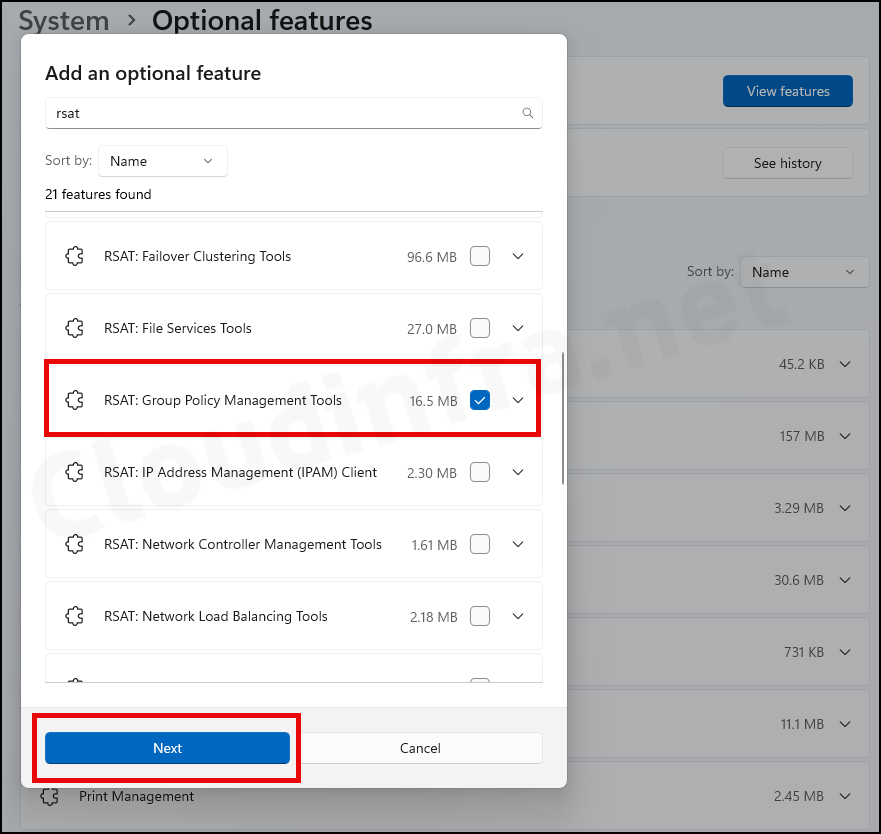
- Search for RSAT using the search box. This will display the list of RSAT tools available for installation. Open the Settings app using an administrator account to access and install the tools.
- Check the box next to the tool you want to install. For example, if you want to install Group Policy Management tools, select the corresponding checkbox. Then, click on Next to proceed to the next step.
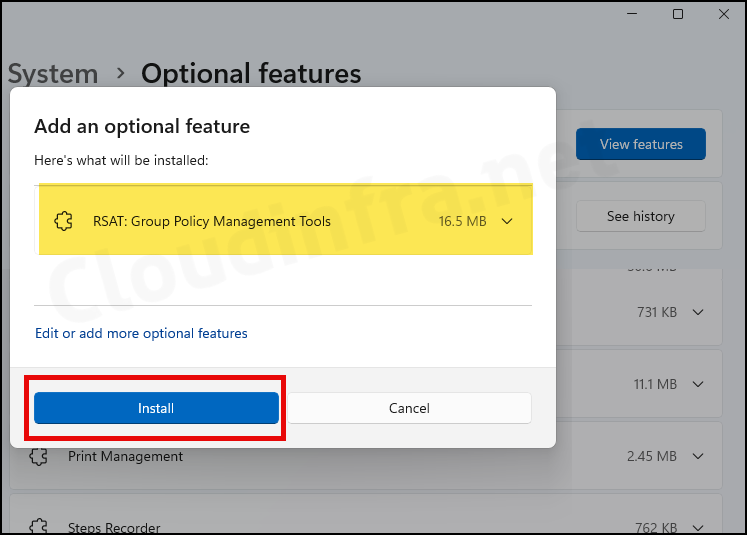
- Click on the Install button to begin the Installation process.
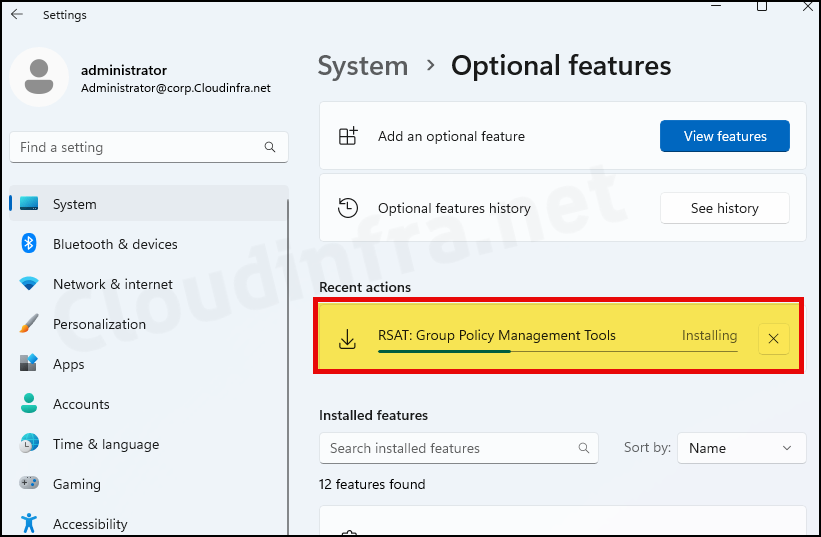
- As you can see from the screenshot below, Group Policy Management tools are currently installing. This process may take some time. Also, please note that I have switched to an administrator account to install these tools on this computer.
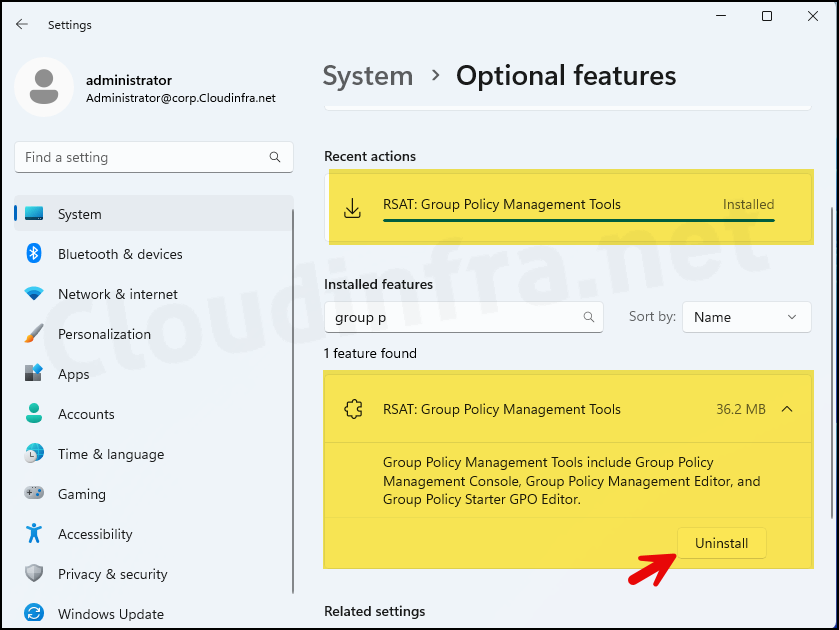
- After waiting around 5-10 minutes, the Group Policy Management tools were successfully installed on my device. Once installed, you can search for the tools in the Installed Features list, and from there, you will have the option to uninstall the tool if you no longer need it.
Method 2 – Install RSAT using Powershell
RSAT Tools can be installed using the PowerShell cmdlet Add-WindowsCapability. This command can install specific RSAT tools such as Group Policy Management Tools and Server Manager Tools etc.
To install Group Policy Management Tools on your Windows 10 or Windows 11 computer, launch PowerShell as an administrator and run the following command:
Install Group Policy Management RSAT Tools
Add-WindowsCapability -Online -Name Rsat.GroupPolicy.Management.Tools~~~~0.0.1.0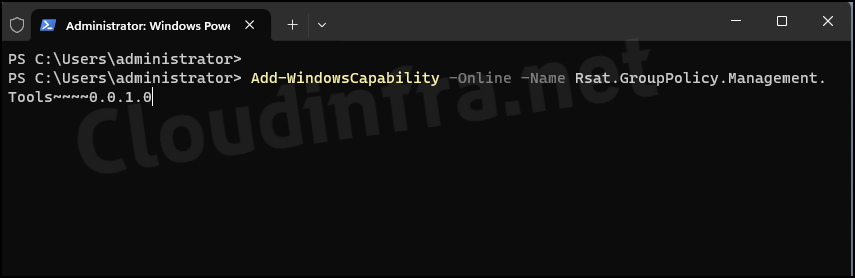
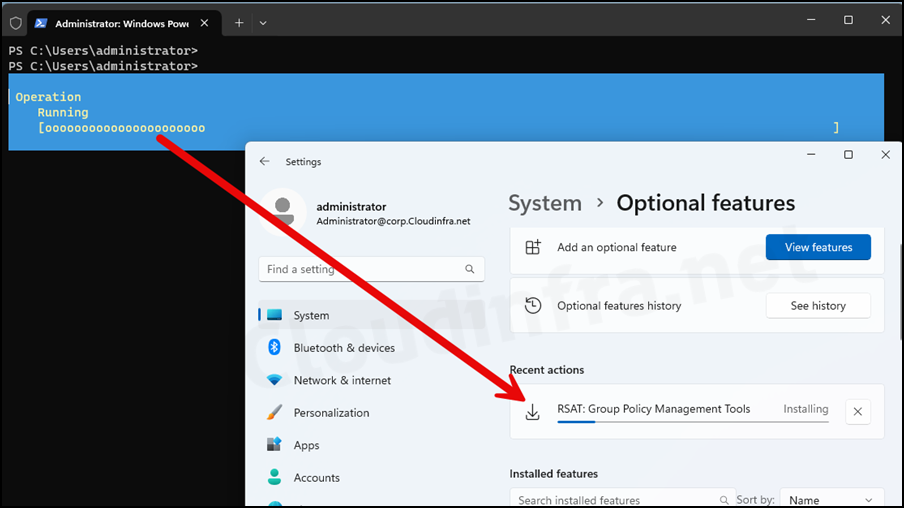
As soon as you run this command, the installation will begin. The progress of the installation will be displayed on the PowerShell console. Additionally, you can monitor the progress of the installation by navigating to Settings > System > Optional features.
To install DHCP Management tools on your device, run the following command in an elevated PowerShell console:
Install DHCP Management RSAT Tools
Add-WindowsCapability -Online -Name Rsat.DHCP.Tools~~~~0.0.1.0Below, the PowerShell command installs any available Group Policy-related RSAT tools not installed on the system.
Install Group Policy RSAT Tool If it’s Missing
Get-WindowsCapability -Name 'Rsat.GroupPolicy.*' -Online | Where-Object { $_.State -ne 'Installed' } | Add-WindowsCapability -OnlineYou can install all RSAT tools that are not currently installed on your device by using the following one-liner command:
Install All RSAT Tools (If it’s not installed) using one single command:
Get-WindowsCapability -Online | Where-Object { $_.Name -like "RSAT*" -and $_.State -eq "NotPresent" } | Add-WindowsCapability -OnlinePowershell Command to Install different RSAT Tools
Add-WindowsCapability -Online -Name Rsat.Shielded.VM.Tools~~~~0.0.1.0

Add-WindowsCapability -Online -Name Rsat.StorageMigrationService.Management.Tools~~~~0.0.1.0

Add-WindowsCapability -Online -Name Rsat.IPAM.Client.Tools~~~~0.0.1.0

Add-WindowsCapability -Online -Name Rsat.DHCP.Tools~~~~0.0.1.0

Add-WindowsCapability –online –Name Rsat.Dns.Tools~~~~0.0.1.0

Add-WindowsCapability –online –Name Rsat.ActiveDirectory.DS-LDS.Tools~~~~0.0.1.0

Add-WindowsCapability -Online -Name Rsat.BitLocker.Recovery.Tools~~~~0.0.1.0

Add-WindowsCapability -Online -Name Rsat.NetworkController.Tools~~~~0.0.1.0

Add-WindowsCapability -Online -Name Rsat.LLDP.Tools~~~~0.0.1.0

Add-WindowsCapability -Online -Name Rsat.RemoteDesktop.Services.Tools~~~~0.0.1.0

Add-WindowsCapability -Online -Name Rsat.CertificateServices.Tools~~~~0.0.1.0

Add-WindowsCapability -Online -Name Rsat.RemoteAccess.Management.Tools~~~~0.0.1.0

Add-WindowsCapability -Online -Name Rsat.NetworkLoadBalancing.Tools~~~~0.0.1.0

Add-WindowsCapability -Online -Name Rsat.GroupPolicy.Management.Tools~~~~0.0.1.0

Add-WindowsCapability -Online -Name Rsat.FileServices.Tools~~~~0.0.1.0

Add-WindowsCapability -Online -Name Rsat.FailoverCluster.Management.Tools~~~~0.0.1.0

Add-WindowsCapability -Online -Name Rsat.SystemInsights.Management.Tools~~~~0.0.1.0

Add-WindowsCapability -Online -Name Rsat.WSUS.Tools~~~~0.0.1.0

Add-WindowsCapability -Online -Name Rsat.ServerManager.Tools~~~~0.0.1.0

Add-WindowsCapability -Online -Name Rsat.VolumeActivation.Tools~~~~0.0.1.0

Add-WindowsCapability -Online -Name Rsat.StorageReplica.Tools~~~~0.0.1.0
Verify If RSAT Tools are Installed
To check and confirm if the RSAT tool is installed, you can either go to Settings > Optional Features and search for the RSAT tools under Installed Features or use the PowerShell command below to list the RSAT tools installed on your device.
Verify If RSAT Tools are Installed
Get-WindowsCapability -Name RSAT* -Online | ft DisplayName, State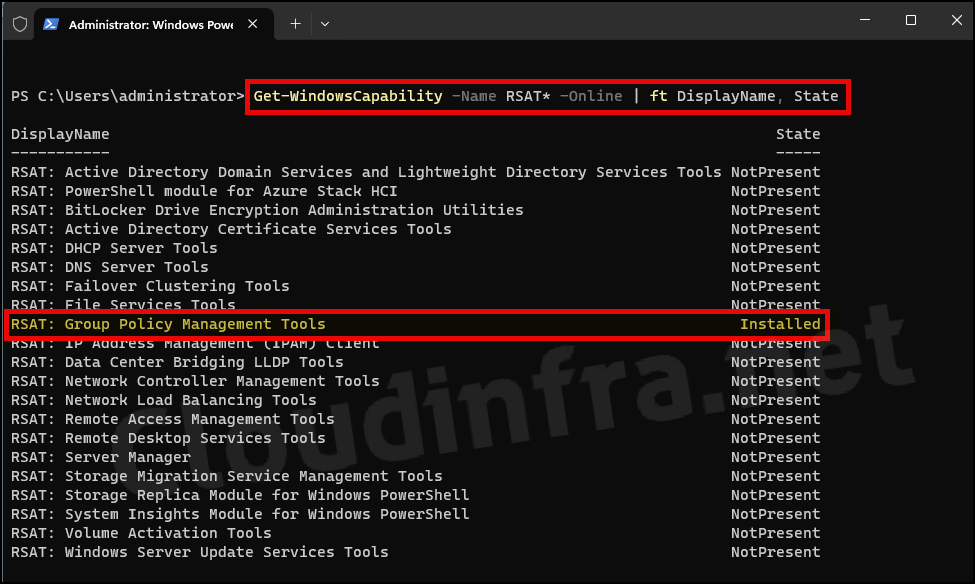
More Information:
Install RSAT Tools on Windows Server 2016/2019/2022
RSAT tools can also be installed on a Windows Server OS 2016, 2019, or 2022. You can Install RSAT tools using Server Manager or Powershell. Let’s check the steps:
- Login to the Windows Server OS using administrator credentials.
- Go to Server Manager > Manage > Add Roles and Features.
You will encounter a wizard to add the RSAT feature. Proceed with the wizard and select the options as suggested below:
- Before you Begin: Click Next.
- Installation Type: Choose Role-based or feature-based installation.
- Server Selection: Proceed by clicking Next.
- Server Roles: Click Next to continue.
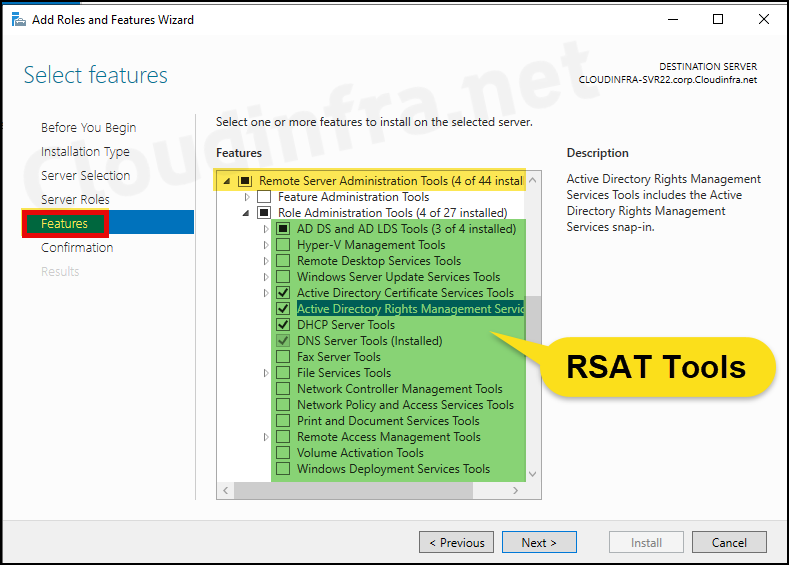
- Features: Scroll down to find Remote Server Administration Tools and expand the list. Select the desired tool and click Next.
- Confirmation: Click Install to install the RSAT tools on the Server OS.
Using Powershell
You can also use Powershell to Install RSAT Tools on a Windows Server OS. We will be using Install-WindowsFeature cmdlet for this purpose.
To check and confirm the list of RSAT tools available or installed on this Windows Server OS, execute the following command in an elevated PowerShell window.
Get RSAT Tools Status
Get-WindowsFeature | Where-Object {$_.name -like "*RSAT*"} | ft Name,Installstate, Installed
Install RSAT Tools on Windows Server OS
To Install a specific RSAT tool on the Windows Server OS, you must use Install-WindowsFeature cmdlet with the name of the component you want to install. For example:
Install-WindowsFeature: AD Admin Center
Install-WindowsFeature RSAT-AD-AdminCenterInstall-WindowsFeature: Hyper-V Management Console and Powershell Modules
Get-WindowsFeature | Where-Object { $_.Name -like "RSAT-Hyper-V-Tools" } | Add-WindowsFeature -IncludeAllSubFeature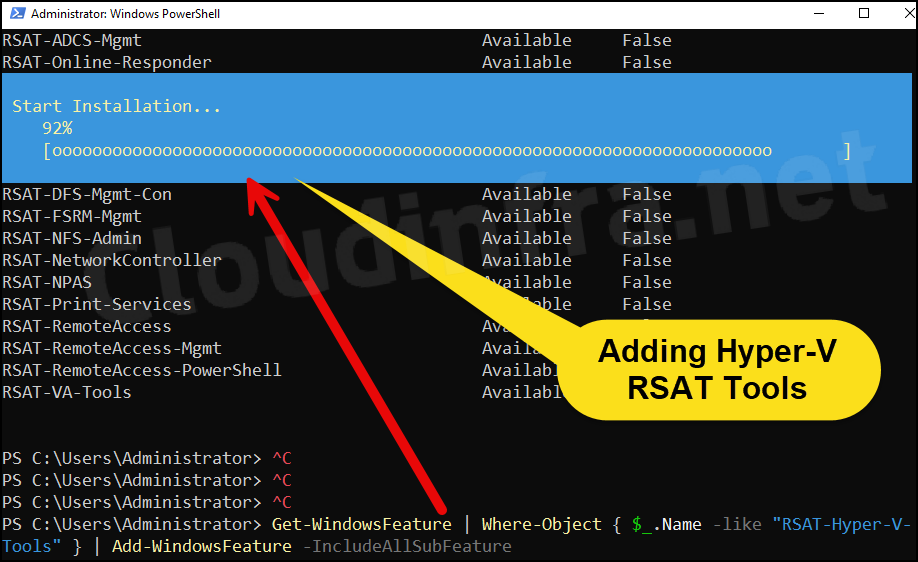
Hyper-V RSAT Tools and Powershell Modules are now Installed on this Windows Server OS.

Fix RSAT Installation Error 0x800f0954
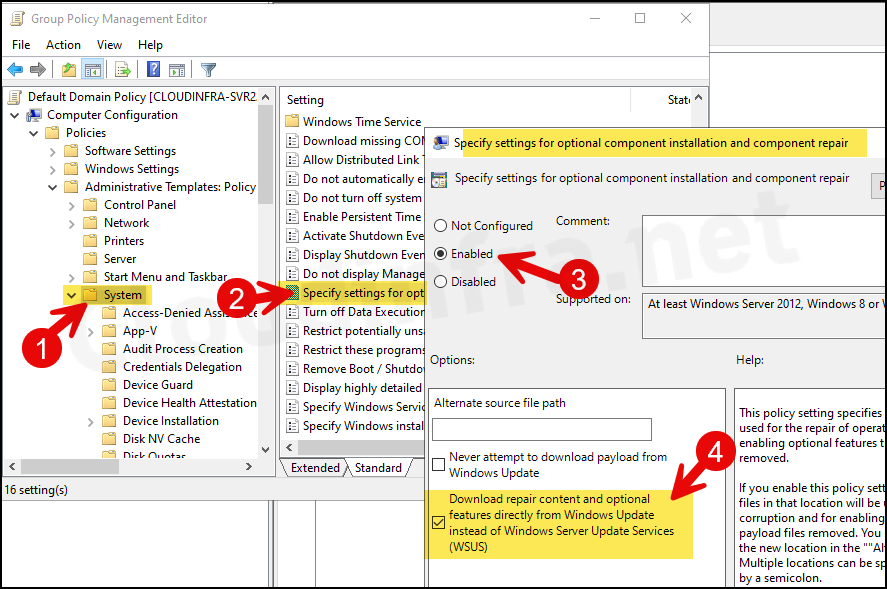
You may encounter error code 0x800f0954 while attempting to install RSAT tools on your Windows device. This issue could arise if the device is configured to receive updates from WSUS or SCCM.
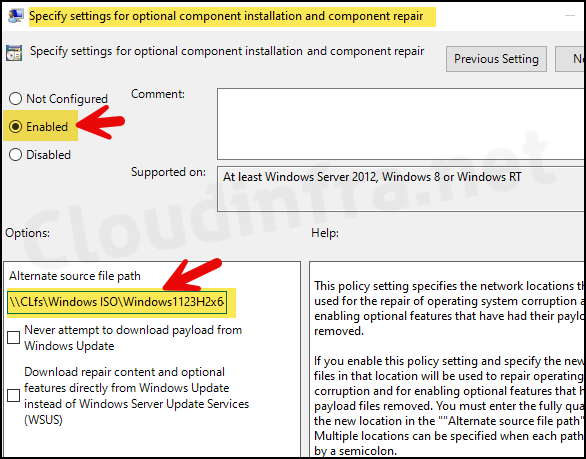
To resolve this error, you must enable a GPO setting: “Download repair content and optional features directly from Windows Updates instead of Windows Server Updates Services (WSUS).” You can configure this setting locally via the Local Group Policy Editor, or if multiple computers are affected, you can deploy it using the Group Policy Management Console.
- If you create a new GPO with this setting, don’t forget to link it with an Organizational unit containing devices.
- On client computers, GPO updates/refreshes typically take around 90 minutes. However, to expedite the policy sync, you can open a command prompt as an administrator and execute
gpupdate /force.
- After executing the
gpupdate /forcecommand, you can restart your device to refresh the Windows Update services. If you prefer not to restart the client device, you can execute the following commands:net stop wuauservandnet start wuauservto restart the Windows Update services.
Installing RSAT Tools Offline on Windows from an ISO Image
Accessing Microsoft update servers directly from your device may not be feasible in certain situations. If this is the case, you can opt to install RSAT tools offline by leveraging a Windows 10/11 FoD ISO image.
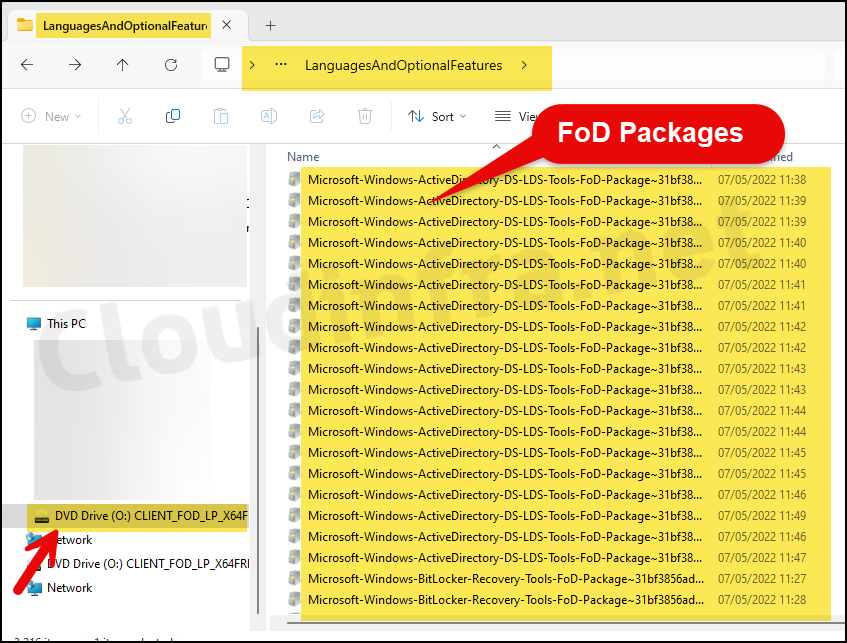
FoD, or Features on Demand, can be installed on your device using an ISO image containing FoD components. These components are provided as .cab files within the Languages and Optional Features ISO.
| ISO Image | Download Link |
|---|---|
| Download FoD Image for Windows 11 | https://learn.microsoft.com/en-us/azure/virtual-desktop/windows-11-language-packs |
| Download FoD Image for Windows 10 | https://github.com/MicrosoftDocs/azure-docs/blob/main/articles/virtual-desktop/language-packs.md#prerequisites |
Extract the contents of the ISO file, which will contain *.cab files that can be used to install language packs and optional features, including RSAT tools.
To install RSAT Tools for Group Policy Management Tools offline, you can utilize the Add-WindowsCapability PowerShell cmdlet with the -LimitAccess switch. This instructs the command not to use Windows Update or Windows Server Update Services for source files, allowing for an offline installation.
Install Group Policy Management RSAT Tools Offline
Add-WindowsCapability -Online -Name Rsat.GroupPolicy.Management.Tools~~~~0.0.1.0 -LimitAccess -Source C:\temp\Extracted ISO folder locationYou can further streamline the process by storing the extracted ISO content on a file server in a shared folder accessible to all users. Then, configure this path as an “optional component installation and component repair” path via Group Policy.
If you prefer to use the Windows registry for configuring the FoD ISO path locally on Client devices, you can follow below steps:
- Open Registry Editor on the client device.
- Navigate to HKEY_LOCAL_MACHINE\SOFTWARE\Microsoft\Windows\CurrentVersion\Policies\Servicing
- Create a REG_EXPAND_SZ entry called LocalSourcePath with value as location of the FoD ISO: \\CLfs\Windows ISO\Windows1123H2x64.

Using Powershell:
Alternatively, to create a REG_EXPAND_SZ entry named “LocalSourcePath” with the value being the location of the FoD ISO (\CLfs\Windows ISO\Windows1123H2x64), you can use the following command in Command Prompt or PowerShell:
Configure FoD ISO path in Registry
reg add "HKLM\SOFTWARE\Policies\Microsoft\Windows\WindowsUpdate" /v LocalSourcePath /t REG_EXPAND_SZ /d "\CLfs\Windows ISO\Windows1123H2x64" /fThis command adds the registry entry under the specified key with the provided name, type, and value. Make sure to run this command with administrative privileges.