In this post, I will show you how to automatically enroll Windows 365 Business Cloud PCs in Intune. Windows 365 Business makes it easy to provision Cloud PCs by simply assigning a license to a user, but getting those Cloud PCs into Microsoft Intune requires a couple of specific tenant settings. If you configure it correctly, every new Windows 365 Business Cloud PC is automatically enrolled into Intune at first setup.
There are multiple ways to enable the automatic enrollment of Windows 365 Cloud PCs. You can either use windows365.microsoft.com or admin.microsoft.com (Microsoft 365 admin center) and simply enable a checkbox, Enroll new Cloud PCs in Microsoft Intune. That’s it; I will show you the steps to find these options and how to enable it. If the Cloud PC is not enrolled in Intune, you will typically see a message: Looking to enroll Windows 365 Business Cloud PCs in Intune. For more details, refer to the link Admins deploying apps to Windows 365 Business Cloud PCs | Microsoft Learn.
An important point to note is that custom images and provisioning policies are not available in the Windows 365 Business plan, even though the devices are enrolled in Intune. For the differences between Windows 365 Enterprise and Windows 365 Business, refer to the following link: Windows 365 Setup Guide [Step-by-Step].
Contents
Prerequisites
- Windows 365 Administrator role.
- An Intune license subscription.
Method 1: Enable Automatic Enrollment of Cloud PCs Using Windows 365 Portal
The first option for configuring automatic enrollment of new Cloud PCs into Microsoft Intune is to check the box for Enroll new Cloud PCs in Microsoft Intune on the Windows 365 portal (windows365.microsoft.com).
- Sign in to windows365.microsoft.com using the Windows 365 administrator role, and select Admin > Update organization settings.
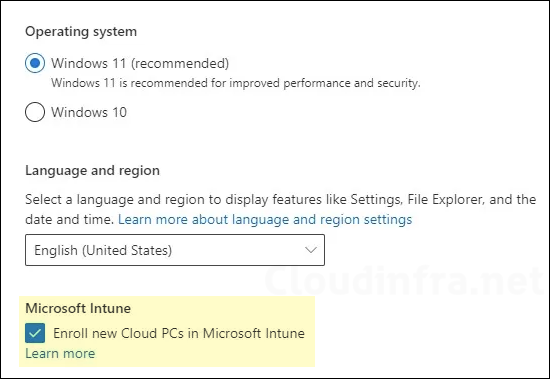
- Switch to the setup tab and, under Microsoft Intune, enable the checkbox Enroll new Cloud PCs in Microsoft Intune.
Method 2: Enable Automatic Enrollment of Cloud PCs Using Microsoft 365 Admin Center
If you have access to the Microsoft 365 admin center, you can enable the same setting from there as well. Go to the Microsoft 365 admin center, navigate to Settings > Org settings, and under the Services tab, select Windows 365. In the Organization settings pane, scroll down, enable Enroll new Cloud PCs in Microsoft Intune, and then click Save. This is the same option as we saw above. You don’t have to enable this option on both portals; just use one of the portals (method 1 or method 2) and enable this setting.
Verify Cloud PCs Enrollment in Intune
You can check and confirm if the new Windows 365 Business Cloud PC is now enrolled in Intune by signing into Intune admin center > Devices > All devices. Filter or search for Cloud PCs (often model shows as Cloud PC). Now you can connect to your Cloud PC. Refer to the guide: 4 Ways To Connect Windows 365 Cloud PC.