
There are several ways to enroll Windows 11 devices into Microsoft Intune, like using Windows automatic enrollment or by using Autopilot, etc. I have discussed these in detail in my other blog post: Enroll Windows Devices In Intune. This post is about enrolling Windows 11 devices in Intune in bulk by utilizing a provisioning package (.ppkg).
A provisioning package can be created using Windows Configuration Designer (WCD). When the package is applied to a Windows 11 device, it automatically joins the device to Microsoft Entra ID and enrolls it into Microsoft Intune. Once the enrollment is complete, users can sign in using their Microsoft Entra account, and the device receives the policies, applications, and configurations assigned from Intune.
Contents
Prerequisites
Before creating the provisioning package, ensure the following requirements are met:
- Windows automatic MDM enrollment is enabled.
- Make sure that the service principal for Microsoft.Azure.SyncFabric (AppID 00000014-0000-0000-c000-000000000000) exists in Entra.
- Account used to create the bulk enrollment token is included in the MDM user scope.
- Windows Configuration Designer (WCD) app is installed on a Windows client device.
- Account used to retrieve the bulk token has one of these Microsoft Entra roles:
- Cloud Device Administrator
- Intune Administrator
- Password Administrator
- Windows platform is allowed in the Default enrollment restriction.
- Windows 11 devices have Internet connectivity during provisioning.
Microsoft also requires a Microsoft Intune subscription and Microsoft Entra ID P1 or P2 for automatic MDM enrollment.
Important: Bulk enrollment is intended for organization-owned devices. Microsoft considers it a userless enrollment method, so the Default enrollment restriction is used during enrollment rather than a restriction assigned to a specific user.
Step 1: Configure Windows Automatic Enrollment
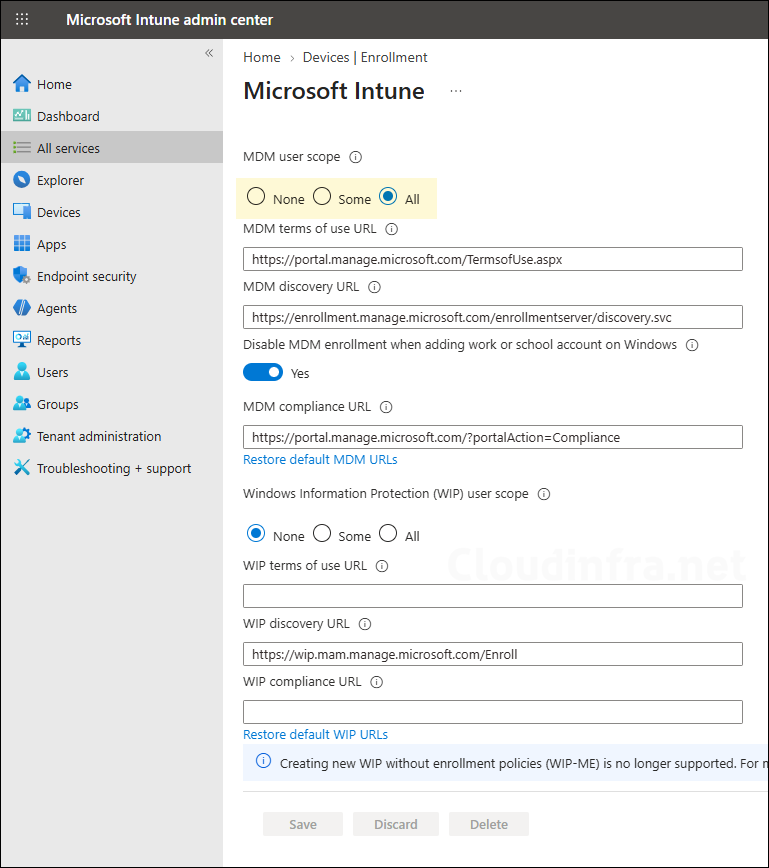
First, verify that automatic Windows enrollment is enabled in your Intune tenant. Sign in to the Microsoft Intune admin center and go to Devices > Device onboarding > Enrollment > Windows > Automatic Enrollment. Ensure that MDM user scope is set to All or Some. If you select Some, make sure the user account that you will use to retrieve the bulk enrollment token is included in the selected group.
Step 2: Check Microsoft.Azure.SyncFabric Service Principal
Windows Configuration Designer (WCD) requires the Microsoft.Azure.SyncFabric service principal to retrieve a bulk enrollment token. Ensure that the Microsoft.Azure.SyncFabric service principal with App ID 00000014-0000-0000-c000-000000000000 exists in your Microsoft Entra tenant. To verify this, open a PowerShell console and run the commands below.
If the Microsoft Graph PowerShell module is not installed on your system, install it first using the command below. If you encounter any issues while installing the module, refer to the guide Install Microsoft Graph PowerShell Module for detailed installation and troubleshooting steps.
Install-Module Microsoft.Graph -Scope CurrentUser -Repository PSGallery -ForceConnect-MgGraph -Scopes "Application.Read.All"Get-MgServicePrincipal -Filter "AppId eq '00000014-0000-0000-c000-000000000000'" | Select-Object DisplayName, AppId, Id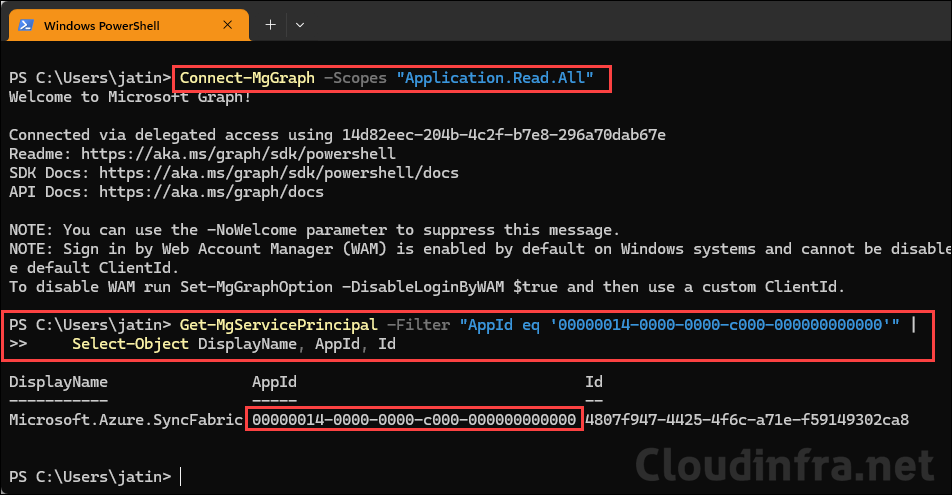
If the Microsoft.Azure.SyncFabric service principal does not exist in your Microsoft Entra tenant; you can create it by running the command below.
New-MgServicePrincipal -AppId "00000014-0000-0000-c000-000000000000"Step 3: Install Windows Configuration Designer (WCD)
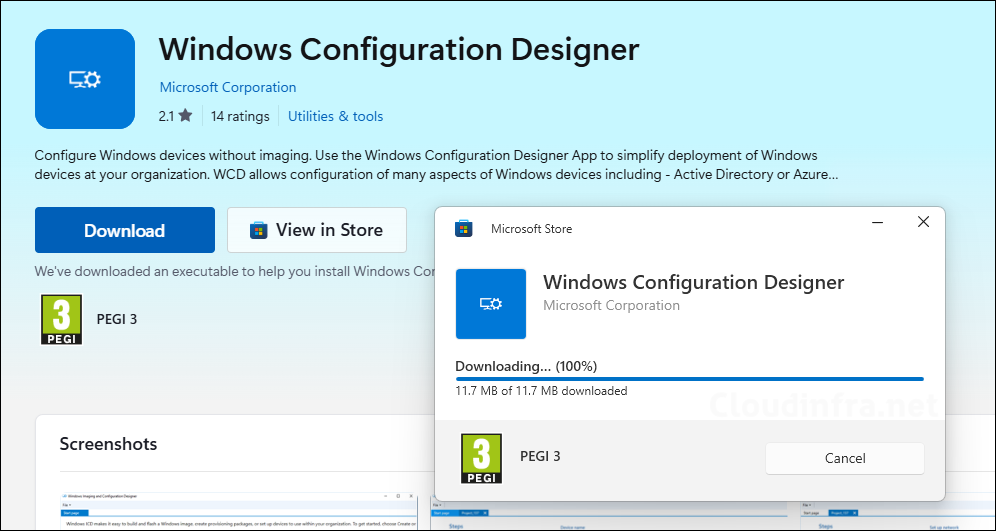
Windows Configuration Designer (WCD) is used to create the provisioning package. On a Windows 11 device, open the Microsoft Store, search for Windows Configuration Designer, and install the application. Direct MS Store link for WCD: Windows Configuration Designer.
Step 4: Create a Provisioning Package
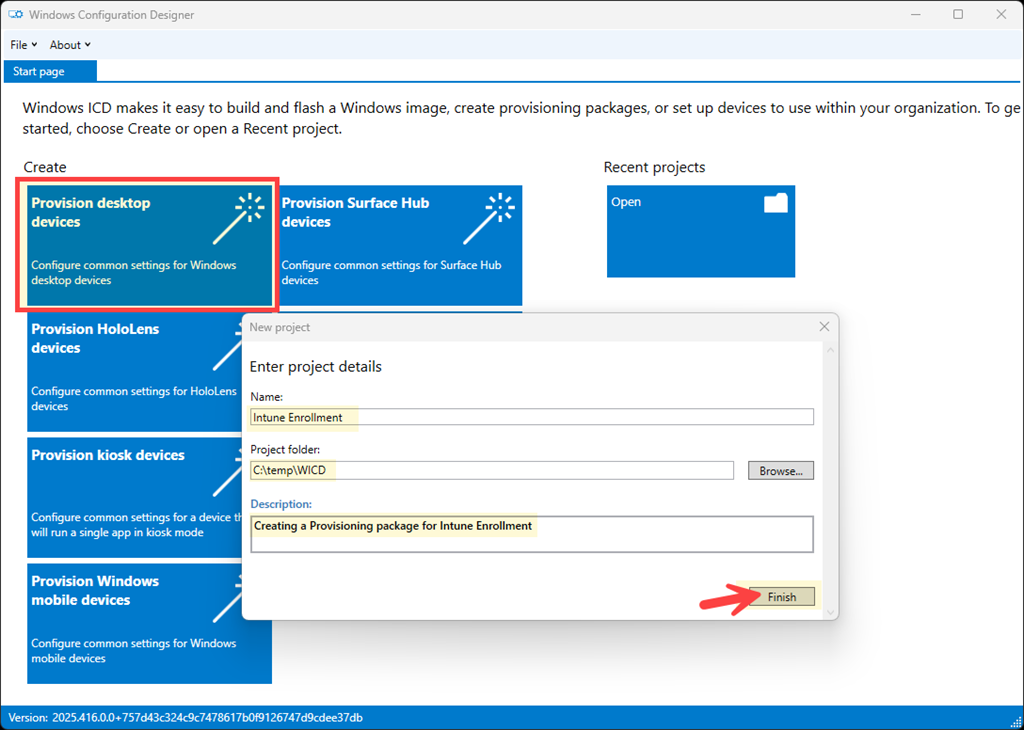
- Launch the Windows Configuration Designer app and click on Provision desktop devices.
- Name: Provide a name for the project.
- Project folder: Provide the location where provisioning package (.ppkg) file will be created.
- Description: Provide a description of the project and click Finish.
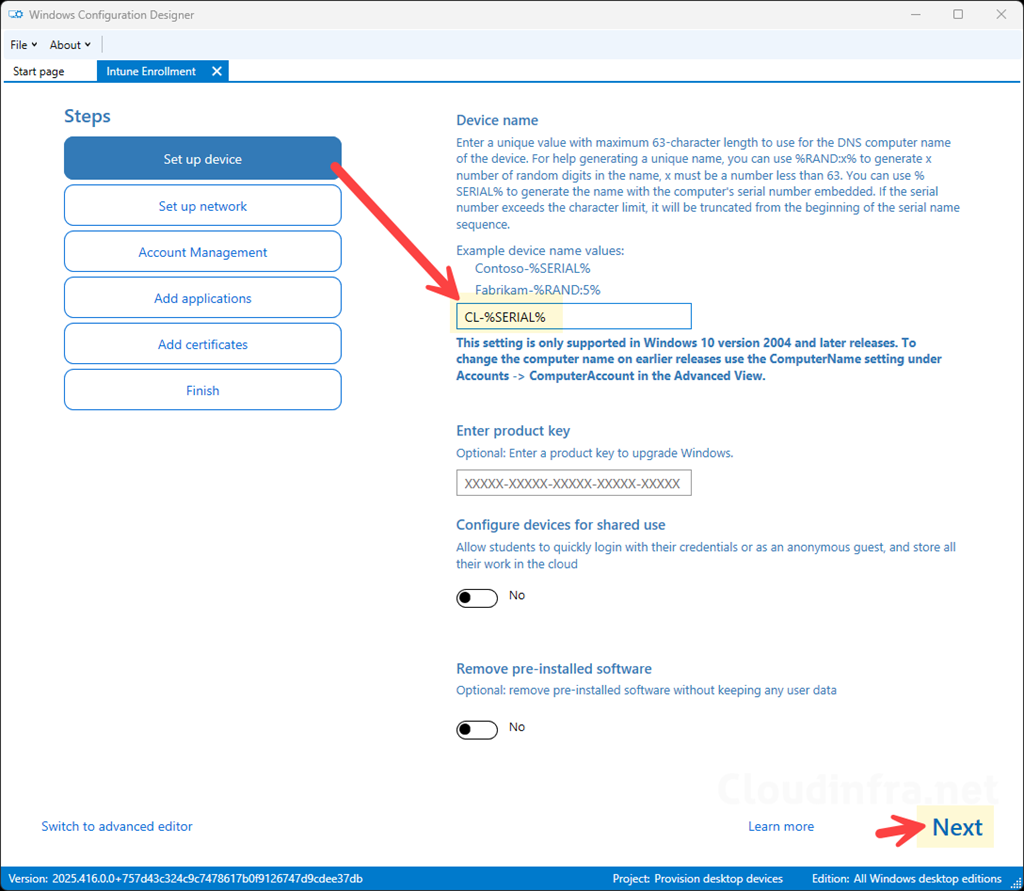
- On the Set up device page, you can configure a naming convention for your Windows 11 devices. For example, I have used
CL-%SERIAL%, where%SERIAL%automatically adds the device’s serial number to the computer name. You can also configure other options, such as entering a product key, setting up devices for shared use, and removing pre-installed software. For most environments, these options are not required and can be left at their default settings. Click Next to continue.
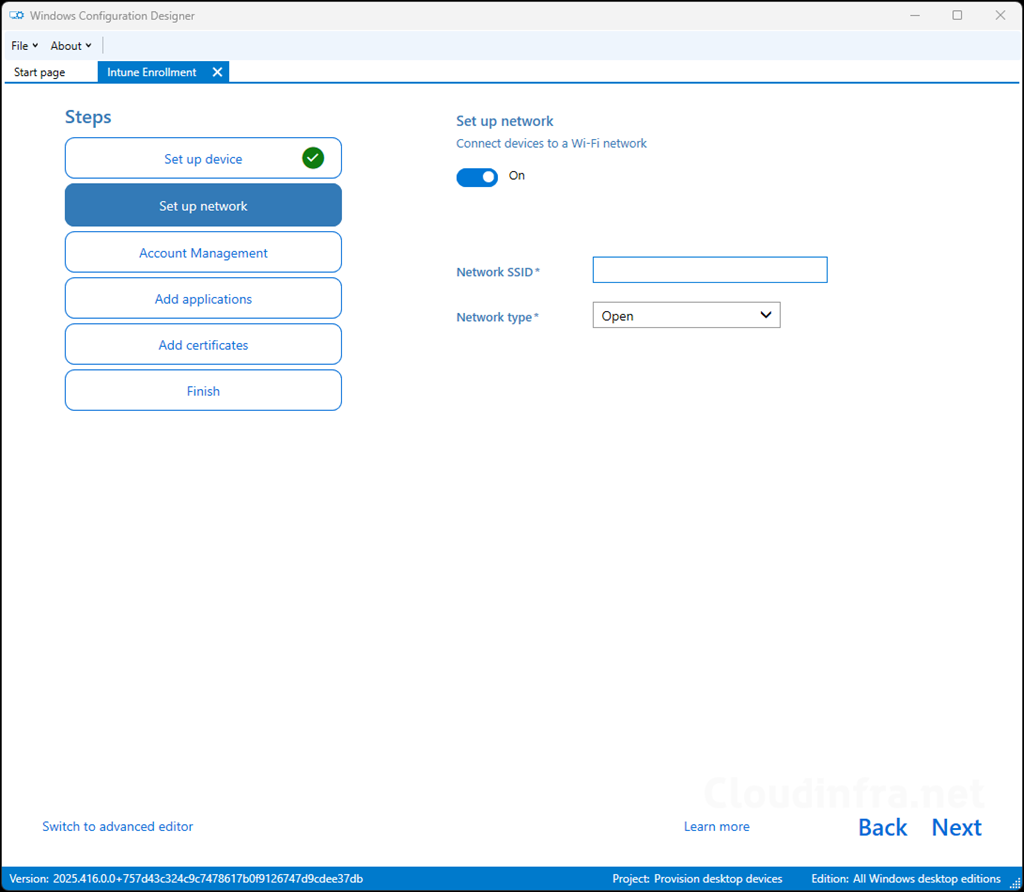
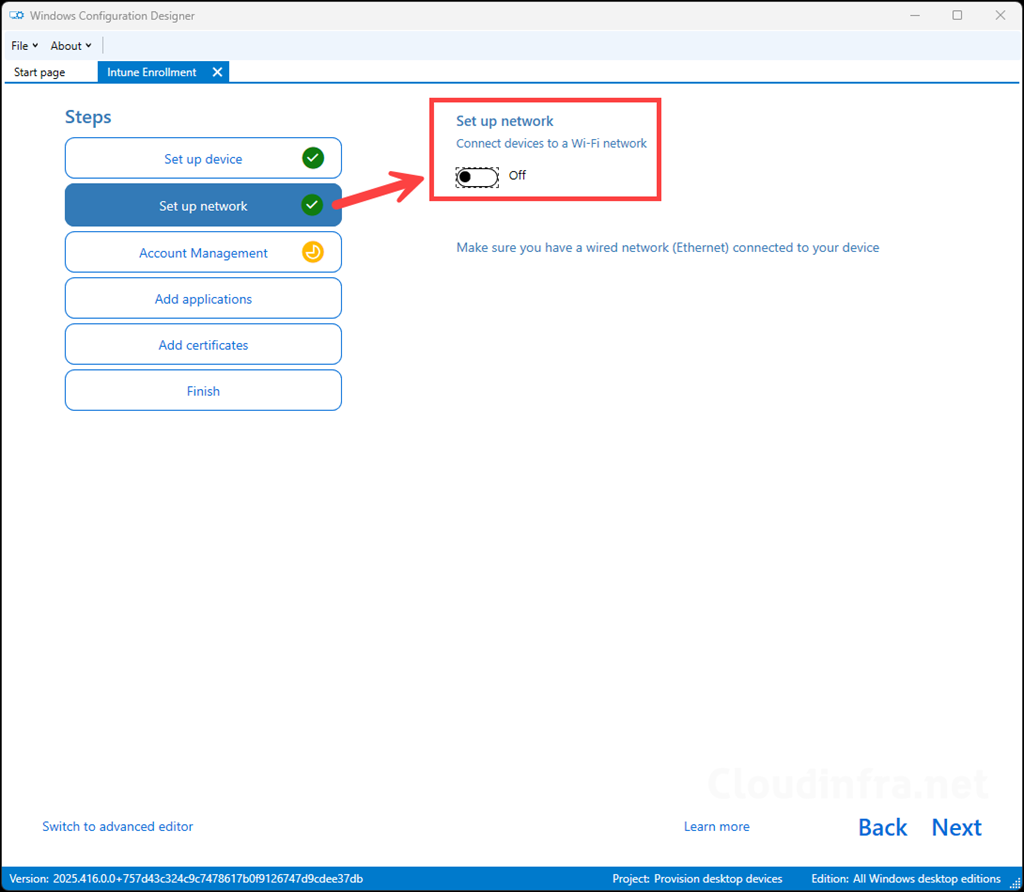
- On the Set up network page, you can optionally configure a Wi-Fi network that Windows devices will use during provisioning. If you don’t configure Wi-Fi in the provisioning package, ensure that the device has a wired Ethernet connection during the initial provisioning process. An active internet connection is required for the device to communicate with Microsoft Entra ID and Intune.
- I will not configure a Wi-Fi network in the provisioning package. Instead, I will connect to one of the available Wi-Fi networks during the Out-of-Box Experience (OOBE). Click Next to continue.
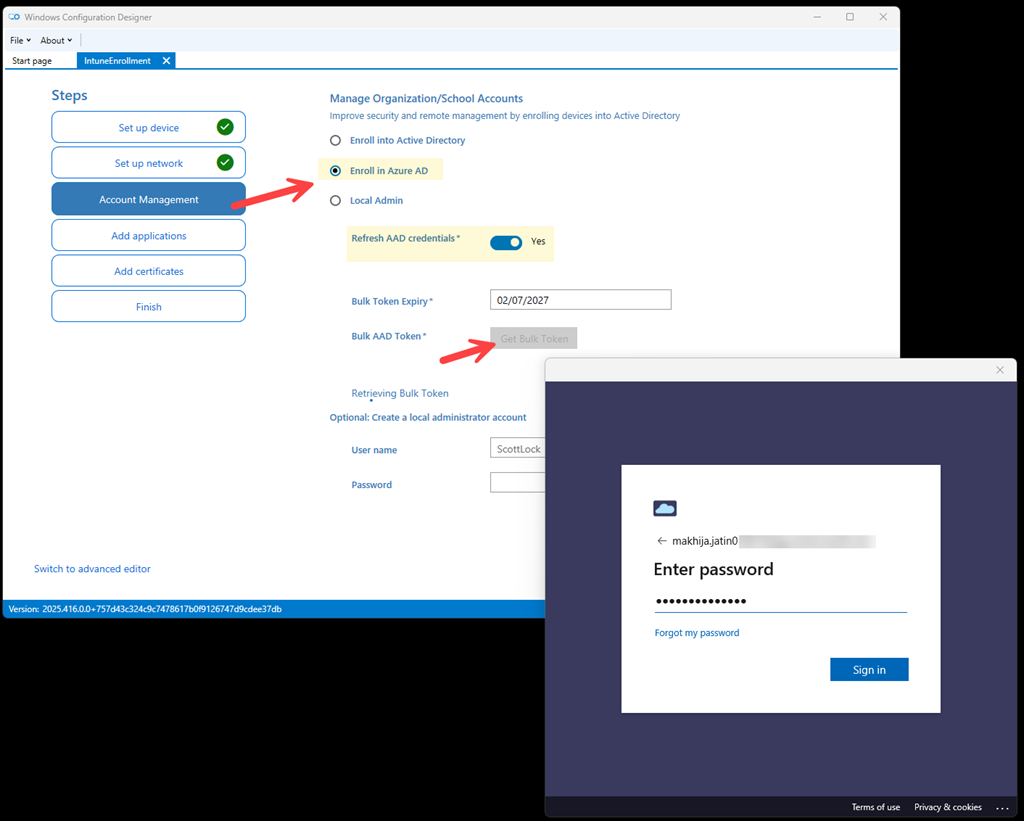
- On the Account management page, select:
- Enroll in Azure AD: Windows Configuration Designer still uses the Enroll in Azure AD terminology in this part of the interface, although the service is now called Microsoft Entra ID.
- Refresh AAD credentials: Enable this option to refresh the Entra ID credentials used by the provisioning package.
- Bulk Token Expiry: Specify the validity period for the bulk enrollment token. Microsoft currently allows the token to be valid for up to 180 days.
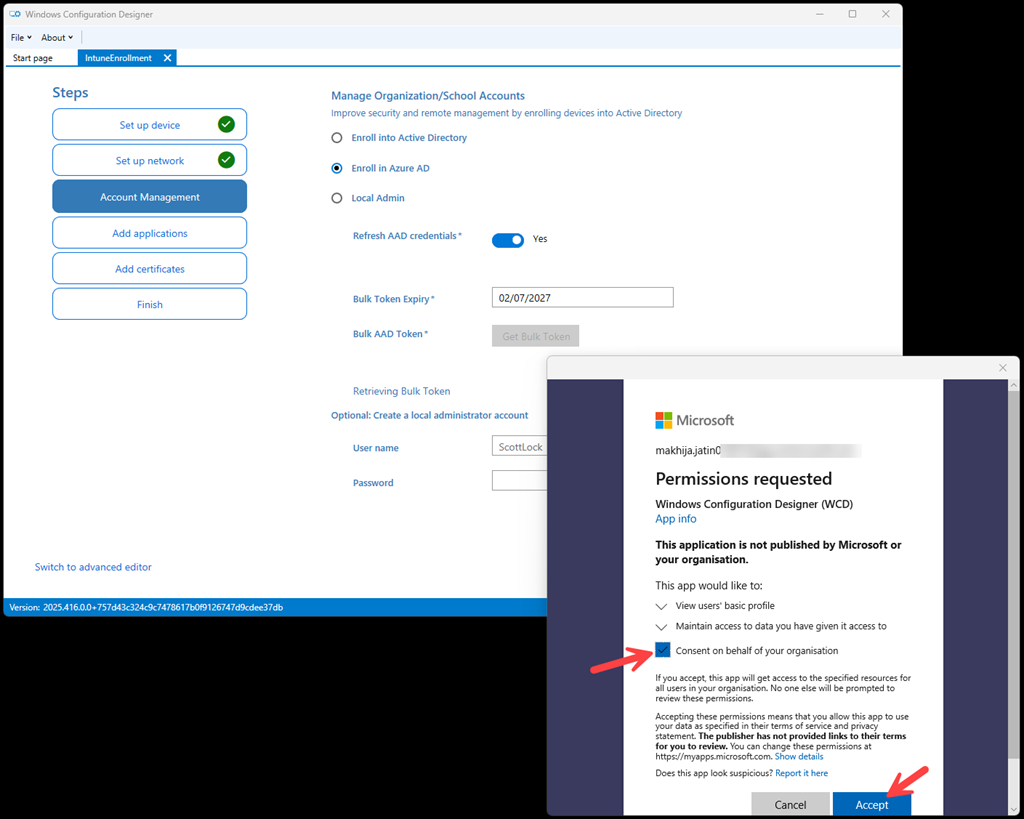
- Get Bulk Token: Click Get Bulk Token to retrieve the bulk enrollment token. When prompted, enter the credentials of the account you want to use for authentication and complete any required sign-in steps. Ensure that this user is included in the MDM user scope.
- A pop-up will appear requesting permission for Windows Configuration Designer (WCD) to access the required resources. Review the requested permissions and click Accept to continue.
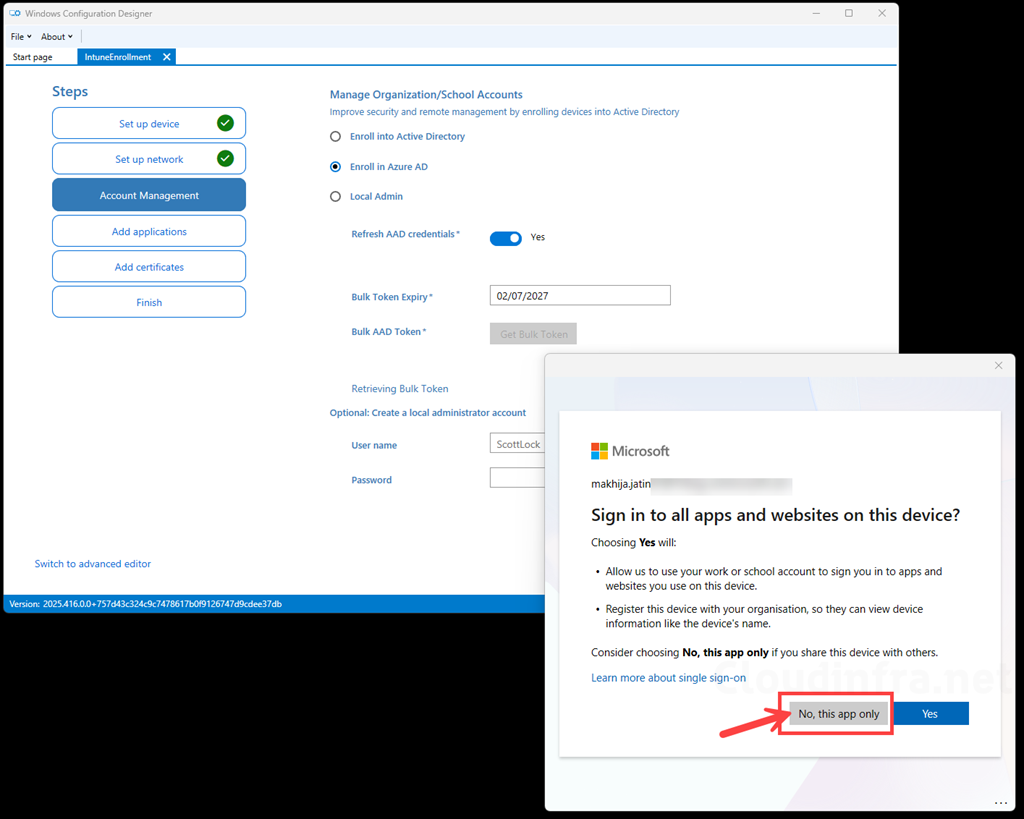
- Click No, this app only to sign in to Windows Configuration Designer without adding or registering the Windows device with your organization.
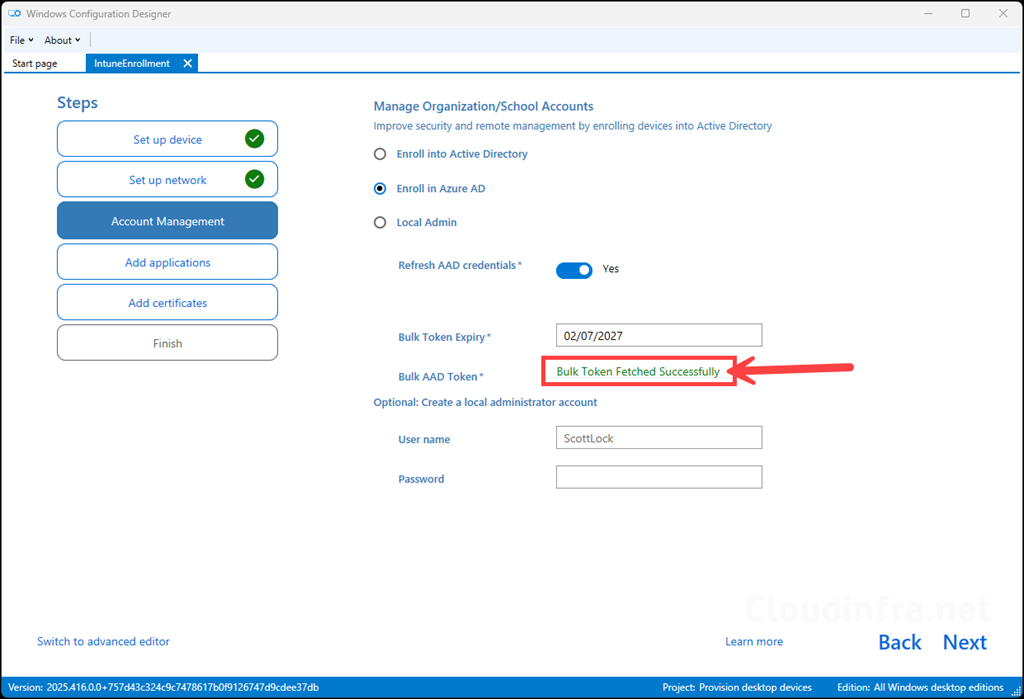
- The bulk enrollment token has been retrieved successfully.
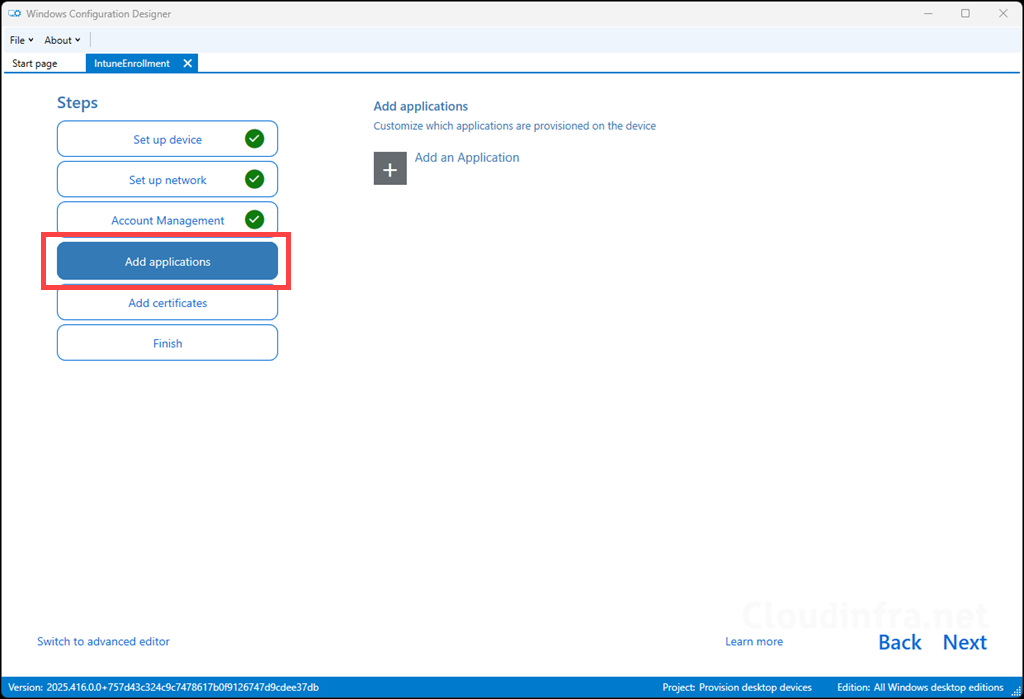
- Optionally, you can add applications to the provisioning package. Since I will be managing and deploying applications through Intune, I will skip this option and click Next to continue.
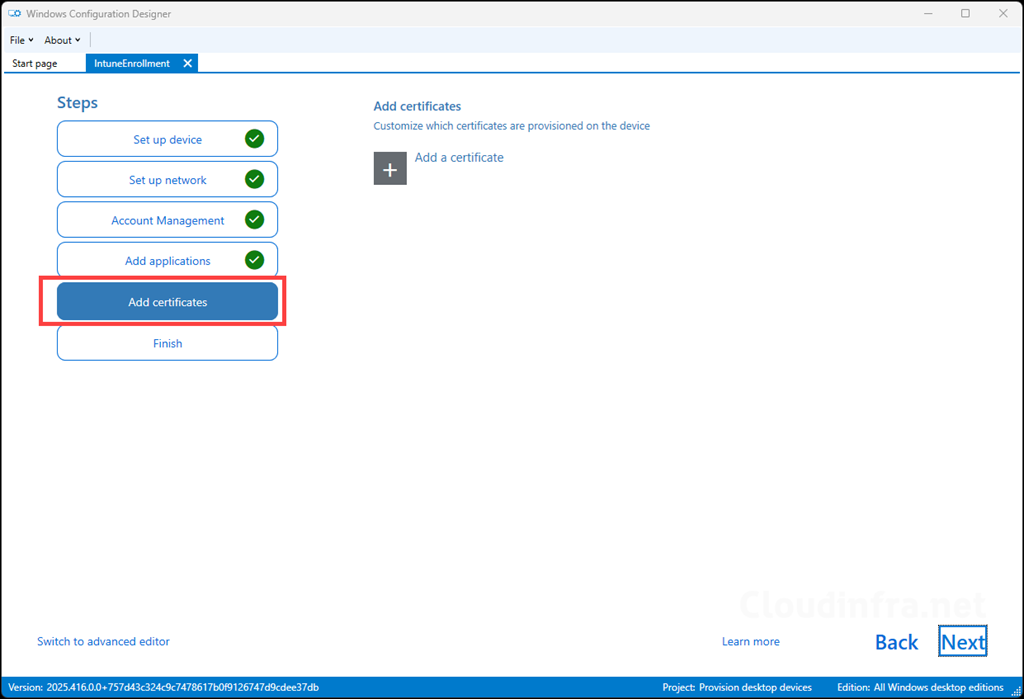
- Optionally, you can add certificates to the provisioning package, which will be installed on the device when the package is applied. If you are using the package only for Microsoft Entra join and Intune enrollment, you can skip this option and click Next.
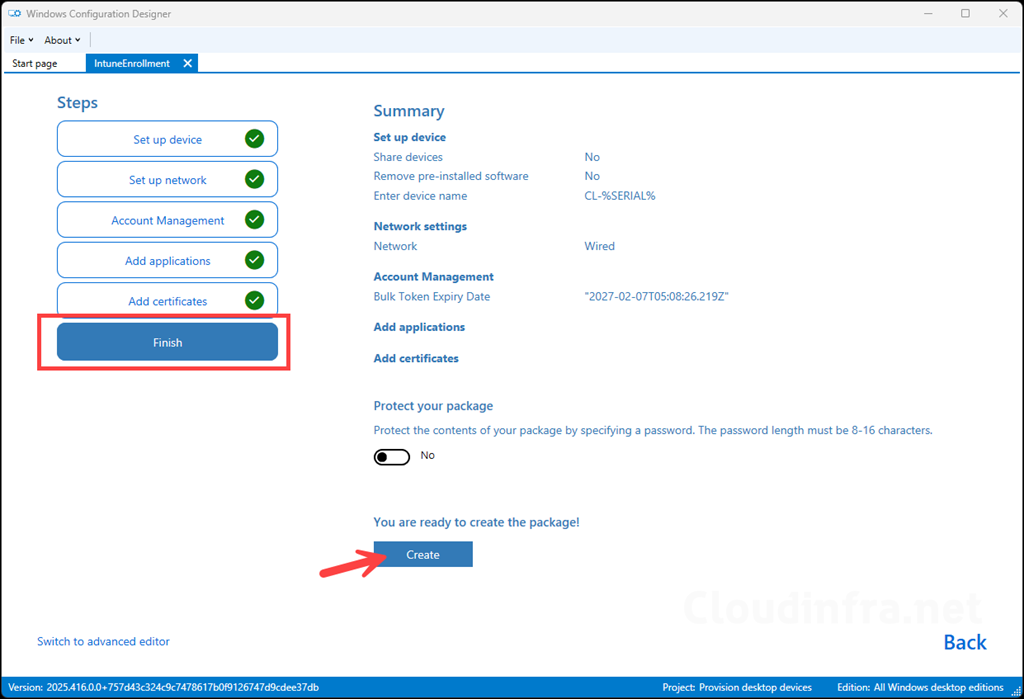
- On the final page, review the provisioning package configuration. You can optionally protect the package with a password for additional security. Once you have verified the settings, click Create to generate the provisioning package.
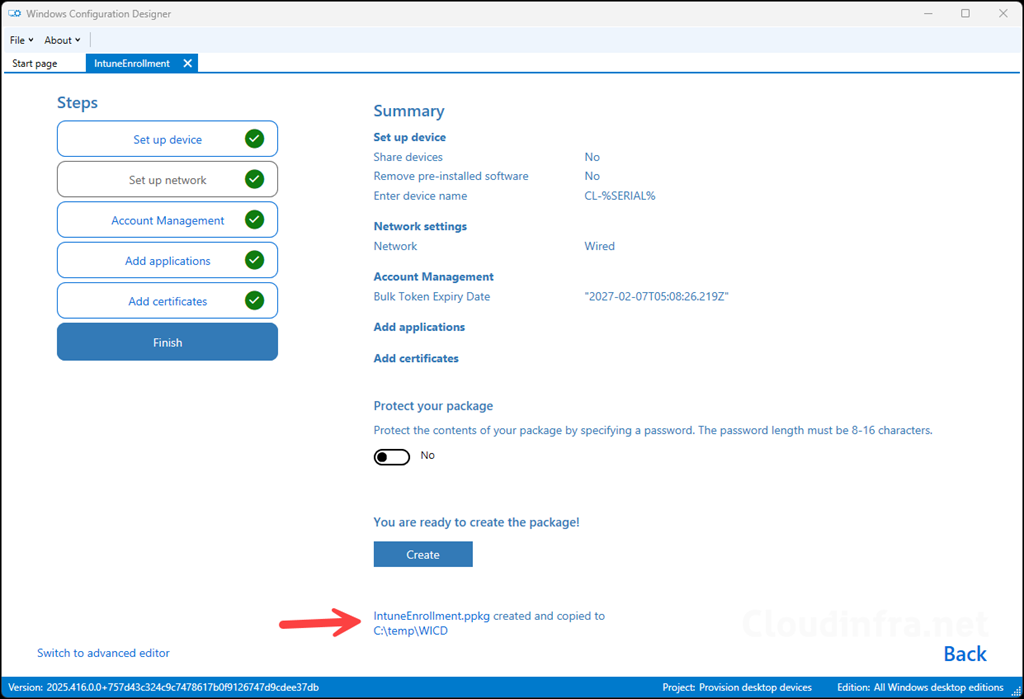
- Windows Configuration Designer will create the provisioning package and save it in the project folder. The provisioning package file will have a
.ppkgextension.
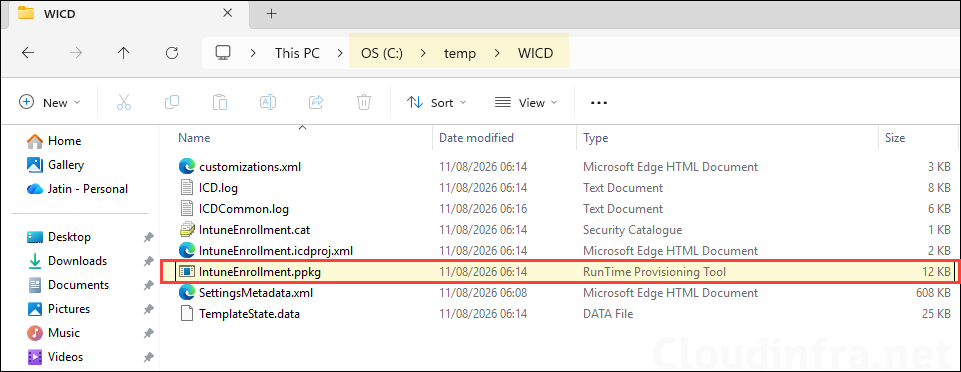
- Go to the project folder and verify its contents. You should see the IntuneEnrollment.ppkg file, which is the provisioning package we will use to join the device to Microsoft Entra ID and enroll it in Intune.
Step 5: Enroll Windows 11 Device in Intune using the Provisioning Package
Now that we have created the provisioning package (.ppkg file), we will use it to join a Windows device to Microsoft Entra ID and enroll it in Intune. Let’s apply the provisioning package to a device.
- Sign in to the Windows device you want to enroll in Intune using a local administrator account.
- Copy the IntuneEnrollment.ppkg provisioning package file to the device.
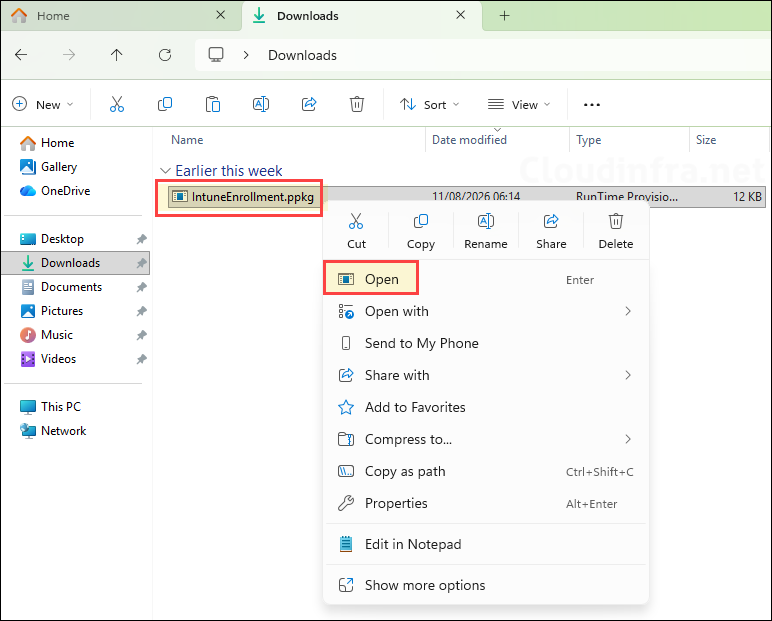
- Right-click the
.ppkgfile and select Open, or simply double-click the file to apply the provisioning package.
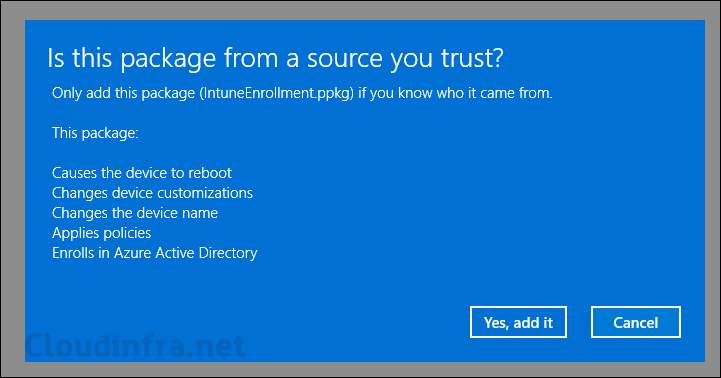
- Click Yes, add it to apply the provisioning package. This will join the device to Microsoft Entra ID and enroll it in Intune.
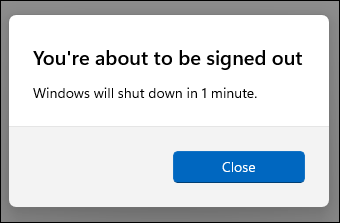
- The device will automatically restart in approximately one minute to complete the provisioning process.
- After the device restarts, users can sign in using their organization credentials. To verify that the device is connected to your organization, open Settings > Accounts > Access work or school. You should see that the device is connected to Microsoft Entra ID using an account in the format package_<GUID>@tenant.onmicrosoft.com, which indicates that the device was joined using a provisioning package.
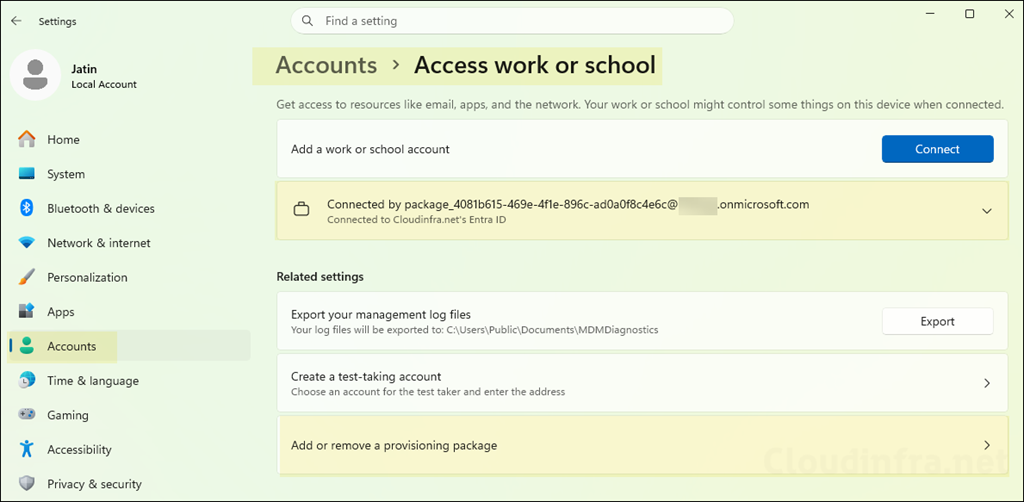
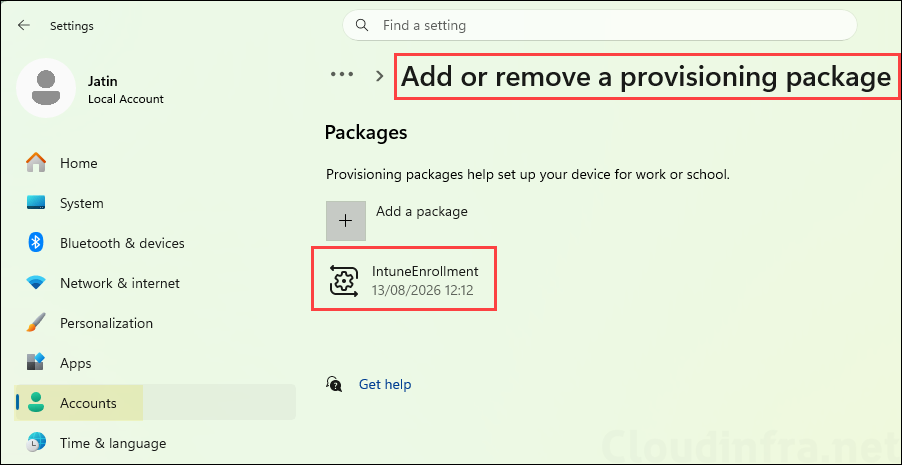
- Click Add or remove a provisioning package to view the provisioning package that was applied to enroll the device.
- In the Microsoft Entra admin center, go to Devices > All devices and verify that the device appears in the list. This confirms that the device has successfully joined Microsoft Entra ID.

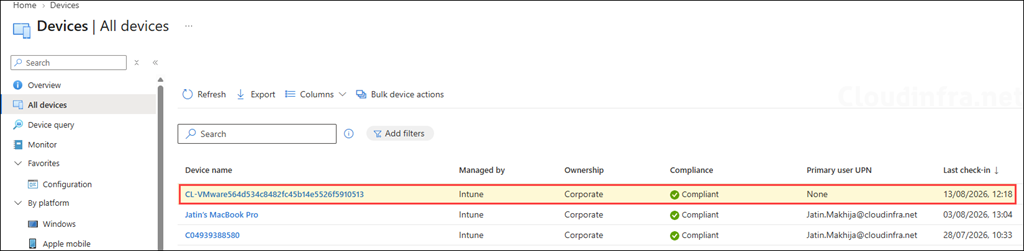
- The device will also be automatically enrolled in Intune. To confirm the enrollment, go to the Intune admin center > Devices > All devices and verify that the device appears in the list.
Ways to Apply a Provisioning Package on Windows 11 Device
There are several ways to apply a provisioning package to join a Windows device to Microsoft Entra ID and enroll it in Intune. In the previous section, we used one of the simplest methods: copying the .ppkg file to the target device and double-clicking it to apply the package. Below, I will cover the different methods you can use to apply a provisioning package.
Apply Provisioning Package During OOBE using USB
Copy the .ppkg file to a USB drive and connect it to the Windows 11 device while it is at the Out-of-Box Experience (OOBE) screen. Press the Windows key five times to launch the provisioning options, select Install provisioning package, choose the .ppkg file from the USB drive, and follow the on-screen prompts to apply the package.
Apply Provisioning Package from Windows Settings
On an already configured Windows 11 device, go to Settings > Accounts > Access work or school > Add or remove a provisioning package > Add a package. Browse to and select the .ppkg file, then follow the on-screen prompts to apply the provisioning package.
Apply Provisioning Package by Double-Clicking the File
You can copy the .ppkg file to the device, USB drive, or network location and simply double-click it. Accept the UAC prompt and confirm that you trust the provisioning package to apply its settings.
Apply Provisioning Package using PowerShell
You can install a provisioning package using PowerShell with the Add-ProvisioningPackage cmdlet. This method is useful when you want to automate or script the provisioning process across Windows 11 devices.
Apply Provisioning Package using DISM
A provisioning package can also be installed using the DISM command-line tool. This method is mainly useful for automated deployments, advanced administration, or when servicing Windows images.
