In this post, I will show you how to create policies with App Control Policy Wizard. It can be used to create both base and supplemental policies for App Control for Business. The wizard generates an XML policy file and a compiled .cip file. Use the XML file for Intune deployments (Endpoint Security > App Control for Business). The .cip file is useful for local testing and troubleshooting on a device before broad rollout.
App Control for Business Comprehensive Setup guide
Step-by-Step guide
Contents
1. Download App Control Policy Wizard
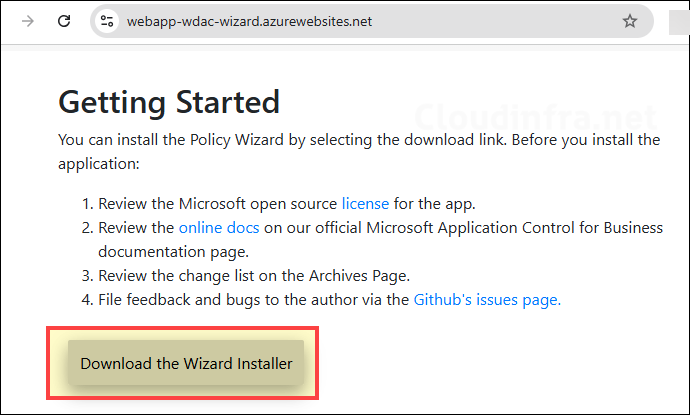
First, download App Control Policy Wizard and install it on a Windows device. It’s best to use a machine that already has the applications used in your organization installed. On the download page, click Download the Wizard Installer to start the download; it will provide an .msix installer file.
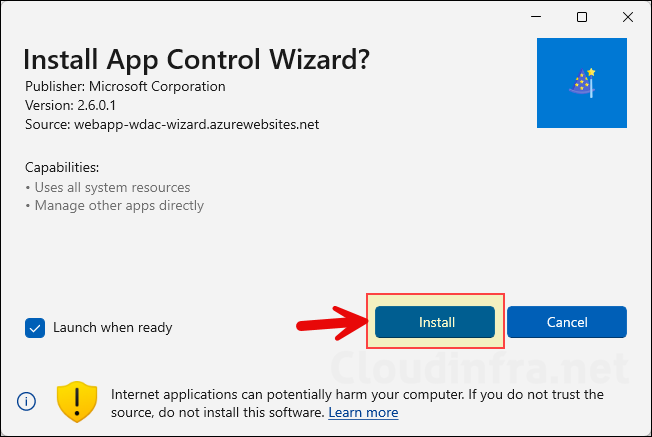
Launch the installer file and click on Install button to proceed with the Installation.
2. Create a Base Policy using App Control Policy Wizard
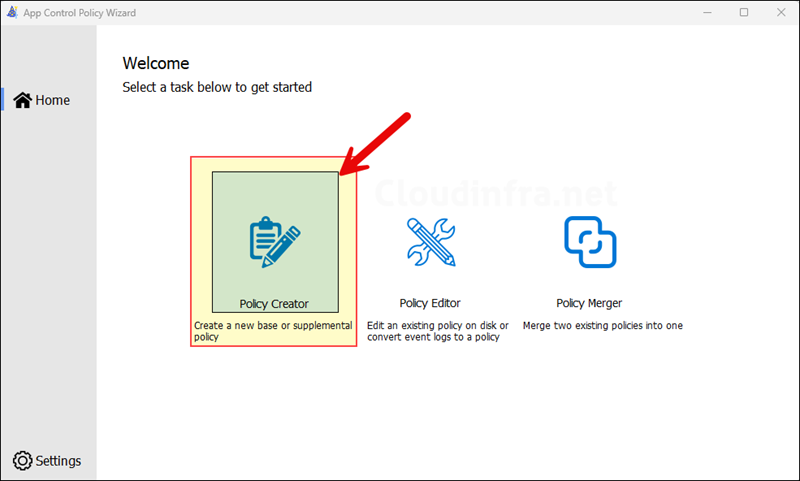
Let’s start by creating an App control base policy. To create a base policy, Open the App control wizard and click on Policy Creator.
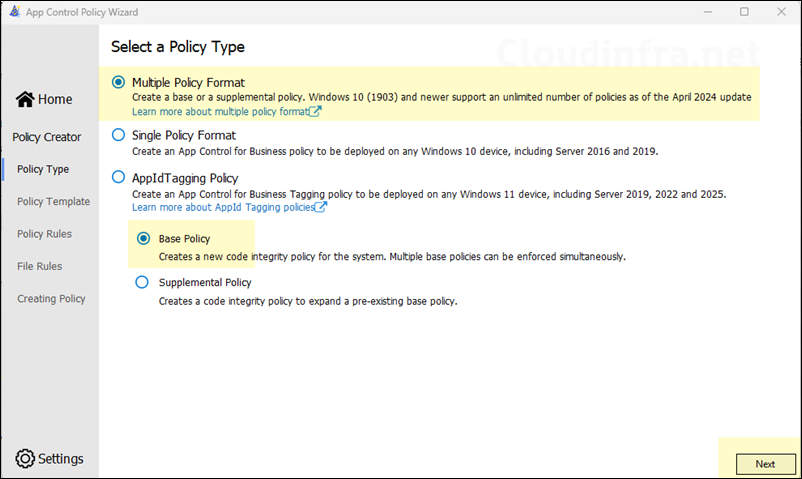
- Select Multiple Policy Format and Base Policy option and click Next.
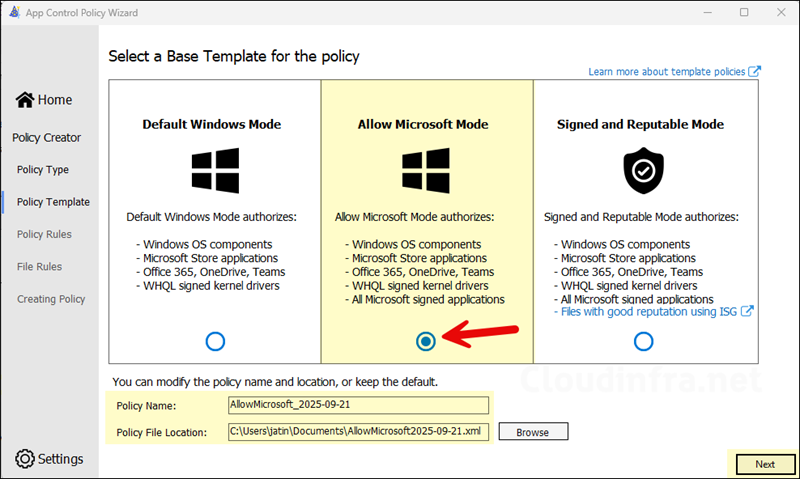
- Now, you need to select a base template. There are three options available:
- Default Windows Mode: Allows OS components, Microsoft Store applications, Office 365, OneDrive, Teams, WHQL signed kernel drivers.
- Allow Microsoft Mode: Everything in default mode + All Microsoft signed applications.
- Signed and Reputable Mode: Everything in Allow Microsoft mode + Allow Microsoft ISG approved list of apps.
Even if you select a template, you can still customize the options on the next screen. The template pre-selects certain options, making it easier to configure the base policy. I will go with All Microsoft Mode as a starting point and then proceed with the configuration. Even if the template does not pre-select Microsoft ISG, you can still enable it later if needed. I will not choose the Microsoft ISG option because it allows users to run applications trusted by Microsoft ISG but not explicitly approved by my organization.
Note
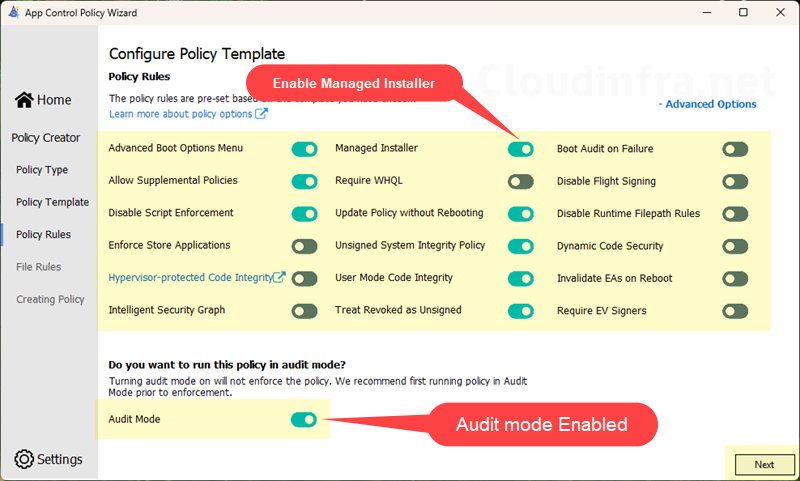
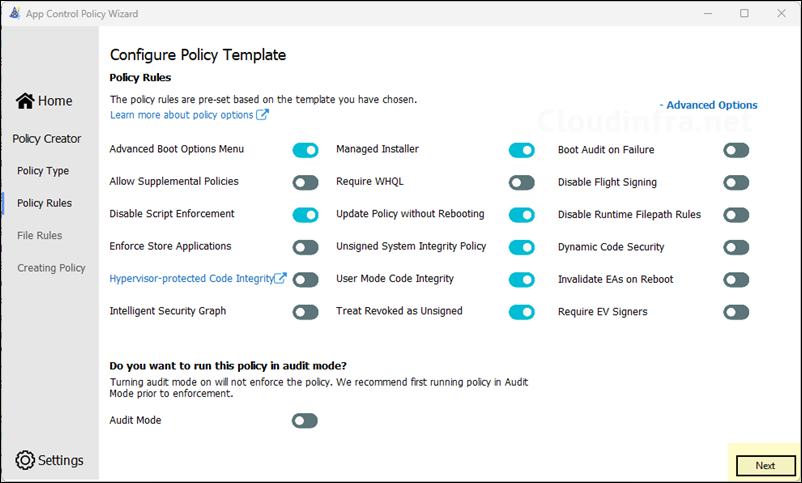
- The bulk of the configuration is done on Configure Policy Template screen. Here, you will enable or disable the toggle configuration switches for base policy. There are some important ones which I recommend you enable it in the base policy like Managed Installer and Allow Supplemental Policies. Start with Audit mode first and gather information about applications which are in use in your organization. Later in the post, I will show you how to switch from Audit mode to enforced mode.
| Policy Setting | Status | Description |
|---|---|---|
| Advanced Boot Options Menu | On | Keeps the F8 boot menu available for troubleshooting. |
| Allow Supplemental Policies | On | Enables additional policies to extend the base policy without rebuilding it. |
| Disable Script Enforcement | On | Unsigned PowerShell scripts and interactive PowerShell sessions are restricted to Constrained Language Mode. |
| Enforce Store Applications | Off | UWP apps are not explicitly enforced. |
| Hypervisor-protected Code Integrity | Off | HVCI is disabled; kernel protections rely only on standard code integrity. When enabled, code integrity runs in a hypervisor-protected container. |
| Intelligent Security Graph | Off | When its Off, List of apps truested by Microsoft Intelligent Security Graph (ISG) are not allowed. Only apps which are deployed by Intune or are explicitly approved by using Supplemental policies are allowed to run. |
| Managed Installer | On | Trusts applications installed by the Intune Management Extension (IME)/deployed via Intune. |
| Require WHQL | Off | Non-WHQL drivers are permitted; driver validation is less strict. When enabled, kernel-mode drivers must be WHQL-signed. |
| Update Policy without Rebooting | On | Allows deploying App Control for Business policies without requiring a restart. |
| Unsigned System Integrity Policy | On | Accepts unsigned App Control for Business policies, simplifying testing and deployment. |
| User Mode Code Integrity | On | Enforces rules on user-mode applications and DLLs. When enabled, user-mode executables and scripts are validated, in addition to kernel-mode binaries. |
| Treat Revoked as Unsigned | On | Revoked binaries are treated as untrusted and blocked. |
| Refer for Complete list of Policy Options | NA | Understand App Control for Business policy rules and file rules | Microsoft Learn |
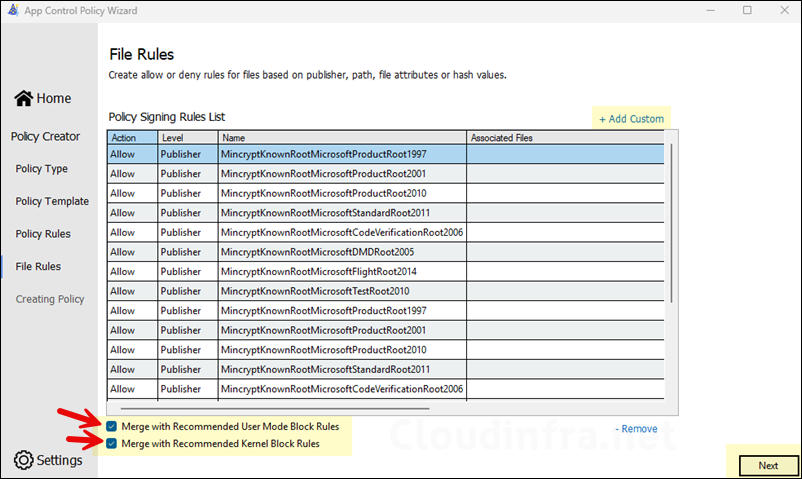
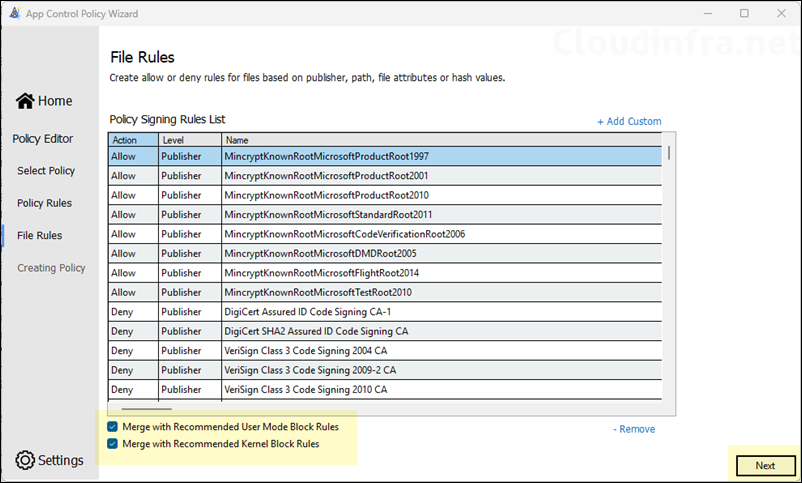
- Merge with Recommended User Mode Block Rules: Select the checkbox.
- Merge with Recommended Kernel Mode Block Rules: Select the checkbox and click Next.
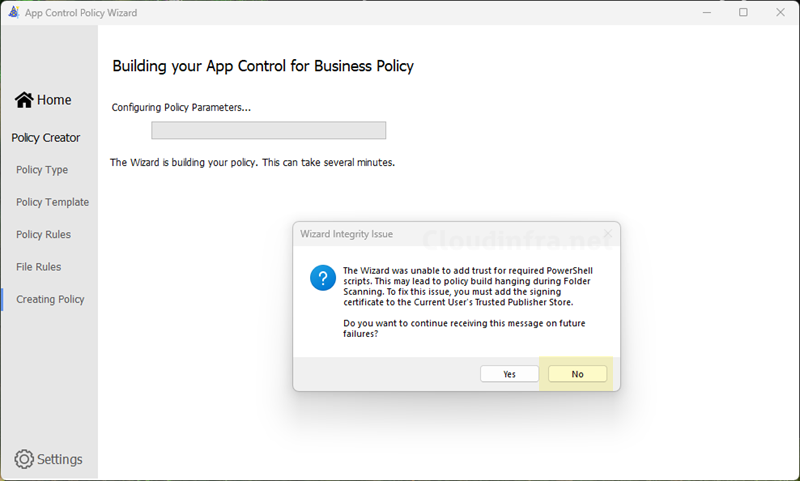
- When you click on Next, you may be prompted about Wizard Integrity Issue. You can safely ignore this message and click on No to proceed to the policy creation.
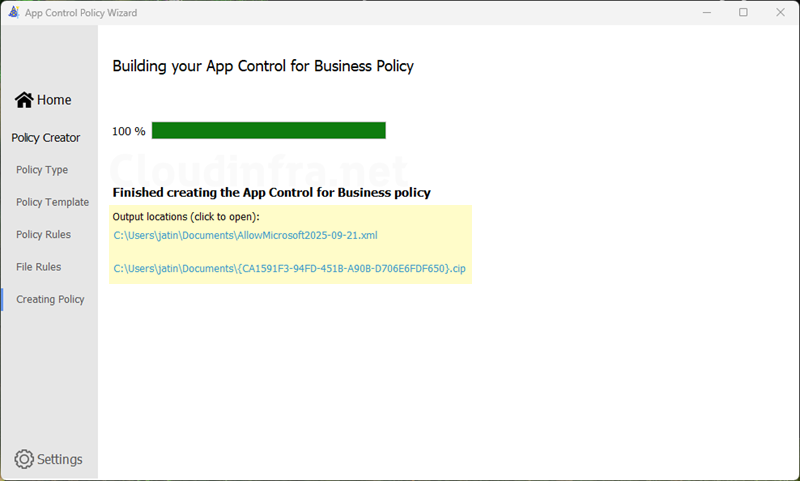
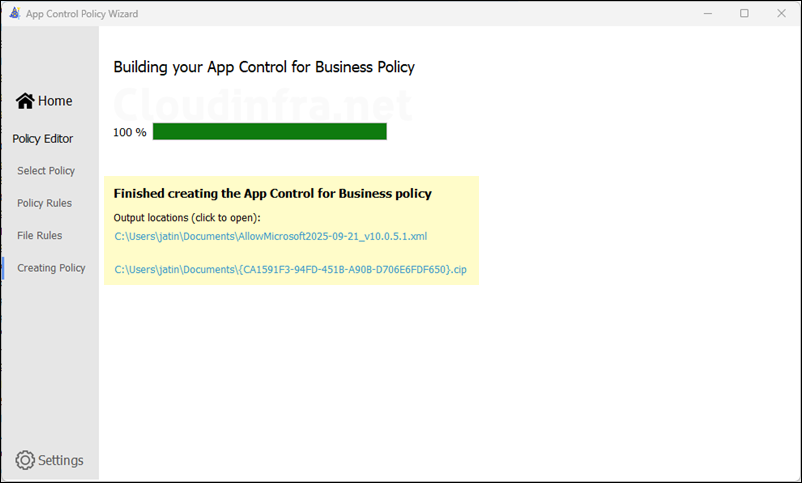
- By default, base policy will be created in Documents folder. Note down the Output locations and check your base policy XML and .cip file.
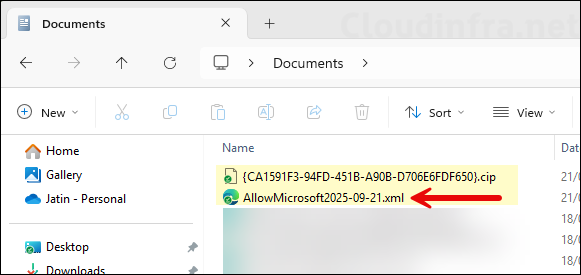
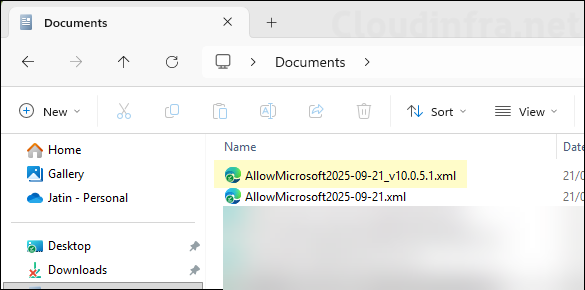
- Below screenshot shows the base policy .xml and .cip files.
3. Create a Supplemental policy
You can create a supplemental policy using either PowerShell or the App Control Wizard. In the next sections, I’ll cover both methods, starting with PowerShell. I’ve included a PowerShell script that works for most applications and creates a publisher-level rule. If you want to change the rule type from Publisher to Hash or Path, adjust the -Level parameter in the script.
Option 1: Create a Supplemental Policy using PowerShell
You can download the script from my GitHub page (ACfB_Allow_Chrome_Supplemental.ps1) or copy it from below. It outputs two files: one with the .xml extension and one with the .cip extension.
ACfB_Allow_Chrome_Supplemental.ps1
<#
.SYNOPSIS
    Creates a WDAC/App Control for Business supplemental policy that allows Google Chrome
    to run by defining a Publisher rule.

.DESCRIPTION
    This script generates a supplemental ACfB policy for Google Chrome.
    It scans the Chrome installation directory, builds Publisher-level rules (with hash fallback),
    associates the supplemental policy with the specified base policy using its PolicyID,
    and compiles the XML into a deployable CIP/BIN file.

.PARAMETER $scanPath
    The file path to the Google Chrome installation directory that will be scanned to create allow rules.

.PARAMETER $outXml
    The output path where the generated XML policy file will be saved.

.PARAMETER $baseId
    The PolicyID of the base policy this supplemental policy should be linked to.

.PARAMETER $outBin
    The output path where the compiled CIP/BIN file will be saved.

.NOTES
    Author: Jatin Makhija
    Copyright: Cloudinfra.net
    Version: 1.0

.EXAMPLE
    To generate a supplemental policy allowing Google Chrome:
    .\ACfB_Allow_Chrome_Supplemental.ps1
    This will create an XML and a compiled CIP file that can be deployed through Intune or another
    management solution as a supplemental policy to the existing base policy.
#>

# Create a supplemental policy that allows Google Chrome by Publisher
$scanPath = "C:\Program Files\Google\Chrome\Application"   # adjust if needed
$outXml   = "C:\Temp\ACfB_Allow_Chrome_Supplemental.xml"
New-CIPolicy -FilePath $outXml -ScanPath $scanPath -Level Publisher -UserPEs -Fallback Hash

# Mark it as a supplemental policy (Link it to your base by BasePolicyID)
# Replace the GUID below with your base policy’s PolicyID
$baseId = '{030A293A-FC23-4402-A2AE-CDD924FEED5A}'
Set-CIPolicyIdInfo -FilePath $outXml -SupplementsBasePolicyID $baseId

# Compile to CIP/BIN
$outBin = "C:\temp\ACfB_Allow_Chrome_Supplemental.cip"
ConvertFrom-CIPolicy -XmlFilePath $outXml -BinaryFilePath $outBin
Option 2: Create a Supplemental policy using App Control Policy Wizard
When the base policy is deployed in Audit mode, monitor the event logs to identify which applications are getting blocked and build an inventory of apps you intend to allow. You then have two options: 1) either edit the base policy to add allow rules, or 2) create supplemental policies to allow those apps. I will recommend going with option 2.
I recommend keeping the base policy minimal (so you don’t need to update it frequently), and using supplemental policies to build your allow list. For easier management, create one policy per app, though you can group multiple related apps into a single supplemental policy if required. Make sure to document each supplemental policy along with its File rules. This will help the service-desk and other administrators quickly find information and troubleshoot issues more efficiently.
- Launch App Control Policy Wizard and click on Policy Creator.
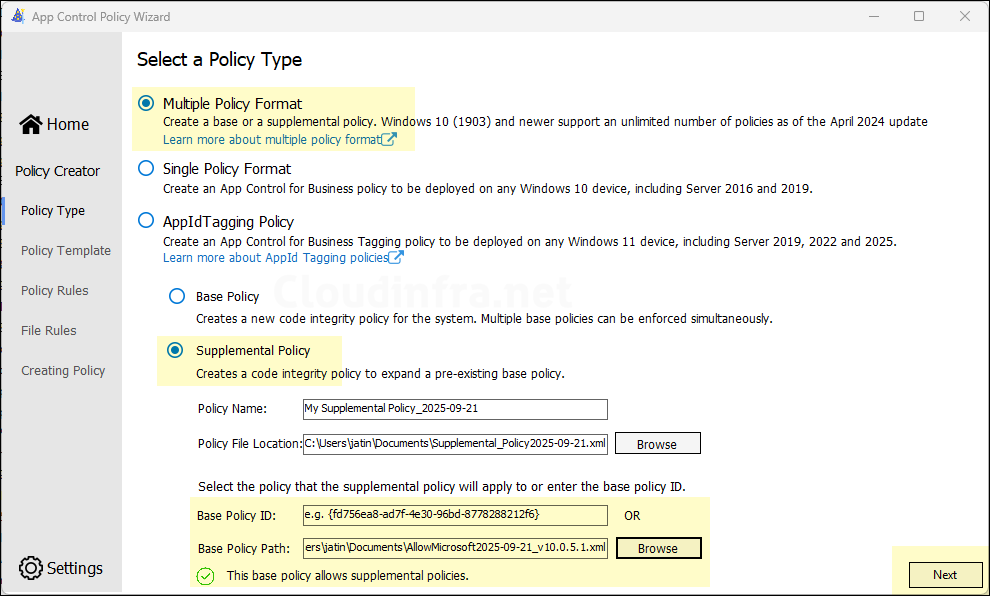
- Select Policy Type as Multiple Policy Format and Select Supplemental Policy.
- If the base policy XML file is saved on the computer where you’re creating the supplemental policy, click Browse and select it. Otherwise, enter the Base Policy ID and click Next.
- On the next screen, you’ll configure the supplemental policy. Settings controlled by the base policy can’t be changed here. A supplemental policy can only add to the base (e.g., additional allow rules/signers); it cannot relax or remove base options. Settings enforced by the base remain not editable in the supplemental policy UI. Click on Next.
- Click on + Add Custom and add the rules for the apps you want to whitelist. Use below table to understand about different rule types and decide which one best fits your scenario.
Create custom rules for the apps you want to explicitly allow on devices, such as Google Chrome, Notepad++, or any line-of-business app.
| Rule Type | Description |
|---|---|
| Publisher | Trust by digital signature. Best for vendor-signed apps and future updates. Resilient to app updates. |
| Path | Trust files in a specific folder or file path. Use only for trusted, non-writable paths. Weak Rule if app is moved to another folder, app will be allowed to run. |
| File Attributes | Match file metadata like OriginalFileName or ProductName. Useful for unsigned apps. Easier to spoof. Can break when metadata changes between builds. |
| Packaged App | Allow AppX/MSIX by package identity. For Store and MSIX LOB apps. |
| File Hash | Exact file match by hash. Use for one specific build or emergency allows. Exact match. Highest precision. Any update changes the hash, which requires a new rule. High maintenance. |
| COM Object | Allow specific COM CLSIDs needed by apps under UMCI. More complex to build and maintain. |
| Folder Scan | Scan a folder and auto-create rules at your chosen level (publisher, hash, path). Fast bulk rule creation. Captures many files in one pass. Can over-include. Review output to avoid allowing unwanted binaries. |
| Certificate File | Trust everything signed by a given code-signing certificate. Broad coverage for all binaries signed by that cert. Survives file updates. Too broad if the cert signs many products. |
| AppID Tags | Advanced tagging for special components or organization. Rarely required. Useful for niche scenarios and structured rule grouping. |
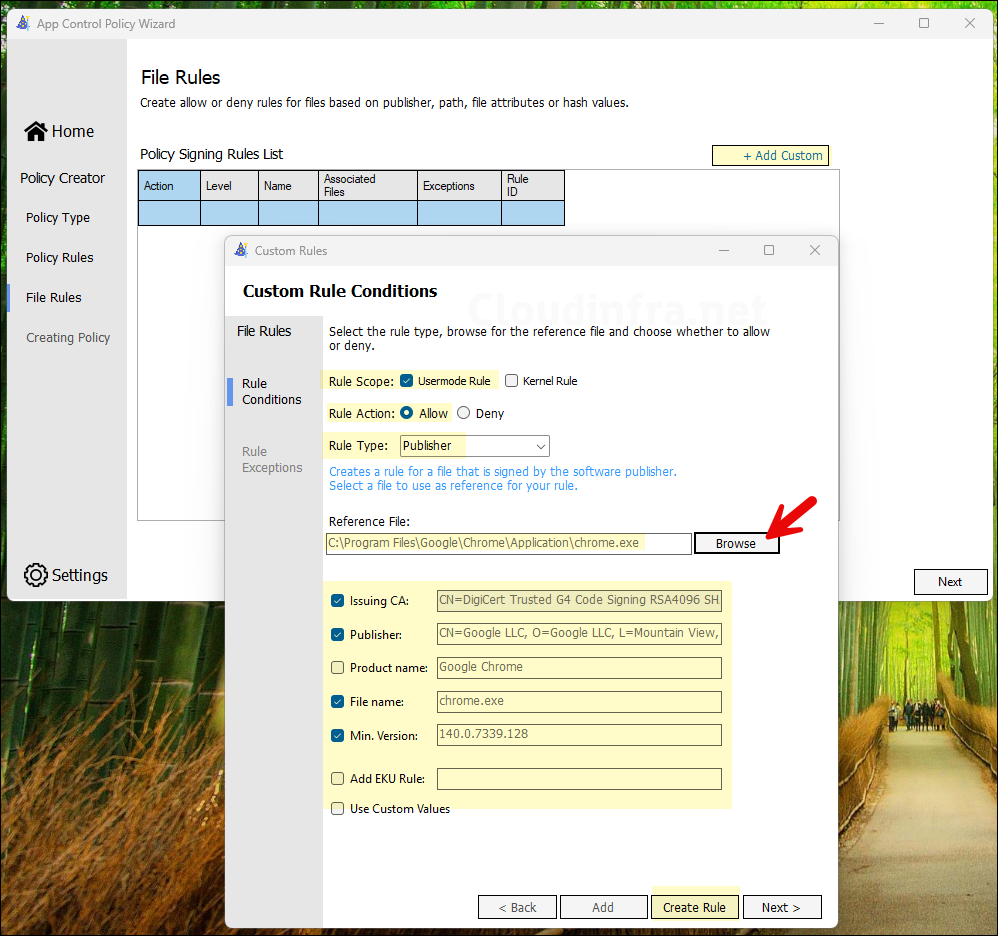
Custom Rule Conditions
Below is an example of a custom rule that allows the Google Chrome and few other applications. I will use the Publisher rule type for chrome so that the it will work even if the app is updated. It is best to create the supplemental policy on a system where the applications are already installed.
- Rule scope: Select Usermode Rule.
- Rule Action: Allow
- Rule Type: Publisher
- Click Browse and select chrome.exe file. This will automatically pull all the information about the application for creating a rule. If you want, you can adjust the values by using Use Custom Values checkbox.
- Click Create Rule.
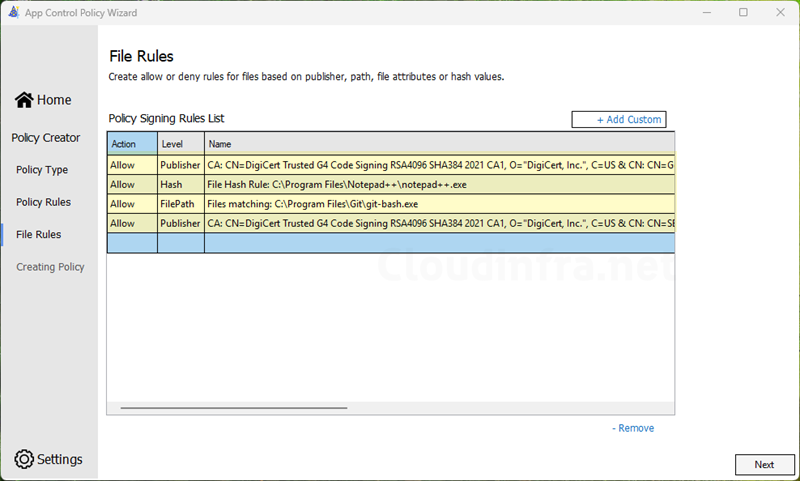
- Repeat the above step to add more applications by clicking + Add custom link. You can use different rule types (Hash, Path, etc.) and add them to a single policy. Once you are done, click Next.
- By default, Supplemental policy will be created in the Documents folder. Go to the location to review the policy files.
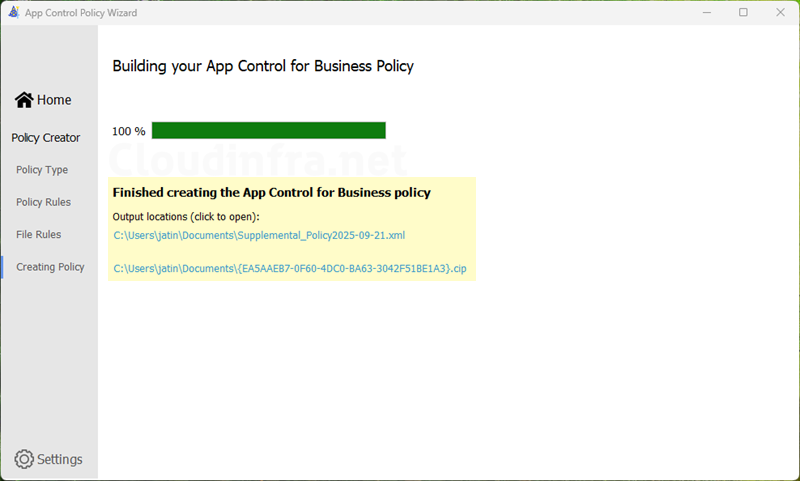
- Below screenshot shows the Supplemental policy has been created in Documents folder.
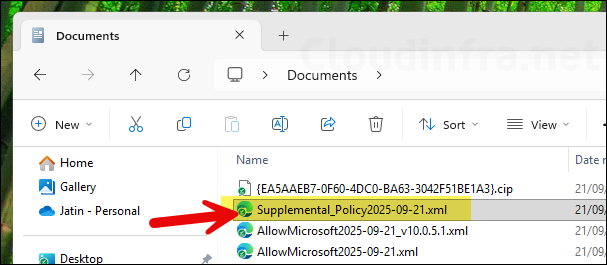
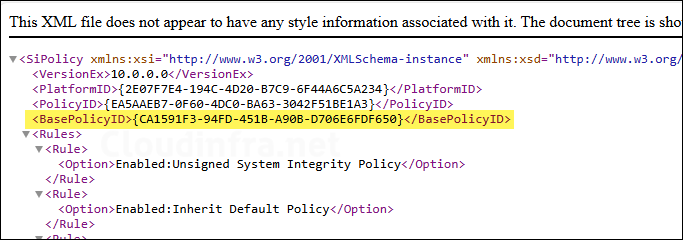
- If you open the Supplemental policy XML, you will find that it references the base policy by using Base Policy ID.
I’ve uploaded a copy of a sample copy of supplemental policy XML file to Github (Allow_Apps_Supplemental_Policy.xml) for reference only. Please generate your own supplemental policy using the App Control Policy Wizard. Do not use my XML file, as it contains references to my base policy ID, supplemental policy ID, and other build-specific metadata.
4. Switching from Audit Mode to Enforced Mode
For App Control for Business, start by deploying a base policy in Audit mode > Monitor event logs > build an inventory > and create supplemental policies to allow required apps and drivers. Iterate until you’re confident nothing business-critical will be blocked. Then switch the base policy from Audit to Enforced mode. Below steps will guide you to convert your policy to enforced mode.
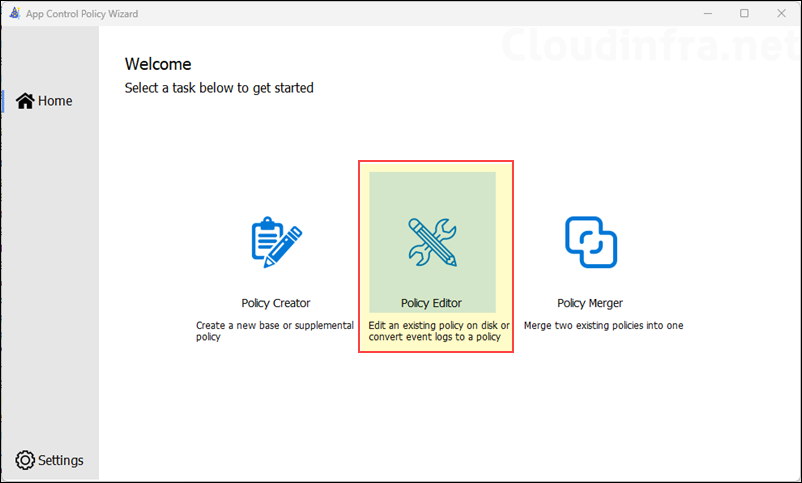
- Open App Control Policy Wizard and click on Policy Editor.
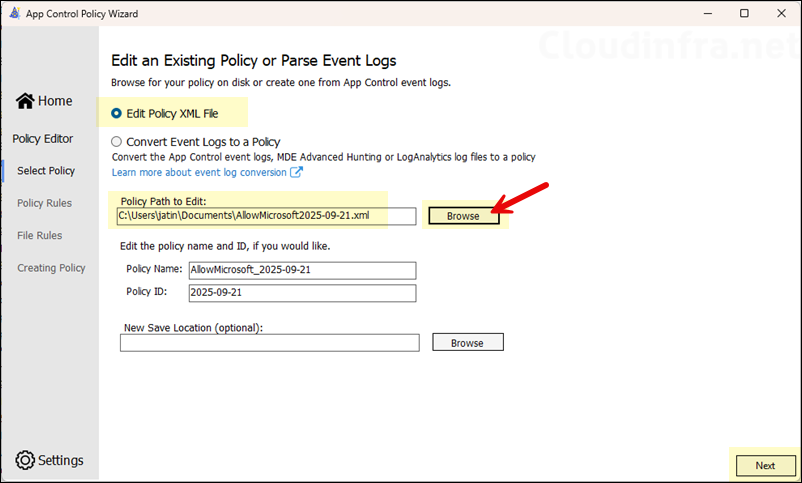
- Select Edit Policy XML file and then browse to the base policy XML file. Click Next.
- Keep rest of the configuration unchanged and disable Audit mode toggle switch.
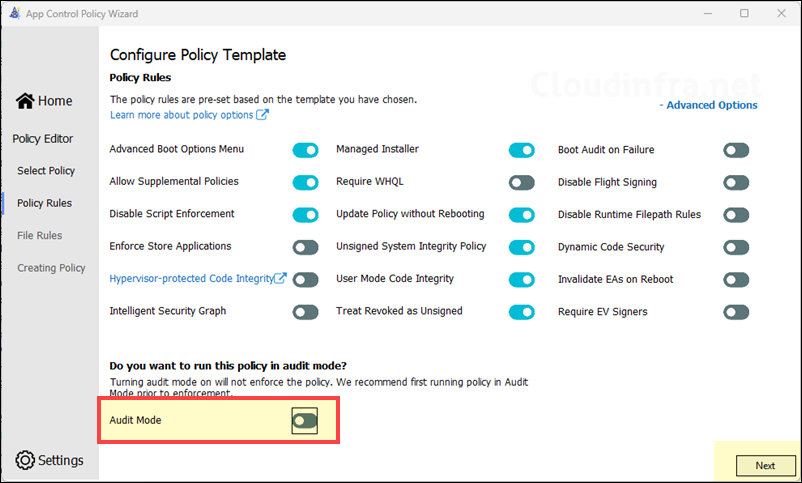
- Keep the File rules and selections as it is, Click Next.
- Base policy has been updated now.
- By default, the updated base policy XML file will be saved in the Documents folder. In Intune, open the existing App Control for Business policy and upload the new XML file to turn off audit mode. The policy will redeploy to target devices and switch from Audit to Enforced mode.
Conclusion
In this post, we covered creating base and supplemental policies for App Control for Business. Keep the base policy minimal to cover common app scenarios, monitor events, and create supplemental policies to allow required apps. Maintain a central repository in SharePoint or GitHub for base and supplemental XML files and related screenshots. Document all allow-listed apps in supplemental policies to simplify troubleshooting. For a Step-by-step guide to Setup App control for business via Intune, Refer to my other post: App Control for Business Intune Setup Guide.