This blog post will see how to disable Windows 10/11 Lock Screen using Intune admin center. The lock screen is the initial screen that appears after powering on your device, preceding the Sign-in page.
If you are still using Windows 10, you may need to press the Ctrl+Alt+Del keys on the keyboard before reaching the sign-in page. In Windows 11, you can either use your mouse to dismiss the lock screen or press any key on the keyboard.
There is currently no built-in option to remove the Windows 11 Lock screen using the Settings App. However, administrators can utilize various alternative methods to disable it for end users, like Intune, Group Policy, or registry editor. I have provided the steps for each of these methods in this post.
Contents
Windows 11 Lock Screen
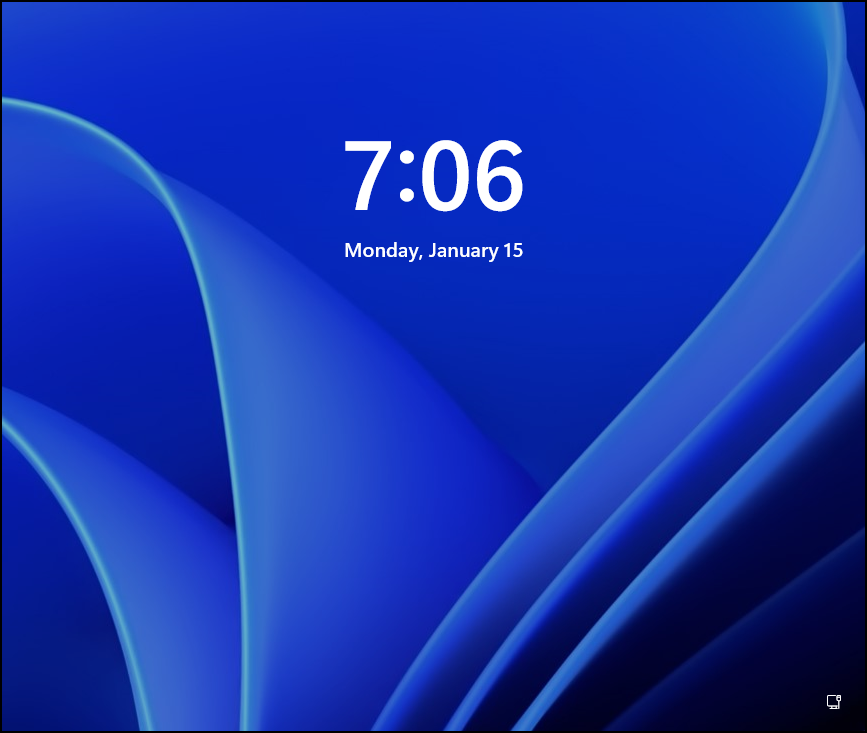
Below is an example of the default Windows 11 lock screen. You will find the Date and Time Information along with the background image, which could be different if you have placed a custom lock screen wallpaper.

After dismissing the Lock screen, you can enter your password or PIN, depending on the login options configured on your device.

Steps to Disable Windows 10/11 Lock Screen using Intune
- Sign in to the Intune admin center > Devices > Configuration > Create > New Policy.
- Select Platform as Windows 10 and later.
- Profile type: Settings Catalog.
- Basics: Provide a Name and Description of the policy.
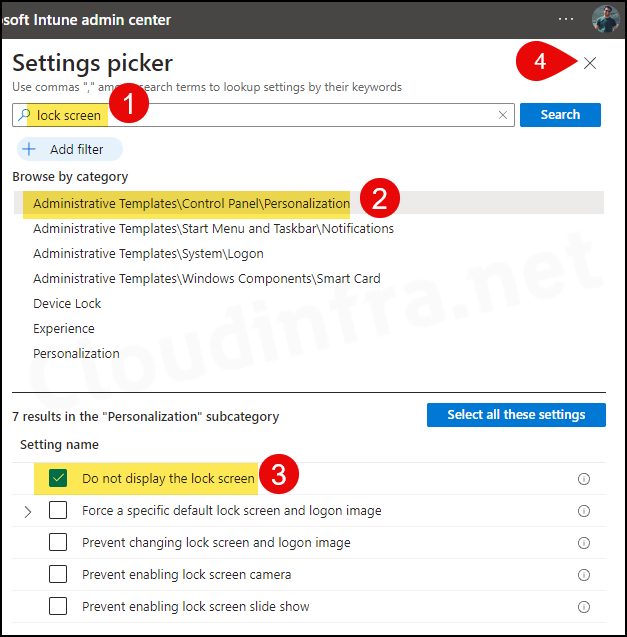
- Configuration settings: Click on + Add settings and search for the lock screen. Select the category Administrative Templates\Control Panel\Personalization. Select the setting, Do not display the Lock screen.

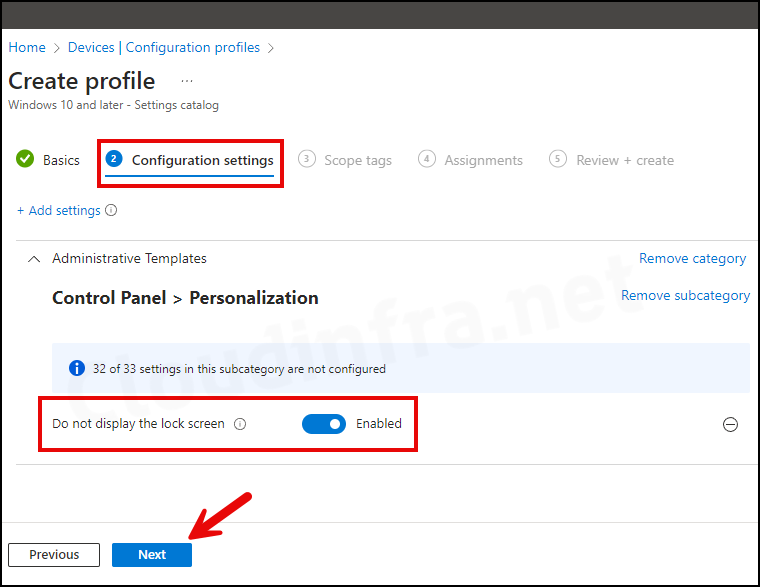
Use the toggle switch to enable the setting Do not display the lock screen and click Next.
This policy setting controls whether the lock screen appears for users. If you enable this policy setting, users that are not required to press CTRL + ALT + DEL before signing in will see their selected tile after locking their PC. If you disable or do not configure this policy setting, users that are not required to press CTRL + ALT + DEL before signing in will see a lock screen after locking their PC. They must dismiss the lock screen using touch, the keyboard, or by dragging it with the mouse.
About the setting, Do not display the lock screen

- Scope tags (optional): A scope tag in Intune is an RBAC label you add to resources (policies, apps, devices) to limit which admins can see and manage them. For more Information, read: How to use Scope tags in Intune.
- Assignments: Assign the policy to Entra security groups that contain the target users or devices. As a best practice, pilot with a small set first; once validated, roll it out more broadly. For guidance on assignment strategy, see Intune assignments: User groups vs. Device groups.
- Review + create: Review the deployment summary and click Create.
Sync Intune Policies
The device check-in process might not begin immediately. If you’re testing this policy on a test device, you can manually kickstart the Intune sync from the device itself or remotely through the Intune admin center.
Alternatively, you can use PowerShell to force the Intune sync on Windows devices. Restarting the device is another way to trigger the Intune device check-in process.
Monitoring the deployment progress
- Sign in to the Intune admin center > Devices > Configuration.
- Choose the Device Configuration profile you want to work with, and at the top of the page, you’ll see a quick view of the Success, Failure, Conflict, Not Applicable, and In Progress status.
- Click on View report to access more detailed information.
End User Experience
Users may need to restart their devices once to apply this policy. Once the policy is in place, users will not be required to press CTRL + ALT + DEL before signing in on Windows 10 and dismiss it using mouse or keyboard on Windows 11 devices.
If you want to confirm the policy, you can test it by pressing the Windows key + L to lock your computer; it should display the Sign-in page instead of the lock screen.
Disable Windows 10/11 Lock Screen using Group Policy
If the devices are Entra Hybrid joined, you can create a GPO and disable the lock screen on the Windows devices. Let’s check the steps:
- Log in to a Domain Controller as a Doman admin.
- Press the Windows key + R to open the Run dialog box.
- Type
gpmc.mscPress Enter to open the Group Policy Management Console. - Create a GPO object and Navigate to Computer Configuration > Administrative Templates > Control Panel > Personalization.
On the right-hand side, you will find a setting called Do not display the lock screen. Double-click on it and select Enabled. Click on OK to Save and close. After configuring the settings, link this GPO to an Organization Unit containing Windows 10/11 devices.
If you want to configure this setting locally on a Windows 10/11 device, you can type
Useful Tipgpedit.mscin the Run dialog box and press Enter. This will open the Local Group Policy Editor. Navigate to the same setting and enable it.

Disable Windows 10/11 Lock Screen using Registry
You can also disable the Windows 10/11 Lock screen using the Windows registry. Let’s check the steps:
- Login on a Windows 10 or Windows 11 device as an administrator.
- Press the Windows key + R together to open the Run dialog box.
- Type
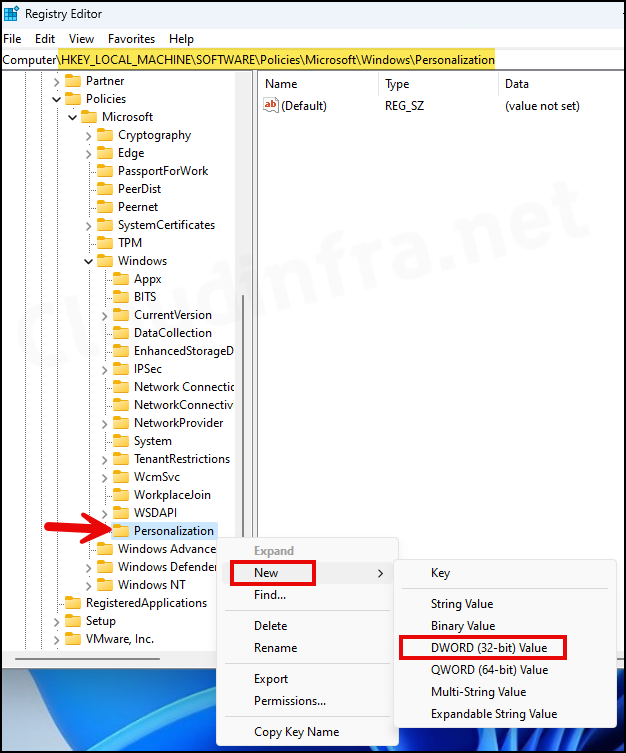
regeditPress Enter to open the Registry Editor. - Navigate to HKEY_LOCAL_MACHINE\SOFTWARE\Policies\Microsoft\Windows. Right-click on it and create a new Key.

- Provide the registry key name as Personalization and right-click on it to create a new DWORD (32-bit) registry entry.

- Provide the name of the registry entry as NoLockScreen and set its value to 1. Close out of the Registry editor after completing the changes.
- Restart your Windows device, and you will notice that the Lock screen is no longer showing. You can directly log in to the device without pressing Ctrl + Alt + Del or dismissing the Lock screen by other means.


Amazingly I have found the answer to disabling my lock screen on W11 very easily. Now the screen goes off after 1 min or more (depending what I have set it to) and I just need to move the mouse and the screen comes on, back to what I was working on. PHEW!
1. click Windows key
2. begin typing in “lock screen settings” even if there is no box to type in. (system settings is the subtitle that comes up under this). This is a different place to where all the instructions have sent me before
3. scroll down to select “screensaver settings” at the bottom of the choices
4. Uncheck “on resume, display log-on screen”, and adjust how soon after the computer is idle that you want the screen to switch off. I set 2 mins. This is separate to the choices on the power settings where I have set 15 mins before the screen goes off.