In this post, I will show you how to install printer drivers and printers using Intune. If your printers are Universal Print compatible, you can take advantage of Microsoft’s cloud-based printing service called Universal Print. It’s simple to set up and manage, but it requires a Universal Print license, and the printers must support the service. With Universal Print, there’s no need for on-premises print servers or printer drivers.
If your printers are not Universal Print compatible or you’re not using the service, you can directly deploy printer drivers and set up printers on users computers through Intune. This approach is especially useful for small and medium-sized businesses (SMBs) where the printer environment is relatively small and not spread across multiple locations.
We will be working with network printers that have an assigned IP address and are accessible over the network. Do not worry, there is no requirement for the printer to be online during the installation process. If the printer is offline, it will simply appear as offline on the user’s device, but this will not prevent the printer driver from being installed or the printer from being set up.
Overall solution involves downloading the printer drivers for your printer model from the vendor’s website, deploying the driver, creating a printer port, and installing the printer with its default settings on target Windows computers, all through Intune. This will be done using a Win32 app deployment method along with a PowerShell script.
First, the printer driver needs to be staged on the computer’s driver store using the built-in command-line utility pnputil.exe. Next, a standard TCP/IP port will be created using Add-PrinterPort, followed by installing the printer driver with Add-PrinterDriver, and finally adding the printer to the device using Add-Printer. The script will also generate detailed logs for each step and save them to a file named Install-Printers.log located at C:\ProgramData\Microsoft\IntuneManagementExtension\Logs. More details about the log file and its contents are provided later in this post.
Contents
Planning Stage
Before we go through the steps to install printer drivers and printers on Windows devices, there are a few important planning considerations to keep in mind. These key points will help ensure a smooth and successful implementation of printer deployment through Intune.
- Download the model-specific printer drivers that are compatible with your printer. Make sure to test the driver manually by sending test print jobs to verify proper functionality. Once you’re confident that the driver works as expected, note down the driver name and the steps/links used to download it.
- Create a document listing the printer names, printer IP addresses, and their compatible driver information. This document will help you organise and manage the deployment process when creating a separate Intune Win32 app for each printer. The table below shows an example of how you can record this information.
| Printer Name | Printer IP | Printer Driver |
|---|---|---|
| Office MFP 3rd Floor | 10.1.1.3 | V3 Xerox Global Print Driver PCL6 |
| Office MFP 2nd Floor | 10.2.1.0 | HP Universal Print Driver for Windows PCL6 |
| Office MFP Ground Floor | 10.3.1.3 | Cannon PostScript 3 Printer Driver V30.02 |
| Ricoh MFP B/W | 192.168.1.4 | Ricoh PCL 6 Driver |
- You can also include any optional settings that may need to be configured for each printer. Although in this guide I’ll be installing the printer driver and printer using their default configuration, you can use a PowerShell script to modify these settings with the Set-PrintConfiguration cmdlet. I’ll show a few examples of how to do this later in the post.
- Ensure that the Print Spooler service is running on the Windows 11 devices where you plan to deploy the printer. This service must be active for the printer installation and printing process to work correctly.
- Always use a digitally signed printer driver downloaded from the printer manufacturer’s official website to avoid compatibility or security issues.
- If your environment has Point and Print restrictions or print driver installation policies, ensure they do not prevent administrators from installing printer drivers in the system context.
Download Printer Drivers
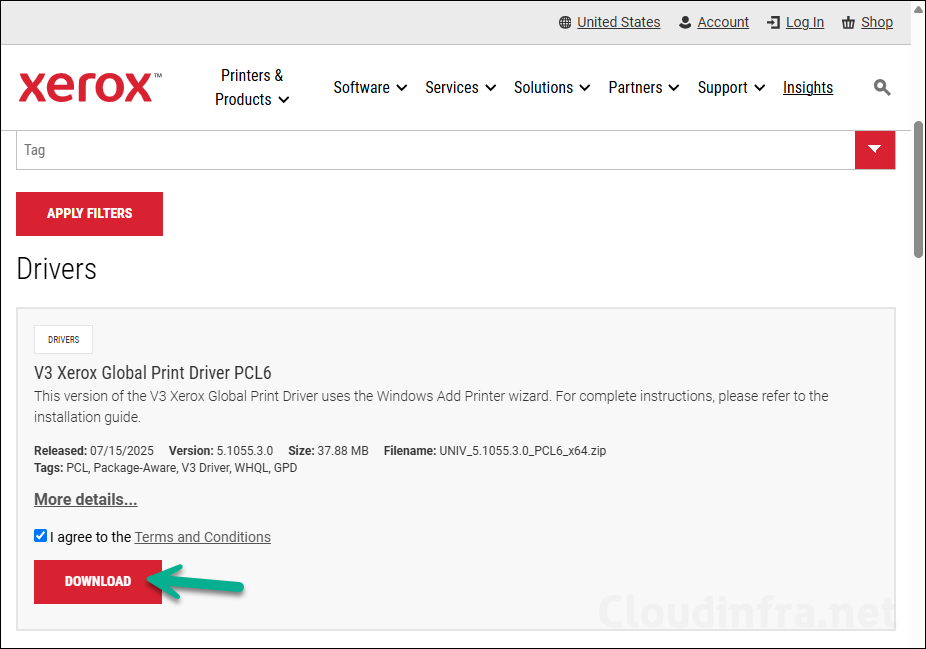
The first step is to download the compatible printer drivers for your printer model from the printer manufacturer’s website. For demonstration purposes, I’ll be using the V3 Xerox Global Print Driver PCL6. The same steps apply to any other printer driver, I picked this driver randomly to show you the process.
Extract the contents of the ZIP file and open the folder that contains the driver package. You will find several files including .DLL, .CAB, a Security Catalog (.CAT) file, and a Setup Information (.INF) file. Every driver package includes a setup information file that contains details required by the system to install the printer driver such as driver files, registry entries, device IDs, catalog file information, and the printer name.
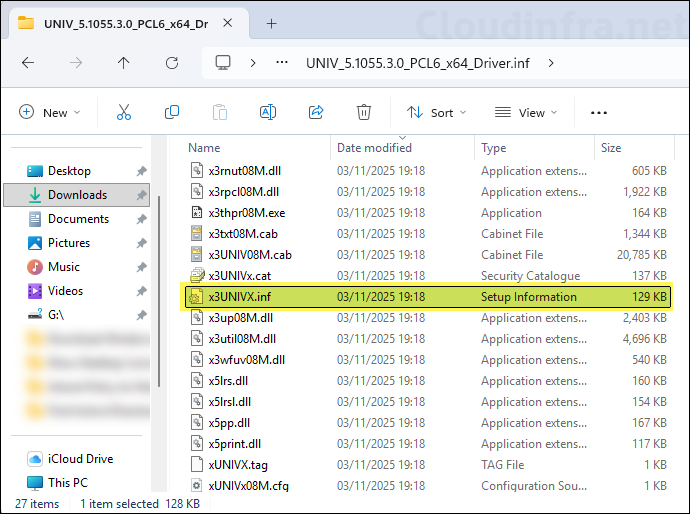
Open the INF file and review its contents to identify the files it references, which will be required for the printer driver installation. At the beginning of the file, you’ll find a reference such as CatalogFile=x3UNIVX.cat. You must include this catalog file in your Intune deployment along with the INF file, as the catalog file is used to verify that the driver package has not been altered after publication by validating its digital signature.
Look for the [SourceDisksNames] section in the INF file, which lists the additional files required for the driver installation. For more information about the different components and files that make up a driver package, refer to the Microsoft Learn article: Components of a Driver Package – Windows Drivers | Microsoft Learn.

Stage Printer Driver to the Driver Store
The next step is to add, or stage, the printer driver to the driver store using the PnPUtil command-line tool. You can open Command Prompt and type pnputil /? to view all available switches for this command. In this process, we will use the /add-driver and /install switches to add the driver.
Below command copies the INF-defined files (INF, CAT, DLLs, and others) into the Windows Driver Store and pre-installs the package so that Windows trusts and can use it. This step does not create a printer or a port; it only makes the driver available in the system. This is different from the Add-PrinterDriver cmdlet, which installs the driver on the device using the Driver Store. The Add-PrinterDriver cmdlet can only succeed if the driver package already exists in the Driver Store.
pnputil /add-driver <path\to\driver.inf> /installStaging V3 Xerox Global Print Driver PCL6
pnputil.exe /add-driver "x3UNIVX.inf" /install
Creating a Standard TCP/IP Printer Port
In the next step, I will create a Standard TCP/IP printer port using the RAW protocol and the default port number 9100. This configuration works for most printers unless your setup specifically requires the LPR protocol. In that case, you’ll need to modify the script to create an LPR printer port. To create the port, use the Add-PrinterPort cmdlet as shown below.
Add-PrinterPort -Name Port_10.1.1.3 -PrinterHostAddress 10.1.1.3Installing Printer Driver
To install the printer driver on the device, use the Add-PrinterDriver cmdlet, which requires the driver name as a parameter. Specify the exact name of the driver that was staged into the driver store to install it successfully. If you provide a name that differs from the one defined in the INF file, the driver installation will fail.
Add-PrinterDriver -Name <DriverName from INF file>
Add-PrinterDriver -Name "Xerox Global Print Driver PCL6"
Installing Printer
Once you have created the printer port and installed the printer driver on the device, you can add the printer to the computer using the Add-Printer command. This command requires the Printer Name, Driver Name, and Printer Port Name as parameters. As noted during the planning stage, you can use the documented printer name and driver name from your reference list. The port information will be automatically created by the PowerShell script used for deployment, which generates the port name based on the printer’s IP address (for example, port_10.1.1.3). You only need to specify the printer IP address when deploying the configuration.
Add-Printer -Name $PrinterName -DriverName $DriverName -PortName $PortName -ErrorAction Stop

Example:
Add-Printer -Name Office MFP 3rd Floor -DriverName V3 Xerox Global Print Driver PCL6 -PortName Port_10.1.1.3
Downloading PowerShell Scripts
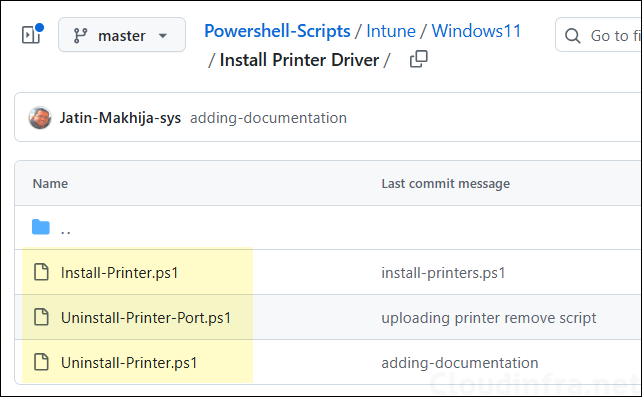
For Intune deployment, I have created PowerShell scripts that perform all the steps mentioned above to install the printer driver and printer on Windows devices. You can download these scripts from my GitHub repository: Install Printer Driver · GitHub.
- Install-Printer.ps1: Use this script to stage the printer driver, create the printer port, install the printer driver, and install the printer.
- Uninstall-Printer.ps1: Use this script to remove the printer from target devices. It does not remove the printer port or printer driver.
- Uninstall-Printer-Port.ps1: Use this script to remove both the printer and its associated port from the target devices. If the port cannot be removed, the script will record the issue in the log file. It does not remove the printer driver.
Create IntuneWin file
Since we’ll be using the Win32 app deployment method, the source files must be packaged in the .intunewin file format. First, we’ll create this package, and then in the next step, we’ll use the generated .intunewin file to create the Win32 app deployment in Intune.
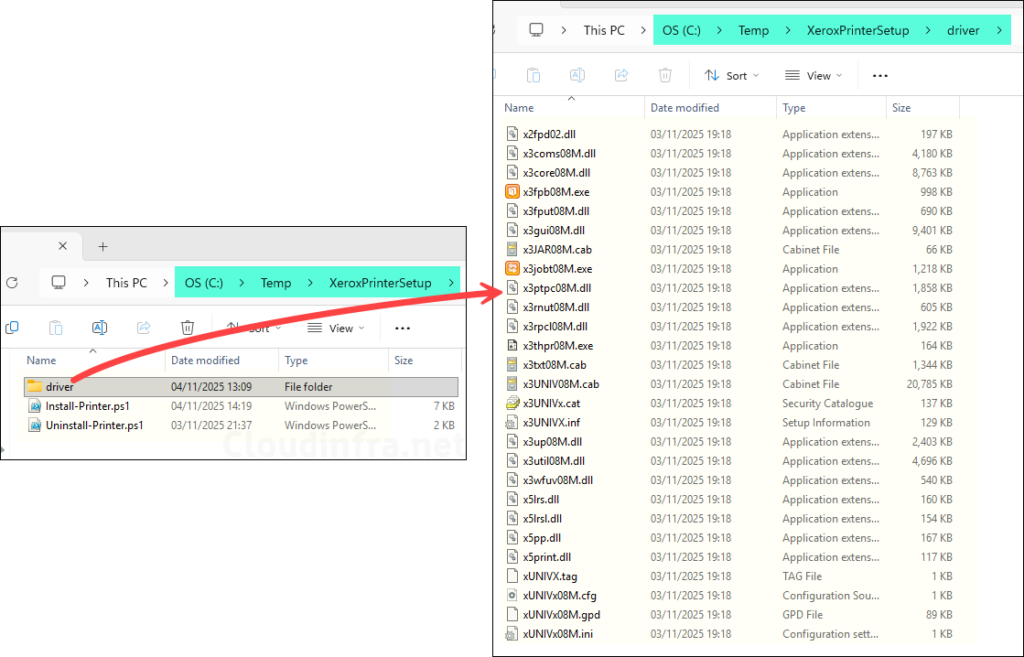
- Create a new folder and give it any name, for example XeroxPrinterSetup.
- Inside the XeroxPrinterSetup folder, copy the Install-Printer.ps1 and Uninstall-Printer.ps1 scripts.
- Create a subfolder named driver and copy all required driver files identified from the .INF file into this folder. For the Xerox driver example, all files were required, so I copied the entire driver package.
One common issue with printer driver deployment is missing files in the source folder, which causes the deployment to fail. Ensure that all necessary driver files required for the installation are included in this folder.
- Download the Microsoft Win32 Content Prep tool and extract it.
- Launch PowerShell console and navigate to the extracted folder.
- Run IntunewinAppUtil.exe:
- Source Folder: C:\Temp\XeroxPrinterSetup
- Setup File: install-printer.ps1
- Output folder: C:\Output
- Catalog folder: Type N and press Enter.
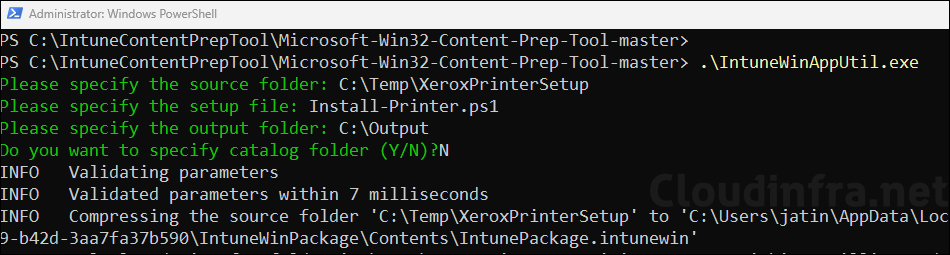
- Check the Output folder (e.g., C:\Output) to locate the .intunewin file.
For more details about creation of Intunewin file, refer to the post: How To Create An IntuneWin File.
Create Win32 App Deployment
Now that the .intunewin file has been created, you can proceed to create a Win32 app deployment in the Intune admin center to deploy the scripts and install the printer on target devices.
- Sign in to the Intune Admin Center > Apps > All Apps.
- Click on + Create and Select Windows app (Win32) from the app type.
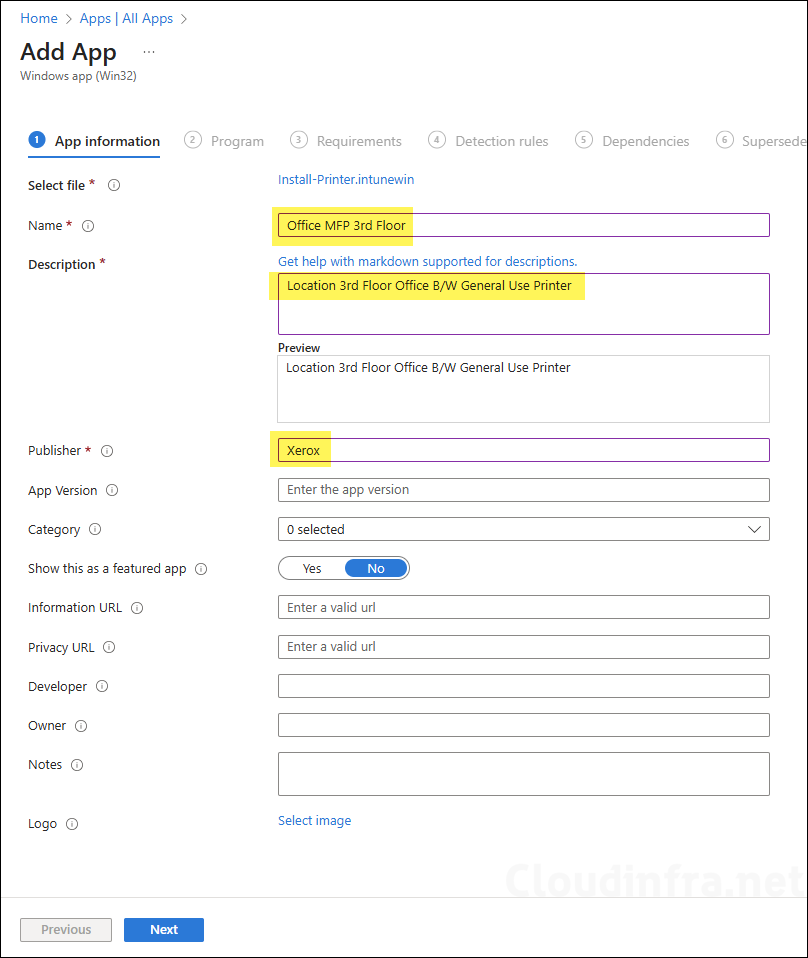
- App Information tab: Click on Select app package file to browse to the intunewin file created in the previous step. Provide a Name, description, and publisher information and click Next.
Program tab
Update the Install commands with respect to your printer. In the below Install command, update PrinterIP, PrinterName, InfPath and DriverName.
Install-Printer.ps1 -PrinterIP 10.1.1.3 -PrinterName “Office MFP 3rd Floor” -InfPath “.\Driver\x3UNIVX.inf” -DriverName “Xerox Global Print Driver PCL6“
- Printer IP: Provide the IP address of your printer.
- PrinterName: Provide the Printer name which will be visible to the users on their computers.
- InfPath: Provide the path of the INF file. Make sure to include .\Driver\ as this is the folder where we had copied all printer driver files including the INF file.
- DriverName: Provide the name of the driver exactly as mentioned in the INF file.
Install command
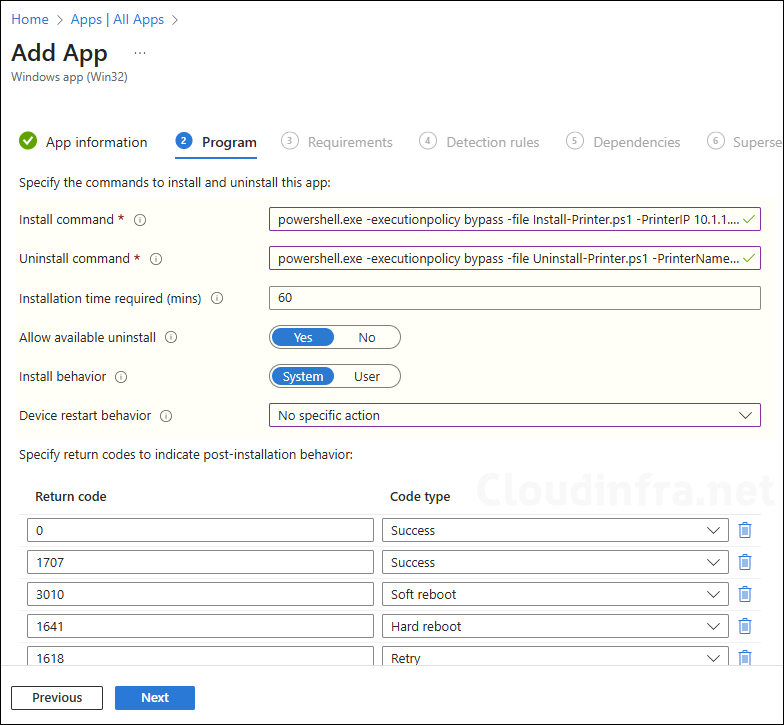
powershell.exe -executionpolicy bypass -file Install-Printer.ps1 -PrinterIP 10.1.1.3 -PrinterName "Office MFP 3rd Floor" -InfPath ".\Driver\x3UNIVX.inf" -DriverName "Xerox Global Print Driver PCL6"Uninstall command
powershell.exe -executionpolicy bypass -file Uninstall-Printer.ps1 -PrinterName "Office MFP 3rd Floor"- Installation time required (mins): Keep default
- Allow available uninstall: Keep default
- Install behavior: System
- Device restart behavior: No specific Action
- Specify return codes to indicate post-installation behavior: Keep default
- Requirements: Specify the requirements that the devices must meet for the printer to be installed.
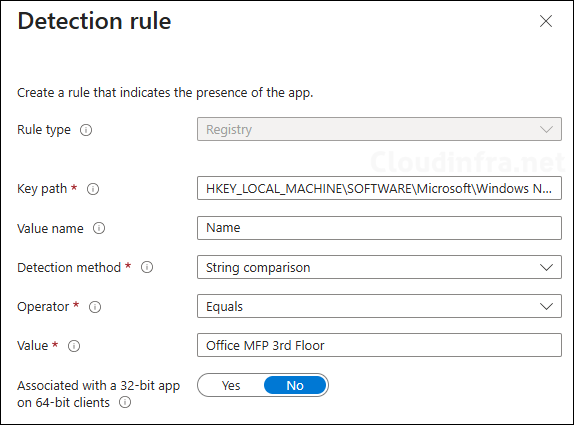
- Detection Rules: Select Manually configure detection rules and click on +Add to add a detection rule.
- Rule Type: Registry
- Path: HKEY_LOCAL_MACHINE\SOFTWARE\Microsoft\Windows NT\CurrentVersion\Print\Printers\Office MFP 3rd Floor
- File or folder: Name
- Detection method: String comparision
- Operator: Equals
- Value: Office MFP 3rd Floor
- Associated with 32-bit app on 64-bit clients: No
- Scope tags (optional): A scope tag in Intune is an RBAC label you add to resources (policies, apps, devices) to limit which admins can see and manage them. For more Information, read: How to use Scope tags in Intune.
- Assignments: Assign the app to Entra security group that contain the the devices on which you want to install the printer driver and specified printer. For guidance on assignment strategy, see Intune assignments: User groups vs. Device groups.
- Review + create: Review the deployment summary and click Create.
Sync Intune Policies
The device check-in process might not begin immediately. If you’re testing this policy on a test device, you can manually kickstart Intune sync from the device itself or remotely through the Intune admin center.
Alternatively, you can use PowerShell to force the Intune sync on Windows devices. Restarting the device is another way to trigger the Intune device check-in process.
Monitoring Printer Deployment
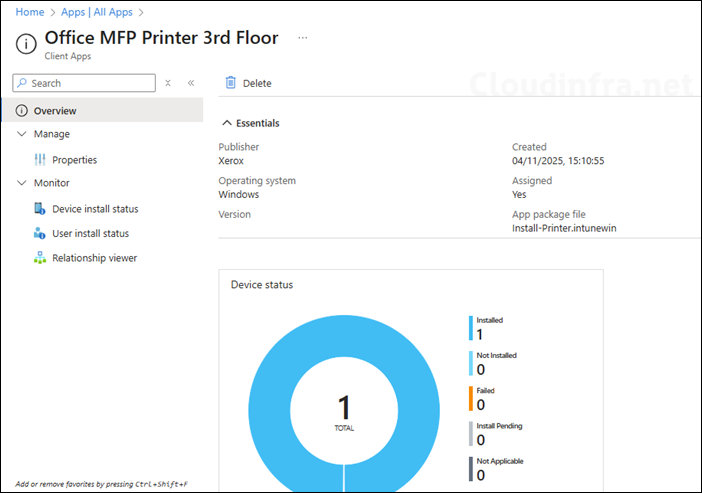
- Sign in to the Intune admin center > Apps > All Apps.
- Select the app deployment for the printer and go to the Overview page to check the installation status.
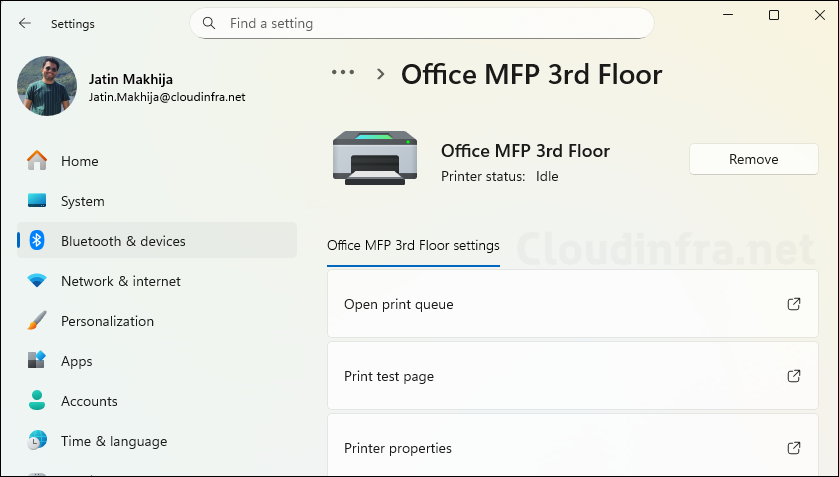
End User Experience
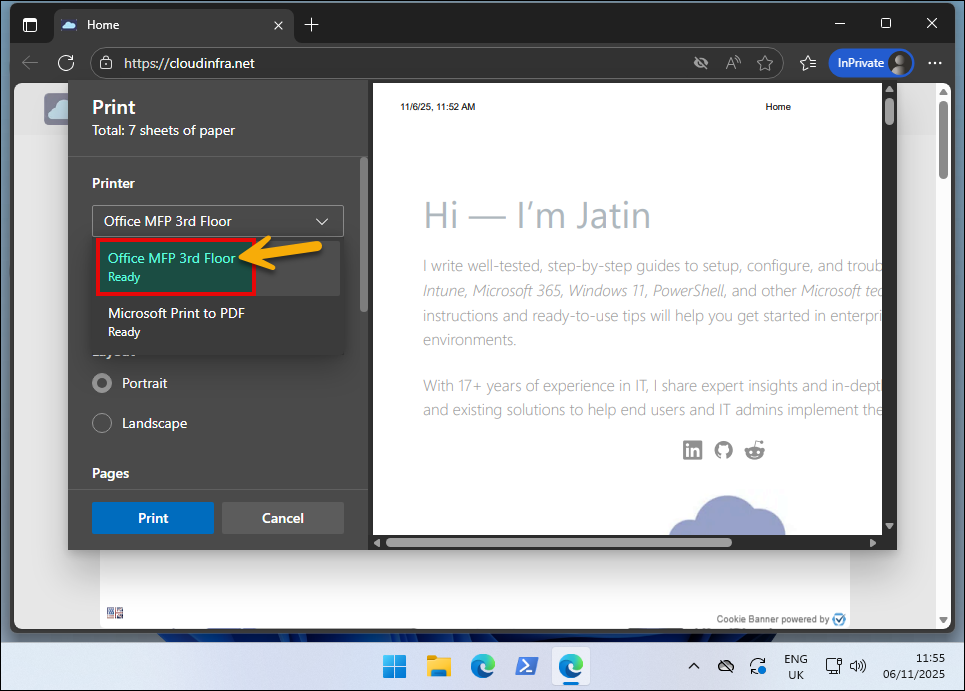
After the deployment completes successfully, the printer will be installed on the user’s device. To verify, open the Settings app and navigate to Bluetooth & devices > Printers & scanners, then confirm that the deployed printer appears in the list.
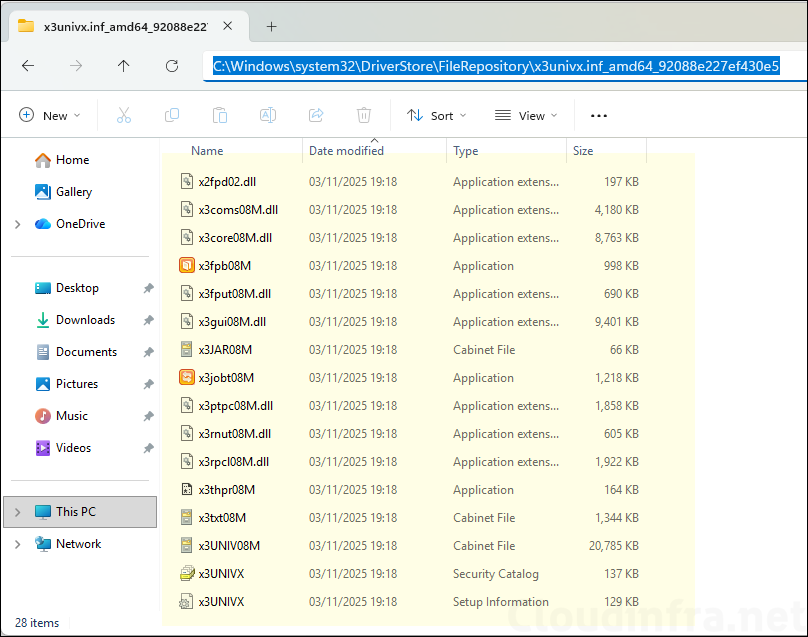
Check and confirm that the printer driver has been correctly staged in the following location: C:\Windows\System32\DriverStore\FileRepository. You should see a folder matching the INF file name, indicating that the driver was successfully added to the Driver Store.
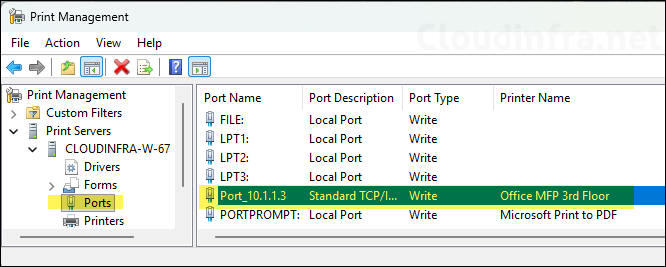
A RAW Standard TCP/IP port named Port_<ip address> will be created using the specified printer IP address. In this deployment, a port named Port_10.1.1.3 has been created for the printer with IP address 10.1.1.3.
The printer driver has been installed successfully on the device.

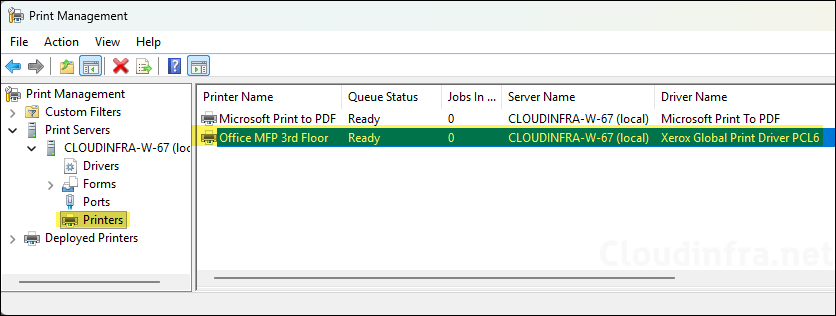
Finally, verify the printer installation to confirm that the printer has been successfully added. The printer will be installed with the default settings.
Troubleshooting
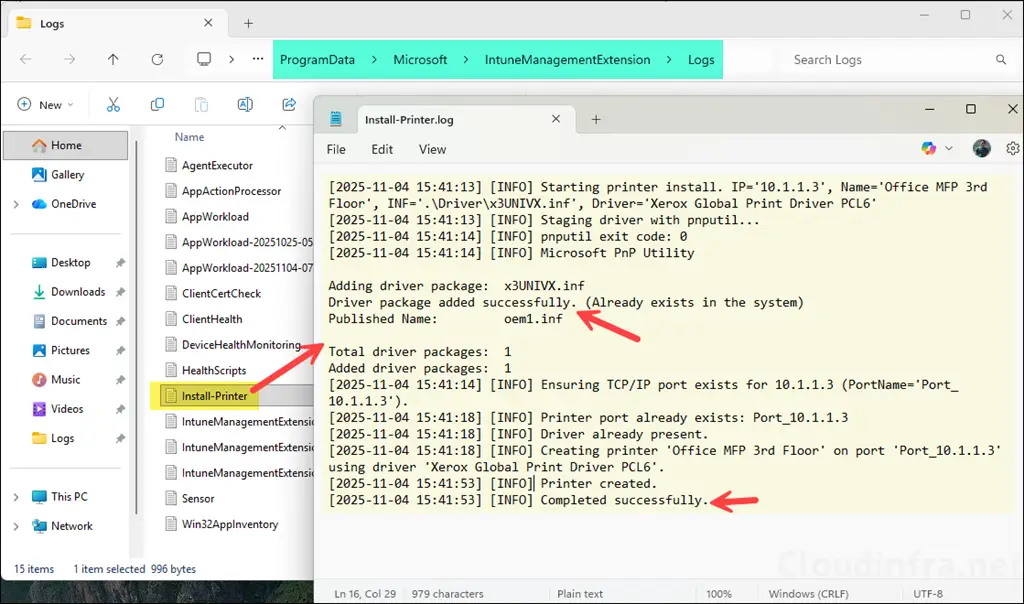
The script creates a log file named Install-Printer.log at the following location: C:\ProgramData\Microsoft\IntuneManagementExtension\Logs. This log file contains detailed information about each step involved in installing the printer driver and printer on the device. If any issues occur, you can review the log to identify which step failed and troubleshoot accordingly. To keep the log file clean and avoid excessive data, the script clears the previous contents on each run, so the log only displays the most recent execution details, whether successful or failed.
Set-PrintConfiguration
The printer will be installed with its default configuration, including settings such as duplex printing, colour mode, paper size, and print quality. You can modify these settings using the Set-PrintConfiguration PowerShell cmdlet. Use the commands below to update the configuration, using the printer deployed in this example.
Get-Printer -Name "Office MFP 3rd Floor"Get-PrintConfiguration -PrinterName "Office MFP 3rd Floor" | Format-List *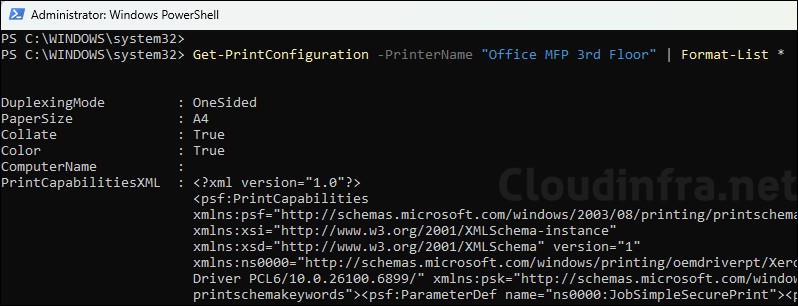
Use below command to update the printer settings.
Set-PrintConfiguration
Set-PrintConfiguration -PrinterName "Office MFP 3rd Floor" -DuplexingMode TwoSidedLongEdge -Color $true -PaperSize A4 -Collate $trueGet-PrintConfiguration
Get-PrintConfiguration -PrinterName "Office MFP 3rd Floor" | Select-Object DuplexingMode, Color, PaperSize, Collate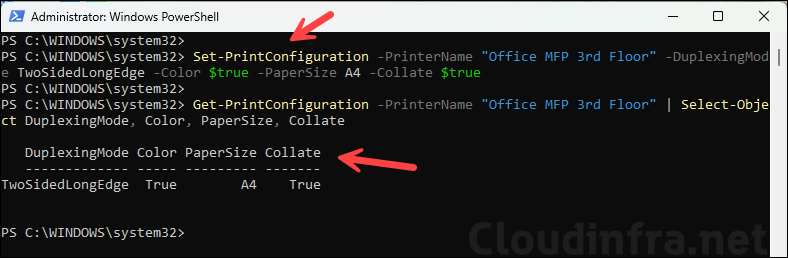
Once you have tested the command, you can create a PowerShell script and deploy it on the devices to change the printer settings. Refer to the guide How To Deploy A PowerShell Script Using Intune for the deployment steps.
Deploying Printer Driver and Printer on Kiosk Devices
The method used to install the printer driver and printer on Intune-managed Windows 11 devices also works for kiosk devices. Simply assign the Win32 app deployment to the Kiosk Devices Entra group. The printer will be automatically deployed and available for kiosk users.
Below screenshot shows the same printer that was previously deployed to a standard Windows 11 device, now successfully deployed to a kiosk device as well. The printer will appear for all the apps specified in the Kiosk XML configuration file.