In this post, I will show you how to setup Multi-app kiosk mode on Windows 11 via Intune. Multi-app kiosk mode is also referred to as restricted user experience. Unlike single-app kiosk mode, this mode allows you to run multiple applications. It shows a minimum/restricted Start menu with only the apps that are allowed. You can configure a locked-down experience for different account types like local user, Active directory domain user or an Entra user. This mode is suitable for shared devices that need multiple tools, like front desk or labs.
- To setup kiosk mode on Windows 11 manually, see: Setup Kiosk Mode On Windows 11.
- To setup single-app kiosk mode on Windows 11 via Intune, see: Single App, Full Screen Kiosk Setup With Intune.
Configuring single-app kiosk mode is relatively straightforward and can be easily done through Intune admin center GUI form. However, configuring multi-app mode is more complex and involves creating and maintaining XML files. Microsoft recommends deploying the XML file with a custom device configuration profile using AssignedAccess CSP. In this guide, we will cover the prerequisites, planning for multi-app kiosk, how to find AUMIDs for the apps you want to allow, steps to create and deploy a multi-app kiosk profile, and finally, the end-user experience.
Contents
Prerequisites
- Windows 11 device enrolled into Intune.
- List of all the applications you want to allow with their AUMIDs.
- An XML configuration file for multi-app kiosk.
Planning for Multi-App Kiosk
- Define the kiosk account model
- Auto sign-in local standard user for unattended kiosks.
- Entra User sign-in if you want per-user audit and conditional access.
- List allowed apps
- UWP apps need AUMID or Package Family Name.
- Win32 apps need full path to the executable.
- Edge can be added with kiosk-friendly arguments.
- Decide the Start experience
- Basic pinned apps via the kiosk profile.
- Optional Start pins policy for a consistent layout.
- Decide the Taskbar experience
- Taskbar should be visible or hidden?
- Which apps you want to pin to the taskbar?
- Choose restrictions
- Decide on File explorer access. By default, file explore access is not allowed. Check if any specific special folder access is required like Downloads and accordingly update the XML.
- Do you want to allow removable drives?
- Secondary tiles using Microsoft Edge
- Decide on if you will be using secondary tiles for MS Edge browser.
- If yes, then you will have to include below apps in
<AllowedApps>tag.
<App DesktopAppPath="%ProgramFiles(x86)%\Microsoft\Edge\Application\msedge.exe" />
<App DesktopAppPath="%ProgramFiles(x86)%\Microsoft\Edge\Application\msedge_proxy.exe" />
<App AppUserModelId="Microsoft.MicrosoftEdge.Stable_8wekyb3d8bbwe!App"/>
Recommendations
- Its recommended to use a standard local user account for public-facing kiosk devices instead of using a domain user or Entra ID user account or a local administrator account. The account should have the least privileges.
- For best experience, I will recommend using automatic logon for kiosk devices.
- Configure Windows update settings for least interruption to the end users. For example, configuring when the updates can occur, update notification level etc. For Windows update policy CSPs, refer to the link: recommendations#windows-update.
- Configure Power settings, like sleep settings and disable users access to shutdown or restart a kiosk device. refer to the link for recommended Power settings: recommendations#power-settings.
- By default, Alt+F4, Alt+tab, Alt + Shift + Tab, Ctrl + Alt + Delete are allowed, use Keyboard filter to block these.
- If you are adding an application under <AllowedApps> tag, ensure that the apps are installed on the kiosk devices before Assigned access XML deployment.
- Do not allow users to access any files or drives if its not required.
- Do not allow removable drive access as well if not required.
- Once you create the kiosk configuration XML file, apply it to test devices which will be used as Kiosk and run through all the scenarios from end users perspective like opening all apps, links, shortcuts, taskbar pins, start menu pins, file explorer content access checks etc.
- Remove lock screen notifications using ./Device/Vendor/MSFT/Policy/Config/AboveLock/AllowToasts, set to 0.
Collect App Information
Once you have decided on the apps which will be allowed to run on the kiosk devices, you will need to collect the apps AUMID information (for UWP apps). For Win32 apps, record the full path to the executable you will allow. Execute below commands to find the AUMID information of the application.
If you do not find the app in the list after running the commands, then it could be possible that the app is not installed. Install the app and then rerun the command to get the AUMID info.
List Start-registered apps with AUMIDs:
Get-StartApps | Sort-Object Name | Format-Table Name, AppID -Auto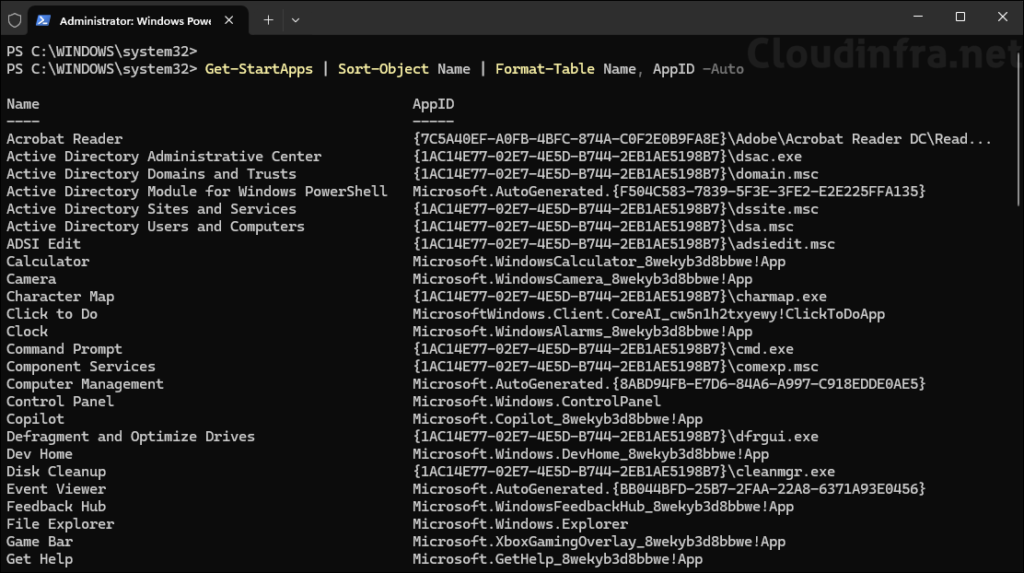
Another way to check the AUMIDs for the apps is to run Get-AppxPackage cmdlet.
Get-AppxPackage
Get-AppxPackage | Select Name, PackageFamilyName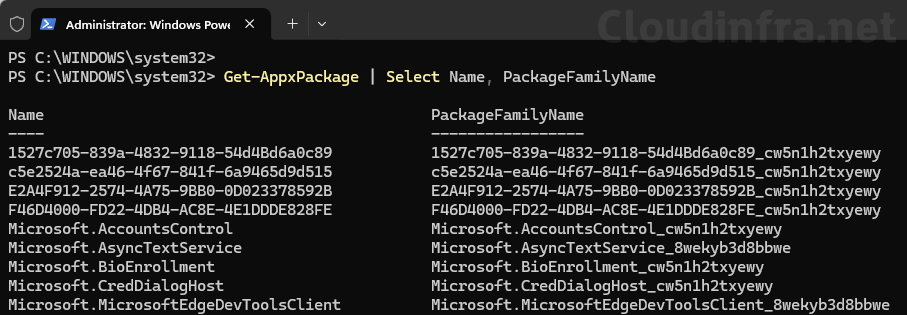
Create XML Configuration File for Multi-App Kiosk
Assigned access multi-app kiosk XML configuration file has a particular schema or structure you need to follow. The two most important tags or sections in the file are <Profiles> …. </Profiles> and <Config>……..</Config>. A configuration file can contain one or more profiles. Each profile is identified by a unique identifier Profile Id and, optionally, a Name. Config section is used to link a standard or admin user or group to a profile. When a user defined in the config section will sign in, its associated profile will get automatically applied. Similar to the profile section, you can have multiple config sections as well. Let’s now understand the structure of XML file and various components.
Root and Schema section
Defines the document root and declares XML namespaces, so the parser knows which feature set is in use (base 2017 plus newer extensions like rs5, v3, v5). Always keep the base namespace default and add versioned prefixes only when you use their elements. If you do not include the schema definition and use a feature from that schema later in the XML, you will not be able to create an Intune policy due to an error “unable to validate the structure of the XML“. Make sure you include the schema if you are using one of its feature.
Example of Schema section
<?xml version="1.0" encoding="utf-8"?>
<AssignedAccessConfiguration
  xmlns="http://schemas.microsoft.com/AssignedAccess/2017/config"
  xmlns:rs5="http://schemas.microsoft.com/AssignedAccess/201810/config"
  xmlns:v3="http://schemas.microsoft.com/AssignedAccess/2020/config"
  xmlns:v5="http://schemas.microsoft.com/AssignedAccess/2022/config">
  ...
</AssignedAccessConfiguration>
Profiles section
Holds one or more Profile definitions. A Profile describes the restricted desktop experience, the allowed apps, and optional UI settings such as Start pins and taskbar behavior.
The Profile Id must be unique within the XML file. You can generate a GUID with the PowerShell cmdlet
New-Guid.
Profiles section
<Profiles>
  <Profile Id="{03578b85-ac78-4f8c-a963-96728bb276e6}">
    ...
  </Profile>
</Profiles>
AllAppsList and AllowedApps
Lists every app the kiosk user is allowed to run. Include UWP apps by AUMID and desktop apps by full path. If an app spans helpers, include those executables too.
If an app has a dependency on another app, you will need to include both the apps in <AllowedApps> tag.
Note
- AppUserModelId: Provide application User Model ID (AUMID) of the UWP app.
- DesktopAppPath: Provide full path to a desktop app executable.
AllAppsList and AllowedApps
<AllAppsList>
        <AllowedApps>
          <App DesktopAppPath="%ProgramFiles(x86)%\Microsoft\Edge\Application\msedge.exe" rs5:AutoLaunch="true" rs5:AutoLaunchArguments="--kiosk https://cloudinfra.net --edge-kiosk-type=public-browsing --kiosk-idle-timeout-minutes=2"/>
          <App DesktopAppPath="%ProgramFiles(x86)%\Microsoft\Edge\Application\msedge_proxy.exe"/>
          <App AppUserModelId="Microsoft.MicrosoftEdge.Stable_8wekyb3d8bbwe!App"/>
          <App DesktopAppPath="%windir%\System32\WindowsPowerShell\v1.0\PowerShell.exe"/>
        </AllowedApps>
</AllAppsList>
AutoLaunch and AutoLaunchArguments
- rs5:AutoLaunch: It is a boolean attribute to specify whether to launch the app (either desktop or UWP app) automatically when the user signs in.
- rs5:AutoLaunchArguments: Use this to pass autolaunch arguments.
AutoLaunch and AutoLaunchArguments
<App DesktopAppPath="%ProgramFiles(x86)%\Microsoft\Edge\Application\msedge.exe" rs5:AutoLaunch="true" rs5:AutoLaunchArguments="--kiosk https://cloudinfra.net --edge-kiosk-type=public-browsing --kiosk-idle-timeout-minutes=2"/>File Explorer Restrictions (rs5 and v3)
When you use multi-app kiosk mode, folder browsing is by default locked down, even though you do not include <rs5:FileExplorerNamespaceRestrictions></rs5:FileExplorerNamespaceRestrictions> in your XML file. You would use this tag when you want to explicitly allow special known folders such as downloads, desktops, pictures etc. This section is also used if you want to allow removable drives.
Use this tag to block everything. However, if you don’t include it in your XML file, all file explore locations are blocked by default. Therefore, you don’t need to include this tag if your goal is to block everything.
<rs5:FileExplorerNamespaceRestrictions>
</rs5:FileExplorerNamespaceRestrictions>
Only Allow Removable drives
<rs5:FileExplorerNamespaceRestrictions>
    <v3:AllowRemovableDrives />
</rs5:FileExplorerNamespaceRestrictions>
Only Allow Downloads folder
<rs5:FileExplorerNamespaceRestrictions>
 <rs5:AllowedNamespace Name="Downloads"/>
 </rs5:FileExplorerNamespaceRestrictions>
Allow both Downloads folder and Removable drives
<rs5:FileExplorerNamespaceRestrictions>
  <rs5:AllowedNamespace Name="Downloads" />
  <v3:AllowRemovableDrives />
</rs5:FileExplorerNamespaceRestrictions>
Allow everything – No restrictions
<rs5:FileExplorerNamespaceRestrictions>
    <v3:NoRestriction />
</rs5:FileExplorerNamespaceRestrictions>
Start pins for Windows 11 (v5)
You must include this block for configuring multi-app kiosk mode. <Startpins> block contains the list of apps you want to pin to the Start menu. You would typically pin all the apps which are in the <AllowedApps> list. However, you can also choose to not pin all of those apps which are allowed and pin it to the taskbar instead.
If you need to create a secondary tile in Microsoft Edge, include a secondaryTile block and define parameters such as title, arguments, displayName, packageAppId, smallIconPath, smallIcon, and largeIconPath. Below code pins Microsoft Edge browser, PowerShell, and creates a secondary tile which points to https://cloudinfra.net website.
To simplify the process, sign in to a Windows 11 device and customize the Start menu by pinning the apps you want on the kiosk device. Then, use PowerShell to export the layout to a JSON file with the command: Export-StartLayout -Path “C:\Temp\LayoutModification.json”. Next, copy the pinnedList section from the exported file and add it to the <Startpins> block.
Start pins for Windows 11 (v5)
<v5:StartPins>
        <![CDATA[
        {
          "pinnedList": [
            {
              "desktopAppLink": "%ALLUSERSPROFILE%\\Microsoft\\Windows\\Start Menu\\Programs\\Microsoft Edge.lnk"
            },
            {
              "desktopAppLink": "%APPDATA%\\Microsoft\\Windows\\Start Menu\\Programs\\Windows PowerShell\\Windows PowerShell.lnk"
            },
            {
              "secondaryTile": {
                "tileId": "MSEdge._pin_mjalfbhoimpkfjlpajnjkpknoe",
                "arguments": " --pin-url=https://cloudinfra.net --profile-directory=Default --launch-tile",
                "displayName": "Cloudinfra Webpage",
                "packagedAppId": "Microsoft.MicrosoftEdge.Stable_8wekyb3d8bbwe!App",
                "smallIconPath": "ms-appdata:///local/Pins/MSEdge._pin_mjalfbhoimpkfjlpajnjkpknoe/ContosoLogo.png",
                "smallIcon": "iVBORw0KGgoAAAANSUhEUgAAADQAAAA0CAYAAADFeBvrAAAACXBIWXMAAAInAAACJwG+ElQIAAABaWlDQ1BEaXNwbGF5IFAzAAB4nHWQvUvDUBTFT6tS0DqIDh0cMolD1NIKdnFoKxRFMFQFq1OafgltfCQpUnETVyn4H1jBWXCwiFRwcXAQRAcR3Zw6KbhoeN6XVNoi3sfl/Ticc7lcwBtQGSv2AijplpFMxKS11Lrke4OHnlOqZrKooiwK/v276/PR9d5PiFlNu3YQ2U9cl84ul3aeAlN//V3Vn8maGv3f1EGNGRbgkYmVbYsJ3iUeMWgp4qrgvMvHgtMunzuelWSc+JZY0gpqhrhJLKc79HwHl4plrbWD2N6f1VeXxRzqUcxhEyYYilBRgQQF4X/8044/ji1yV2BQLo8CLMpESRETssTz0KFhEjJxCEHqkLhz634PrfvJbW3vFZhtcM4v2tpCAzidoZPV29p4BBgaAG7qTDVUR+qh9uZywPsJMJgChu8os2HmwiF3e38M6Hvh/GMM8B0CdpXzryPO7RqFn4Er/QcXKWq8MSlPPgAABFZJREFUeAHdWu1RajEQ3ev4X61AXgX6KhA68FWgrwLpAK0AO0ArUCsQKxArECsAK8jLuTNh9i3J5uMGBc9MhivmY0/2ZEk2l8jCGDOyZWF2FxNbeuDS2Iex/RzS7mPaNM0AhBb2j0P6Gfi1Txsms1wu6fPzs/1E6fV6dHBwQIeHGxm2t0+V8fLyQrPZjKbTafs5n8+99UDo9PSUzs/Pqd/v08nJCVWBqYDFYmGur6+NNdCgy5KCtnd3d6Yj+lhDhjrg5uaGbm9vWzlJwAuQGDzBAa/Be742qG8nhy4uLqgAg2IPvb6+Gjt4dNaHw6Gx8vP28f7+biaTibGSW2uLvvH/XA8VEbIeyZYUDISkQkbi+8vLy7V2kPJGCWGAkMGYaRiFz9B6Qj3NSBCTHoOXN0JIkrFrxIxGo+CsI1g8PDx4Zx7Enp+fg2OhX14ffVQlJMlg1mBwChwx35rTvIU2mLQM+aURQsfcCMxeCgkYEAscLniEJgfBh9eNhPY4IciJGxUj44jwmU0NGiHpjsfj/2SuRL84Ia7/mI4leWcAFjkkiugIsnj2BQ20DXmKBwolSOiEYGDKDAKQBveKCxjaOvOFahgugd8x3jc8VkSID6ZpV3oGRqUGDADRjrfnHsC4nLDdQWhdhQlJ76i9MDlEBjTaeNwLCEQysiYEozAhbElSvMPraWsgBTKa5kZWoxHis66tHS6Vgr3XGiC3QjKt2V5CmGVtkTpgsabUywHG5tKDAjLQ3yMP3t7eVs9y68/x+Pi4erYBhGoARw5Loj342WCR3a/3xGqls3rWCOFM41DtxGkBMigl8Hro4+Nj9Xx8fBxszAlpxL8SXkL8JKklM1w9nDK3BVFCR0dH3oah5Md3Yy9WwUYd7/cbSkN1hpcQl5AvkQGAkCO1Td7yEuKBgAcICR4IeID4TngJpRrK6yHBWAv39/c0GAzaZGU2Qr/WlLADwC6ZKu8U5M49M/mYtpfTNpy8npb0SEXHVFaYEM+9aR1yL2m5gRTwnbs8wieSChPisss5DyWmm9Ygz0OQmkxldc762P1U0YkV7XKOEvKIzU+s3GsJE6YT4nLCgLH8ACflUr9aG/xPnn8gW4mM/Fw/mvXhA5ZkfVwEhBFYlyjoMzdBz4NFcdYHkAeumI5RX2o/pWhkeICKZJ/ihAAuvdSIg0FD+TefB78sc+rgS56nLnwYi8Xtk6N2syCDRaesjw+SFAyEQdrtA4zi0ZK31X6I5R1UYnosj5CPFDfQ3Q+BQEhqsYzql94PxUhpJUYklORX0r71CAGhEO2TZEhaIAFphUJ4wd6w+y04bqyx3fcd8ty7CDLngENj6B0GtLm6umr7LUD5LTiHu81OudwiJXTDW102t1U8JIGZf3p6Wr1Joh3h8QYJytnZWa002KA6IQn3jg/k5fIQPB9RGT/ubazfyClsR3ajO+ZN08xA6C/+oN3G3JY/eGjcN1Z6WJW7KL0lPOP++AdqljW+tM7PvwAAAABJRU5ErkJggg==",
                "largeIconPath": "ms-appdata:///local/Pins/MSEdge._pin_mjalfbhoimpkfjlpajnjkpknoe/ContosoLogo.png"
              }
            }
          ]
        }
        ]]>
      </v5:StartPins>
Taskbar Visibility
Show or hide the taskbar for the kiosk session. Hiding can simplify the experience but makes window switching harder. If you decide to show the taskbar, you can customize the layout by adding pinned apps as shown in the next section.
Taskbar visibility
<Taskbar ShowTaskbar="true" />Taskbar Layout Pins (v5)
You can pin applications to the taskbar using <v5:TaskbarLayout> section. As per below code, I am pinning PowerShell and Edge browsers to the taskbar. My code does not use <CustomTaskbarLayoutCollection PinListPlacement=”Replace”> that means you may also find default Pins like File explorer pinned to the taskbar. If you want to replace all the pins with the one you specify in the code then use <CustomTaskbarLayoutCollection PinListPlacement=”Replace”>
Taskbar layout pins (v5)
<v5:TaskbarLayout>
        <![CDATA[
        <?xml version="1.0" encoding="utf-8"?>
        <LayoutModificationTemplate
            xmlns="http://schemas.microsoft.com/Start/2014/LayoutModification"
            xmlns:defaultlayout="http://schemas.microsoft.com/Start/2014/FullDefaultLayout"
            xmlns:start="http://schemas.microsoft.com/Start/2014/StartLayout"
            xmlns:taskbar="http://schemas.microsoft.com/Start/2014/TaskbarLayout"
            Version="1">
          <CustomTaskbarLayoutCollection>
            <defaultlayout:TaskbarLayout>
              <taskbar:TaskbarPinList>
                <taskbar:DesktopApp DesktopApplicationLinkPath="%APPDATA%\Microsoft\Windows\Start Menu\Programs\Windows PowerShell\Windows PowerShell.lnk"/>
                <taskbar:DesktopApp DesktopApplicationLinkPath="%ALLUSERSPROFILE%\Microsoft\Windows\Start Menu\Programs\Microsoft Edge.lnk"/>
              </taskbar:TaskbarPinList>
            </defaultlayout:TaskbarLayout>
          </CustomTaskbarLayoutCollection>
        </LayoutModificationTemplate>
        ]]>
      </v5:TaskbarLayout>
Add this code to Pin Settings app to the taskbar
<taskbar:DesktopApp DesktopApplicationID="windows.immersivecontrolpanel_cw5n1h2txyewy!microsoft.windows.immersivecontrolpanel" />Add this code to Pin Windows Explorer to the taskbar
<taskbar:DesktopApp DesktopApplicationID="Microsoft.Windows.Explorer" />Configs Section
Use this section to bind a user or group to a profile. When a user signs in to the device, its associated profile is automatically applied. You can add multiple profiles and configuration sections to assign different profiles to different accounts.
You can also define an assigned access profile and use the GlobalProfile tag (shown in the next section) in the config section to bind it to the profile ID. This applies the profile to all non-admin users who sign in to the device. However, if a specific user is assigned to a different profile, that user-specific profile takes priority over the global profile.
Config section below includes the code <AutoLogonAccount rs5:DisplayName=”Cloudinfra Kiosk”/>, which defines the display name of the auto-logon account. You cannot specify the account name, as it is automatically created with the default name, kioskUser0.
Configs
  <Configs>
    <Config>
      <AutoLogonAccount rs5:DisplayName="Cloudinfra Kiosk"/>
      <DefaultProfile Id="{03578b85-ac78-4f8c-a963-96728bb276e6}"/>
    </Config>
  </Configs>
Target a specific account
Autologon account does not allow you to specify a custom local user account for kiosk devices. If you want to use a custom account then you can use below config code. You need to ensure that the local user account exists before you apply the XML profile.
To create a local user acount using Intune, you can refer to my other post: Create a Local Admin using Intune and PowerShell. Only use step 1 of the post to create a local user account, in the step 2, the account is added to the local administrators group, do not use Step 2, as we don’t want to make this user a local administrator and keep it as a standard local user account.
Using Local User Account
<Config>
  <Account>user</Account>
  <DefaultProfile Id="{GUID}"/>
</Config>
You can also use an Entra ID user account for kiosk devices. The format of the account is AzureAD\{UPN}. The below config section for an Entra user will not setup autologon. If you want to setup autologon for an Entra user on a Multi-app kiosk device, refer to the post Setup Entra User Autologon in Intune Multi-App Kiosk Mode.
Using Entra ID User Account
<Config>
  <Account>AzureAD\jatin@cloudinfra.onmicrosoft.com</Account>
  <DefaultProfile Id="{GUID}"/>
</Config>
Optional: Global profile
Apply the same restricted experience to all non admin users when you do not want to enumerate accounts individually.
Optional: Global profile
<Configs>
  <v3:GlobalProfile Id="{GUID}"/>
</Configs>
Putting It All Together
We have seen different sections of XML configuration file; let’s finalize the configuration by including all the sections in the XML file. This file will be required when we will be creating an Intune deployment for multi-app kiosk. You can also download this XML file from my GitHub repo: multi-app-kiosk-v3.xml.
multi-app-kiosk-v3.xml
<?xml version="1.0" encoding="utf-8"?>
<AssignedAccessConfiguration
  xmlns="http://schemas.microsoft.com/AssignedAccess/2017/config"
  xmlns:rs5="http://schemas.microsoft.com/AssignedAccess/201810/config"
  xmlns:v5="http://schemas.microsoft.com/AssignedAccess/2022/config">

  <Profiles>
    <Profile Id="{03578b85-ac78-4f8c-a963-96728bb276e6}">
      <AllAppsList>
        <AllowedApps>
          <App DesktopAppPath="%ProgramFiles(x86)%\Microsoft\Edge\Application\msedge.exe" rs5:AutoLaunch="true" rs5:AutoLaunchArguments="--kiosk https://cloudinfra.net --edge-kiosk-type=public-browsing --kiosk-idle-timeout-minutes=2"/>
          <App DesktopAppPath="%ProgramFiles(x86)%\Microsoft\Edge\Application\msedge_proxy.exe"/>
          <App AppUserModelId="Microsoft.MicrosoftEdge.Stable_8wekyb3d8bbwe!App"/>
          <App DesktopAppPath="%windir%\System32\WindowsPowerShell\v1.0\PowerShell.exe"/>
        </AllowedApps>
      </AllAppsList>

      <rs5:FileExplorerNamespaceRestrictions>
      <rs5:AllowedNamespace Name="Downloads"/>
      </rs5:FileExplorerNamespaceRestrictions>

      <v5:StartPins>
        <![CDATA[
        {
          "pinnedList": [
            {
              "desktopAppLink": "%ALLUSERSPROFILE%\\Microsoft\\Windows\\Start Menu\\Programs\\Microsoft Edge.lnk"
            },
            {
              "desktopAppLink": "%APPDATA%\\Microsoft\\Windows\\Start Menu\\Programs\\Windows PowerShell\\Windows PowerShell.lnk"
            },
            {
              "secondaryTile": {
                "tileId": "MSEdge._pin_mjalfbhoimpkfjlpajnjkpknoe",
                "arguments": " --pin-url=https://cloudinfra.net --profile-directory=Default --launch-tile",
                "displayName": "Cloudinfra Webpage",
                "packagedAppId": "Microsoft.MicrosoftEdge.Stable_8wekyb3d8bbwe!App",
                "smallIconPath": "ms-appdata:///local/Pins/MSEdge._pin_mjalfbhoimpkfjlpajnjkpknoe/ContosoLogo.png",
                "smallIcon": "iVBORw0KGgoAAAANSUhEUgAAADQAAAA0CAYAAADFeBvrAAAACXBIWXMAAAInAAACJwG+ElQIAAABaWlDQ1BEaXNwbGF5IFAzAAB4nHWQvUvDUBTFT6tS0DqIDh0cMolD1NIKdnFoKxRFMFQFq1OafgltfCQpUnETVyn4H1jBWXCwiFRwcXAQRAcR3Zw6KbhoeN6XVNoi3sfl/Ticc7lcwBtQGSv2AijplpFMxKS11Lrke4OHnlOqZrKooiwK/v276/PR9d5PiFlNu3YQ2U9cl84ul3aeAlN//V3Vn8maGv3f1EGNGRbgkYmVbYsJ3iUeMWgp4qrgvMvHgtMunzuelWSc+JZY0gpqhrhJLKc79HwHl4plrbWD2N6f1VeXxRzqUcxhEyYYilBRgQQF4X/8044/ji1yV2BQLo8CLMpESRETssTz0KFhEjJxCEHqkLhz634PrfvJbW3vFZhtcM4v2tpCAzidoZPV29p4BBgaAG7qTDVUR+qh9uZywPsJMJgChu8os2HmwiF3e38M6Hvh/GMM8B0CdpXzryPO7RqFn4Er/QcXKWq8MSlPPgAABFZJREFUeAHdWu1RajEQ3ev4X61AXgX6KhA68FWgrwLpAK0AO0ArUCsQKxArECsAK8jLuTNh9i3J5uMGBc9MhivmY0/2ZEk2l8jCGDOyZWF2FxNbeuDS2Iex/RzS7mPaNM0AhBb2j0P6Gfi1Txsms1wu6fPzs/1E6fV6dHBwQIeHGxm2t0+V8fLyQrPZjKbTafs5n8+99UDo9PSUzs/Pqd/v08nJCVWBqYDFYmGur6+NNdCgy5KCtnd3d6Yj+lhDhjrg5uaGbm9vWzlJwAuQGDzBAa/Be742qG8nhy4uLqgAg2IPvb6+Gjt4dNaHw6Gx8vP28f7+biaTibGSW2uLvvH/XA8VEbIeyZYUDISkQkbi+8vLy7V2kPJGCWGAkMGYaRiFz9B6Qj3NSBCTHoOXN0JIkrFrxIxGo+CsI1g8PDx4Zx7Enp+fg2OhX14ffVQlJMlg1mBwChwx35rTvIU2mLQM+aURQsfcCMxeCgkYEAscLniEJgfBh9eNhPY4IciJGxUj44jwmU0NGiHpjsfj/2SuRL84Ia7/mI4leWcAFjkkiugIsnj2BQ20DXmKBwolSOiEYGDKDAKQBveKCxjaOvOFahgugd8x3jc8VkSID6ZpV3oGRqUGDADRjrfnHsC4nLDdQWhdhQlJ76i9MDlEBjTaeNwLCEQysiYEozAhbElSvMPraWsgBTKa5kZWoxHis66tHS6Vgr3XGiC3QjKt2V5CmGVtkTpgsabUywHG5tKDAjLQ3yMP3t7eVs9y68/x+Pi4erYBhGoARw5Loj342WCR3a/3xGqls3rWCOFM41DtxGkBMigl8Hro4+Nj9Xx8fBxszAlpxL8SXkL8JKklM1w9nDK3BVFCR0dH3oah5Md3Yy9WwUYd7/cbSkN1hpcQl5AvkQGAkCO1Td7yEuKBgAcICR4IeID4TngJpRrK6yHBWAv39/c0GAzaZGU2Qr/WlLADwC6ZKu8U5M49M/mYtpfTNpy8npb0SEXHVFaYEM+9aR1yL2m5gRTwnbs8wieSChPisss5DyWmm9Ygz0OQmkxldc762P1U0YkV7XKOEvKIzU+s3GsJE6YT4nLCgLH8ACflUr9aG/xPnn8gW4mM/Fw/mvXhA5ZkfVwEhBFYlyjoMzdBz4NFcdYHkAeumI5RX2o/pWhkeICKZJ/ihAAuvdSIg0FD+TefB78sc+rgS56nLnwYi8Xtk6N2syCDRaesjw+SFAyEQdrtA4zi0ZK31X6I5R1UYnosj5CPFDfQ3Q+BQEhqsYzql94PxUhpJUYklORX0r71CAGhEO2TZEhaIAFphUJ4wd6w+y04bqyx3fcd8ty7CDLngENj6B0GtLm6umr7LUD5LTiHu81OudwiJXTDW102t1U8JIGZf3p6Wr1Joh3h8QYJytnZWa002KA6IQn3jg/k5fIQPB9RGT/ubazfyClsR3ajO+ZN08xA6C/+oN3G3JY/eGjcN1Z6WJW7KL0lPOP++AdqljW+tM7PvwAAAABJRU5ErkJggg==",
                "largeIconPath": "ms-appdata:///local/Pins/MSEdge._pin_mjalfbhoimpkfjlpajnjkpknoe/ContosoLogo.png"
              }
            }
          ]
        }
        ]]>
      </v5:StartPins>

      <Taskbar ShowTaskbar="true"/>
      <v5:TaskbarLayout>
        <![CDATA[
        <?xml version="1.0" encoding="utf-8"?>
        <LayoutModificationTemplate
            xmlns="http://schemas.microsoft.com/Start/2014/LayoutModification"
            xmlns:defaultlayout="http://schemas.microsoft.com/Start/2014/FullDefaultLayout"
            xmlns:start="http://schemas.microsoft.com/Start/2014/StartLayout"
            xmlns:taskbar="http://schemas.microsoft.com/Start/2014/TaskbarLayout"
            Version="1">
          <CustomTaskbarLayoutCollection>
            <defaultlayout:TaskbarLayout>
              <taskbar:TaskbarPinList>
                <taskbar:DesktopApp DesktopApplicationLinkPath="%APPDATA%\Microsoft\Windows\Start Menu\Programs\Windows PowerShell\Windows PowerShell.lnk"/>
                <taskbar:DesktopApp DesktopApplicationLinkPath="%ALLUSERSPROFILE%\Microsoft\Windows\Start Menu\Programs\Microsoft Edge.lnk"/>
              </taskbar:TaskbarPinList>
            </defaultlayout:TaskbarLayout>
          </CustomTaskbarLayoutCollection>
        </LayoutModificationTemplate>
        ]]>
      </v5:TaskbarLayout>
    </Profile>
  </Profiles>

  <Configs>
    <Config>
      <AutoLogonAccount rs5:DisplayName="Cloudinfra Kiosk"/>
      <DefaultProfile Id="{03578b85-ac78-4f8c-a963-96728bb276e6}"/>
    </Config>
  </Configs>

</AssignedAccessConfiguration>
Deploying Multi-App Kiosk Configuration
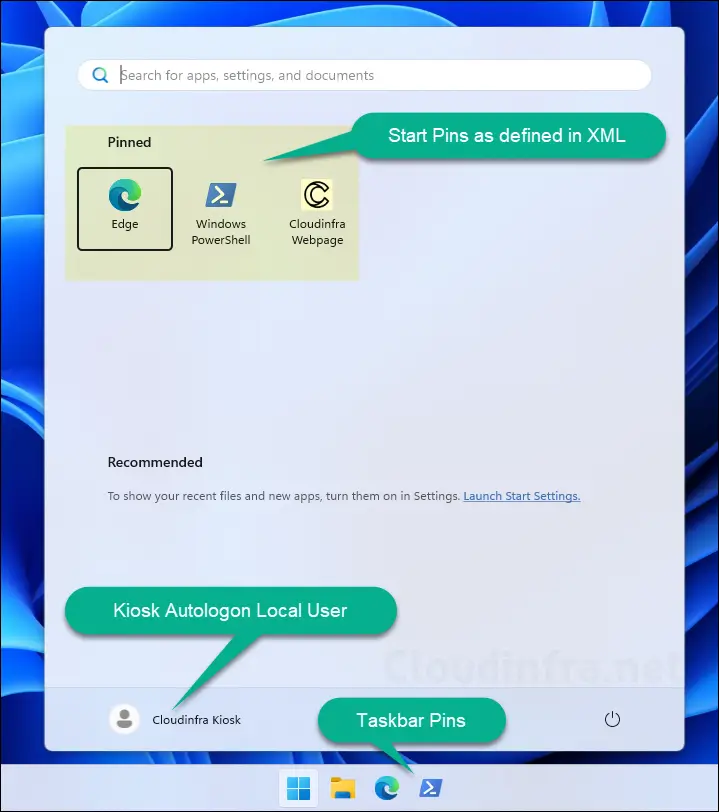
In the next steps, I will create a custom device configuration profile using the AssignedAccess CSP. The OMA-URI setting which I will use is ./Vendor/MSFT/AssignedAccess/Configuration. Once this profile is applied to the devices, the multi-app kiosk mode will take effect. Since an auto-logon account is configured, the device will automatically sign in after each restart and launch the website, https://cloudinfra.net (as per XML file). You’ll also see the Start menu pins, taskbar pins, and overall setup as defined in the configuration file.
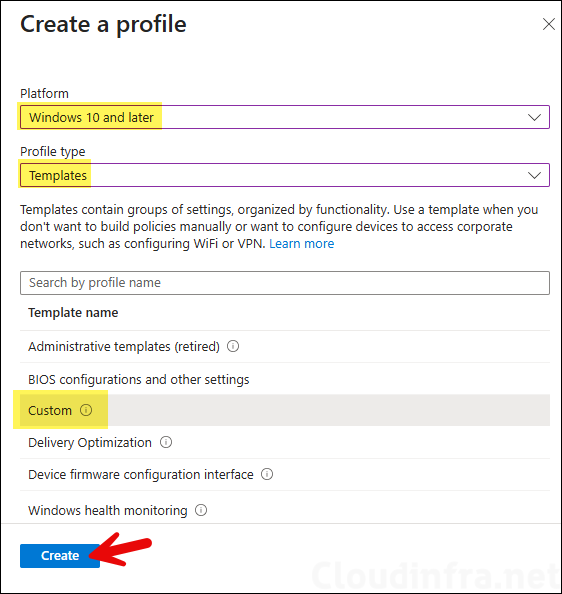
- Sign in to the Intune admin center and go to Devices > Windows > Configuration > + Create > New Policy. Platform: Select Windows 10 and later, Profile type: Select Templates.
- Template name: Select Custom.
- On the Basics page, provide a name and description of the profile.
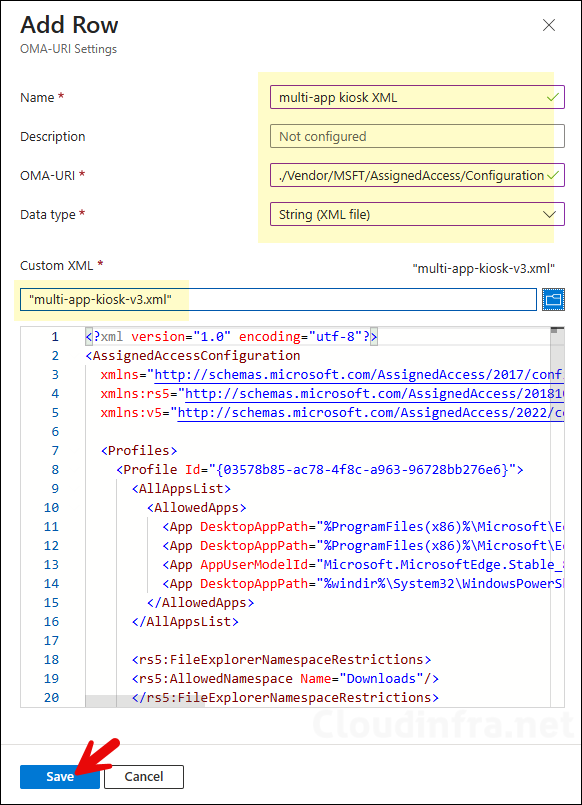
- On the Configuration settings page, click Add and add below OMA-URI settings:
- Name: multi-app kiosk XML.
- Description: Add a description
- OMA-URI: ./Vendor/MSFT/AssignedAccess/Configuration
- Data type: String (XML file) and browse to the XML config file.
- Scope tags (optional): A scope tag in Intune is an RBAC label you add to resources (policies, apps, devices) to limit which admins can see and manage them. For more Information, read: How to use Scope tags in Intune.
- Assignments: Assign the policy to Entra security group that contain the Windows kiosk devices. As a best practice, pilot with a small set first; once validated, roll it out more broadly. For guidance on assignment strategy, see Intune assignments: User groups vs. Device groups.
- Applicability Rules (optional): Here, you can add the rules for applying this policy. For example: Assign this profile only if the OS edition is Windows 11 Enterprise. Intune will only apply the profile to devices that meet the combined criteria of these rules.
- Review + create: Review the deployment summary and click Create.
Sync Intune Policies
The device check-in process might not begin immediately. If you’re testing this policy on a test device, you can manually kickstart Intune sync from the device itself or remotely through the Intune admin center.
Alternatively, you can use PowerShell to force the Intune sync on Windows devices. Restarting the device is another way to trigger the Intune device check-in process.
Monitoring Intune Policy Deployment
- Sign in to the Intune admin center > Devices > Configuration.
- Select the Device Configuration profile you want to work with, and at the top of the page, you’ll see a quick view of the Success, Failure, Conflict, Not Applicable, and In Progress status.
- Click on View report to access more detailed information.
Experience Multi-App Kiosk Mode
Once the profile is successfully applied, the device will operate in multi-app kiosk mode. This means it will be restricted according to the settings defined in your XML file, including the allowed apps, configured Start menu pins, access to File Explorer, and taskbar pins. In the next sections, we will explore this further by verifying the kiosk mode configuration on a Windows 11 device.
If the File Explorer namespace restrictions block is missing, or if you add the block shown below, all drive and file access will be completely blocked. The screenshot below shows that when File Explorer is opened, no contents are visible or accessible to the user.
<rs5:FileExplorerNamespaceRestrictions>
</rs5:FileExplorerNamespaceRestrictions>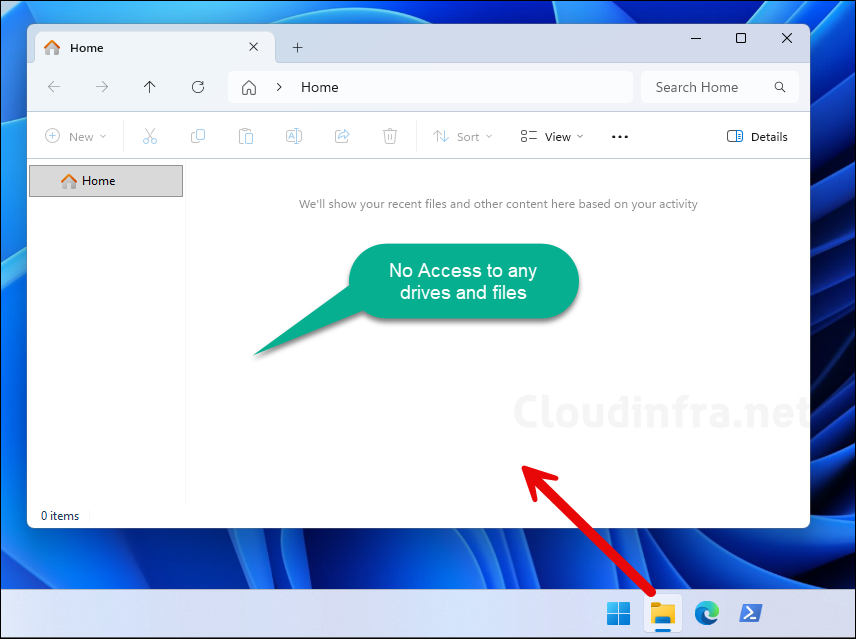
In my XML configuration file, I added below code to allow access to the Downloads folder. The screenshot shows that when a user opens File Explorer, only the Downloads folder is visible, while all other folders and drives are hidden.
<rs5:FileExplorerNamespaceRestrictions>
<rs5:AllowedNamespace Name="Downloads"/>
</rs5:FileExplorerNamespaceRestrictions>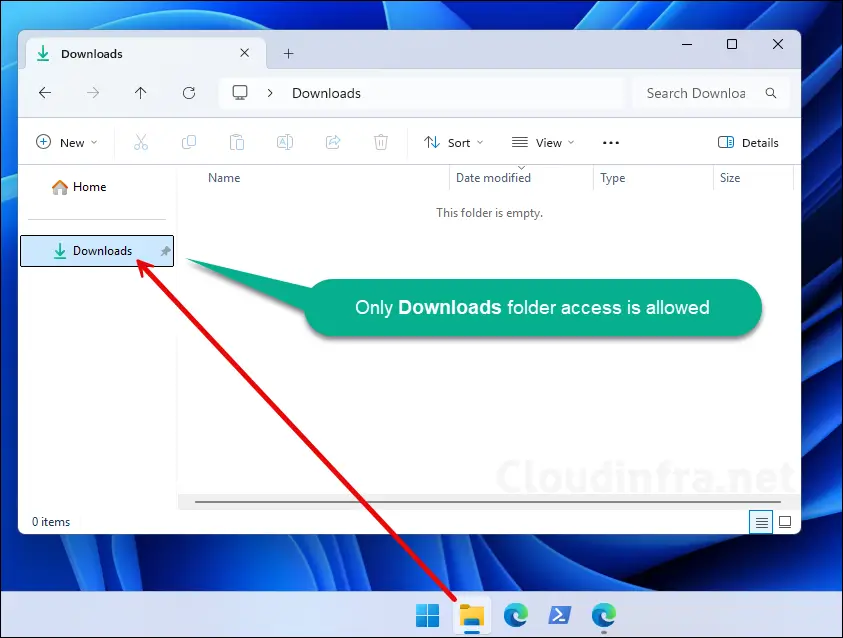
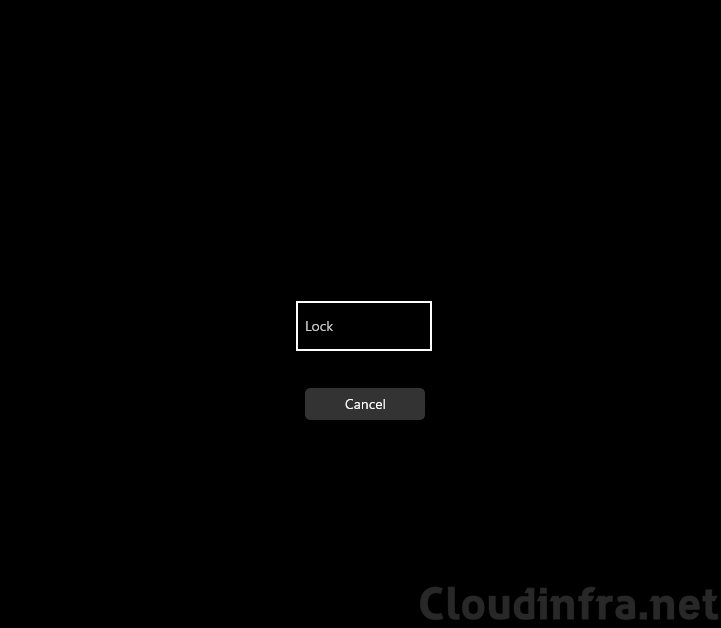
One more thing I have noticed, if you press Ctrl+Alt+Del, you will not find any switch user option to switch to another account. All you get is a Lock option and cancel button. You can click on Lock to lock the kiosk device and then switch to another account.
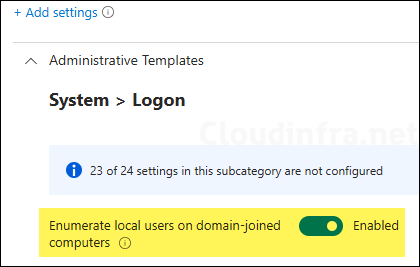
Another option to switch to another account is to use the Lock option in the Start menu. From the lock screen, you can select Other users and then sign in using your administrator account. Another important point is that Entra join and domain join devices do not display local user accounts on the sign-in screen by default, You can use a settings catalog policy or an OMA-URI setting (./Device/Vendor/MSFT/Policy/Config/WindowsLogon/EnumerateLocalUsersOnDomainJoinedComputers) if you want to display local accounts on the sign-in screen:
Troubleshooting
If there are any issues with your multi-app kiosk deployment, check the Event viewer logs first to investigate. Open Event viewer on the kiosk device, and go to Applications and Services Logs > Microsoft > Windows > AssignedAccess > Operational to review the logs.
Check below machine level registry keys for troubleshooting multi-app kiosk issues:
- HKLM\Software\Microsoft\Windows\AssignedAccessConfiguration
- HKLM\Software\Microsoft\Windows\AssignedAccessCsp
User registry key for Assigned Access configuration: HKCU\SOFTWARE\Microsoft\Windows\AssignedAccessConfiguration
Wow, what an amazing guide! Thank you so much! Is it possible to install printers on these kiosks?
Thanks for the feedback, yes you can easily install printers on kiosk devices. I have a post which shows the steps to install printer drivers and printers on an Intune managed Windows device and also a Kiosk device as well: https://cloudinfra.net/install-printer-drivers-and-printers-with-intune/
This is great!
I have a question about the profiles section though. Is this section defining what user profile the XML applies to? What if I am using autologon with the default built-in Kiosk User profile?
@Ryan: The Profile section defines the schema for creating the kiosk profile, but it does not determine which user profile XML will be applied. Use the Config section to assign the profile to the user.
I see. So if I understand correctlyt, generating the GUID isn’t tied to anything pre-exsiting, and is used to define to which user profiles the configuration will be applied?
That’s right.
Great thanks! Now, for the MS Edge Secondary Titles, can it only do one, or can it do multiple? Say if I want to have titles for my company site, my payroll site, my safety site, and then titles for Gmail, Yahoo, etc. is that possible?
You can configure multiple secondary tiles; just duplicate the secondaryTile block and create tiles for your company site, payroll site, safety site, or any other site.
As this may require further discussion, let’s connect over email. Please contact me at support@cloudinfra.net, and I will help you with your XML file.
Hello. Since few days, i’m working on kiosk need for a company. Kiosk configuration with an autologon with a local account work fine.
Now, i would like to create a KIOSK configuration (single or multiple apps) with an autologon but with an EntraID account.
I tried to use “AzureAD\toto@company.onmicrosoft.com” as you write in this post, but the autologon doesn’t work.
AzureAD\jatin@cloudinfra.onmicrosoft.com
Have you really successfully configured a kiosk with an Entra ID account mode with Autlogon on Windows 11?
If yes, is there something else to know?
Hello Jerome, thanks for the comment.
Simply using an Entra user account in the config section will not enable autologon for this user. You will have to use autologon64.exe and PowerShell scripts to enable the autologon. I have tested the scenario and created the blog post: https://cloudinfra.net/setup-entra-user-autologon-in-intune-multi-app-kiosk-mode/. Please let me know if it helps.
Hello Jatin
Thank you so much for putting this comprehensive guide together. I’m working on testing this out within our org but running into bit of trouble. I’ve kept your example config as is but simply changed the display name of the account and URL edge auto launches. When i go to save the OMA-URL XML within the intune portal, i’m receiving this error.
{“error”:{“code”:””,”message”:”The request is invalid.”,”innerError”:{“message”:”configuration.OmaSettings[0].Value : XML must be well formed.\r\n”,
Hi Andrew, please send me your XML for review at support[at]cloudinfra.net. Let me check and see what could be the issue.
Hi Jatin,
Thank you for this guide.
I’m running into an issue where the local kiosk user that I create doesn’t autologin and it prompts for a password.
I’m using the same xml config file as you but running into this issue.
I am deploying this device using a share device autopilot profile.
I’m not able to see any logs in event viewer that would provide clues as to why this is happening
thats a standard feature of windows 11 security unfortunately – I worked around that by not doing the autologon and set the pc to allow only our fido cards for users to logon with – set the default logon to fido cards and now users just got up with the card and their allocated pin or guest account can logon with the issued card of which on return the pin is reset. I also have the machine remove any accounts innactive of more than 2 days.
Hey. I am to push multi app kisok mode configuration policy through intune with Citrix Workspace application and Windows app which is used to connect to the cloud PC. Even after the policy is applied, device did not launch in kiosk Mode. Could you please suggest how to do this.