This post is about showing you how to setup/configure Remote Help in Intune. Remote help is a cloud-based solution which provides a secure connection to your managed devices through Intune. When using Remote Help, there are two roles: Helpers and Sharers. Simply put, helpers are the users who provide assistance, while sharers are the users who share their screen to receive help.
Both helper and sharer will need to sign in to the Remote help app using their Entra ID credentials. A helper must have be assigned the required Intune RBAC role (discussed later) to help the users.
By default, Remote Help is disabled in an Intune tenant. Once enabled, it applies tenant-wide and cannot be scoped to a specific group of users.
Note
Contents
Requirements for Using Remote Help
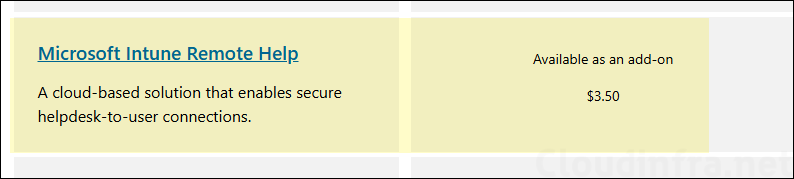
- Intune subscription with Remote Help Intune add-on license or Microsoft Intune suite license assigned to helpers and sharers.
- Supported on Windows 10/11, Windows 365, Android, macOS 13+, AVD.
- Remote Help app deployed on the users devices who need remote assistance.
- RBAC permissions for helpers (refer to the steps for creating this role later in this post).
- Create Firewall rules if required, refer to the link: Firewall rules.
Limitations of Remote Help
- Cannot take remote session from one tenant to another tenant.
- Remote Help isn’t supported on GCC High or DoD (U.S. Department of Defense) tenants.
- Remote Help might not be available in all markets or localizations.
Few Important Points about Remote Help
- You can use Remote help on devices which are not enrolled in Intune.
- If a helper is connecting to a device which is not compliant, a warning message will be shown.
- If you have just purchased licenses for Remote help, it may take from 30 minutes to 8 hours to become active.
Step 1: Enable Remote Help in Your Intune Tenant
After you have purchased the licenses or started the trial for Remote help, you will be able to enable Remote help in your Intune tenant. Without the licenses, the option to enable Remote help will be greyed out.
- Sign in to the Intune admin center > Tenant administration > Remote Help.
- Click Settings tab > Configure. Set below values and click Save.
- Enable Remote Help: Enabled
- Allow Remote Help to unenrolled devices: Allowed
- Disable Chat: No (If you do not want to allow Chat in Remote help sessions, then select Yes).
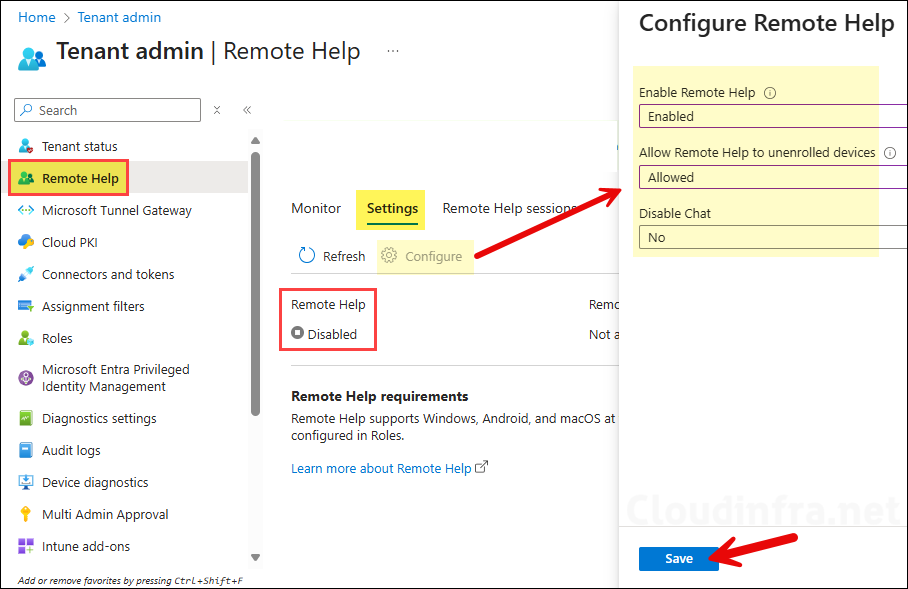
- Confirm that the Remote Help is enabled under the Settings tab.

Step 2: Configure RBAC Permissions for Remote Helpers
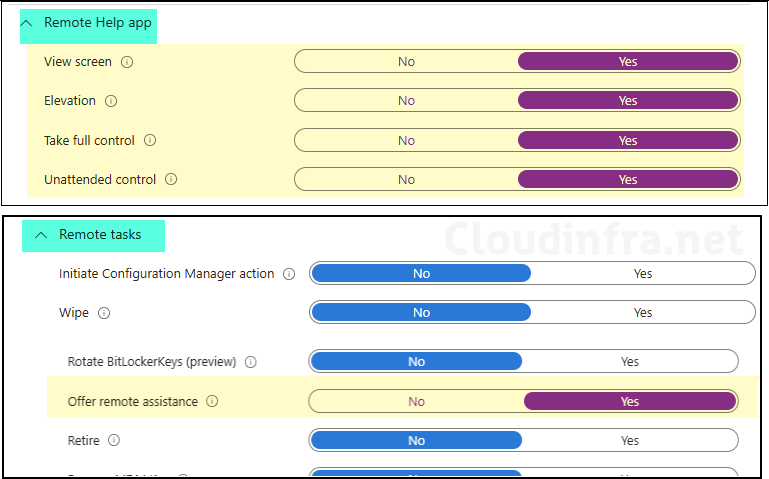
Remote helpers or simply helpers who will assist users (sharers) will need to be assigned role-based access control (RBAC) permissions. This will decide, which users they can help and what level of access they will have. Below are the RBAC permissions available in Intune, it’s in the category of Remote Help app and Remote tasks.
- Select Remote Help app category and configure below permissions
- Elevation : Yes/No
- View screen : Yes/No
- Take full control : Yes/No
- Unattended control : Yes/No
- Remote tasks category and configure below permissions
- Offer remote assistance : Yes/No
By default, built-in Intune role Help Desk Operator already has these permissions set to Yes. You can assign this role to helpers, which grants all remote assistance permissions along with some additional permissions included in the Help Desk Operator role. Alternatively, you can create a custom Intune role dedicated specifically to Remote Help permissions.
I suggest creating a custom role for Remote Help permissions. This ensures that helpers only have the required Remote Help permissions, aligning with the principle of least privilege. I will create a custom role called Remote Helpers and assign it to the Remote Helpers (Tech Team). To learn how to create a custom role in Intune step-by-step, refer to this detailed guide: How To Create Custom RBAC Role In Intune.
| Custom Role Name | Admin Groups | Scope Groups |
|---|---|---|
| Remote Helpers | Remote Helpers (Tech Team) | All Users and All Devices |
Create Remote Helpers Custom Role
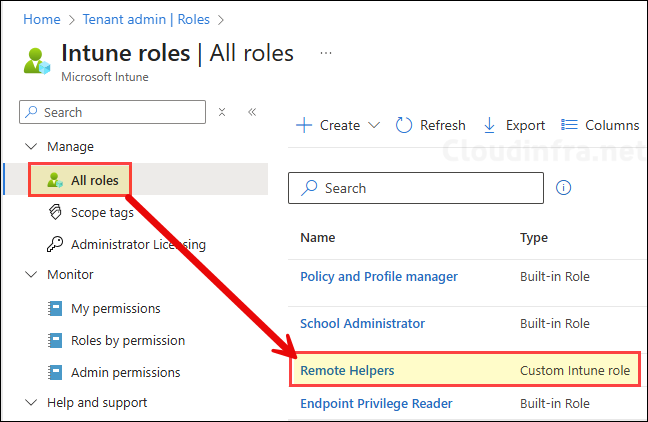
- Sign in to the Intune admin center > Navigate to Tenant administration > Roles > Create > Intune role.
- Basics tab: Provide the name and description of the custom role. For example: Remote Helpers.
- Permissions tab: On the permissions tab, expand Remote Help app and Remote tasks. Configure the permissions as shown in below screenshot.
Assign Remote Helpers Custom Role
Once you have created a Remote helpers custom role, assign it to a group which contains administrators who will be providing assistance to users.
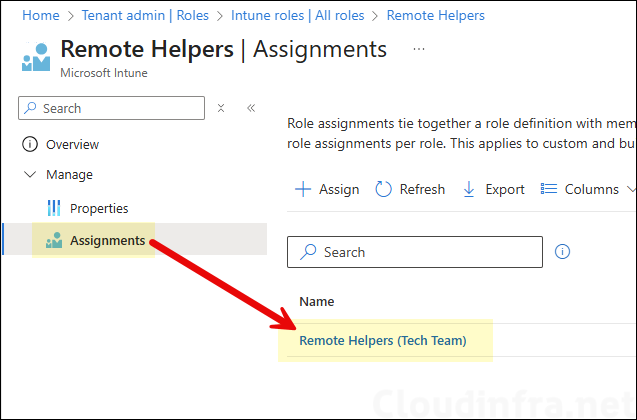
- Go to Tenant administration > Roles > All roles and click on Remote Helpers role.
- Go to Assignments and click on + Assign.
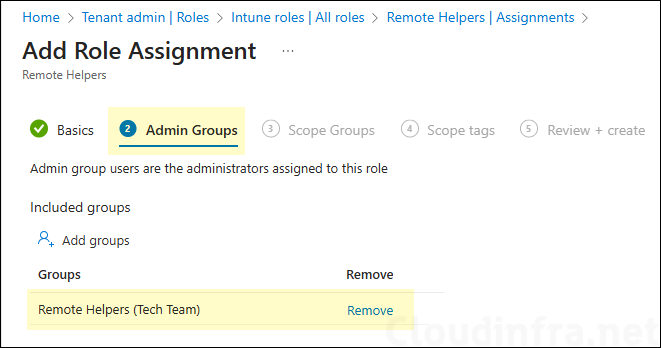
- Basics tab: Provide a name and description of the assignment. For example: Remote Helpers (Tech Team).
- For Admin Groups, add a group which contain admins (helpers) who will provide remote assistance. I have already created a group called Remote Helpers (Tech Team) for this purpose.
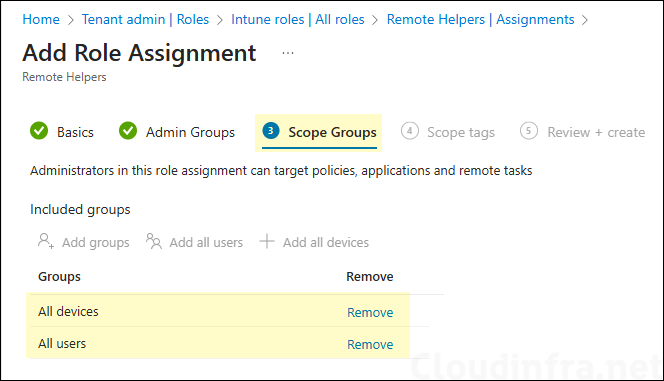
- Under the Scope Groups tab, you can add a group that contains your organization’s devices and another group for users. Helpers configured under Admin Groups will be able to connect with the devices and users which are in those scope groups. To allow helpers to provide remote assistance across all devices and users, I will select Add all users and Add all devices. Keep in mind that both helpers and sharers must be assigned a Remote Help license for the remote connection to work successfully.
- Scope tags (optional): A scope tag in Intune is an RBAC label you add to resources (policies, apps, devices) to limit which admins can see and manage them. For more Information, read: How to use Scope tags in Intune.
- Review + create: Review the deployment summary and click Create.
Step 3: Deploy Remote Help App
To take full advantage of the Remote Help solution, Remote Help app must be installed on user devices. This app is available on the following platforms:
- Windows 10 and Windows 11 (including ARM64).
- macOS (13 Ventura, 14 Sonoma, 15 Sequoia; web app supports 11 Big Sur, 12 Monterey).
- Android Enterprise dedicated (Samsung Knox and Zebra)
- To deploy the app on Windows, refer to the link: Deploy Remote Help App on Windows via Intune.
- To deploy the app on macOS, refer to the link: Deploy Remote Help App on macOS via Intune.
- To deploy the app on Android, refer to the link: #remote-help-android-deploy-remote-help-app.
Step 4: Using Remote Help to Provide Assistance
The main purpose of the Remote Help solution is to assist end users and resolve issues. Once the environment is set up, you can begin using it. As a helper, you can provide assistance either through the Intune admin center or from your own work or personal PC.
When using the Intune admin center, you can launch the Remote Help app directly from the portal, which opens in a sandbox environment. This works the same as running the app on your own PC, with no limitations, and allows you to take full control of the user’s PC (based on your assigned helper permissions).
If you don’t have the Remote Help app installed or encounter issues running it, you can use the Remote Help web app instead. Keep in mind, however, that the web app is more limited since it only supports view-only screen sharing and does not allow full control.
1. Provide Assistance via Intune Portal
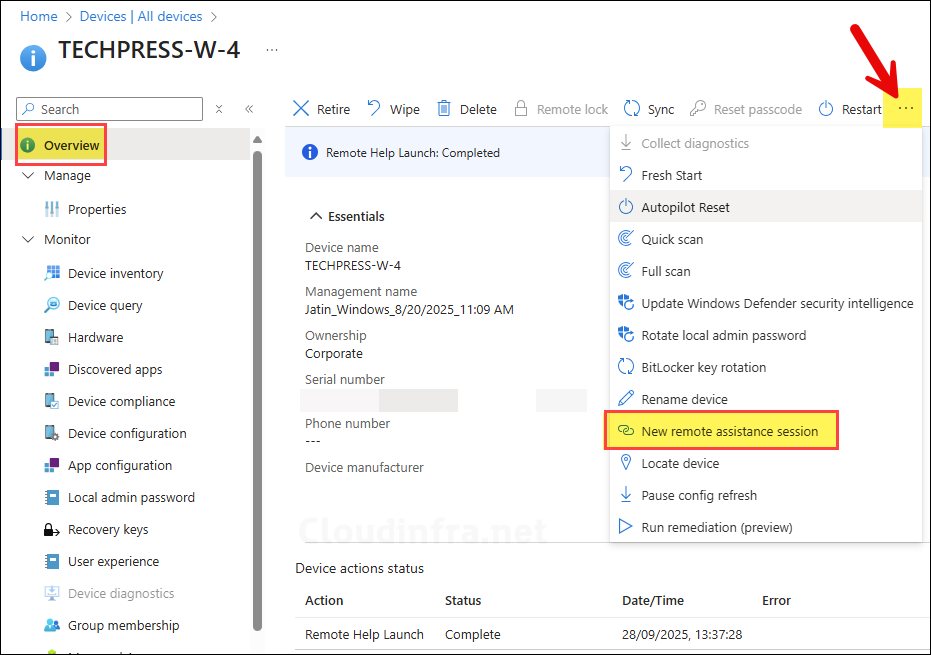
As a helper, you can provide assistance to users via Intune portal by going to Intune admin center > Devices > All devices. Click on the device you want to connect with and click on ellipses (…) > New remote assistance session.
2. Provide Assistance via Remote Help App
If you are assisting a user and have the Remote Help desktop app installed on your device, you can use it to connect to the user’s PC and provide remote assistance. The Remote Help app offers full functionality, allowing you to both view the user’s screen and take full control when needed.
- Helper: Open the Remote Help app on your PC and click Get security code. A security code will be generated, share this code with the user you are helping.
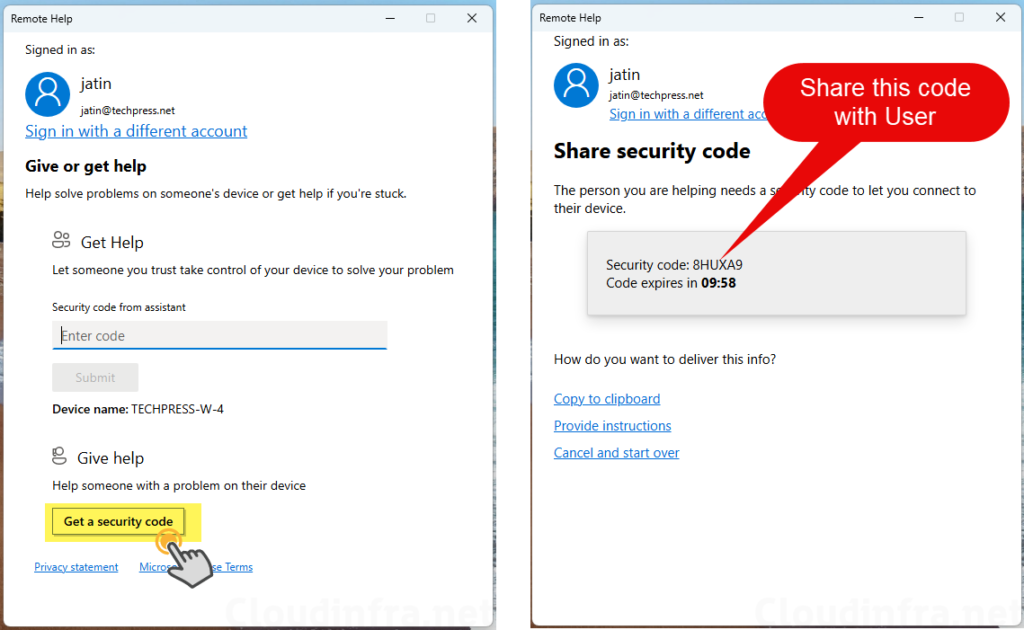
- User (Sharer): Open the Remote Help app on your PC, enter the security code in the Security code from assistant textbox, and then click Submit.
3. Provide Assistance via Remote Help Web App
If you can’t access the Intune portal or use the Remote Help desktop app, you can still assist a user through the Remote Help web app. With the web app, you connect to the user’s PC via a browser like Chrome or Edge, in much the same way as with the desktop app. The key difference is that the web app is limited to view-only screen sharing, you won’t have full control of the user’s device.
This can still be very useful in situations where you only need to guide the user over the phone and don’t require mouse or keyboard access. I’ve written a detailed guide with step-by-step instructions on how to provide assistance using the Remote Help web app. Refer to the link for more details: Quick Start Guide on Remote Help Web App.
Conclusion
I hope this post has helped you understand how to enable and use the Remote Help solution in Intune. Keep in mind that this feature is not included in standard Intune licenses such as Plan 1 or Plan 2. You’ll need to purchase a separate Remote Help add-on or use the Intune Suite license. If your users are remote and geographically dispersed, and your help desk or IT team is responsible for supporting them, providing this tool can make the team more efficient and improve First Call Resolution (FCR). This is possible because Remote Help offers multiple ways to connect to a user’s PC (as covered earlier) and provides compliance-related information about the managed PC when the helper initiates the connection.