In this post, I will show you how to configure taskbar pins on Windows 11 with Intune. You can easily customize the taskbar layout, including the pinned items. While there are other sections of the taskbar such as Widgets and the System Tray, we will not configure those here. The main focus for this post is to show you how you can pin and unpin the apps to the taskbar using Intune.
Below screenshot shows three sections of the taskbar, Widgets, the middle section which shows the start menu, search, taskview, and the pinned apps and the right most section is for System tray. To configure the taskbar layout, Microsoft recommends using Start Policy CSP.

Contents
Planning Stage
- Decide the pinning structure: First step is to decide how the taskbar layout should look in terms of the pinned applications, and then create the configuration accordingly. Ask yourself a few key questions: do you want to replace the existing list of pinned items, or add to the existing ones? For shared or kiosk devices, replacing the existing pins is usually the preferred approach as it provides consistent user experience to all users of the shared device.
- Gather Application Information: List all the applications you want to pin to the taskbar, and make sure those applications are installed on the devices where you plan to configure the pins. If an application is not installed on a device, it will be ignored, and no pinned item will be created for that app.
- Find Application Identifiers: For the applications you plan to pin, locate their application identifiers and document them. Use the desktop shortcut path for classic apps, the DesktopApplicationID for File Explorer, and the AUMID for UWP or Microsoft Store apps. The steps to find this information are shown later in this post.
- User Choice: Starting with Windows 11 version 23H2 (KB5060826) and 24H2 (KB5060829), you can optionally allow specific pins to be unpinned and not re-applied during the next policy refresh by using the
PinGenerationattribute. If you use this attribute on an incompatible version of Windows 11, the taskbar pins will not apply.
Windows 11 Taskbar Pinning Cheat Sheet
The table below lists the different types of applications that can be pinned to the taskbar on Windows 11 devices. You will need the application identifier for each app, which is required in the taskbar XML configuration file. The table also provides the corresponding XML tag to use for each type of application.
| App type | Description | Identifier | XML Tag |
|---|---|---|---|
| UWP or Store app | Modern packaged app installed per user | AUMID | <taskbar:UWA AppUserModelID=”…”/> |
| MSIX Desktop Bridge app | Classic Win32 wrapped as MSIX; exposes an AUMID | AUMID | <taskbar:UWA AppUserModelID=”…”/> |
| Classic desktop app with shortcut | Traditional Win32 that creates a Start Menu .lnk | .lnk path | <taskbar:DesktopApp DesktopApplicationLinkPath=”…”/> |
| Classic desktop app without shortcut | Win32 without a shortcut; you create a shortcut during deployment | .lnk path you create | <taskbar:DesktopApp DesktopApplicationLinkPath=”…”/> |
| Shell app (File Explorer) | Special system app addressed by a known ID | DesktopApplicationID | <taskbar:DesktopApp DesktopApplicationID=”Microsoft.Windows.Explorer”/> |
| System Settings app | Windows Settings packaged with an AUMID | AUMID | <taskbar:UWA AppUserModelID=”windows.immersivecontrolpanel_cw5n1h2txyewy!microsoft.windows.immersivecontrolpanel”/> |
| Control Panel item shortcut | Legacy CPL or MMC pinned via a shortcut you provide | .lnk path | <taskbar:DesktopApp DesktopApplicationLinkPath=”…”/> |
| Web app installed as PWA | Edge-installed PWA that registers like an app | AUMID or .lnk | <taskbar:UWA AppUserModelID=”…”/> or <taskbar:DesktopApp DesktopApplicationLinkPath=”…”/> |
Finding Application ID
Now that we have identified the applications we want to pin to the taskbar and determined their types, the next step is to gather their application identifiers and document them. The below steps explain how to find this information and how to record it for use in the XML configuration, Intune deployment, and maintenance of the taskbar pins.
For more information about finding AUMID or AppID or AppUserModelId, refer to the blog post: 7 Ways Find AUMID Of Apps In Windows 11.
Find UWP Apps AUMID (AppUserModelID)
To find the UWP (Universal Windows Platform) or Microsoft Store app AUMID (AppUserModelID), use the Get-StartApps cmdlet in PowerShell. This cmdlet retrieves the names and AppIDs of all installed apps for the current user.
Get AUMIDs for current user
Get-StartApps | Sort-Object Name | Format-Table Name, AppID -AutoExample: Let’s say you want to pin the Camera app to the taskbar. You can find its AUMID value by running the Get-StartApps cmdlet in PowerShell, then use that value in the taskbar layout XML configuration file.
Using Camera App AUMIDs in XML
<taskbar:UWA AppUserModelID=”Microsoft.WindowsCamera_8wekyb3d8bbwe!App”/>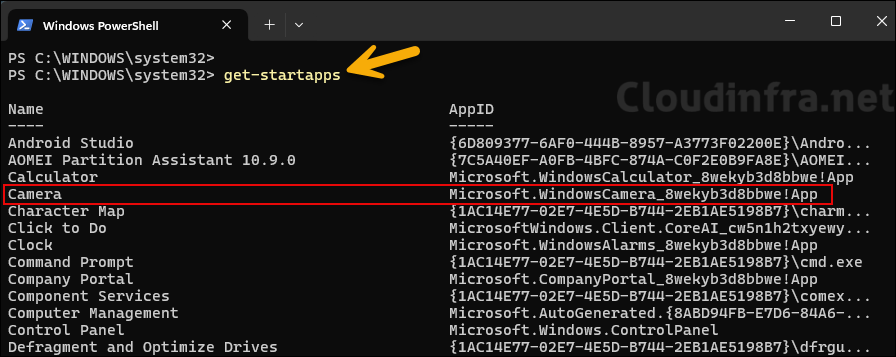
You can also retrieve the AUMID information for apps installed for the current user by using the Get-AppxPackage cmdlet. If you want to list the AUMIDs of apps installed in the device context (for all users), add the -AllUsers switch. When using the -AllUsers switch, make sure to run PowerShell with elevated (administrator) privileges.
List AUMIDs for current user
Get-AppxPackage | Select-Object Name, PackageFamilyNameList AUMIDs for All Users
Get-AppxPackage -AllUsers | Select-Object Name, PackageFamilyNameDesktopApplicationID
For classic desktop apps, use the following XML format. Select this option for traditional desktop applications such as File Explorer.
DesktopApplicationID
<taskbar:DesktopApp DesktopApplicationID="..." />Pinning File Explorer
<taskbar:DesktopApp DesktopApplicationID="Microsoft.Windows.Explorer"/>Find AppUserModelId for Desktop apps
Get-ChildItem "HKCU:\Software\Classes\AppUserModelId" | Select-Object -ExpandProperty PSChildName
Get-ChildItem "HKLM:\Software\Classes\AppUserModelId" | Select-Object -ExpandProperty PSChildName
DesktopApplicationLinkPath
If the app already creates a Start Menu shortcut, simply reference the .lnk file in your XML. If no shortcut exists, create one during the app deployment process or by using an PowerShell script, so that your XML can correctly point to it.
Application Link File [Syntax]
%ALLUSERSPROFILE%\Microsoft\Windows\Start Menu\Programs\Vendor\AppName.lnkUsing DesktopApplicationLinkPath tag
<taskbar:DesktopApp DesktopApplicationLinkPath="%ALLUSERSPROFILE%\Microsoft\Windows\Start Menu\Programs\Vendor\AppName.lnk"/>Examples of DesktopApplicationLinkPath
<taskbar:DesktopApp DesktopApplicationLinkPath="%ALLUSERSPROFILE%\Microsoft\Windows\Start Menu\Programs\FileZilla FTP Client\FileZilla.lnk"/>
<taskbar:DesktopApp DesktopApplicationLinkPath="%ALLUSERSPROFILE%\Microsoft\Windows\Start Menu\Programs\Microsoft Edge.lnk" />

<!-- Notepad++ (per-user Start Menu) -->
<taskbar:DesktopApp DesktopApplicationLinkPath="%APPDATA%\Microsoft\Windows\Start Menu\Programs\Notepad++\Notepad++.lnk" />
Find App Identifier Quick Cheat Sheet
Below table is a quick cheat sheet to find application identifier information for the apps.
| Requirement | PowerShell Command |
|---|---|
| List all AUMIDs for current user | Get-StartApps | Sort-Object Name | Select-Object Name, AppID |
| Get AUMID for a specific app | (Get-StartApps -Name “AppName”).AppID |
| List packages for current user | Get-AppxPackage | Select-Object Name, PackageFamilyName |
| List packages for all users | Get-AppxPackage -AllUsers | Select-Object Name, PackageFamilyName |
When to use Which tag: Quick Check
Below table is a quick reference of when to use which tag. For example, for a UWP app, you will use <taskbar:UWA AppUserModelID=”…”/> tag, For Classic Win32 with Start Menu shortcut, use <taskbar:DesktopApp DesktopApplicationLinkPath =”…”/> and for File Explorer use <taskbar:DesktopApp DesktopApplicationID=”Microsoft.Windows.Explorer”/>.
| App Type | When to use | XML tag format |
|---|---|---|
| UWP/Store/MSIX app | App is packaged and exposes an AUMID | <taskbar:UWA AppUserModelID=”PackageFamilyName!AppID”/> |
| Classic Win32 with Start Menu shortcut | App installs a .lnk under Programs (all users or per user) | <taskbar:DesktopApp DesktopApplicationLinkPath=”%ALLUSERSPROFILE%\Microsoft\Windows\Start Menu\Programs\FileZilla FTP Client\FileZilla.lnk”/> |
| Classic Win32 without shortcut | You create a .lnk during deployment, then reference it | <taskbar:DesktopApp DesktopApplicationLinkPath=”%ALLUSERSPROFILE%\Microsoft\Windows\Start Menu\Programs\FileZilla FTP Client\FileZilla.lnk”/> |
| File Explorer (special shell app) | Mainly for Explorer, which has a known DesktopApplicationID | <taskbar:DesktopApp DesktopApplicationID=”Microsoft.Windows.Explorer”/> |
Understand the Taskbar Layout XML
Taskbar Layout XML tells Windows which apps to pin on the taskbar and in what order. You deploy this XML with Intune through the Start Policy CSP.. Windows reads it per user at shell initialization and pins entries left to right in the order you define.
File header and namespaces
Declare the schema at the top of the code for Windows to know how to interpret taskbar elements.
Declare Schema
<?xml version="1.0" encoding="utf-8"?>
<LayoutModificationTemplate
  xmlns="http://schemas.microsoft.com/Start/2014/LayoutModification"
  xmlns:defaultlayout="http://schemas.microsoft.com/Start/2014/FullDefaultLayout"
  xmlns:start="http://schemas.microsoft.com/Start/2014/StartLayout"
  xmlns:taskbar="http://schemas.microsoft.com/Start/2014/TaskbarLayout"
  Version="1">
  ...
</LayoutModificationTemplate>
CustomTaskbarLayoutCollection
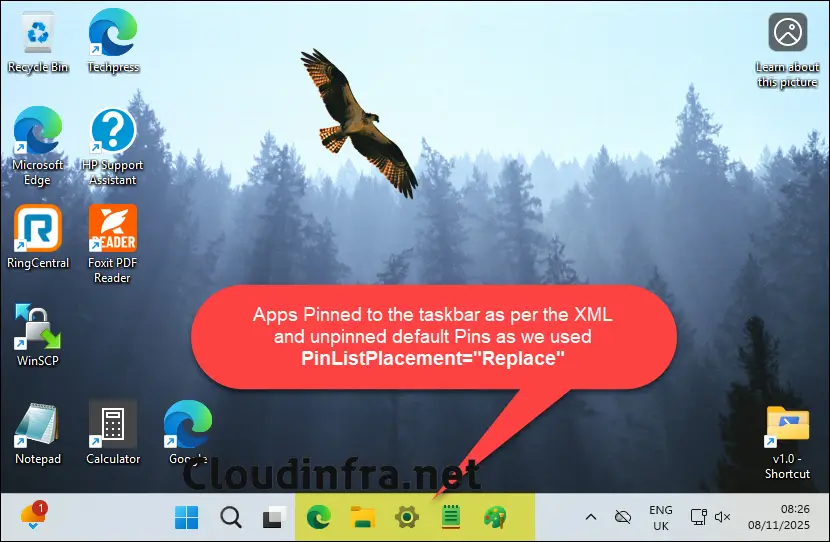
The apps you add in this section will be pinned after the default apps. To replace the default pinned apps and pin only the ones defined in your XML, add the switch PinListPlacement=”Replace”. If you do not use this switch, the apps in the XML file will be pinned after the existing default pinned items. This is useful for shared devices or Kiosk devices where you want to provide consistent user experience.
CustomTaskbarLayoutCollection
<CustomTaskbarLayoutCollection PinListPlacement="Replace">
  ...
</CustomTaskbarLayoutCollection>
TaskbarLayout and TaskbarPinList
<TaskbarLayout> groups the actual pin list. <TaskbarPinList> is the list itself. Order inside TaskbarPinList is the left-to-right order on the taskbar.
TaskbarLayout and TaskbarPinList
<defaultlayout:TaskbarLayout>
  <taskbar:TaskbarPinList>
    <!-- pinned apps entries go here -->
  </taskbar:TaskbarPinList>
</defaultlayout:TaskbarLayout>
PinGeneration
This parameter can be used with the pin list to allow certain pinned apps to be unpinned by users. When a user unpins an app that includes the PinGeneration parameter, that app will not be re-pinned during the next Intune policy update cycle.
The PinGeneration parameter is only available starting with Windows 11, version 24H2 with KB5060829 and 23H2 with KB5060826. Only assign this policy to such devices, otherwise the taskbar pins don’t apply.
- When PinGeneration is not defined, users can unpin the apps, but the pins will be repinned during the next Intune policy update cycle.
- When PinGeneration is defined, users can unpin the apps from the taskbar, and the pins will not be repinned during the next Intune policy update cycle.
- When you change the PinGeneration value in the XML to another number (for example, from 1 to 2 or 2 to 3), the app will be pinned again.
- The PinGeneration value is app-specific. One app in the XML can have a value of 1, and another can have 2. Ideally, keep the same value for each app and only increment the value for the app you want to re-pin.
- Do not reuse the same number for this parameter. If you have used 1, increment to 2. Do not switch back to 1.
Regionalization and multiple layouts
You can include more than one <defaultlayout:TaskbarLayout> within the same collection. Add the attribute Region=”US” or another valid ISO country code to scope the layout to a specific region. Windows will automatically select the layout block that best matches the device’s region. For reference, see the Table of Country/Region and State/Province Names and Codes [C++] | Microsoft Learn.
Using region scenario is useful when you want to deploy different applications or URL shortcuts based on the region. For example, you may want users in the US region to have a shortcut that points to servers located in the United States, while users in other regions have shortcuts that connect to their respective regional servers. This allows you to configure the taskbar pins according to each region’s requirements.
- If the region defined in the <TaskbarPinList> matches the one configured on the device, the taskbar layout for that region will be applied.
- If the region defined in the <TaskbarPinList> does not match the one configured on the device, the taskbar layout without a region specified will be applied instead.
Regionalization and multiple layouts example
<CustomTaskbarLayoutCollection PinListPlacement="Replace">
    <defaultlayout:TaskbarLayout Region="US|UK">
      <taskbar:TaskbarPinList >
        ---Taskbar Pins----
      </taskbar:TaskbarPinList>
    </defaultlayout:TaskbarLayout>
    <defaultlayout:TaskbarLayout Region="DE|FR|IT">
         ---Taskbar Pins-----
    </defaultlayout:TaskbarLayout>
    <defaultlayout:TaskbarLayout>
      <taskbar:TaskbarPinList>
        <taskbar:DesktopApp DesktopApplicationLinkPath="%ALLUSERSPROFILE%\Microsoft\Windows\Start Menu\Programs\Microsoft Edge.lnk" PinGeneration="2"/>
        <taskbar:DesktopApp DesktopApplicationID="Microsoft.Windows.Explorer" PinGeneration="2"/>
        <taskbar:UWA AppUserModelID="windows.immersivecontrolpanel_cw5n1h2txyewy!microsoft.windows.immersivecontrolpanel" PinGeneration="2"/>
        <taskbar:UWA AppUserModelID="Microsoft.WindowsNotepad_8wekyb3d8bbwe!App" PinGeneration="2"/>
        <taskbar:UWA AppUserModelID="Microsoft.Paint_8wekyb3d8bbwe!App" PinGeneration="2"/>
      </taskbar:TaskbarPinList>
    </defaultlayout:TaskbarLayout>
  </CustomTaskbarLayoutCollection>
</LayoutModificationTemplate>
My Taskbar Layout XML File
Now that you understand the structure of the Taskbar XML configuration file, you can create an XML file for the apps you want to pin. I have created an XML file based on my requirements. The XML file and its configuration is shown below. You can also download this file from my GitHub repository: Taskbar-Layout-Windows11.xml.
- PinListPlacement=”Replace”: This parameter replaces any default pinned items with the ones defined in the XML.
- Pinned Apps: In this example, I will use the following five apps to pin to the taskbar. You can modify the XML file to pin apps based on your own requirements.
- Microsoft Edge
- File Explorer
- Settings App
- Notepad App
- Paint App
Taskbar pinned apps list
<taskbar:DesktopApp DesktopApplicationLinkPath="%ALLUSERSPROFILE%\Microsoft\Windows\Start Menu\Programs\Microsoft Edge.lnk" PinGeneration="2"/>
<taskbar:DesktopApp DesktopApplicationID="Microsoft.Windows.Explorer" PinGeneration="2"/>
<taskbar:UWA AppUserModelID="windows.immersivecontrolpanel_cw5n1h2txyewy!microsoft.windows.immersivecontrolpanel" PinGeneration="2"/>
<taskbar:UWA AppUserModelID="Microsoft.WindowsNotepad_8wekyb3d8bbwe!App" PinGeneration="2"/>
<taskbar:UWA AppUserModelID="Microsoft.Paint_8wekyb3d8bbwe!App" PinGeneration="2"/>
Taskbar-Layout-Windows11.xml
<?xml version="1.0" encoding="utf-8"?>
<LayoutModificationTemplate
  xmlns="http://schemas.microsoft.com/Start/2014/LayoutModification"
  xmlns:defaultlayout="http://schemas.microsoft.com/Start/2014/FullDefaultLayout"
  xmlns:start="http://schemas.microsoft.com/Start/2014/StartLayout"
  xmlns:taskbar="http://schemas.microsoft.com/Start/2014/TaskbarLayout"
  Version="1">
  <CustomTaskbarLayoutCollection PinListPlacement="Replace">
    <defaultlayout:TaskbarLayout>
      <taskbar:TaskbarPinList>
        <taskbar:DesktopApp DesktopApplicationLinkPath="%ALLUSERSPROFILE%\Microsoft\Windows\Start Menu\Programs\Microsoft Edge.lnk" PinGeneration="2"/>
        <taskbar:DesktopApp DesktopApplicationID="Microsoft.Windows.Explorer" PinGeneration="2"/>
        <taskbar:UWA AppUserModelID="windows.immersivecontrolpanel_cw5n1h2txyewy!microsoft.windows.immersivecontrolpanel" PinGeneration="2"/>
        <taskbar:UWA AppUserModelID="Microsoft.WindowsNotepad_8wekyb3d8bbwe!App" PinGeneration="2"/>
        <taskbar:UWA AppUserModelID="Microsoft.Paint_8wekyb3d8bbwe!App" PinGeneration="2"/>
      </taskbar:TaskbarPinList>
    </defaultlayout:TaskbarLayout>
  </CustomTaskbarLayoutCollection>
</LayoutModificationTemplate>
Create Intune Deployment to Configure Taskbar Pinned Apps
Now that we have created the XML file required to configure taskbar pinned apps on Windows 11 devices, we can proceed with creating an Intune deployment to apply this configuration. The CSP used for this purpose is StartLayout. This CSP is supported on Windows 11 Pro, Enterprise, Education, and IoT editions and can be scoped to either users or devices.
- Sign in to the Intune admin center > Devices > Configuration + Create > New Policy.
- Select Platform as Windows 10 and later, Profile type as Settings Catalog, Click Create.
- Basics Tab: Enter the Name and Description of the profile.
- Configuration Settings: Click + Add settings. In the Settings picker, search for the Start layout setting and select the Start category. Paste the XML file contents into the Start Layout text box, then click Next.
You can also use Start Layout (User), which is a user-scoped setting and should be assigned to users instead of devices. The setting used in this example is the one without (User) at the end, meaning it applies in the device context and affects all users on the device. For more information, refer to the link: #policy-scopes.
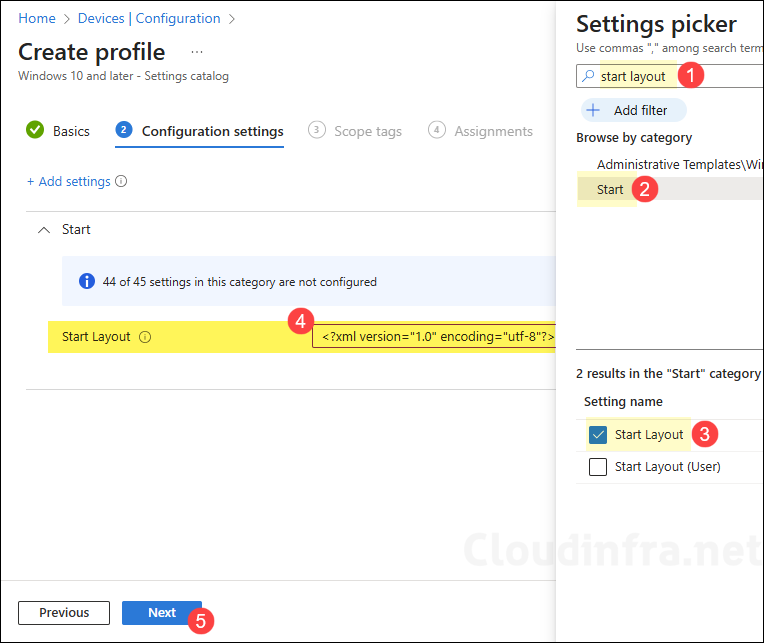
- Scope tags (optional): A scope tag in Intune is an RBAC label you add to resources (policies, apps, devices) to limit which admins can see and manage them. For more Information, read: How to use Scope tags in Intune.
- Assignments: Assign the policy to Entra security groups that contain the target users or devices. As a best practice, pilot with a small set first; once validated, roll it out more broadly. For guidance on assignment strategy, see Intune assignments: User groups vs. Device groups.
- Review + create: Review the deployment summary and click Create.
Update Intune Policies
The device check-in process might not begin immediately. If you’re testing this policy on a test device, you can manually kickstart Intune sync from the device itself or remotely through the Intune admin center.
Alternatively, you can use PowerShell to force the Intune sync on Windows devices. Restarting the device is another way to trigger the Intune device check-in process.
Monitoring Taskbar Pinned Apps Policy
- Sign in to the Intune admin center > Devices > Configuration.
- Select the Device Configuration profile you want to work with, and at the top of the page, you’ll see a quick view of the Success, Failure, Conflict, Not Applicable, and In Progress status.
- Click on View report to access more detailed information.

End User Experience
After the Intune deployment completes successfully, the taskbar pinned items defined in the XML configuration file will be automatically applied. If you have used PinListPlacement=”Replace”, it will remove the default pinned items and keep only the apps specified in the XML file.
Conclusion
This post was about showing you how to configure taskbar pins on windows 11 devices using Intune. You can pre-stage the configuration and assign it to the devices for applying this policy during the autopilot. You can use Enrollment status page to ensure that the policy is applied and pins are configured before the user gets to the desktop.
This worked very well. Thank you very much.