In this blog post, I will show you the steps to block an email address or domain in Outlook. If you are receiving unwanted email from a specific sender or domain, Outlook provides a built-in Blocked Senders List (and in some clients, a Blocked Domains List) that moves messages from those sources to the Junk Email folder.
This is a mailbox-level control, ideal for user-specific nuisance senders, but it does not replace tenant-wide blocking in Microsoft 365. You can also configure an option to delete the emails received from blocked senders instead of moving them to the Junk email folder.
Contents
Important Points
Outlook blocked senders is per mailbox. It affects only the mailbox where the block is configured. It is not a tenant-wide block.
Blocked senders does not “override” security quarantines. If Exchange Online Protection or Microsoft Defender quarantines a message before it reaches the mailbox, Outlook junk lists are not the deciding control.
Block a Sender in Outlook (Classic) App
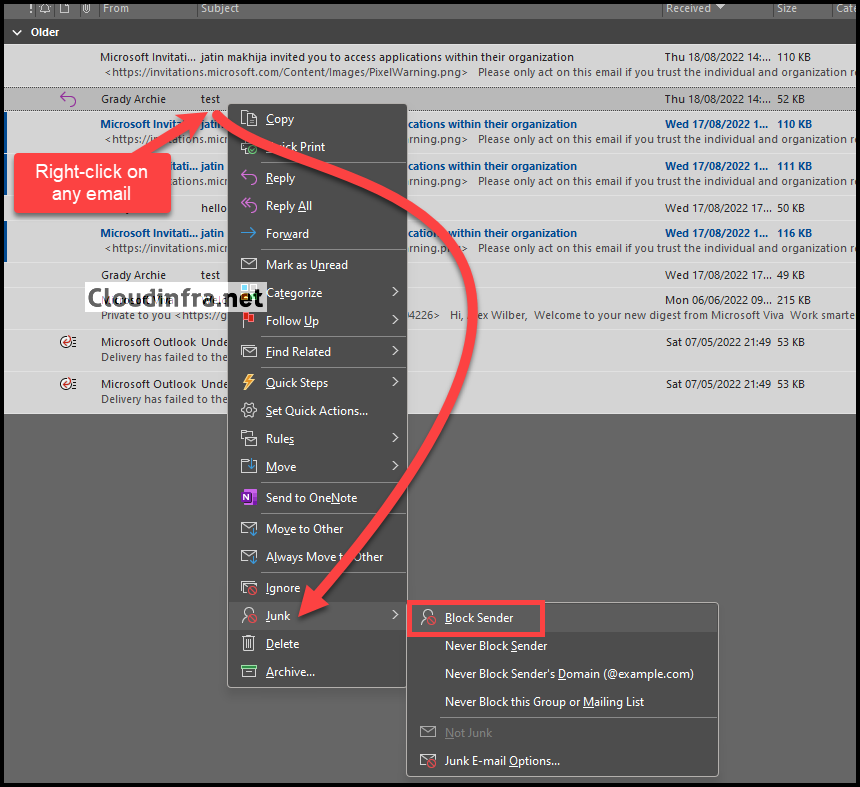
To block a sender email address in the Outlook (Classic) app, follow below steps:
Open the Outlook (Classic) app.
Locate the sender’s email you wish to block within Outlook.
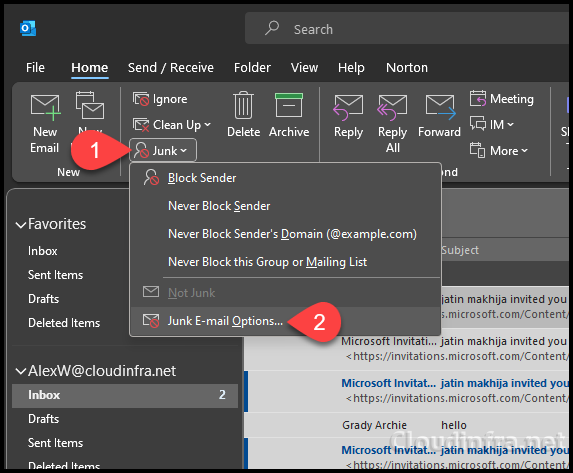
Right-click on the email and select Junk > Block Sender.
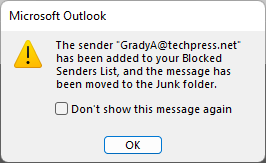
A confirmation pop-up will appear: The sender <sender email address> has been added to your Blocked Senders List, and the message has been moved to the Junk folder. You can check the box Don’t show this message again to prevent this pop-up from appearing.
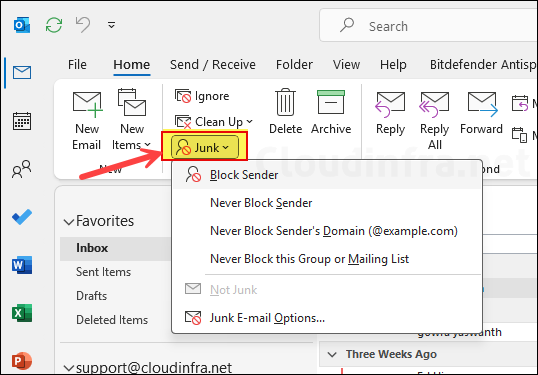
An alternative way to add a sender email address to the blocked sender list in Outlook is to open Outlook (classic) > select the sender’s email > go to Home > Junk > click Block Sender. The selected email sender will be added to the blocked senders list.
When a Blocked Sender Emails You: What to Expect
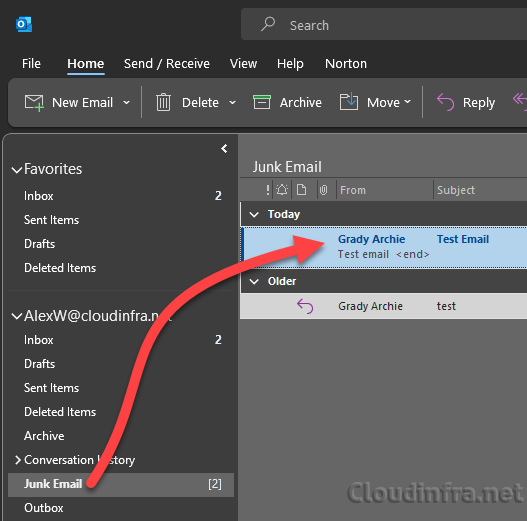
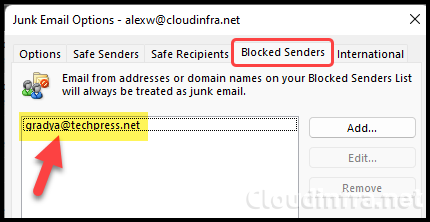
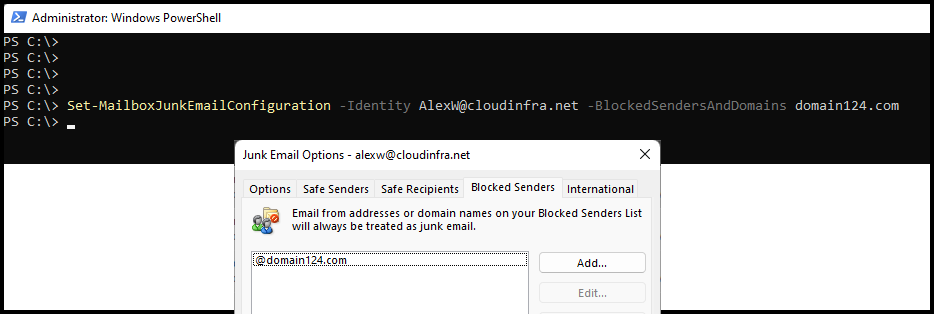
According to the default Junk E-mail Options in Outlook, the email will be directed to the user’s Junk Email folder. To verify this, I performed a test by sending an email from GradyA@techpress.net to AlexW@cloudinfra.net.
As GradyA@techpress.net is a blocked sender, any email from this address will go to AlexW@cloudinfra.net’s junk email folder. The screenshot below confirms that it’s functioning as expected.
Block Sender’s Domain in Outlook (Classic)
If you receive unwanted emails from multiple users within a specific domain, you can block the entire domain instead of blocking individual email addresses. This action will effectively block all users associated with that domain.
For example, if you’re receiving unwanted emails from users like shop@cloudinfra.net, no-reply@cloudinfra.net, hello@cloudinfra.net, and many others, it’s more convenient to block the entire domain “cloudinfra.net” rather than blocking each email address.
Let’s go through the steps to block a domain in Outlook:
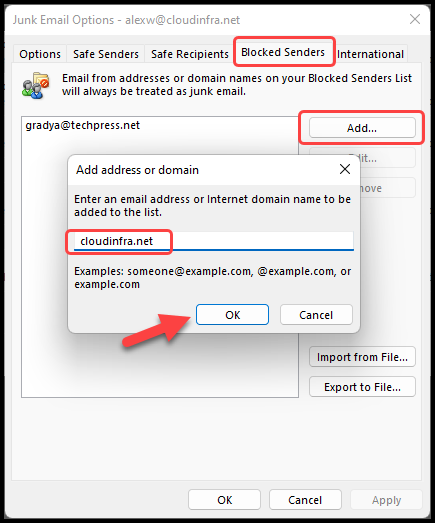
Open the Outlook (Classic) > Home > Junk > Junk E-mail Options.
Go to the Blocked Senders tab.
Click the Add button and enter the domain name you want to block, for example, cloudinfra.net or @cloudinfra.net.
Click Apply and then OK to save and exit.
Manage Block Sender List in Outlook (Classic)
To manage block senders list in Outlook (Classic), follow below steps:
Open the Outlook (Classic) > Home > Junk > Junk E-mail Options.
In the Junk Email Options, navigate to the Blocked Senders tab. You’ll find a list of all your blocked email addresses or domains here. This list serves as the Block Sender’s list in Outlook. You can add or remove senders from this list as required.
Block a Sender in Outlook on the Web (OWA)
You can also block a sender’s email address or domain using the web version of Outlook, commonly referred to as Outlook on the Web or Outlook Web App (OWA). Let’s walk through the steps:
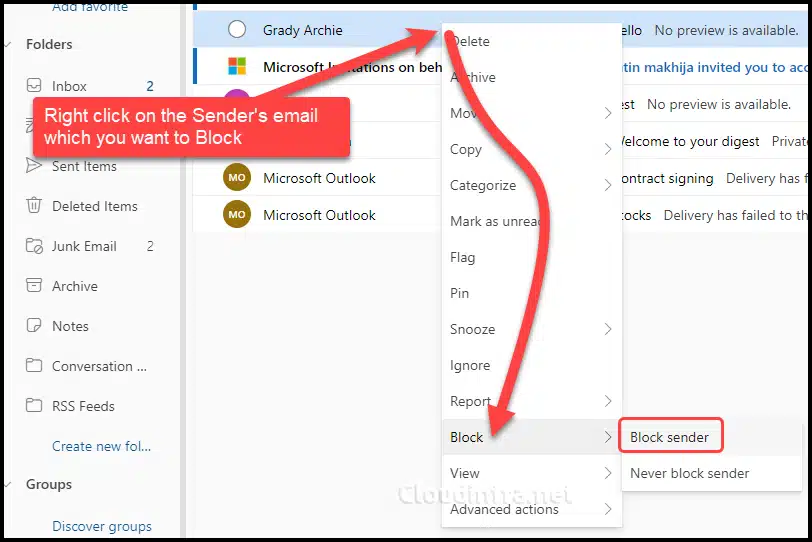
Right-click on the email and select Block > Block sender to add the sender’s email address to the block sender’s list.
Block Senders Domain in Outlook on the Web (OWA)
If you’re receiving numerous unwanted emails from various email addresses originating from the same domain, blocking the entire domain is simpler. This action will block all users associated with that domain, and their emails will be directed to the Junk folder.
Here are the steps to block a sender’s domain in Outlook on the web:
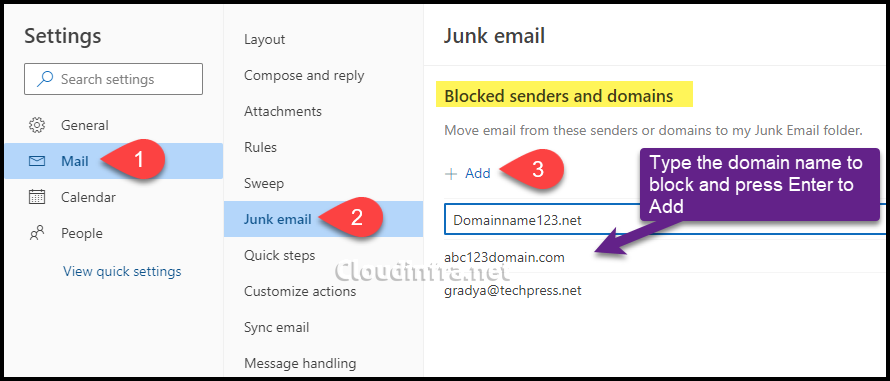
Under the blocked senders and domains tab, click + Add blocked sender.
Type the email address or domain of the sender and click OK.
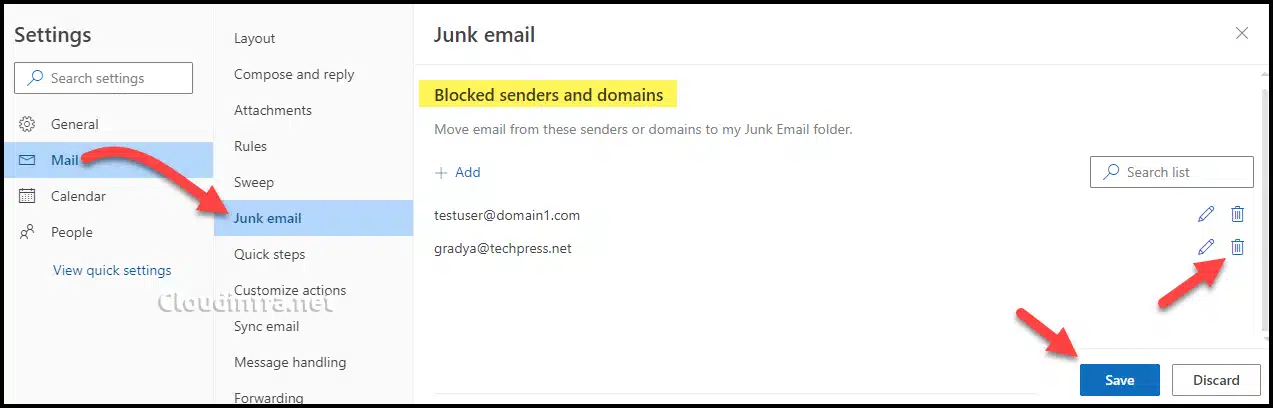
Manage Block Sender List in Outlook on the Web (OWA)
After you’ve added a sender or domain to the block list, you can manage it using Outlook on the Web (Outlook Web App). Follow these steps for managing the block senders list:
Under the Blocked senders and domains tab, find all the blocked senders and domain entries. You can add or remove the entries as required.
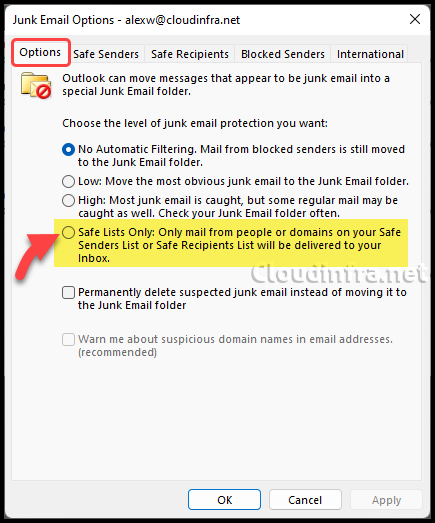
Receive emails only from the safe sender list
To only get emails from the Safe Senders list, configure Junk email options and set it to Safe list only.
Outlook (Classic) App
To configure email delivery exclusively from the Safe Sender List in Outlook (classic) app, follow below steps:
Open the Outlook (Classic) > Home > Junk > Junk E-mail Options.
In the Options tab, select Safe Lists Only: Only mail from people or domains on your Safe Senders List or Safe Recipients will be delivered to your Inbox.
Outlook on the Web (OWA)
To configure email delivery exclusively from the Safe Sender List using Outlook on the Web, follow these steps:
An important point to note when using this option is that it can affect the delivery of emails from unknown email addresses or domains. To receive emails from such sources in your inbox, you must add their senders and domains to your Safe sender and domains list.
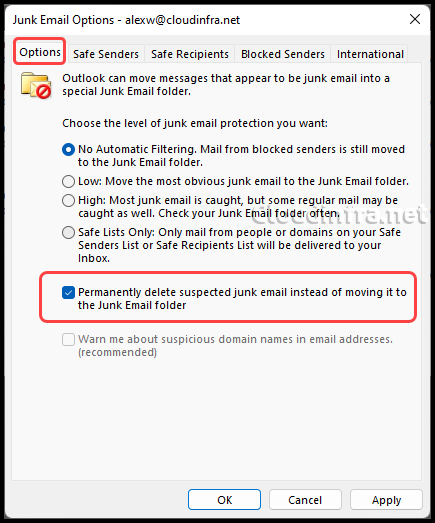
Permanently Delete Suspected Junk Emails
Instead of redirecting emails from blocked senders to Junk email folder, you can permanently delete the emails.
Open the Outlook (Classic) > Home > Junk > Junk E-mail Options.
Go to the Options tab and select Permanently delete suspected junk email instead of moving it to the Junk Email folder.
Unblock an email address or domain in Outlook
Unblocking a sender from the blocked sender’s list is a straightforward process. Just follow these steps:
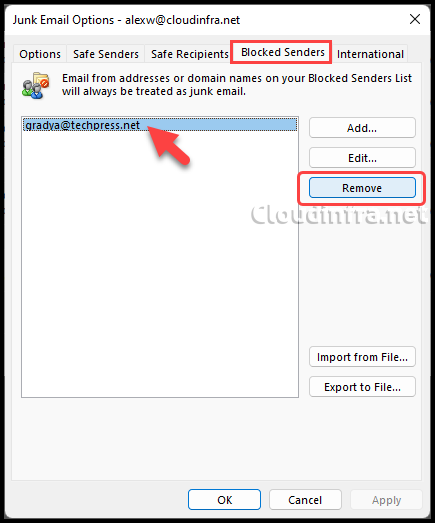
Outlook (Classic)
Open the Outlook (Classic) > Home > Junk > Junk E-mail Options.
Go to the Blocked Senders tab and select the entry you want to remove from the list.
Click on the Remove button to remove the sender from the block list.
Click on Apply and then OK to Save and Exit.
Using Outlook on the Web (OWA)
To unblock a sender’s email address or domain using Outlook on the Web (Outlook Web App), follow these steps:
Under the Blocked senders and domains tab, click on the bin icon next to the block list entry to remove the sender from the block list, and then click on the Save button to save the list.
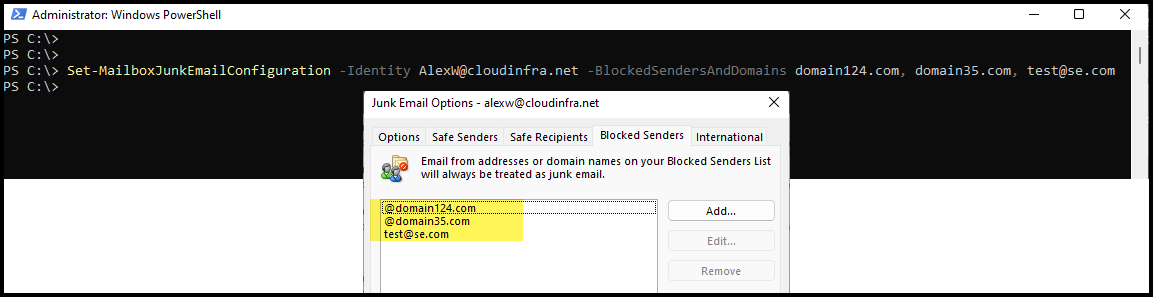
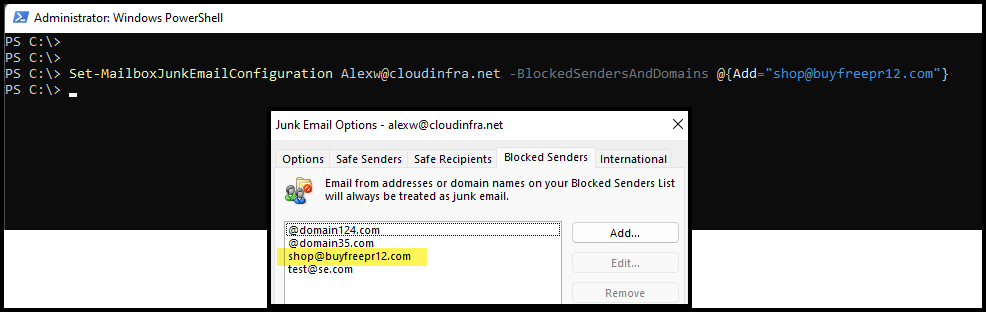
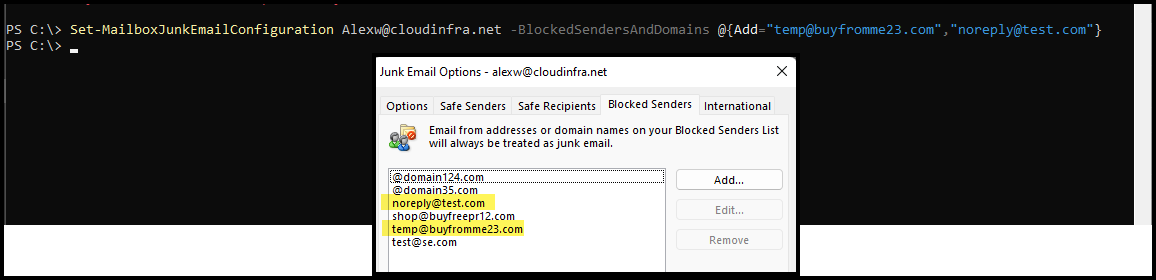
Block an email address or domain using Powershell
Here are the steps to add a sender’s email address using PowerShell. We’ll utilize the PowerShell cmdlet Set-MailboxJunkEmailConfiguration and apply it to a user mailbox to configure the block sender’s list. Before using this cmdlet, ensure that you have installed Exchange Online PowerShell Module and connected to Exchange Online using Connect-ExchangeOnline.
Example 1: Adding domain124.com to a user’s block sender list
Outlook’s blocked sender and domain lists are a practical way to reduce nuisance email for a specific mailbox, and Microsoft supports both UI-based and PowerShell-based management. For enterprise-wide blocking, use Microsoft 365 security controls (Tenant Allow/Block List, anti-spam policies, transport rules) rather than relying on Outlook mailbox junk lists alone.


How can I use the web client to block a long list of domains and addresses without having to put each one in one at a time?
Hello T, You can use PowerShell foreach loop to block the list of domains for a user mailbox.