In this post, I will show you how to configure default font in Outlook using Intune. This will ensure that every new email users compose, reply to, or forward follows your organization’s branding and readability standards. Instead of asking users to manually change their font settings, you can centrally deploy the required configuration and make sure it applies automatically to all targeted devices and users.
Microsoft Outlook (Classic) is the original desktop email client that ships as part of Microsoft Office and Microsoft 365 Apps for enterprise, offering a rich, feature-complete experience that many organizations still rely on for advanced mail, calendar, and add-in scenarios. Microsoft has also developed a new Outlook app, which is built on the same foundation as Outlook on the web (OWA), designed as a modern, cloud-first, cross-platform experience with a consistent interface across Windows, macOS, and the browser.
Microsoft Outlook (Classic) app will be phased out in the future in favor of the new Outlook app. The switch to the new Outlook app will happen in three stages: opt-in, opt-out, and cutover. For more information about these stages, refer to the Microsoft page: New Outlook: Guide to product availability | Microsoft Learn. According to Microsoft, existing installations of classic Outlook through perpetual and subscription licensing will continue to be supported until at least 2029.
Now that we have an overview of both versions of the Outlook app, the next sections will show you how to configure the default font in both the Outlook Classic app and the New Outlook app. If users in your organization only use the New Outlook app, then skip to the section for configuring font settings for new Outlook app.
Contents
Outlook (Classic) vs. New Outlook: Font Locations
Outlook Classic and the New Outlook app store their font configuration in different locations, so one single method to configure the default font will not work for both. You need to configure the default font settings separately for each app based on how each one stores and reads its font settings.
Outlook Classic App Font Location
For the classic Outlook desktop client, the default font settings are stored locally in the user registry under:
HKEY_CURRENT_USER\Software\Microsoft\Office\16.0\Common\MailSettings
New Outlook App Font Location
New Outlook does not rely on the classic MailSettings registry key for its default font configuration, and its font defaults are managed via mailbox configuration Set-MailboxMessageConfiguration instead of per-device HKCU registry values.
Best Practices and Recommendations
Below are some best practices and recommendations for configuring default font in Outlook classic and new Outlook app.
- Use built-in fonts: It’s best practice to use fonts that are already included with Microsoft 365, such as Calibri, Aptos, Segoe UI, or Arial. If you configure a default third-party font in Outlook and if it’s not installed on the system, Outlook will fall back to a generic font. If you want to use a custom font as the default in Outlook, you must first deploy the font to the device and then configure it in the Outlook app. For third-party font deployment, refer to the guide Deploy Fonts Using Intune.
- Align fonts across apps: Try to match Outlook fonts with Word, PowerPoint, and corporate templates. This gives a consistent brand identity across email and documents. Microsoft documents also recommend using templates and cloud policies for Word and Excel where available.
- Keep fonts readable: Choose a size of 11 or 12 and avoid very light colors. Accessibility is more important than squeezing extra text onto a line.
- Pilot before broad rollout: Start with an IT or pilot group. Confirm that the registry-based approach does not conflict with existing GPOs or profile management tools.
- Document your standard: Record the chosen font, size, and color in your IT standards so future Intune or Exchange engineers know what to maintain.
Configuring Default Font in Outlook (Classic) App
You can configure a default font style for each of the different scenarios, such as writing a new email, replying to or forwarding an email, or composing and reading plain text messages. You can set the font name, font style, font size, font color, and other available properties.
For demonstration purposes, I will configure the default font for all of these scenarios. I will also create a detection script to verify that the values for each scenario are set as expected. Below screenshot is from the Outlook Classic app, where the default font and styles are configured.
In the next section, I will begin by deploying the default font configuration for the Outlook Classic app. Later in the post, we will go through the steps to configure the default font in the new Outlook app, either for a single user or for all users at once.
Step 1: Configure Font on a Reference Machine
The first step is to configure the desired default font and its style on a reference machine. Ideally, use a dedicated test device with the latest version of Outlook (Classic) client installed.
- Sign into the reference Windows 11 machine.
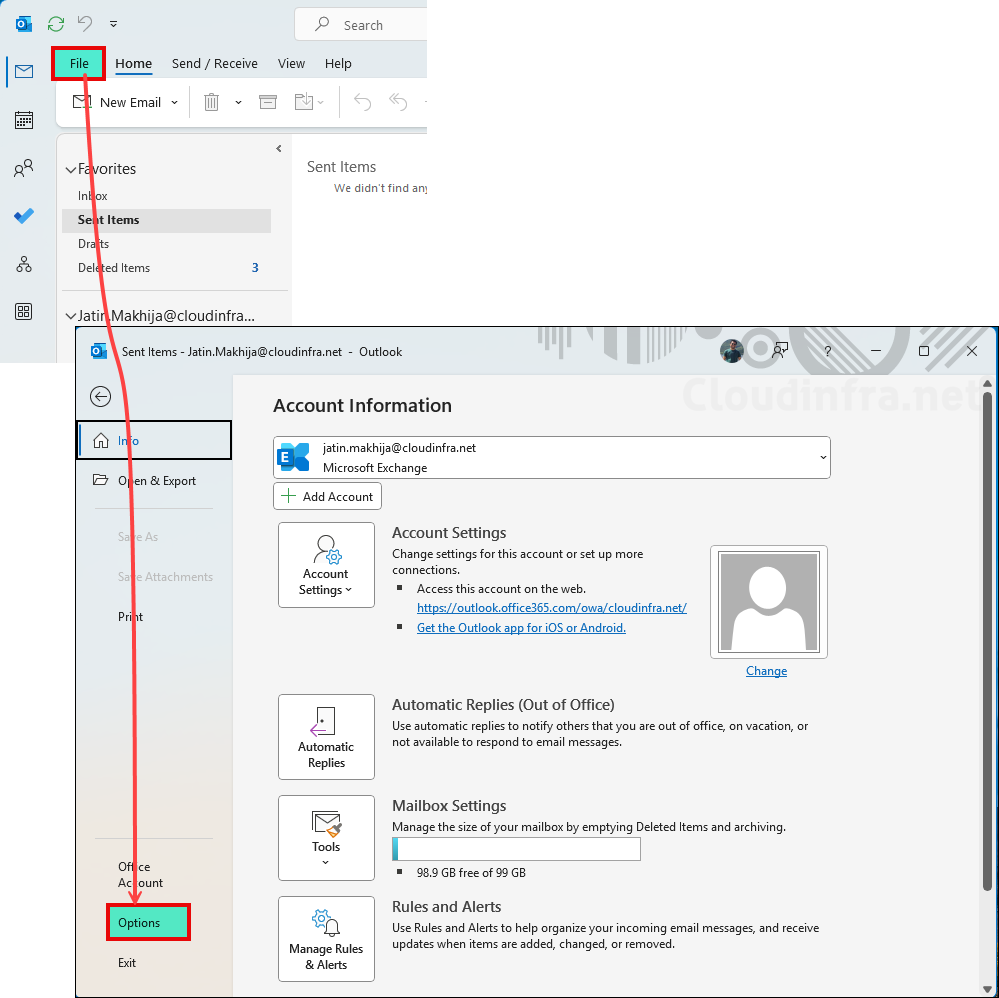
- Open the Outlook (Classic) app and click on File > Options.
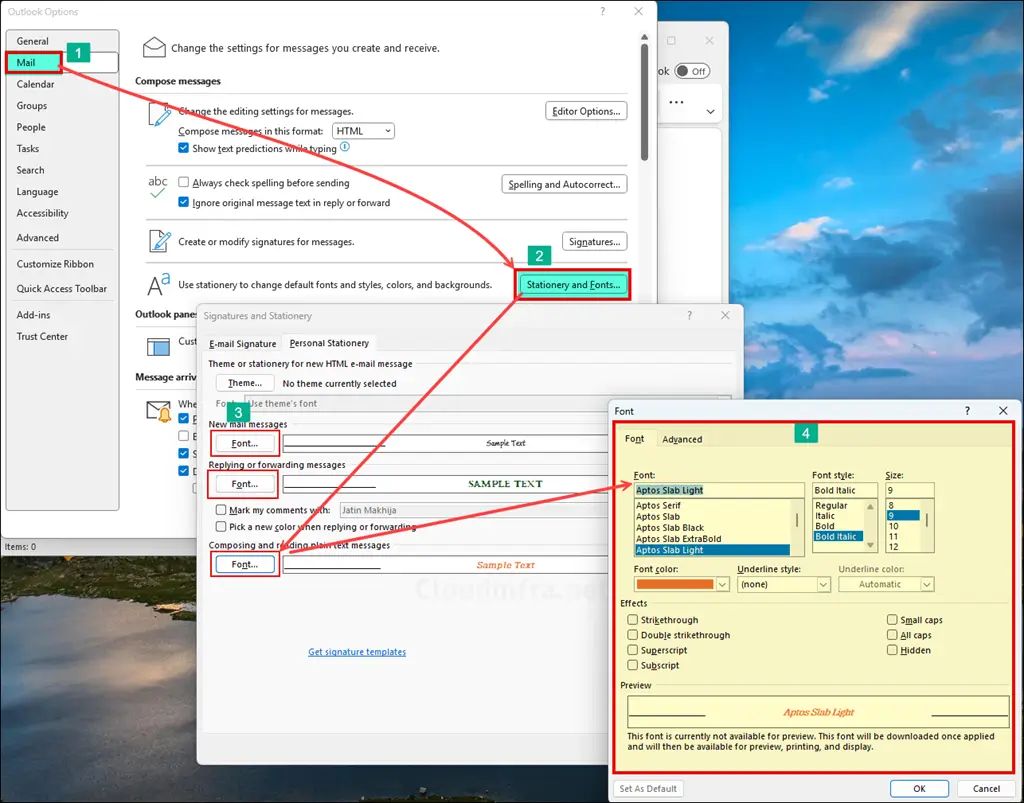
- Click on Mail > Stationery and Fonts.
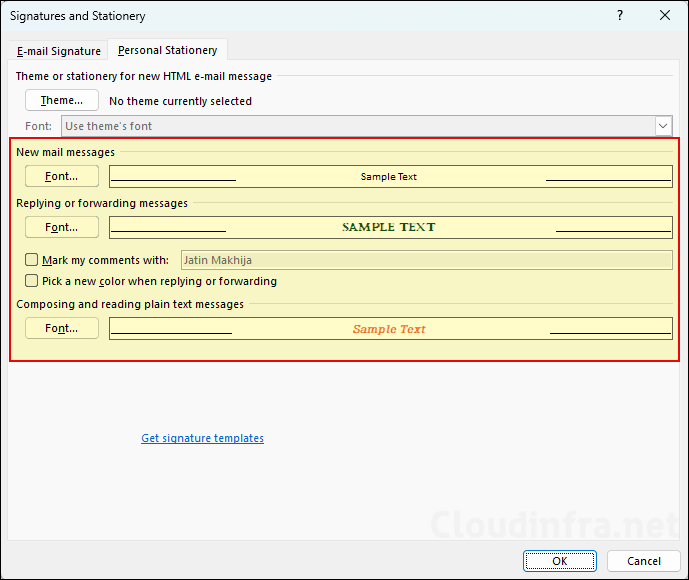
- Under the Personal Stationery tab, there are 3 font buttons for configuring new email, replying to or forwarding an email, or composing and reading plain text messages. Click each font button and set the font name, size, style, color, and any other preferences you want to apply to the target user’s Outlook app.
It’s important to configure the font for each email scenario: new email, replying to or forwarding an email, or composing and reading plain text messages. When you configure these settings, it creates the corresponding registry values (shown later) for each scenario. The detection script will check and confirm that all of these registry values are set as expected. If you would rather not configure the font for one or more scenarios, you must modify the detection script and remove the checks for the registry values related to those specific scenarios; otherwise, the detection will fail.
Below screenshot shows the configuration of the font for one of the email scenarios: composing and reading plain text messages. I have set the font family to Aptos Slab Light, font style to Bold Italic, and font size to 9 and changed the font color to orange. Once you have configured the font for new email, replying to or forwarding an email, or composing and reading plain text messages. Close Outlook and proceed to the next step.
Step 2: Export MailSettings Registry Key
As we know, Outlook (Classic) stores its font configuration data in HKCU\Software\Microsoft\Office\16.0\Common\MailSettings registry key. This key needs to be exported into a .reg file.
- After configuring the default font in Outlook, ensure that Outlook (Classic) is closed.
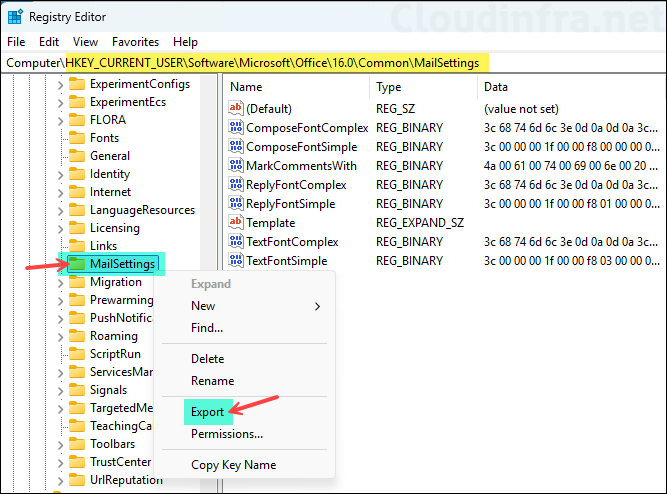
- Open Registry Editor and navigate to HKEY_CURRENT_USER\Software\Microsoft\Office\16.0\Common\MailSettings.
- Right-click on MailSettings and click Export.
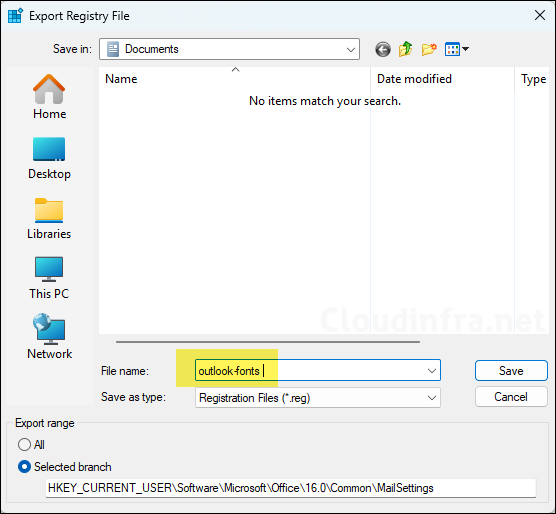
- Give any name to the registry export file. I have named the file as outlook-fonts.reg. Note that if you are using any other file name, you will need to update the name of the file in install.ps1 script.
Step 3: Download PowerShell Scripts
I have created below 5 PowerShell scripts for deploying Outlook font settings through Intune. Download these scripts from my GitHub repository: Powershell-Scripts/Intune/Windows11/OutlookClassic_Fonts at master · Jatin-Makhija-sys/Powershell-Scripts · GitHub.
- Install.ps1: Installs/imports outlook-fonts.reg file on the target devices to configure the fonts in Outlook (classic).
- Uninstall.ps1: Removes the configured font settings for Outlook (classic), which automatically restores them to the default settings.
- Detect-Fonts.ps1: Detection script that verifies whether the font settings are configured as expected. If a user changes the font settings in Outlook, the detection will fail and the Win32 app deployment will reapply the correct configuration.
Helper scripts:
The detection script requires the font-related registry values from a reference machine to validate the configuration on target devices. To update the Detect-Fonts.ps1 script, you will need the following helper scripts. These scripts will output the required information for the detection script. I will show you later how to update the detection script; for now, just download these scripts as well.
- Check-FontNames.ps1: Helper script to check the configured font names in Outlook. Run this on the reference machine.
- MailSettings_Reg_Keys_Formatted.ps1: Retrieves and formats the registry values related to font settings so they can be used in the detection script.
Step 4: Create IntuneWin File
We will use Win32 app deployment method to configure/change the default font in Outlook on the target devices. This method requires the application to be packaged in the .intunewin file format. First, we will repackage the source files into an .intunewin file, and then we will create the Win32 app deployment in Intune. To create .Intunewin file, follow below steps:
- Create a new folder called Outlook-Fonts (you can give it any name you like).
- Copy and paste the downloaded PowerShell script files Install.ps1 and Uninstall.ps1 into this folder.
- Copy and paste the Outlook-fonts.reg file into this folder.
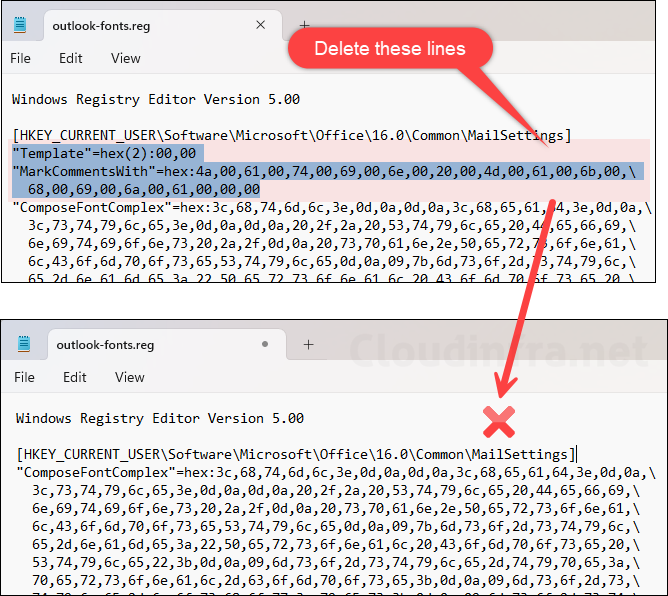
Open the Outlook-fonts.reg file and delete the lines that start with Template and MarkCommentsWith, then save the registry file. Below screenshot highlights the lines to remove and shows how the file should look afterward. For reference, I have uploaded my Outlook-fonts.reg file to my GitHub repository. Ensure that your file looks like this: outlook-fonts.reg. Do not use my GitHub Outlook-fonts.reg file; use the one you have exported from your reference machine. I have uploaded this file just for your reference.
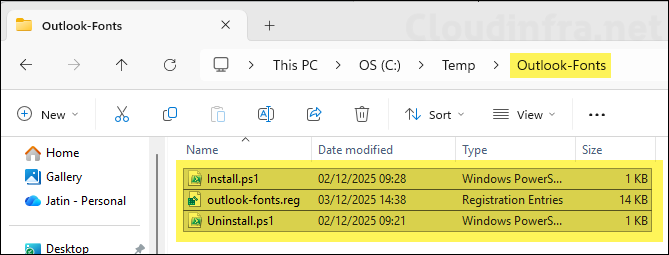
Make sure you have Install.ps1, Uninstall.ps1, and Outlook-fonts.reg files stored in a separate folder, similar to the one shown in the screenshot below.
Now that we have prepared all our source files, we can begin with the creation of Intunewin file.
- Download and extract the Microsoft Win32 Content Prep tool.
- Navigate to the extracted folder and run .\IntuneWinAppUtil.exe.
- Please specify the source folder: C:\Temp\Outlook-Fonts
- Please specify the setup file: Install.ps1
- Please specify the output folder: C:\Output
- Do you want to specify catalog folder (Y/N)?N

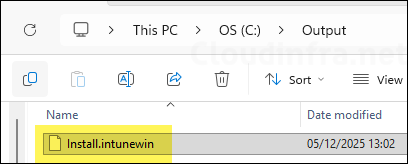
- Go to the C:\Output folder to find the .intunewin file. This file is required for creating the Intune app deployment.
Step 5: Prepare Detection Script (Detect-Fonts.ps1)
A few changes are required in the detection script based on the fonts you configured in Outlook on the reference machine. To make these updates and prepare the detection script, you will need to download the helper scripts Check-FontNames.ps1 and MailSettings_Reg_Keys_Formatted.ps1. In the next steps, I will show you how to update the detection script and get it ready for your Intune deployment.
- Sign in to the reference machine from where you had exported the MailSettings registry key.
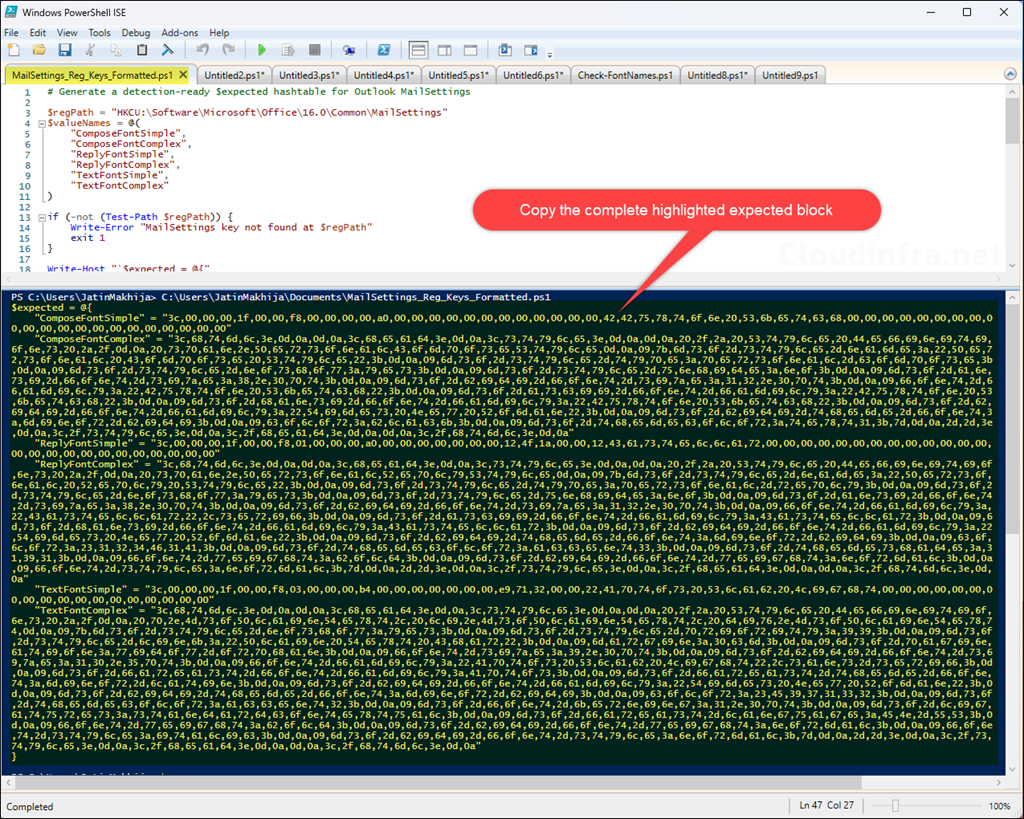
- Open Powershell console or ISE (elevation not mandatory) and run MailSettings_Reg_Keys_Formatted.ps1. It will output the expected hash table block. Copy everything in the output and paste it somewhere in a notepad.
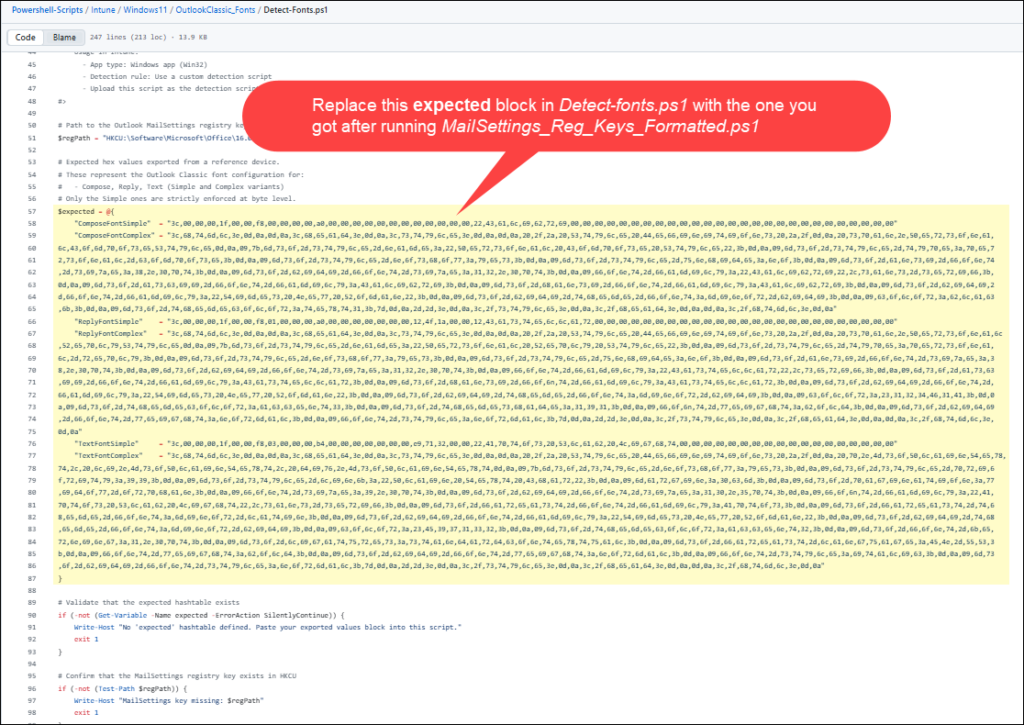
- Open the Detect-Fonts.ps1 script and replace the expected block with the output you obtained from the MailSettings_Reg_Keys_Formatted.ps1 script, then save the file. Below screenshot shows the expected block in Detect-Fonts.ps1 that you need to replace.
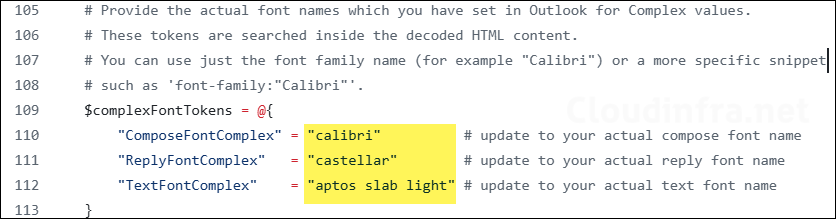
One more update is required in the Detect-Fonts.ps1 script: the font names you configured in Outlook on the reference machine. You can retrieve these font names either by running the helper script Check-FontNames.ps1 or by checking the font settings you configured in Outlook for each mail scenario: new email, replying to or forwarding an email, or composing and reading plain text messages.
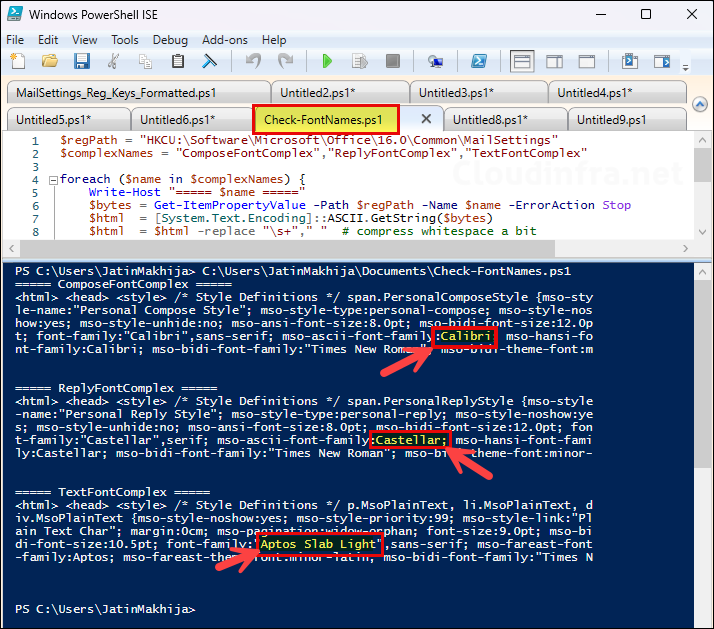
Once you have the font names, update them in the Detect-Fonts.ps1 script as shown in the screenshot below. That’s it. Save the Detect-Fonts.ps1 file. No further modifications are required in the detection script.
Step 6: Create Win32 App Intune Deployment
- Sign in to the Intune admin center > Apps > All Apps.
- Click on + Create and select Windows app (Win32) from the app type drop-down.
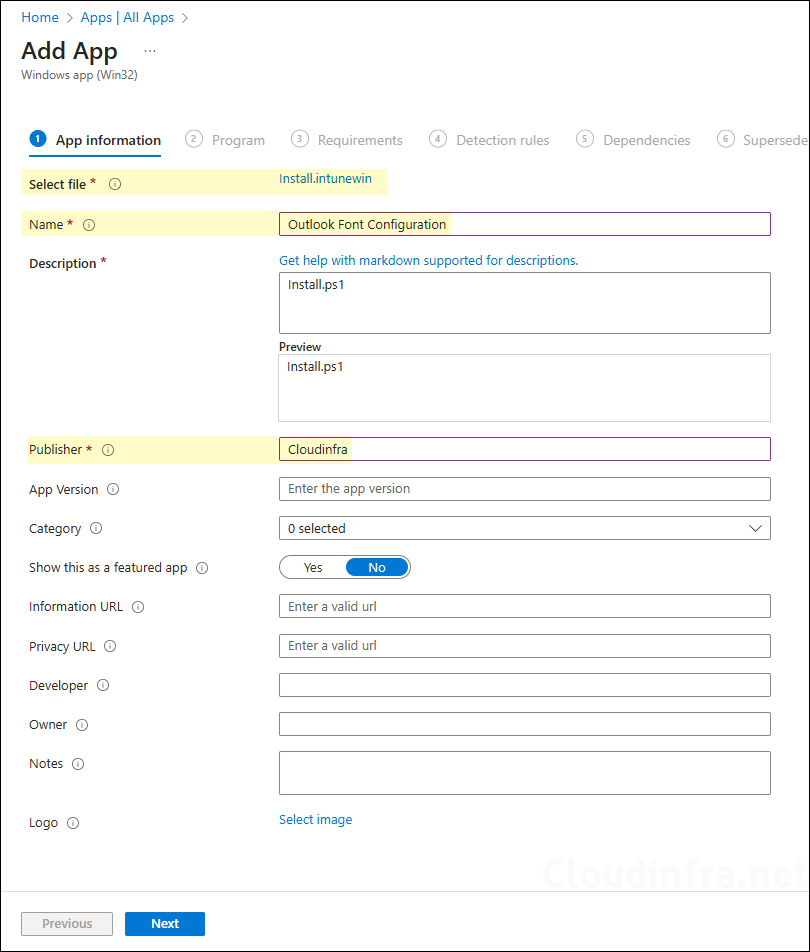
- App Information: Click on Select app package file and browse the Intunewin file, which we created in C:\Output folder.
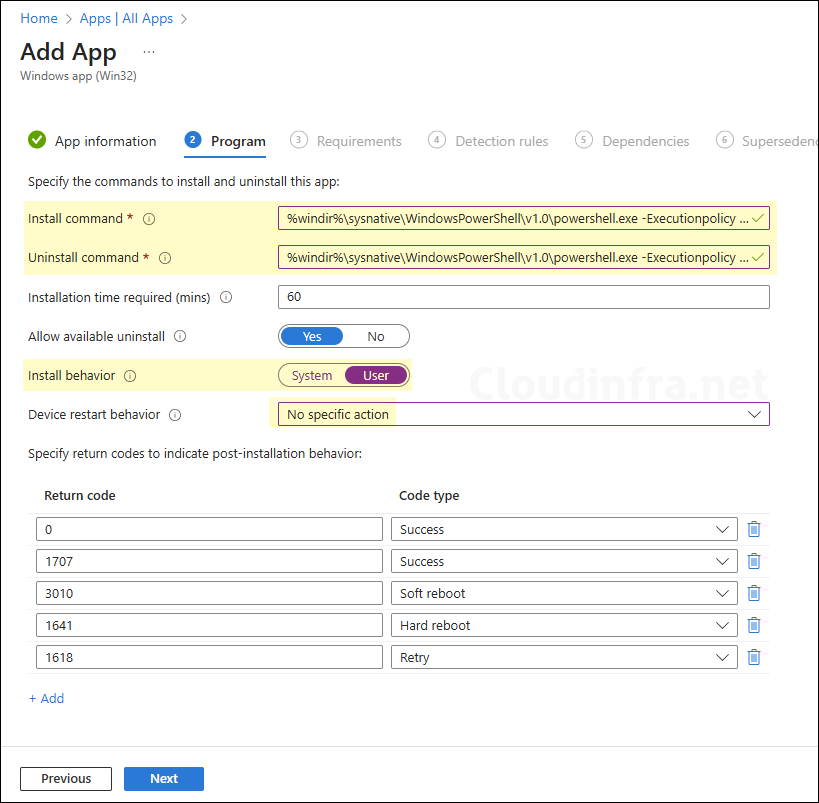
- Program tab:
- Install command: %windir%\sysnative\WindowsPowerShell\v1.0\powershell.exe -Executionpolicy Bypass .\install.ps1
- Uninstall command: %windir%\sysnative\WindowsPowerShell\v1.0\powershell.exe -Executionpolicy Bypass .\Uninstall.ps1
- Installation time required (mins): Keep default
- Allow available uninstall: Keep default
- Install behavior: User
- Device restart behavior: No specific Action
- Specify return codes to indicate post-installation behavior: Keep default
- Requirements: Specify the requirements that the devices must meet before the app is installed.
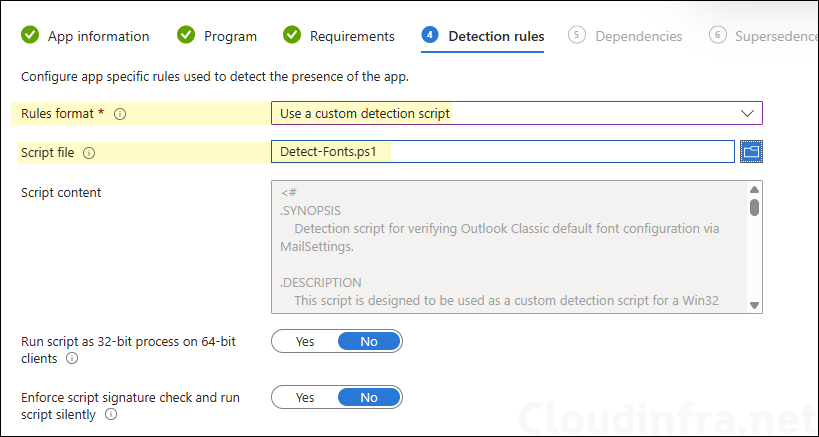
- Detection Rules:
- Rules Format: Use a custom detection script
- Script file: Browse to the detection script Detect-fonts.ps1 we prepared in the previous step.
- Run script as 32-bit process on 64-bit clients: No
- Enforce script signature check and run script silently: No
- Dependencies: Click Next.
- Supersedence: Click Next.
- Scope tags (optional): A scope tag in Intune is an RBAC label you add to resources (policies, apps, devices) to limit which admins can see and manage them. For more information, read: How to use Scope tags in Intune.
- Assignments: Assign the app to Entra security groups that contain the target users or devices. As a best practice, pilot with a small set first; once validated, roll it out more broadly. For guidance on assignment strategy, see Intune assignments: User groups vs. Device groups.
- Review + create: Review the deployment summary and click Create.
Sync Intune Policies
The device check-in process might not begin immediately. If you’re testing this policy on a test device, you can manually kickstart Intune sync from the device itself or remotely through the Intune admin center.
Alternatively, you can use PowerShell to force the Intune sync on Windows devices. Restarting the device is another way to trigger the Intune device check-in process.
Monitoring Outlook Font Intune Deployment
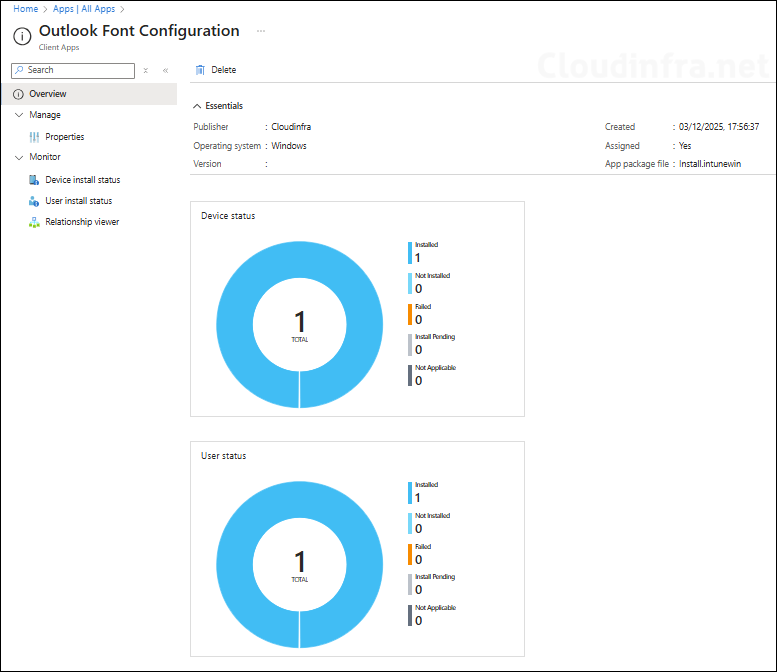
- Sign in to the Intune admin center > Apps > All Apps.
- Select the Outlook font configuration intune deployment and from the overview page, find the status of the deployment. For more detailed information, click Device install status or user install status.
End User Experience
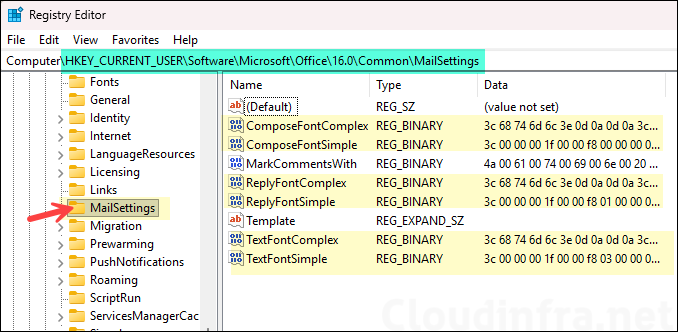
Once the Intune deployment completes successfully, sign in to one of the target devices and verify that the font has been configured as expected. To check, first look at the registry key HKEY_CURRENT_USER\Software\Microsoft\Office\16.0\Common\MailSettings and confirm that the registry entries shown below have been created.
- ComposeFontComplex
- ComposeFontSimple
- ReplyFontComplex
- ReplyFontSimple
- TextFontComplex
- TextFontSimple
If a user has never changed their default font configuration in the Outlook app, the registry entries shown above will not exist. In that case, the Intune deployment will create the required keys. If a user has already set their default font manually in Outlook, these registry entries will already exist and contain hex values based on the user’s configuration. This means that simply checking whether the registry entries exist does not confirm that the deployment succeeded unless you also validate the values. To ensure the Intune deployment succeeded, verify that the correct font configuration is applied in the Outlook app for the user.
- Open the Outlook (Classic) app and click on File > Options.
- Click on Mail > Stationery and Fonts. Under the Personal Stationery tab, click on the font button corresponding to each mail scenario: new email, replying to or forwarding an email, or composing and reading plain text messages, and confirm if it has been set correctly.
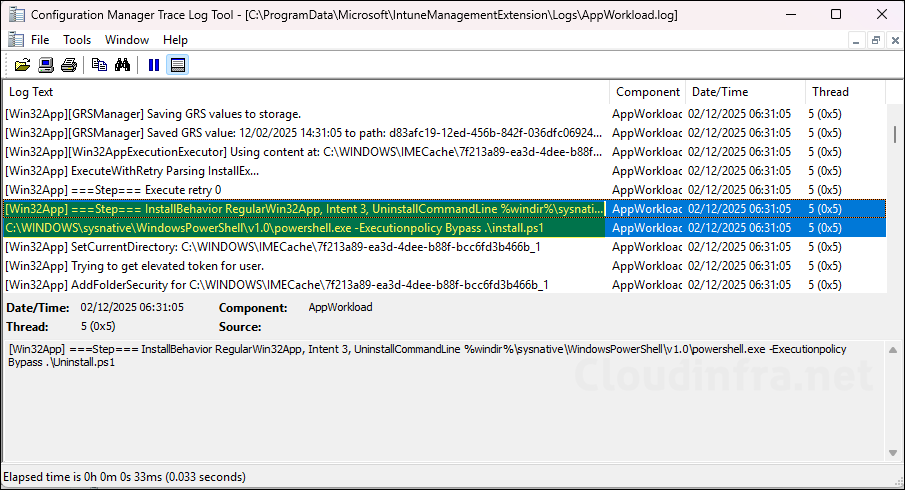
Another way to confirm whether the script has executed on the device is by checking the Intune logs located at C:\ProgramData\Microsoft\IntuneManagementExtension\Logs. In the Logs folder, open the AppWorkload.log file and search for the Install.ps1 script.
Configuring Default Font in New Outlook App
New Outlook does not rely on the classic MailSettings registry key for its default font configuration. Font settings are stored in the mailbox configuration in Exchange Online and are controlled via the Set-MailboxMessageConfiguration cmdlet. It’s much easier to configure default font settings for new Outlook than Outlook (Classic). The change will affect both New Outlook for Windows and Outlook on the web (OWA).
Let’s look at the steps to configure the default font settings in new Outlook for a single user and also for all users in an organization.
Step 1: Install Exchange Online Management Module
Use below commands to install and import the Exchange Online Management module. If you are interested in reading more about learning different variations of installing this module or if you are experiencing any issues, refer to the post: Install Exchange Online PowerShell Module.
- Open the PowerShell console on a Windows device and run below commands.
Install-Module -Name ExchangeOnlineManagement -Scope CurrentUser -force -AllowClobber
Import-Module ExchangeOnlineManagement
Step 2: Connect to Exchange Online
Connect to Exchange Online using an Exchange administrator account. Provide the admin UPN to connect. For more information about the permissions required for connecting to EXO, refer to the post: Permissions in Exchange Online | Microsoft Learn.
Connect-ExchangeOnline -UserPrincipalName <Admin UPN>

Example:
Connect-ExchangeOnline -UserPrincipalName jatin.makhija@cloudinfra.net
Step 3: Set Default Outlook Font for a Single Mailbox
You can configure font settings for a single user mailbox or for all user mailboxes at once. Below command below apply the font settings only to the specified user mailbox. You can add additional font properties as needed. For a complete list of available properties, refer to the Microsoft Learn page for Set-MailboxMessageConfiguration (ExchangePowerShell) | Microsoft Learn.
Example
# Font settings (adjust as needed)
$FontSettings = @{
    DefaultFontName  = "Castellar"   # Font family
    DefaultFontSize  = 4             # HTML size (4 ≈ 14pt)
    DefaultFontColor = "#000000"     # Hex color
    DefaultFontFlags = "Bold"        # Normal, Bold, Italic, Underline, etc.
    DefaultFormat    = "PlainText"   # Html or PlainText
}

# Single mailbox
Set-MailboxMessageConfiguration -Identity "adelev@cloudinfra.net" @FontSettings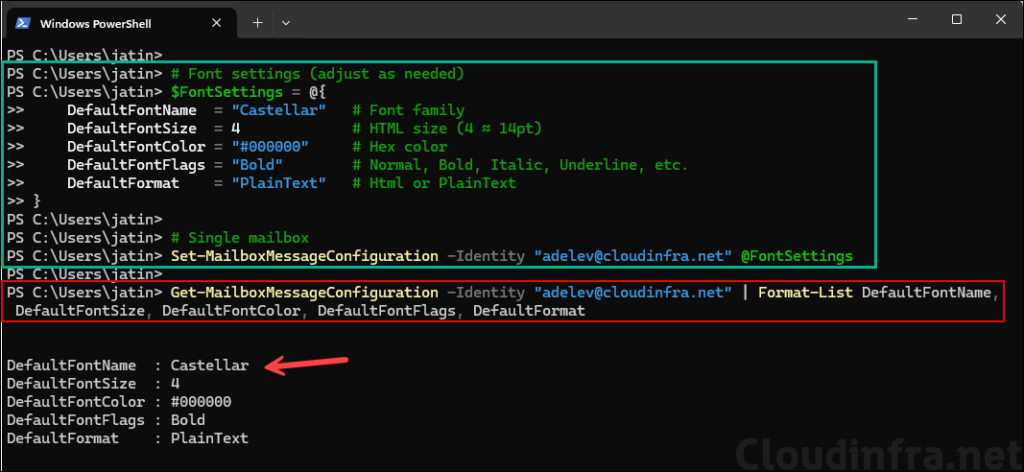
Step 4: Set Default Outlook Font for All User Mailboxes
If you want to apply standard default font settings for all users in your organization, you can set it in one go using the command below. Update the font settings as required; I have included only a few of the most commonly configured options. You can add additional font properties as required. Refer to the Microsoft Learn page for the full list of available properties for Set-MailboxMessageConfiguration: Set-MailboxMessageConfiguration (ExchangePowerShell) | Microsoft Learn.
Set Default Outlook Font for All User Mailboxes
# Font settings (adjust as needed)
$FontSettings = @{
    DefaultFontName  = "Castellar"   # Font family
    DefaultFontSize  = 4             # HTML size (4 ≈ 14pt)
    DefaultFontColor = "#000000"     # Hex color
    DefaultFontFlags = "Bold"        # Normal, Bold, Italic, Underline, etc.
    DefaultFormat    = "PlainText"   # Html or PlainText
}

Get-Mailbox -ResultSize Unlimited | ForEach-Object {
    Set-MailboxMessageConfiguration -Identity $_.PrimarySmtpAddress @FontSettings
}
Step 5: Verify Default Outlook Font for a All User Mailboxes
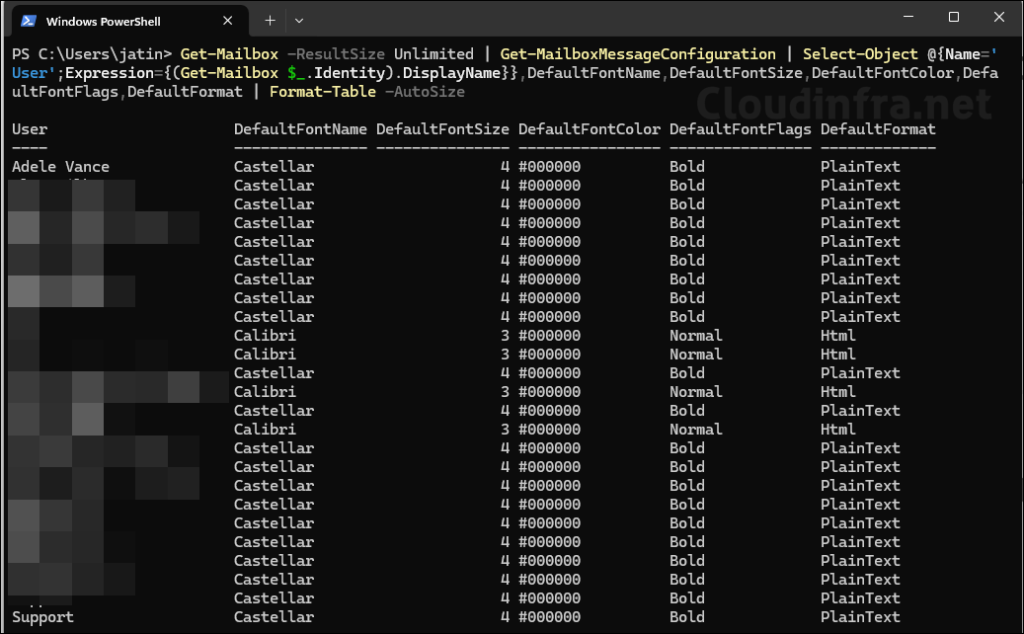
Run below command to verify the default font configuration for all user mailboxes.
Get-Mailbox -ResultSize Unlimited | Get-MailboxMessageConfiguration | Select-Object @{Name='User';Expression={$_.Identity}},DefaultFontName,DefaultFontSize,DefaultFontColor,DefaultFontFlags,DefaultFormat | Format-Table -AutoSizeEven after running the command to set the same font configuration for all mailboxes, some user mailboxes are still showing the previous default font settings. In my case, this happened because the script was unable to uniquely resolve those users. You may not encounter this issue, as it is specific to my organization.
Step 6: Export Default Outlook Font Configuration for All User to CSV
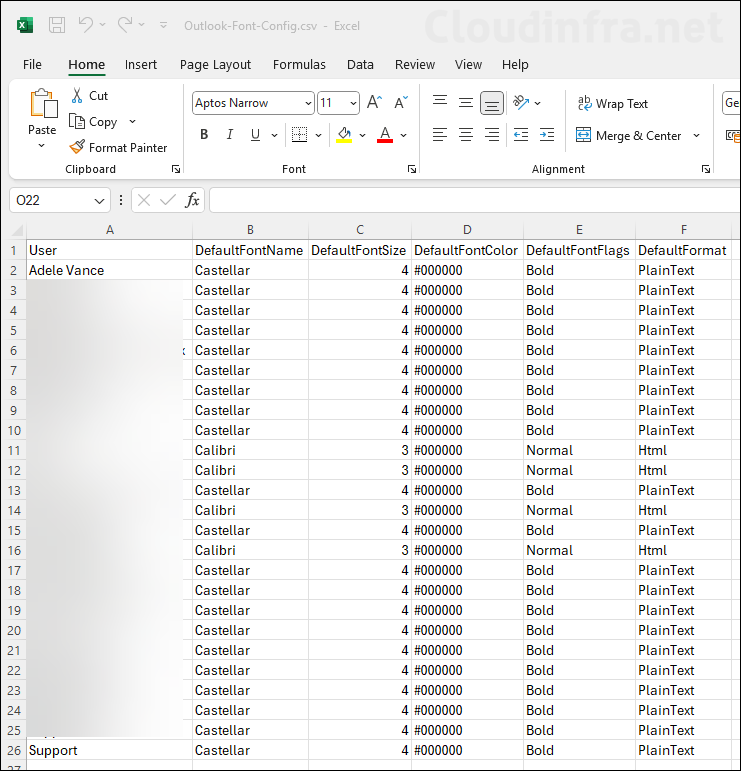
Run below command to export default font configuration for all user mailboxes to a CSV file.
Get-Mailbox -ResultSize Unlimited | Get-MailboxMessageConfiguration | Select-Object @{Name='User';Expression={(Get-Mailbox $_.Identity).DisplayName}},DefaultFontName,DefaultFontSize,DefaultFontColor,DefaultFontFlags,DefaultFormat | Export-Csv "Outlook-Font-Config.csv" -NoTypeInformation