In this detailed deployment guide, I will show you the steps on how to deploy fonts using Intune. Custom fonts are often required for branded templates, marketing material, or consistent document formatting across an organization. When a font is installed “for all users”, Windows stores the font file in C:\Windows\Fonts and registers it in HKLM\SOFTWARE\Microsoft\Windows NT\CurrentVersion\Fonts.
To install a font manually on a Windows device, download the custom font file, for example from Google Fonts, right-click it, and select Install. The font is then installed on the device.
Instead of manually installing fonts on each device, you can automate the deployment and installation process using Intune. There are several ways to deploy fonts via Intune, including the Win32 app method (recommended), Master Packager, and PowerShell scripts. In this guide, we will focus on the Win32 app method only; for complete information on the other methods, refer to guide Simplify Fonts Deployment in Intune: 3 Methods.
Step-by-Step guide
Contents
Ways to Deploy Fonts on Windows Devices Using Intune
Below are three common methods to deploy fonts on Windows devices using Intune:
- Using Win32 App Deployment: This is my recommended method for deploying fonts on Windows devices. This method requires creating PowerShell scripts, provides better reporting, and allows you to easily uninstall fonts from user’s devices.
- Using Master Packager: This tool allows you to create and edit MSI files. You can use the community edition of this tool to create an MSI installer file that includes the custom font files. The MSI file is then deployed using the Line-of-Business app option in Intune.
- Using a PowerShell Script: This method involves creating a standalone PowerShell script to deploy font files. The script copies the font files to C:\Windows\Fonts directory. Once the script is tested, deploy it using Intune. For a step-by-step guide on deploying PowerShell scripts, refer to How to deploy a PowerShell script using Intune.
Method 1: Deploy Fonts Using Win32 App Method [Recommended]
The first method I will cover uses Win32 app deployment in the Intune admin center. This method will use PowerShell scripts to deploy font files on Windows 10 and Windows 11 devices. Let’s go through the steps:
1. Download Font files
The first step is to download your font files you want to deploy. Font files typically have the file extension .ttf, .otf, or .ttc. You can download font files from the Google Fonts open-source font library. You do not need a separate license or pay any fee to use the fonts downloaded from Google Fonts, as it’s an open-source font library. For more details about licensing and usage, refer to the FAQs page on the Google Fonts website.
2. Create an IntuneWin file
Follow these steps to create an Intunewin file.
- Create an empty folder called DeployFonts and create a subfolder under DeployFonts called Fonts.
- Copy your downloaded font files with .ttf or .otf extensions to the Fonts folder.
- Create two PowerShell scripts, InstallFonts.ps1 and Uninstallfonts.ps1, in the DeployFonts folder. [Copy and paste the script code below into these files].

InstallFonts.ps1
<#
.SYNOPSIS
Install Fonts on users devices

.DESCRIPTION
Below script will Install all fonts copied inside Fonts directory to a target device

.NOTES
        Name       : Font Installation Script
        Author     : Jatin Makhija
        Version    : 1.0.0
        DateCreated: 31-Jan-2023
        Blog       : https://cloudinfra.net

.LINK
https://cloudinfra.net
#>
#Get all fonts from Fonts Folder
$Fonts = Get-ChildItem .\Fonts
$regpath = "HKLM:\Software\Microsoft\Windows NT\CurrentVersion\Fonts"
foreach ($Font in $Fonts) {
    $fontbasename = $font.basename
    If ($Font.Extension -eq ".ttf")  {$fontvalue = $Font.Basename + " (TrueType)"}
    elseif($Font.Extension -eq ".otf") {$fontvalue = $Font.Basename + " (OpenType)"}
    else {Write-Host " Font Extenstion not supported " -ForegroundColor blue -backgroundcolor white; break}
    $fontname = $font.name
    if (Test-path C:\windows\fonts\$fontname)
    {
        Write-Host "$fontname already exists."
    }
    Else
    {
        Write-Host "Installing $fontname"
        #Installing Font
        $null = Copy-Item -Path $Font.fullname -Destination "C:\Windows\Fonts" -Force -EA Stop
    }
    Write-Host "Creating reg keys..."
    #Creating Font Registry Keys
    $null = New-ItemProperty -Name $fontvalue -Path $regpath -PropertyType string -Value $Font.name -Force -EA Stop
}
UninstallFonts.ps1
<#
.SYNOPSIS
Uninstall Fonts from users devices

.DESCRIPTION
Below script will Uninstall all fonts copied inside Fonts directory to a target device

.NOTES
        Name       : Font Uninstallation Script
        Author     : Jatin Makhija
        Version    : 1.0.0
        DateCreated: 31-Jan-2023
        Blog       : https://cloudinfra.net

.LINK
https://cloudinfra.net
#>
#Get all fonts from Fonts Folder
$Fonts = Get-ChildItem .\Fonts
$regpath = "HKLM:\Software\Microsoft\Windows NT\CurrentVersion\Fonts"
foreach ($Font in $Fonts) {
    $fontname = $font.name
    $fontbasename = $font.basename
    If ($Font.Extension -eq ".ttf")  {$fontvalue = $Font.Basename + " (TrueType)"}
    elseif($Font.Extension -eq ".otf") {$fontvalue = $Font.Basename + " (OpenType)"}
    else {Write-Host " Font Extenstion not supported " -ForegroundColor blue -backgroundcolor white; break}
    #Remove Font from Windows folder
    Remove-Item C:\windows\fonts\$fontname -force -EA SilentlyContinue
    #Delete corresponding registry keys for the font
    Remove-ItemProperty -Path $regpath -Name $fontvalue -force -EA SilentlyContinue
}
- Download the Microsoft Win32 Content Prep Tool. It’s a zip file; therefore, extract its contents into a folder.
- Create an empty folder, for example, C:\output.
- Repackage the DeployFonts folder to .intunewin file using the IntuneWinAppUtil.exe, found in the Microsoft Win32 Content Prep Tool.
Open an elevated command prompt and change to the folder where IntuneWinAppUtil.exe is located. After that, create an intunewin file by running below command.
IntuneWinAppUtil.exe -c <setup_folder> -s <setup_file> -o <output_folder>- <setup_folder> = Provide DeployFonts folder path.
- <setup_file> = InstallFonts.ps1
- <output_folder> = C:\output
.\IntuneWinAppUtil.exe -c "C:\DeployFonts\" -s InstallFonts.ps1 -o C:\output

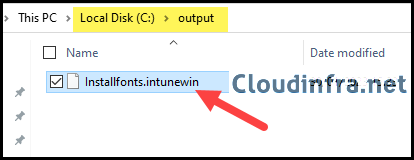
- Once the command is executed successfully, you can check the c:\output folder where the .intunewin file is created. We will use this file later to create a Windows app (win32) deployment.
3. Create Win32 App Deployment
- Sign in to the Intune admin center at https://intune.microsoft.com.
- Go to Apps > All apps.
- Select + Create, then in App type choose Windows app (Win32).
- Click on the Select app package file to select the Installfonts.intunewin file.
- On the App information page, provide below details:
- Name: Fonts Installation
- Description: Brief description of the app and version.
- Publisher: Microsoft
- Any optional information (category, logo, etc.) to match your requirements.
Click Next.

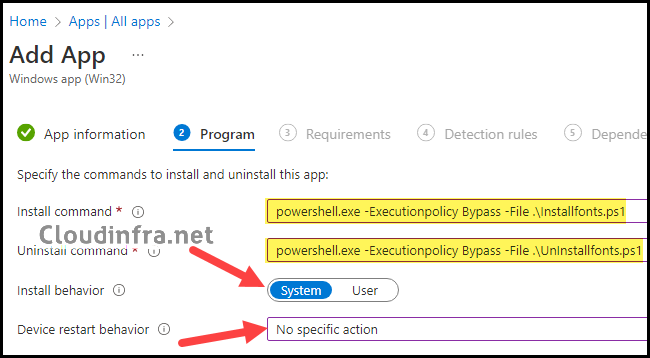
- Program tab:
- Install command: powershell.exe -Executionpolicy Bypass -File .\Installfonts.ps1
- Uninstall command: powershell.exe -Executionpolicy Bypass -File .\Uninstallfonts.ps1
- Installation time required (mins): Keep default
- Allow available uninstall: Keep default
- Install behavior: System
- Device restart behavior: No specific Action
- Specify return codes to indicate post-installation behavior: Keep default
If you encounter error code 0x80070002 for this app, verify that the Install and Uninstall commands are entered correctly. For more information about this error code, refer to the post: Fix Intune Win32 App Install Error 0x80070002.
Note
- Requirements:
- Check operating system architecture: Select Yes. Specify the systems the app can be installed on and check Install on x64 system.
- Minimum operating system: Choose the minimum Windows 10/11 version you support.
Click Next.
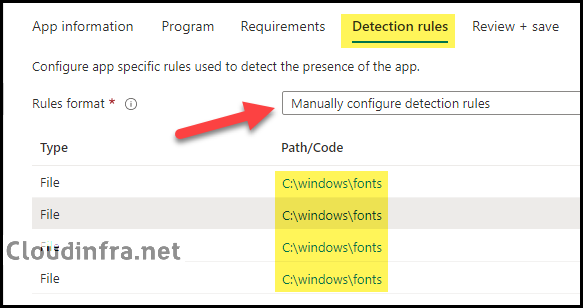
- Detection Rules: Select Manually configure detection rules and click on +Add to add a detection rule.
- Rules Format: Select Manually configure detection rules
- Rule Type: File
- Path: Provide the location of C:\windows\fonts and the name of the font file to detect.
Create one rule for each font file to detect all fonts under the C:\windows\fonts directory. For example:
- Rule type: File
- Path: C:\windows\fonts\
- File or folder: Alata-Regular.ttf
- Detection Method: File or Folder exists.
If you prefer to use a PowerShell script to detect all fonts deployed with this method, you can use the DetectFonts.ps1 script from my GitHub repository: Powershell-Scripts/Intune/Windows11/FontsDeployment/Detectfonts.ps1 · GitHub.
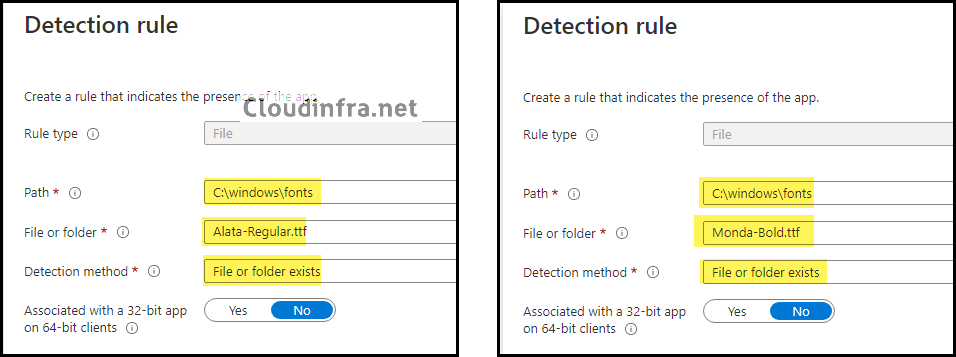
- Since I am deploying four font files, four detection rules are required to verify each font file and confirm successful installation.
- Dependencies: Click Next.
- Supersedence: Click Next.
- Scope tags (optional): A scope tag in Intune is an RBAC label that you assign to resources such as policies, apps, and devices to control which administrators can view and manage them. For more information, see How to use scope tags in Intune.
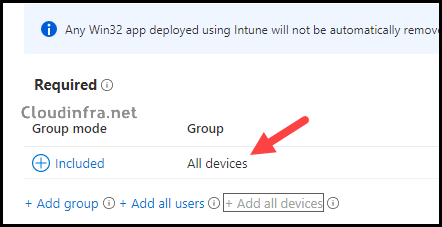
- Assignments: Assign the app to Microsoft Entra security groups that include the target users or devices. As a best practice, start with a small pilot group, and once validated, expand the assignment more broadly. For guidance on assignment strategy, see Intune assignments: User groups vs. Device groups.
- Review + create: Review the deployment summary and click Create.
4. Monitoring Fonts Deployment Progress
- From the Intune admin center, go to Apps > All apps.
- Search for the app deployment (e.g., Fonts Installation) you have created.
- Check the app status from the Overview page or for more and Device install Status or User install status.
Method 2: Use Master Packager Tool (MSI) to Deploy Fonts
The Master Packager Tool is an application packaging solution used to create and edit Microsoft Windows Installer (MSI) files. You can package custom font files into an .MSI installer and then deploy the MSI through Intune to install fonts on Windows 10 and Windows 11 devices.
This method is ideal if you prefer not to use PowerShell scripts and want a straightforward approach to deploying font files. It also provides flexibility, as the MSI can be easily edited later to add or remove font files. For detailed information and a step-by-step guide on deploying fonts via Intune using the Master Packager Tool, refer to Simplify Fonts Deployment in Intune: 3 Methods.
Method 3: Using Powershell Script to Deploy Fonts
The last method involves deploying font files using a PowerShell script through the Intune admin center. You can use the script I have uploaded on my GitHub repo, InstallFonts.ps1, and modify it to download the fonts from the Internet and install them on the device. To deploy the script, use the steps given in the post: Deploy a PowerShell script using Intune.
Sync Intune Policies
The device check-in process might not begin immediately. If you’re testing this policy on a test device, you can manually kickstart Intune sync from the device itself or remotely through the Intune admin center.
Alternatively, you can use PowerShell to force the Intune sync on Windows devices. Restarting the device is another way to trigger the Intune device check-in process.
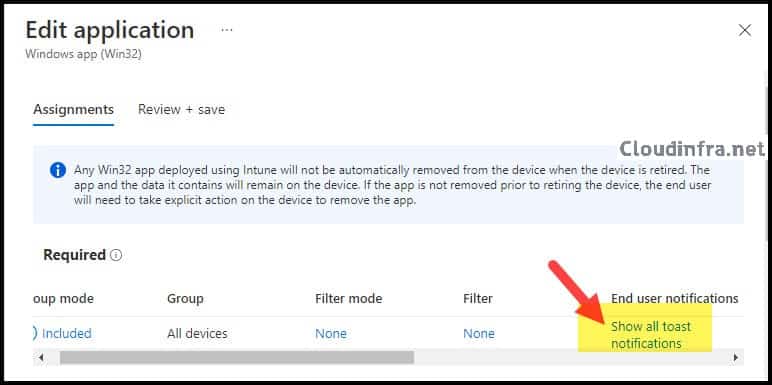
End User Experience
After the deployment is created and assigned in Intune, Fonts will be installed silently in the background on user’s devices. Users may see a pop-up notification related to the deployment, depending on the Show all toast notifications setting. The next sections focus on verifying and confirming that the fonts are installed successfully.
1. Verifying Fonts Installation From C:\windows\fonts Directory
Since we have deployed the four font files to the devices, let’s verify that the fonts are installed successfully on the target devices. Sign in to one of the target devices and follow below steps:
- Go to the C:\Windows\Fonts folder and verify that the font files are there.
- Alata-Regular.ttf
- Monda-Bold.ttf
- Monda-Regular.ttf
- Paprika-Regular.ttf

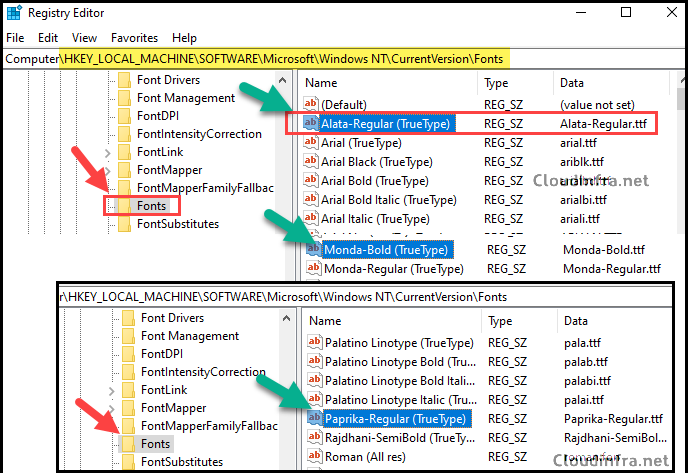
2. Verifying Fonts Installation Using Registry Editor
You can also verify the font installation using the Registry Editor by following below steps:
- Press Win + R to open a Run dialog box.
- Type
regeditand press Enter. - Browse to HKEY_LOCAL_MACHINE\SOFTWARE\Microsoft\Windows NT\CurrentVersion\Fonts and search for the font names on the right-hand side to ensure the deployed fonts entries exist.
3. Verify Fonts Installation Using Microsoft Word
You can launch one of the Microsoft Office applications, e.g., Word, and confirm if the font is showing in the list. This will also confirm the font has been deployed successfully via Intune.

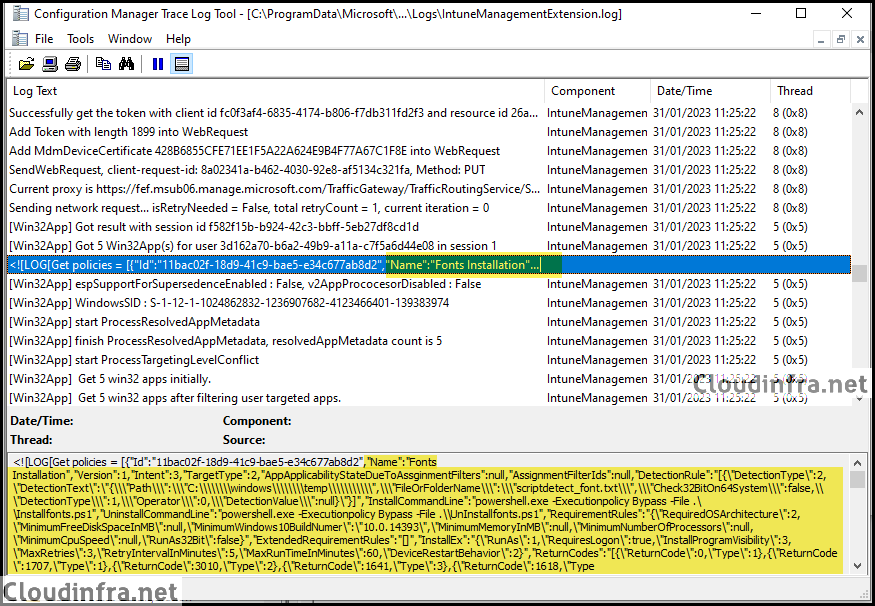
4. Verify Fonts Installation Using IntuneManagementExtension Logs File
You can also verify the font installation using the IntuneManagementExtension log file. Go to
C:\ProgramData\Microsoft\IntuneManagementExtension\Logs and open the most recent IntuneManagementExtension.log file. Search for the app name or the PowerShell script name (InstallFonts.ps1) to locate the log entries related to the font installation deployment.
How to Uninstall Fonts Using Intune
Using the same font deployment created in the previous steps, you can remove the fonts from the devices. The powershell.exe -ExecutionPolicy Bypass -File .\UninstallFonts.ps1 command was already configured in the Program tab during app creation.
You can uninstall the same fonts deployed via Intune because the font files are packaged within the .intunewin file. Since four fonts were deployed (Alata-Regular.ttf, Monda-Bold.ttf, Monda-Regular.ttf, and Paprika-Regular.ttf), you can uninstall these fonts by following below steps:
- Go to the Intune admin center > Apps > All apps.
- Click on your fonts deployment app.
- Click on Properties under Manage.
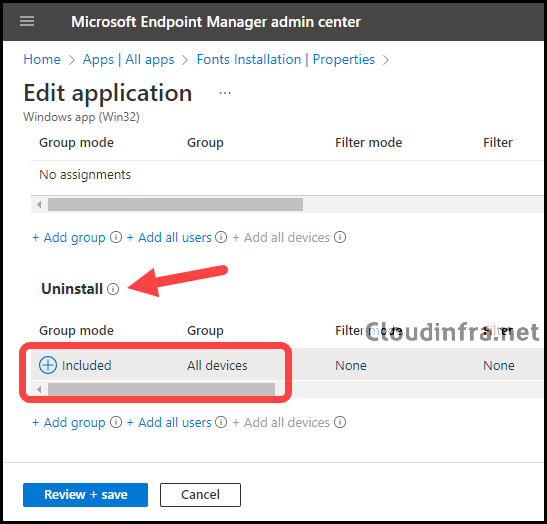
- Scroll down to find Assignments and click on Edit next to it.
- To uninstall these fonts from the devices, remove the devices from the required section and include them in the uninstall section.
I have tried through Win32, and it worked fine.
Thanks
I can confirm that the Win32 option works without issues
Excellent ! thx
Working fine using recommended method
Win32 method works fine
I also used the recommended method and it worked fine.
We do have a lot of different fonts, so I used a custom detection script instead of manually adding it one by one as described in the guide. My Intune window froze when i tried to save the app, so it was never added, so I had to do it again. That was when I used my good pal Copilot to write the script. Might be helpful if any other people have a lot of fonts.:
# List of font files to check
$fontFiles = @(
“Example-font.tff”,
“Example-font2.tff”,
)
# Path to the fonts directory
$fontsPath = “C:\Windows\Fonts”
# Initialize a flag to track if all fonts are found
$allFontsFound = $true
# Check if each font file exists
foreach ($font in $fontFiles) {
$fontPath = Join-Path -Path $fontsPath -ChildPath $font
if (-not (Test-Path -Path $fontPath)) {
Write-Output “$font is NOT located in $fontsPath”
$allFontsFound = $false
}
}
# Return appropriate exit code and output for Intune
if ($allFontsFound) {
Write-Output “All specified fonts are located in $fontsPath”
exit 0
} else {
Write-Output “Some specified fonts are NOT located in $fontsPath”
exit 1
}
Great read, thanks for posting this!
Hi
If someone could help me. I’ve tried this out through Intune but the deployment returned “failed” with error 0x80070000.
I am now searching out why this could be but the results are rather vague. Someone has an idea on what could’ve gone wrong ?
Tx
Kind regards
Kevin