In this blog post, I will show you two different ways to deploy the Zoom Workplace desktop app using Microsoft Intune:
- Method 1: Deploy Zoom as a Windows app (Win32) package.
- Method 2: Deploy Zoom as a Windows Line-of-business (LOB) MSI app.
Zoom provides an MSI installer that is designed for IT administrators and supports a wide range of command-line options for configuration and auto-update. On the Intune side, you can either upload the MSI directly as a Line-of-business app or wrap it with the Win32 Content Prep Tool and deploy it as a Win32 app.
Both methods are supported. In most modern environments, Win32 apps are preferred for Windows because they offer stronger control over detection rules, requirements, dependencies, and supersedence, and they tend to behave better in Autopilot scenarios. The LOB method is simpler and still perfectly valid if you do not need advanced app lifecycle control.
Zoom has also moved to an Enterprise Auto Update model based on the AU2_* policies. The older EnableSilentAutoUpdate, AlwaysCheckLatestVersion, ZoomAutoUpdate, and SetUpdatingChannel options are outdated and are superseded when AU2 policies are configured. By default, auto-update is disabled for MSI deployments until you enable it via ZoomAutoUpdate=1 or one of the AU2 policies, such as AU2_EnableAutoUpdate. In this guide, I will use AU2-based examples that you can adjust to match your app update strategy.
Contents
Prerequisites
- An active Microsoft Intune tenant.
- Windows 10/11 devices enrolled in Intune.
- Permission to create and assign apps in Intune.
- Zoom Workplace desktop app MSI for Windows, downloaded from the Zoom admin download center.
Zoom App Deployment Options
You have two options to deploy Zoom app on Windows devices via Intune. The first and more flexible option is using the Windows app (Win32) app method, and the second one is using Line of business app method (simple and easiest).
| Aspect | Method 1: Windows app (Win32) – Recommended | Method 2: Line-of-business (LOB) MSI app – Simpler |
|---|---|---|
| Packaging | Wrap the Zoom MSI into a .intunewin package. | Upload the Zoom MSI directly to Intune. |
| App type in Intune | Windows app (Win32) | Line-of-business app |
| Install / uninstall logic | Uses msiexec in the Program tab; supports more complex command lines if needed. | Uses the MSI directly; simple msiexec behaviour handled by Intune. |
| Detection | Fully configurable custom detection rules (MSI, file, registry, script). | Detection handled automatically using the MSI product code. |
| Advanced features | Supports requirements, dependencies, supersedence, and richer targeting logic. | More limited: no supersedence, simpler configuration. |
| Scripts | Can use custom install/uninstall scripts if desired (but not required). | No helper scripts; MSI is installed as-is. |
| Alignment with modern Intune | Better aligned with modern Intune app management and Windows Autopilot best practices. | Fine for legacy / simple scenarios, but less flexible for Autopilot and complex environments. |
| Complexity | Slightly more complex to package (extra .intunewin step) but more powerful. | Simpler to configure end-to-end. |
| Best suited for | Standardized production deployments, Autopilot, and environments requiring strong lifecycle control. | Quick, straightforward deployments where advanced Win32 features are not required. |
| Windows 11 support | Yes, fully supported for deploying the Zoom Workplace app on Windows 11 devices. | Yes, it is also supported for deploying the Zoom Workplace app on Windows 11 devices. |
Method 1: Deploy Zoom as a Windows app (Win32)
Let’s understand the process to deploy Zoom Workplace app as a Windows app (Win32). This method uses the Microsoft Win32 Content Prep Tool to wrap the MSI and scripts into a .intunewin file, then deploys it as a Win32 app.
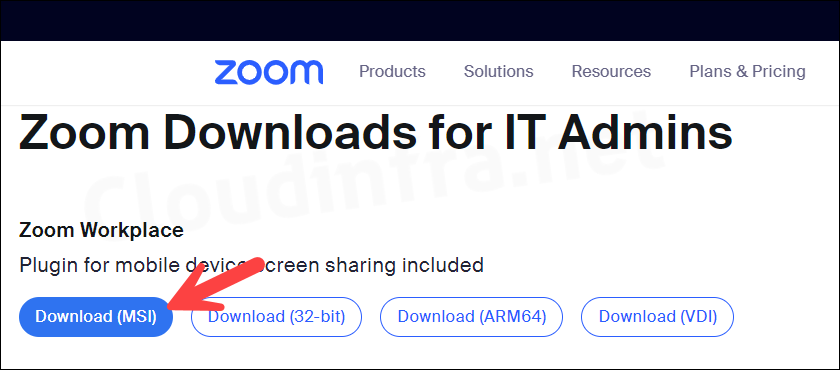
Step 1: Download Zoom MSI
Download Zoom app MSI file from the Zoom Admin Page. Click on Download (MSI) button to download the latest Zoom app MSI file.
Step 2: Create a folder and copy Zoom MSI
Create an empty folder on your packaging machine, for example, C:\Zoom and copy the Zoom MSI file into this folder.
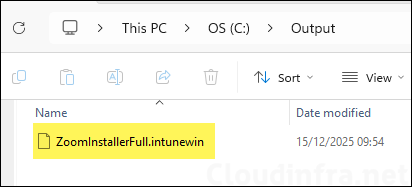
Step 3: Create IntuneWin file
- Download the Microsoft Win32 Content Prep Tool (IntuneWinAppUtil.exe) from the official Microsoft GitHub repository.
- Change to the folder where IntuneWinAppUtil.exe is located. Run IntunewinAppUtil.exe from an elevated command prompt window, enter the following information:
- Source Folder: C:\Zoom
- Setup File: ZoomInstallerFull.msi
- Output folder: C:\output
- Catalog folder: Type N and press Enter.

- Check the folder c:\output; you should find a file with the .intunewin extension.
Step 4: Create Win32 app in Intune
- Sign in to the Intune admin center at https://intune.microsoft.com.
- Go to Apps > All apps.
- Select + Create, then in App type choose Windows app (Win32).
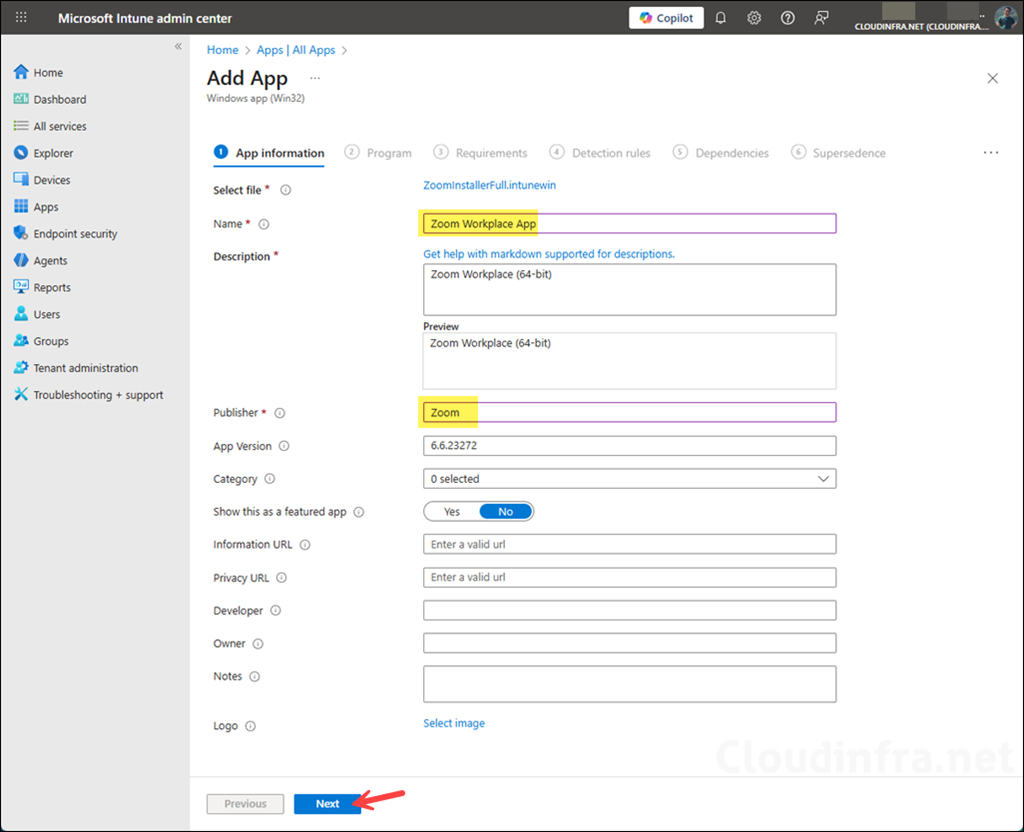
- Click on the Select app package file to select the ZoomInstallerFull.intunewin file package. Click OK.
- On the App information page, fill in:
- Name: Zoom Workplace App
- Description: Brief description of the app and version.
- Publisher: Zoom
- Any optional information (category, logo, etc.) to match your standards.
- Click Next.
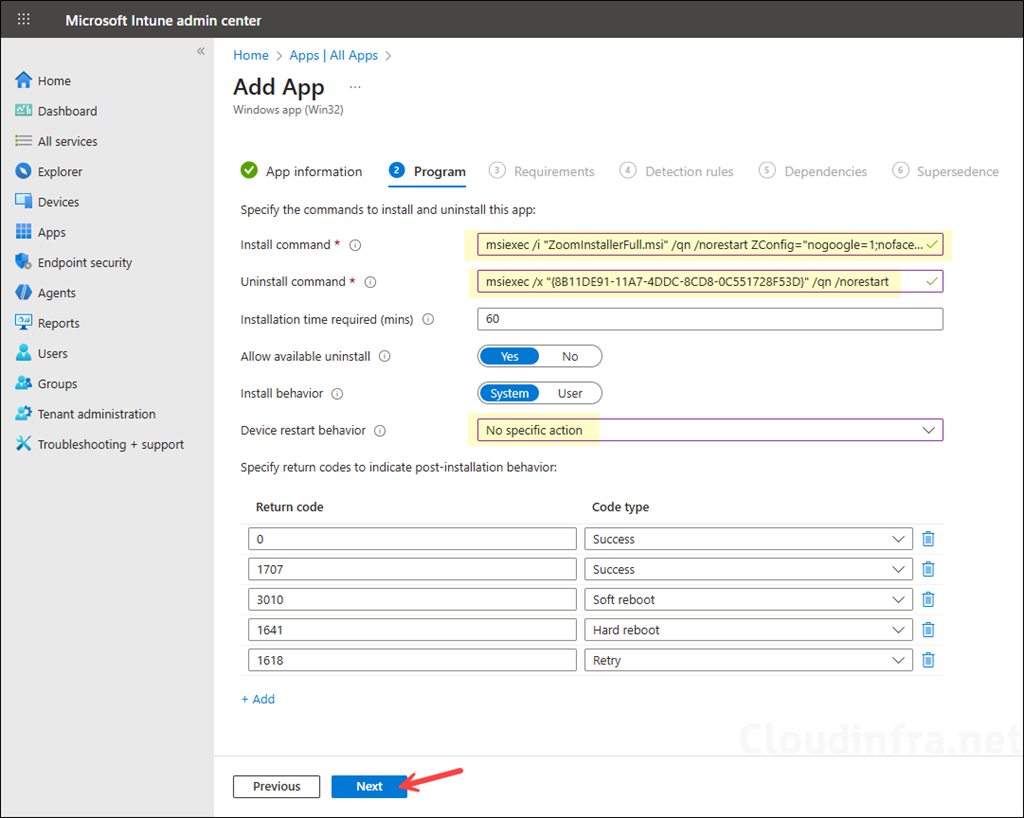
- On the Program tab, you will see that the Install and Uninstall commands are automatically populated with the basic msiexec commands used to install and uninstall the application. If these commands meet your requirements, you can proceed to the next step. In my case, I will modify the commands to include additional parameters, such as enabling Zoom auto-update and disabling Google and Facebook sign-in. Let’s review the parameters and the updated command.
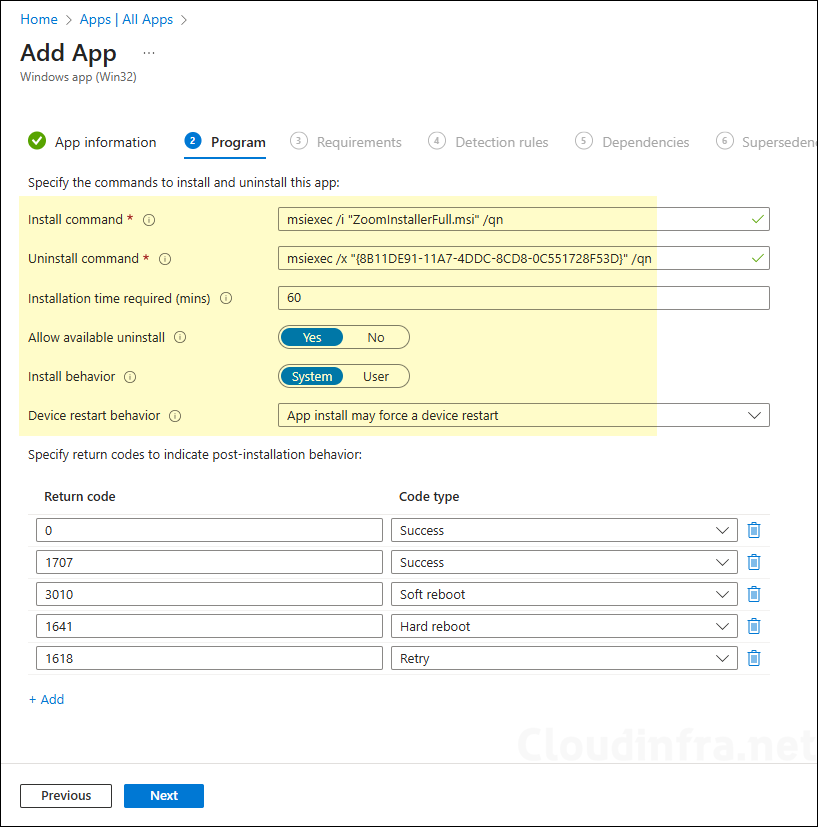
Updated Install Command
msiexec /i "ZoomInstallerFull.msi" /qn /norestart ZConfig="nogoogle=1;nofacebook=1;AU2_EnableAutoUpdate=1;AU2_SetUpdateChannel=0" ZRecommend="AudioAutoAdjust=1"
msiexec: Windows Installer engine used to install MSI packages./i "ZoomInstallerFull.msi": Tells msiexec to install the MSI file named ZoomInstallerFull.msi./qn: Runs the installation in silent mode with no user interface./norestart: Prevents the installer from automatically restarting the device after installation.- ZConfig=”nogoogle=1;nofacebook=1;AU2_EnableAutoUpdate=1;AU2_SetUpdateChannel=0″ applying enforced (locked) Zoom settings to the MSI:
nogoogle=1> Disable Google sign-in option in the Zoom client.nofacebook=1> Disable Facebook sign-in option in the Zoom client.AU2_EnableAutoUpdate=1> Turn on Enterprise Auto Update (AU2) so Zoom can auto-update.AU2_SetUpdateChannel=0> Use the slow update channel (0 = slow and stable, 1 = fast).ZRecommend="AudioAutoAdjust=1": Sets a recommended (default) client setting for audio; enables automatic audio adjustment by default, while still allowing the user to change it.msiexec command parameters (Reference: Mass-deploying with preconfigured settings for Windows)
If you prefer no Zoom auto-update, you can remove the AU2 parameters or explicitly set:
Disable Zoom Auto Update
ZConfig="AU2_EnableAutoUpdate=0;AU2_EnableManualUpdate=0"
- AU2_EnableAutoUpdate: Set this to 0 to disable auto-updating of the Zoom app.
- AU2_EnableManualUpdate: Control the visibility of the Check for Updates option in the client.
Configure Program tab:
- Updated Install Command: msiexec /i “ZoomInstallerFull.msi” /qn /norestart ZConfig=”nogoogle=1;nofacebook=1;AU2_EnableAutoUpdate=1;AU2_SetUpdateChannel=0″ ZRecommend=”AudioAutoAdjust=1″
- Updated Uninstall Command: msiexec /x “{8B11DE91-11A7-4DDC-8CD8-0C551728F53D}” /qn /norestart
- Installation time required (mins): Keep default
- Allow available uninstall: Keep default
- Install behavior: System
- Device restart behavior: No specific Action
- Specify return codes to indicate post-installation behavior: Keep default
Update the product code in the uninstall command according to the Zoom app version you are installing. The uninstall product code may be different from the one used in the example command shown here.
msiexec /x {YOUR-PRODUCT-CODE-HERE} /qn /norestart
About Uninstall command
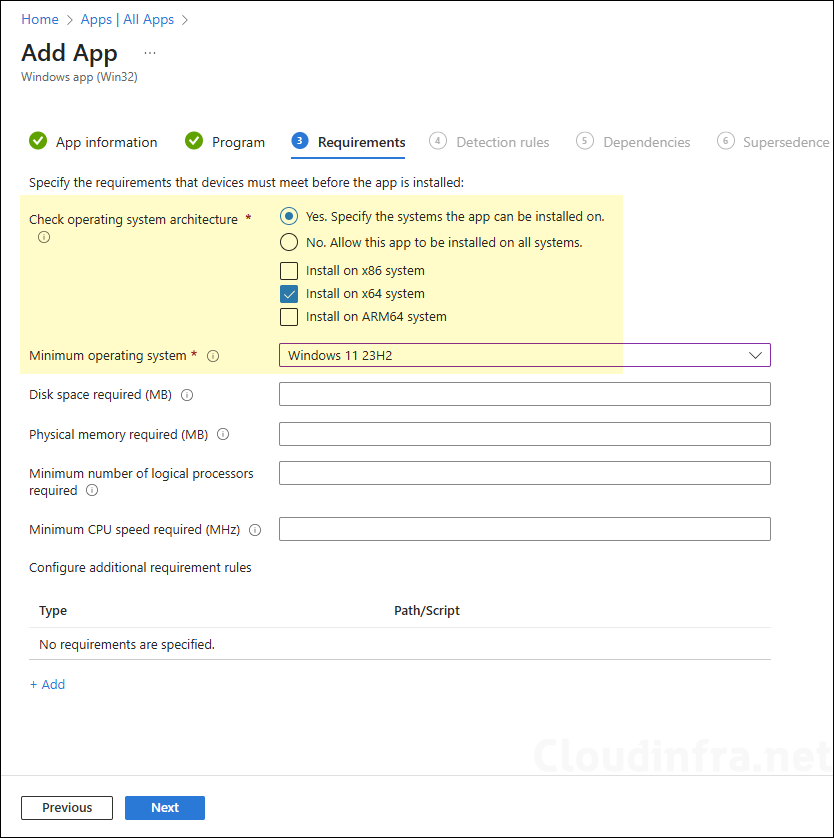
- Requirements:
- Check Operating system architecture: Select Yes. Specify the systems the app can be installed on.
- Install on x64 system.
- Minimum operating system: Choose the minimum Windows 10/11 version you support.
- Check Operating system architecture: Select Yes. Specify the systems the app can be installed on.
Click Next.
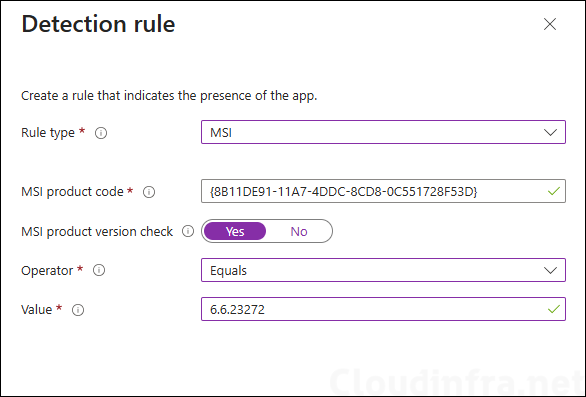
- Detection rules: Use MSI detection with the same product code as the uninstall command.
- Rules format: Manually configure detection rules.
- Click + Add.
- Rule type: MSI.
- MSI product code: {YOUR-PRODUCT-CODE-HERE}.
- Optionally configure MSI product version check if you want strict versioning.
This ensures Intune considers the app installed when that MSI product code is present on the device.
Click Next.
- Dependencies: Click Next.
- Supersedence: Click Next.
- Scope tags (optional): A scope tag in Intune is an RBAC label you add to resources (policies, apps, devices) to limit which admins can see and manage them. For more information, read: How to use Scope tags in Intune.
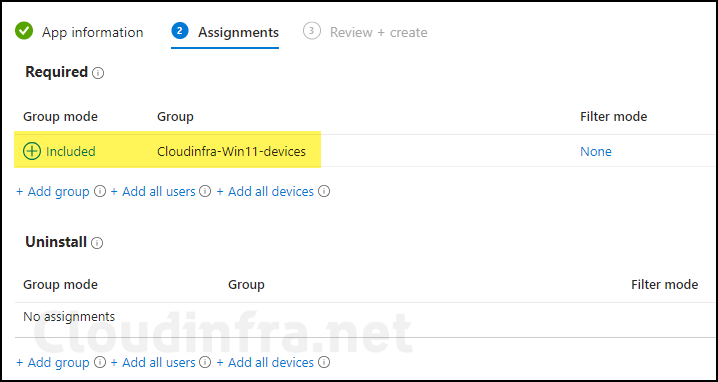
- Assignments: Assign the app to Entra security groups that contain the target users or devices. As a best practice, pilot with a small set first; once validated, roll it out more broadly. For guidance on assignment strategy, see Intune assignments: User groups vs. Device groups.
- Review + create: Review the deployment summary and click Create.
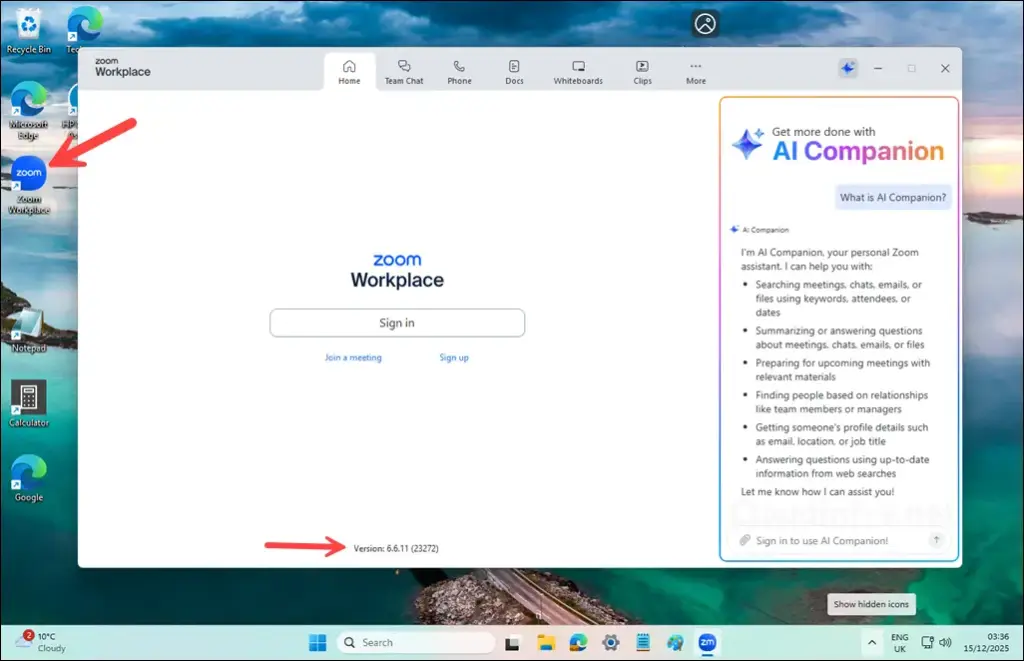
End User Experience (Win32 App)
Once the deployment is successful, users will see a Zoom Workplace icon on their desktop. Double-click the app to launch it and check the version displayed at the bottom of the screen. As an administrator, also verify on at least one device that the Zoom app is configured according to the parameters defined in the install command. You can also manage Zoom settings by importing its ADMX templates in Intune. Refer to the post Import ADMX Templates into Intune for more details.
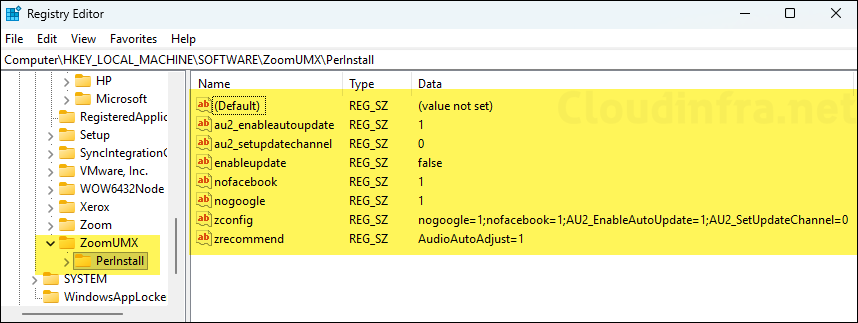
You can go to the Windows registry location HKEY_LOCAL_MACHINE\SOFTWARE\ZoomUMX\PerInstall and confirm if the registry entries are created as per the Intune deployment. The screenshot below shows all the registry entries created successfully, which we specified in the Install command of the Win32 app deployment.
Method 2: Deploy Zoom as a Line-of-business (LOB) MSI app
The second method for deploying the Zoom app is by using Line of business (LOB) app method. This method uploads the Zoom MSI directly into Intune as an LOB app. After you download Zoom Workplace app MSI installer, follow below steps to create the Zoom LOB app deployment in Intune.
- Sign in to the Intune admin center > Apps > All apps.
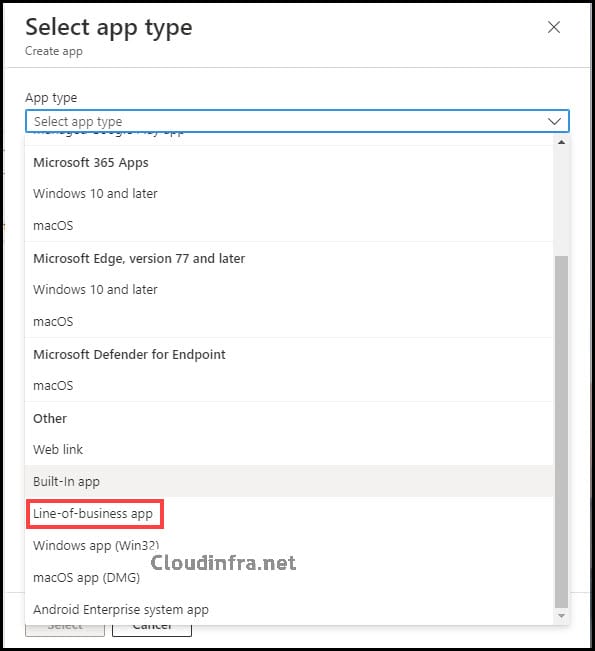
- Click on + Create > Select App type as Line-of-business app.
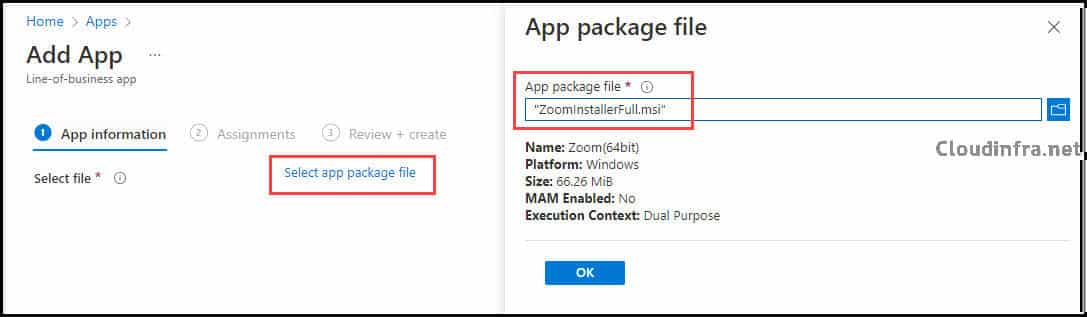
- Click on select app package file and browse for the Zoom MSI file. Click on OK.
- App Information:
- Name: Zoom Workplace App
- Description: Keep default or update the description.
- Publisher: Zoom
- App install context: Device.
- Ignore App version:
- Set to Yes if you plan to let Zoom auto-update itself.
- Set to No if you want to control all updates via new Intune deployments.
- Command-line arguments: If you do not provide any command-line arguments, Intune will use the following:
msiexec /i "ZoomInstallerFull.msi" /qYou can provide additional MSI properties in the Command-line arguments (or equivalent) field. For example, to enable Enterprise Auto Update on the Slow channel and hide Google/Facebook sign-in, use the below parameters. I have already explained these parameters when deploying the Zoom app as a Win32 app in the previous section. You can also refer to the link Mass-deploying with preconfigured settings for Windows for more details.
ZConfig="nogoogle=1;nofacebook=1;AU2_EnableAutoUpdate=1;AU2_SetUpdateChannel=0" ZRecommend="AudioAutoAdjust=1"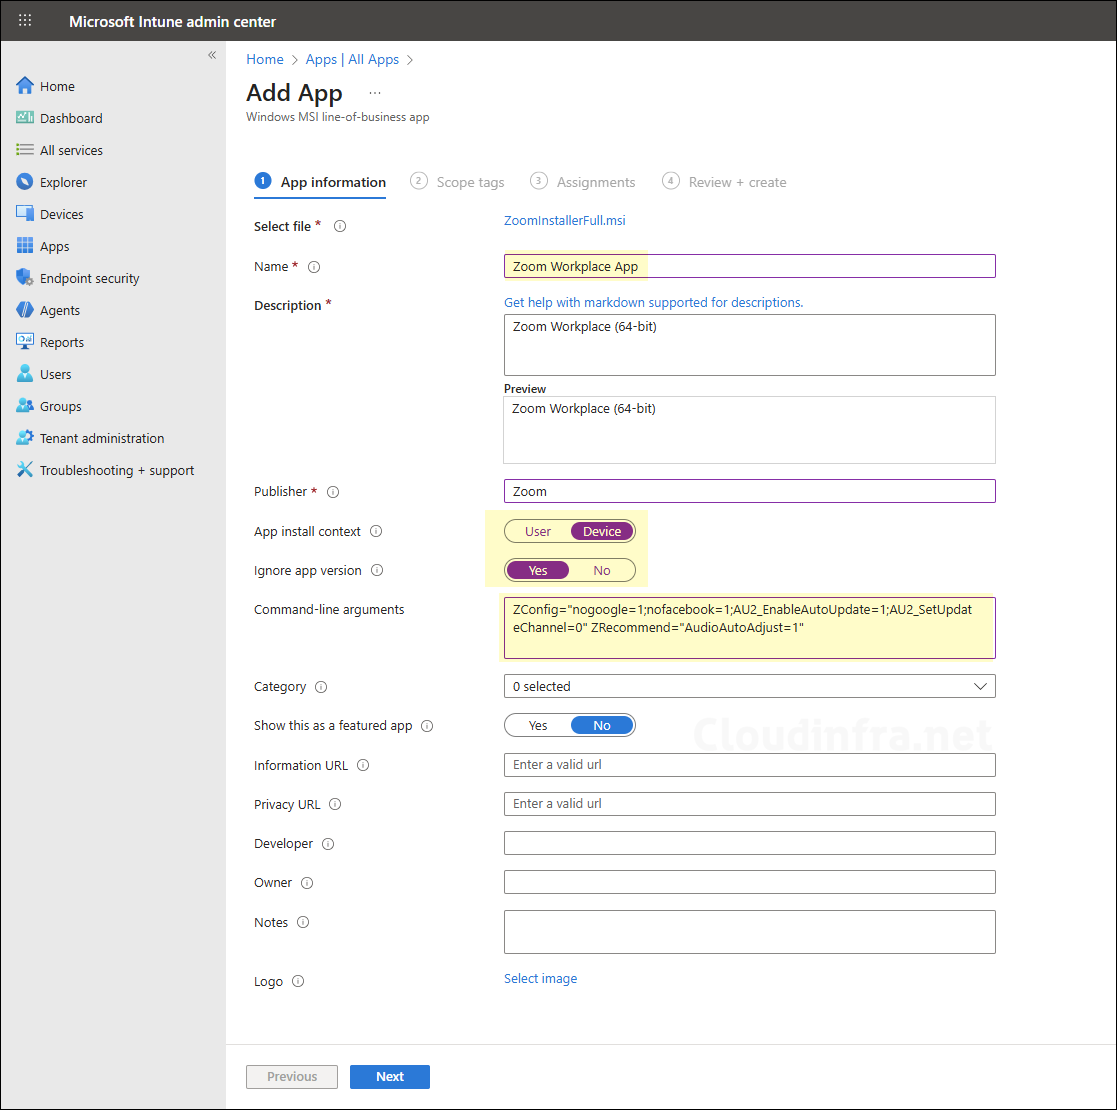
- Scope tags (optional): A scope tag in Intune is an RBAC label you add to resources (policies, apps, devices) to limit which admins can see and manage them. For more information, read: How to use Scope tags in Intune.
- Assignments: Assign the app to Entra security group that contain the target users or devices. Add it under the required section to install the app automatically. As a best practice, pilot with a small set first; once validated, roll it out more broadly. For guidance on assignment strategy, see Intune assignments: User groups vs. Device groups.
- Review + create: Review the deployment summary and click Create.
You may have noticed that the option Available for enrolled devices is missing. This is because the App install context is set to Device. If you change the App install context to User, the option Available for enrolled devices will appear.
Note
- Review + create: Review the app deployment and click on Create to proceed.
Monitoring Zoom App Installation Status
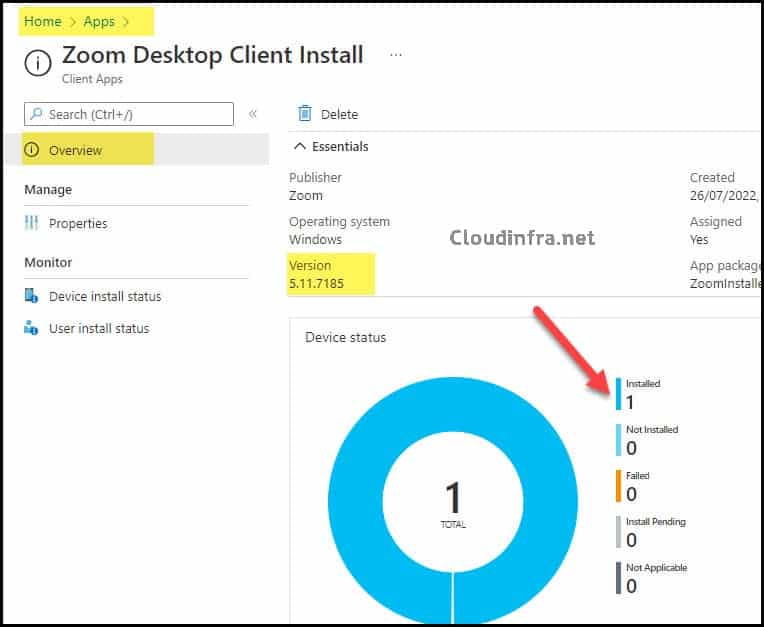
You can monitor the Zoom deployment directly in the Intune admin center:
- Go to Apps > All apps and select your Zoom LOB app.
- On the Overview blade, review the summary chart for Install status.
- Under Monitor, use Device install status or User install status to see detailed per-device/per-user results, including success and error codes.
End User Experience (LOB App)
Once the deployment is successful:
- If you have enabled Enterprise Auto Update (AU2), users will see Zoom update automatically within the behavior you configured (for example, slow channel, update at idle time, etc.).
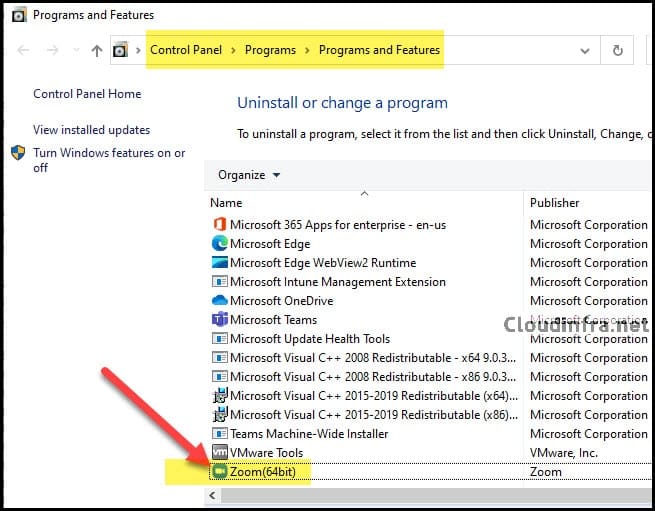
- Zoom Workplace desktop client will appear in Control Panel > Programs and Features or Settings > Apps > Installed apps on the target devices.
- With App install context: Device, the client will be installed once per machine and will be available to all users that sign in.
Zoom App Installation Status Using Event Viewer
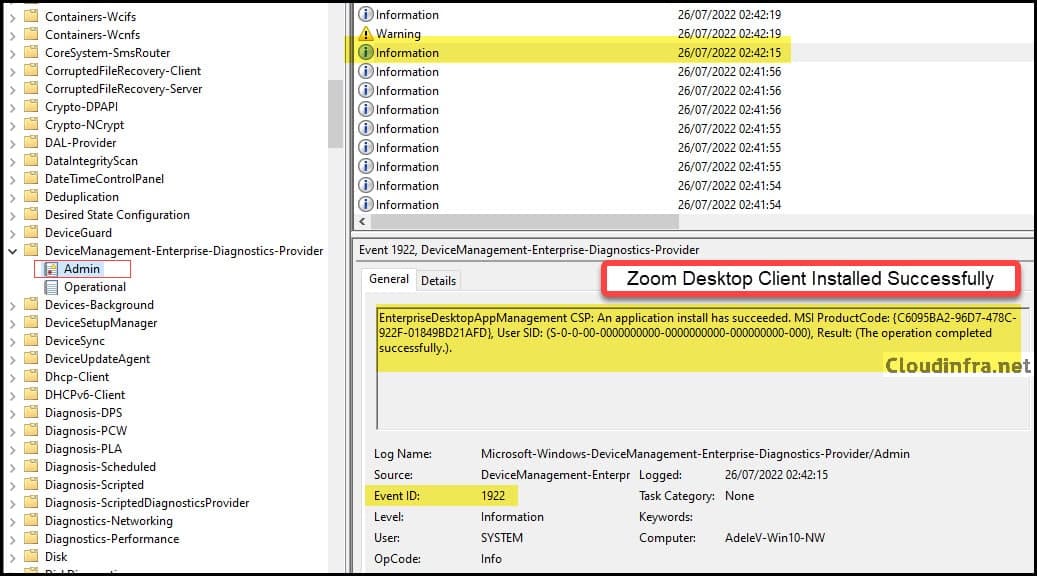
You can also verify the installation status from Event Viewer on a target device:
Sign in to one of the target devices.
- Open Start > Event Viewer. Navigate to Applications and Services Logs > Microsoft > Windows > DeviceManagement-Enterprise-Diagnostics-Provider > Admin.
- Look for events with Event ID 1922, which indicate a successful MSI app installation via the EnterpriseDesktopAppManagement CSP.
A typical success message looks similar to below:
EnterpriseDesktopAppManagement CSP: An application install has succeeded.
MSI ProductCode: {C6095BA2-96D7-478C-922F-01849BD21AFD}, User SID: (S-0-0-00-0000000000-0000000000-000000000-000), Result: (The operation completed successfully.).
FAQs
How do I uninstall the Zoom app using Intune?
As per the app deployment (Win32 or LOB), use the Uninstall section and add the Entra group to uninstall the app from devices. You can also use a PowerShell script removeZoom.ps1 or cleanzoom utility to remove Zoom app. For more details, refer to the guide, How to Uninstall Zoom using Intune.
How do I verify the Zoom auto-update setting?
There are two main ways to verify auto-update:
- Once the device has received and applied the policy. Check the applied policy status in Intune or the local registry keys under HKEY_LOCAL_MACHINE\SOFTWARE\ZoomUMX\PerInstall on the client.
- From the Zoom client UI: Open the Zoom Workplace desktop app. Go to Settings > General. Locate the Zoom Workplace app section. Confirm that Update app automatically is enabled if you configured Enterprise Auto Update.
- To check and confirm the autoupdate setting in Zoom, sign in to the Zoom Workplace app.
- Click on the Settings icon.
- Click General, then scroll down to the Zoom Workplace App settings section. In this section, confirm that the Update app automatically toggle is enabled and that the update channel is set to Slow, as configured in the Intune app deployment parameters.

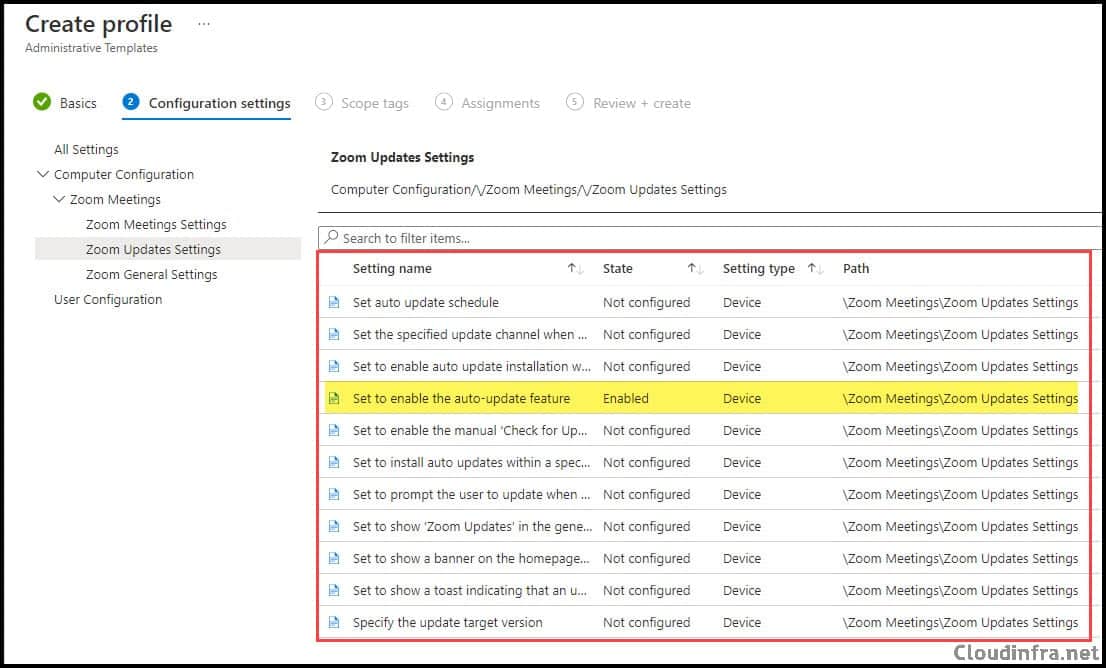
How can I manage Zoom auto-update centrally using Intune instead of MSI switches?
Instead of (or in addition to) setting AU2 policies through MSI properties, you can:
- Import the Zoom ADMX templates into Intune via Devices > Configuration > Import ADMX.
- Create a device configuration profile targeting Windows 10 and later. Select the Imported Administrative templates (Preview) template.
- Configure the Zoom auto-update policies (for example, AU2_EnableAutoUpdate, AU2_SetUpdateChannel, and scheduling options) through ADMX-backed settings.
- Assign this profile to the same device group you use for the Zoom app deployment.
For more details, refer to the post Import ADMX Templates into Intune. Below screenshot shows Zoom ADMX template settings in Intune.
I thought the command line argument ZoomAutoUpdate=true isn’t supported anymore?
The Zoom Support website still lists ZoomAutoUpdate parameter, indicating that it is still a supported switch. If you prefer not to use this switch for Zoom MSI deployment via Intune, you have the option to manage Zoom Auto Update using ADMX files.
Refer to this guide for Importing and managing Zoom settings: https://cloudinfra.net/how-to-import-admx-templates-into-intune/
Zoom Support Page provides information about ZoomAutoUpdate Switch:
https://support.zoom.com/hc/en/article?id=zm_kb&sysparm_article=KB0064484
msiexec /i “ZoomInstallerFull.msi” /quiet /qn /norestart zConfig=”nogoogle=1;nofacebook=;AU2_EnableAutoUpdate=1″ ZRecommend=”AudioAutoAdjust=1″