In this blog post, I will show you the steps to enable and configure bitlocker using Intune. Its the best and recommended method for enabling and configuring Bitlocker drive encryption on Windows 10 and 11 devices using Intune admin center.
BitLocker is a robust security feature integrated into Windows operating systems to protect against unauthorized data access. It encrypts the entire hard drive, including system and user data, and prevents data theft when the device is lost, stolen, or decommissioned.
Bitlocker encryption works best with Trusted Platform Module (TPM) 2.0 technology, a hardware chip typically integrated into the motherboard on Intel and AMD-based devices. This chip is designed to provide security functions like generating and storing cryptographic keys and ensure your device’s OS and firmware are not tampered with.
To Install and use Windows 11 OS on your PC, your device must have TPM 2.0 Enabled. which meets the criteria already.
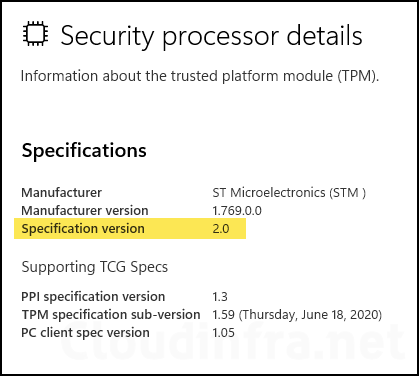
On your Windows 10 computer, you can go to Settings > Update & Security > Windows Security > Device Security. On the right side, find Security Processor; under that, click the hyperlink Security Processor details. Verify that the specification version Information is 2.0. That would also meet the BitLocker encryption criteria.
Contents
Enable Bitlocker Interactively vs Silently
When configuring BitLocker using Intune, you can enable it silently or prompt the user to do so. However, it’s important to be aware of the limitations associated with the silent method, which are listed below. Even though there are limitations, that would be my recommended approach.
- Silently Enable Bitlocker [Recommended]
- This option is more popular, and I have seen it used in many organizations. Enabling Bitlocker silently on a user’s device means the user will not receive any prompts on the screen and, therefore, does not have to interact with the Bitlocker configuration wizard to encrypt the volumes. It also reduces overhead for IT administrators.
- You must not configure settings requiring a TPM startup PIN or key. Using a startup PIN or key is incompatible with silent encryption, as it requires user interaction.
- Interactive Way to Enable Bitlocker – This approach is less preferred because it involves prompting users to enable BitLocker. This option may generate queries from end-users who may require assistance from IT administrators to enable it.
Methods to Enable Bitlocker using Intune
You can enable and configure BitLocker on Windows 10 and 11 devices using Intune through one of the following methods. Since most configuration settings are common across these methods, utilizing all of them is not mandatory to enable and configure BitLocker via Intune.
Microsoft recommends using the Endpoint Security > Disk Encryption profile to enable and configure BitLocker. The settings catalog provides additional settings related to BitLocker encryption.
Alternative methods should only be used if BitLocker configuration settings are unavailable in the Disk Encryption profile. However, creating a single Endpoint Security > Disk Encryption profile is advisable to avoid potential conflicts arising from configuring the same BitLocker settings at multiple places and targeting the same devices.
- Using Endpoint Security > Disk Encryption Profile. [Recommended]
- Using Endpoint Protection Device Configuration Template.
- A Device Configuration Profile – Settings Catalog policies.
Best Practices for Enabling Bitlocker
- Ensure that the device has TPM 2.0 for maximum security.
- Use Endpoint Security > Disk Encryption Profile to enable and configure Bitlocker.
- Avoid assigning more than one Bitlocker profile to the same device. This will avoid policy conflicts.
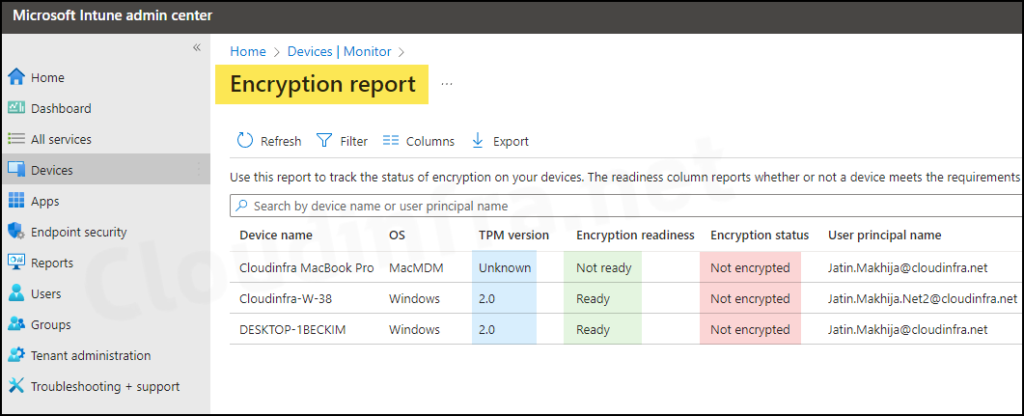
- Check the Encryption readiness status of the devices from Devices > Monitor > Device Encryption status to ensure the device is compliant and meets the criteria before enabling Bitlocker.
- Do not enable Bitlocker on a device with third-party encryption enabled on the drives.
- If you have old devices without TPM, Do not enable Silent Bitlocker Encryption, as it is incompatible.
Prerequisites
Below are the prerequisites for enabling Bitlocker on Windows 10/11 devices.
- Windows 10 version 1803 or later or Windows 11.
- The device must be Microsoft Entra Joined or Microsoft Entra Hybrid Joined.
- The device must have at least TPM (Trusted Platform Module) 1.2 (Recommended TPM 2.0)
- BIOS mode must be set to Native UEFI Only.
- The hard drive must have two partitions.
- OS Drive – contains OS and its support files formatted with the NTFS file system.
- System Drive – contains files required to boot, decrypt, and load the OS.
- Drives must not be encrypted with any third-party encryption software. If so, you may need to decrypt the drives before enabling Bitlocker encryption. Enforcing multiple encryption technologies on the same volume may render the data unusable.
- You must have Intune RBAC permissions to manage Bitlocker in Intune. For example, you can assign a Rotate Bitlocker Keys under the Help Desk Operator role to users who want to manage Bitlocker in Intune.
Silently Enable Bitlocker Encryption using Intune
As discussed earlier regarding Silent BitLocker encryption versus the Interactive method of enabling BitLocker, I would prefer to proceed with Silent BitLocker encryption as it does not show any prompts on the targeted devices and encrypts the drives silently. Let’s check the steps:
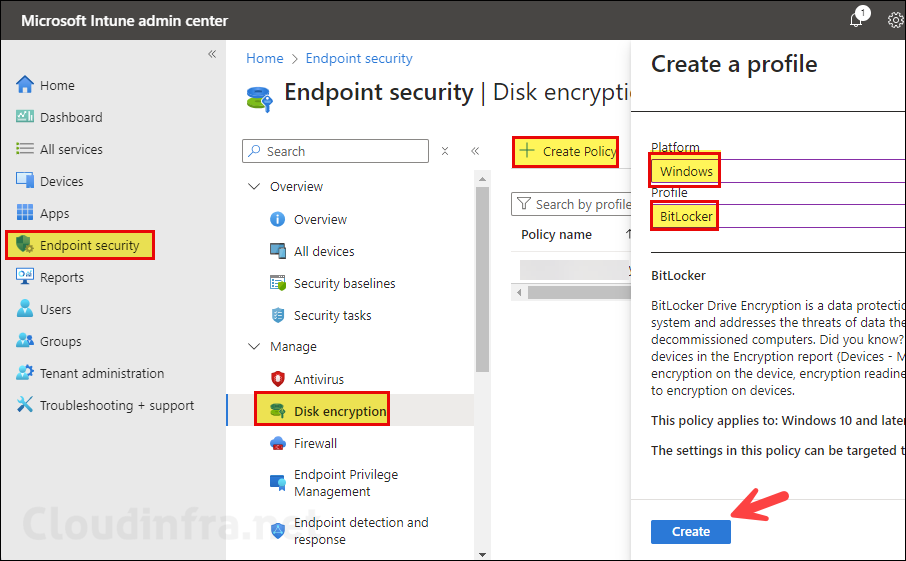
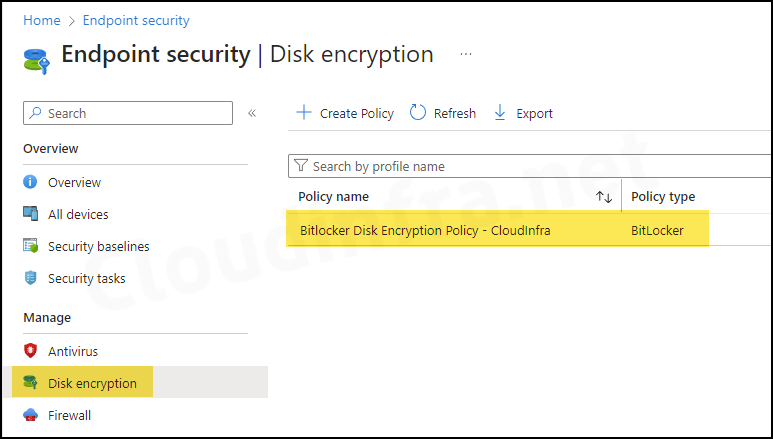
- Sign in to the Intune admin center > Endpoint security > Disk encryption > Create Policy.
- In the Platform list, select Windows.
- Under Profile, select BitLocker.
- Click Create.
- Basics Tab: Provide a Name and Description of the Bitlocker Policy.
Configuration Settings
Bitlocker settings are grouped into below categories.
- Bitlocker: This section contains global bitlocker settings to enforce bitlocker silently.
- Bitlocker Drive Encryption: Select the drive encryption method and cipher strength.
- Operating System Drives: Configure Bitlocker OS drive encryption settings like Full encryption or used space encryption, PIN settings, etc.
- Fixed Data Drives: Configure Bitlocker settings for fixed data drives.
- Removable Data Drives: Configure Bitlocker settings on removable data drives, like Allowing users to use bitlocker protection on removable drives, etc.

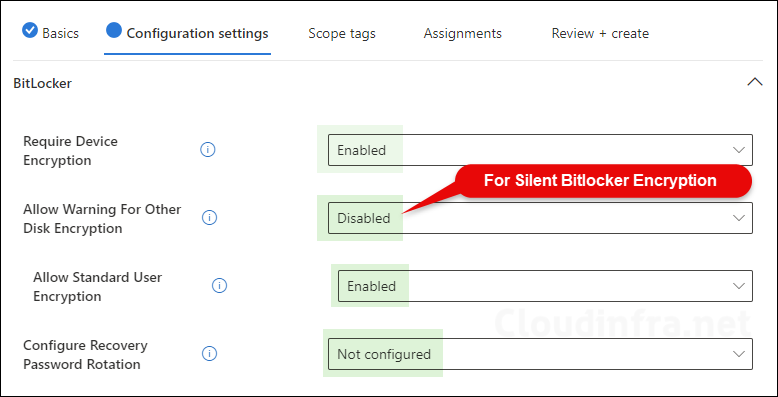
Bitlocker
- Require Device Encryption: Select Enabled to ensure that the Device is Encrypted with Bitlocker.
- Allow Warning For Other Disk Encryption: Allows Admin to disable all UI (notification for encryption and warning prompt for other disk encryption) and turn on encryption on the user machines silently.
- Allow Standard User Encryption: Setting this to Enabled means that Admins can enforce Bitlocker encryption even when the logged-on user is not an administrator on their device. Allow Standard User Encryption setting will work only when Allow Warning for Other Disk Encryption is set to Disabled.
- Configure Recovery Password Rotation: Default state Not configured.
- This Policy will only work when you have configured to backup the recovery password in Entra ID (required).
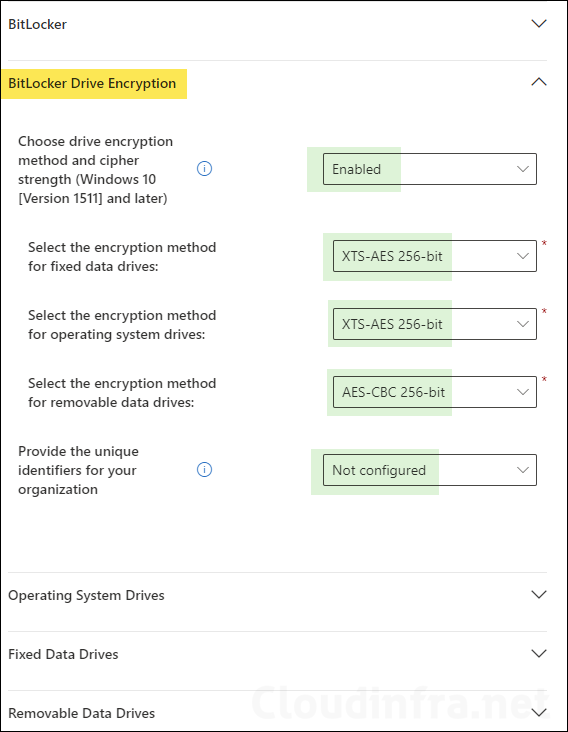
BitLocker Drive Encryption
- Choose drive encryption method and cipher strength (Windows 10 [Version 1511] and later): Enabled
- Select the encryption method for removable data drives: Recommended options are AES-CBC 128-bit or AES-CBC 256-bit.
- Select the encryption method for operating system drives: XTS-AES 256-bit (recommended)
- Select the encryption method for fixed data drives: XTS-AES 256-bit (recommended)
This policy setting allows you to configure the algorithm and cipher strength used by BitLocker Drive Encryption. This policy setting is applied when you turn on BitLocker. Changing the encryption method has no effect if the drive is already encrypted, or if encryption is in progress.
If you enable this policy setting, you will be able to configure an encryption algorithm and key cipher strength for fixed data drives, operating system drives, and removable data drives individually.
For fixed and operating system drives, we recommend that you use the XTS-AES algorithm. For removable drives, you should use AES-CBC 128-bit or AES-CBC 256-bit.
If you disable or do not configure this policy setting, BitLocker will use AES with the same bit strength (128-bit or 256-bit) as the “Choose drive encryption method and cipher strength (Windows Vista, Windows Server 2008, Windows 7)” and “Choose drive encryption method and cipher strength” policy settings (in that order), if they are set.
If none of the policies are set, BitLocker will use the default encryption method of XTS-AES 128-bit or the encryption method specified by the setup script.
About BitLocker Drive Encryption Policies
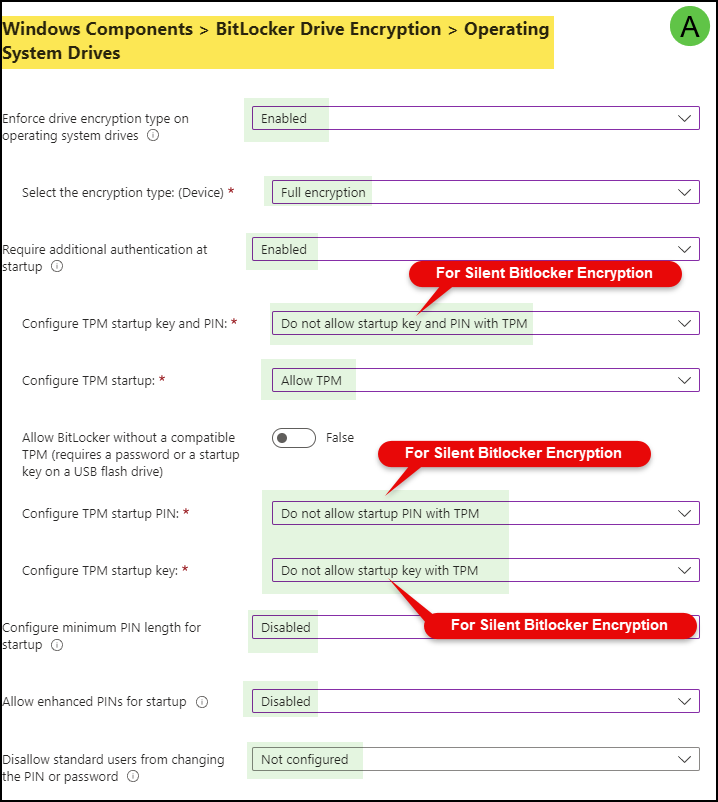
Operating System Drives
- Enforce drive encryption type on operating system drives: Enabled
- Select the encryption type:(Device): Select Full Encryption or Used Space Only encryption.
- Require additional authentication at startup: Enabled
- Configure TPM startup key and PIN: Do not allow startup key and PIN with TPM (If you select this to Allow or Require, Silent Bitlocker Encryption will not work).
- Configure TPM startup: Allow TPM
- Allow BitLocker without a compatible TPM (requires a password or a startup key on a USB flash drive): False (default state).
- Configure TPM startup PIN: Do not allow startup PIN with TPM (If you select this to Allow or Require, Silent Bitlocker Encryption will not work).
- Configure TPM startup key: Do not allow startup PIN with TPM (if you select this to Allow or Require, Silent Bitlocker Encryption will not work).
- Configure minimum PIN length for startup: Disabled (As we are not using a TPM startup PIN, keep this disabled).
- Allow enhanced PINs for startup: Disabled
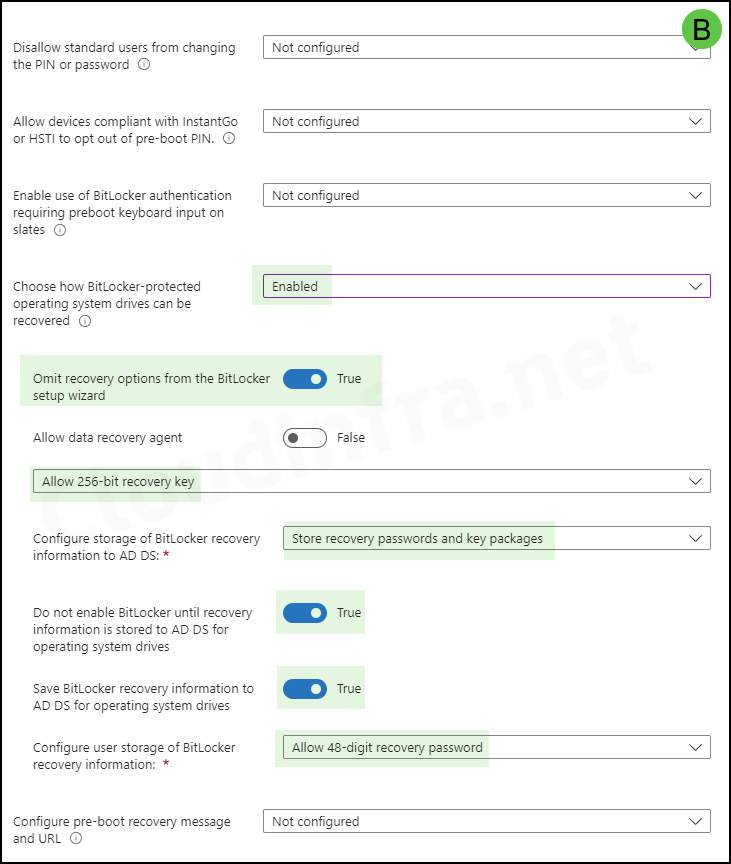
- Disallow standard users from changing the PIN or password: Not Configured
- Allow devices compliant with InstantGo or HSTI to opt out of pre-boot PIN: Not Configured
- Enable use of Bitlocker authentication requiring reboot keyboard input on states: Not configured.
- Choose how Bitlocker-protected operating system drives can be recovered: Enabled
- Omit recovery options from the BitLocker setup wizard: True
- Allow data recovery agent: False
- Configure storage of Bitlocker recovery information to AD DS: Backup recovery passwords and key packages.
- Allow 256-bit recovery key
- Do not enable BitLocker until recovery information is stored to AD DS for fixed data drives: Enable
- Save BitLocker recovery information to AD DS for operating system drives: True
- Configure user storage of BitLocker recovery information: Allow 48-digit recovery password.
- Configure pre-boot recovery message and URL: Not Configured
When you do not configure Enforce drive encryption type on operating system drives option then below conditions determine whether the disk will be fully encrypted or only used space will be encrypted.

Fixed Data Drives
- Enforce drive encryption type on fixed data drives: Enabled
- Select the encryption type:(Device): Full encryption
- Choose how Bitlocker-protected fixed drives can be recovered: Enabled
- Do not enable BitLocker until recovery information is stored to AD DS for fixed data drives: Enable
- Allow data recovery agent: False
- Configure storage of Bitlocker recovery information to AD DS: Backup recovery passwords and key packages.
- Allow 256-bit recovery key
- Save BitLocker recovery information to AD DS for fixed data drives: True
- Omit recovery options from the BitLocker setup wizard: True
- Configure user storage of BitLocker recovery information: Allow 48-digit recovery password
- Deny write access to fixed drives not protected by BitLocker: Not configured

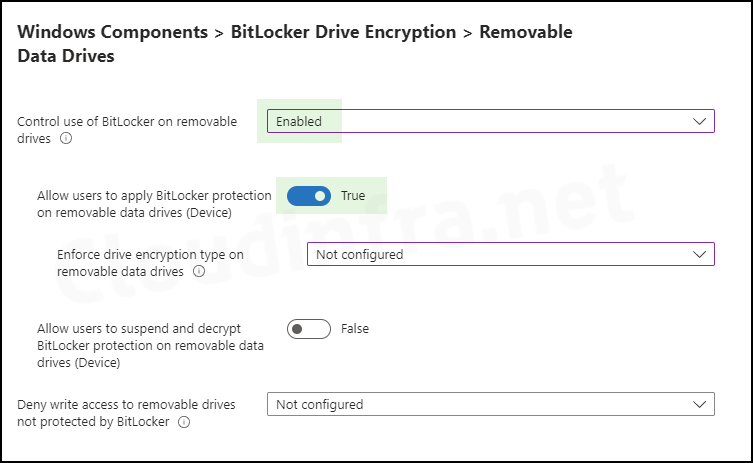
Removable Data Drives
- Control use of BitLocker on removable drives: Enabled
- Allow users to apply BitLocker protection on removable data drives (Device): True
- Enforce drive encryption type on removable data drives: Not configured
- Allow users to suspend and decrypt BitLocker protection on removable data drives (Device): False
- Allow users to apply BitLocker protection on removable data drives (Device): True
- Deny write access to removable drives not protected by BitLocker: Not configured
- Scope tags (optional): A scope tag in Intune is an RBAC label you add to resources (policies, apps, devices) to limit which admins can see and manage them. For more Information, read: How to use Scope tags in Intune.
- Assignments: Assign the policy to Entra security groups that contain the target users or devices. As a best practice, pilot with a small set first; once validated, roll it out more broadly. For guidance on assignment strategy, see Intune assignments: User groups vs. Device groups.
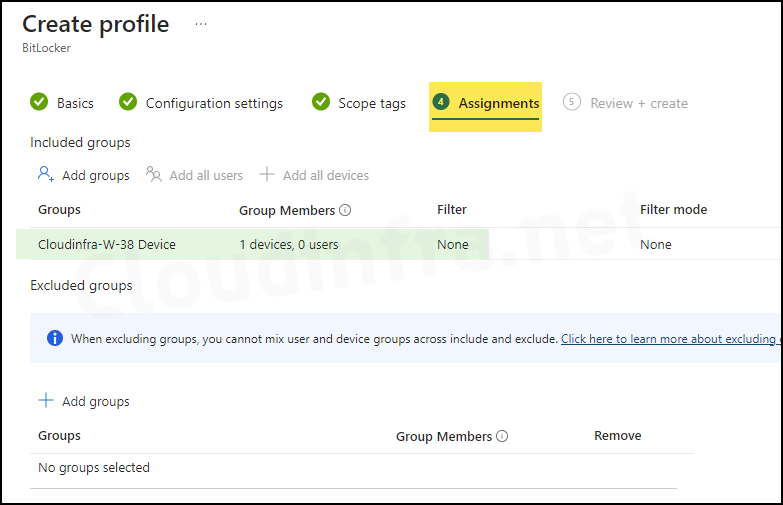
- Review + create: Review the policy summary and click Create.
Sync Intune Policies
The device check-in process might not begin immediately. If you’re testing this policy on a test device, you can manually kickstart Intune sync from the device itself or remotely through the Intune admin center.
Alternatively, you can use PowerShell to force the Intune sync on Windows devices. Restarting the device is another way to trigger the Intune device check-in process.
End User Experience
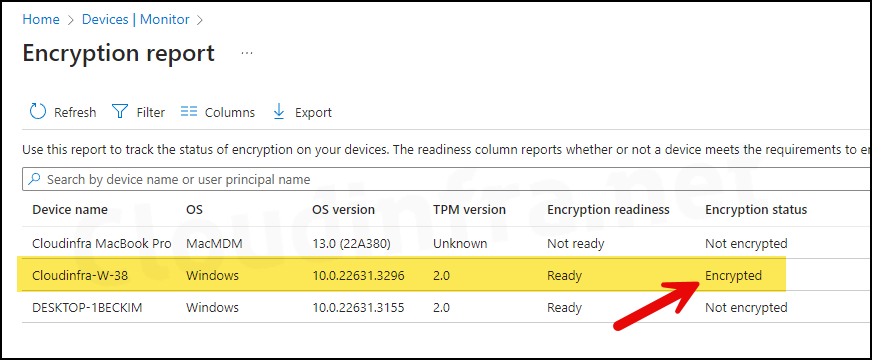
After Bitlocker policy is applied and the drive is encrypted, you can check the Encryption report from Intune admin center to confirm the device encryption status.
Sign in to the Intune admin center > Devices > Monitor and Select Device encryption status. Then, check the Encryption status column to confirm.
Conclusion
In this blog post, we learned about bitlocker encryption and how to silently enable it on Windows 10 and 11 devices. We have configured these settings to ensure that bitlocker will be enabled silently. You can adjust Bitlocker settings based on the following:
- Do you want to allow Bitlocker for removable drives?
- Do you want to enable Bitlocker Recovery options?
- Do you want to use removable drives in earlier versions of Windows 10 (Version 1511)? In that case, you should use AES-CBC 128-bit encryption; otherwise, select AES-CBC 256-bit encryption, which is recommended.
Thanks for the write up! Why do not you upload the JSON export to a GitHub repo so the readers can easily import that ?
I have followed these instructions and Bitlocker will NOT enable on our test devices. They all have the following message:
“Un-protected OS Volume was detected; TPM is not ready for BitLocker”
Thank you, you saved my life….it worked 100%
Followed the guidance above and it worked really well for new system builds. However, our existing systems were encrypted using Trellix drive encryption. To migrate them, we applied the above BitLocker policies to the computers and performed a Trellix decryption. We found that upon decryption, BitLocker was unable to start encrypting. After some diagnosing, it appears the setting “Do not enable BitLocker until recovery information is stored to AD DS for fixed data drives: Enable” leaves BitLocker in a loop where it will not enable because there is no recovery info stored.
We flipped this to “Disabled” and BitLocker immediately started encrypting.
Your mileage may vary but I wanted to share for anyone using this config guidance. 🙂