In this blog post we will explore the steps to create Windows Defender firewall rules using Intune and deploy it to Intune-managed Windows devices. In the previous blog post, we learned the steps for managing the Windows Defender firewall through Intune.
For example, If you want to allow RDP from source 10.1.1.2 (source) to devices in subnet 10.2.3.0/24, you can create and deploy this specific rule from Intune.
Contents
Create a Custom Firewall Rule in Windows Defender Firewall
Let’s check the steps to create a custom firewall rule in Windows defender firewall using Intune admin center.
- Sign in to the Intune admin center > Endpoint Security > Firewall.
- Click on Create Policy to create a new Firewall Policy.
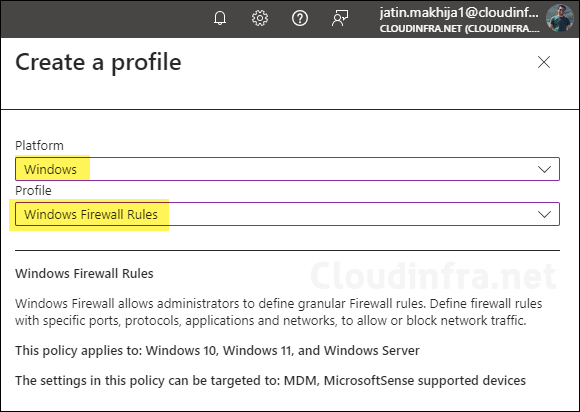
- Platform: Windows
- Profile: Windows Firewall Rules.
- Click on Create to create this policy.
- Basics Tab – Provide a Name and Description of the Policy.
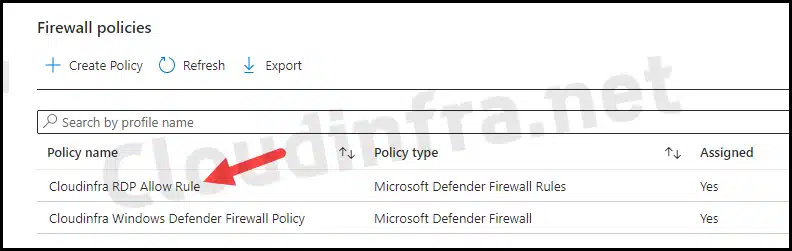
- Name: Cloudinfra RDP Allow Rule
- Description: Provide a helpful description. For example, This Firewall Rule will allow a Remote Desktop Protocol (RDP) Port from a source 10.1.1.2 to destination subnet 10.2.3.0/24.
- Configuration Settings
- Click on + Add.
- Provide a Name of the Rule and click on Edit instance.
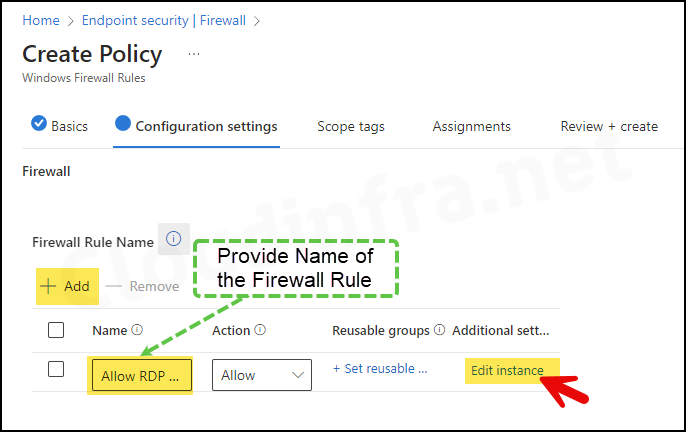
- A pane will open on the right-hand side; configure the firewall rule according to your requirements. For example, I will create a firewall rule allowing the RDP port 3389 from source 10.1.1.2 to the destination subnet 10.2.3.0/24.
- Firewall Rule Configuration:
- Enabled: Enabled
- Interface Types: All
- Direction: The rule applies to Inbound traffic
- Action: Allow
- Local Port Ranges: 3389
- Remote Port Ranges: 10.1.1.2
- Protocol: 6
- Local Address ranges: 10.2.3.0/24
- This is a simple firewall rule created for demonstration; many more settings can be used to create a firewall rule according to your specific requirements. I have provided information about other firewall rule settings at the end of this blog post; you can jump straight to that section by clicking all firewall settings.

- Scope tags (optional): A scope tag in Intune is an RBAC label you add to resources (policies, apps, devices) to limit which admins can see and manage them. For more Information, read: How to use Scope tags in Intune.
- Assignments: Assign the policy to Entra security groups that contain the target users or devices. As a best practice, pilot with a small set first; once validated, roll it out more broadly. For guidance on assignment strategy, see Intune assignments: User groups vs. Device groups.
- Review + create: Review the deployment summary and click Create.
End User Experience
Use the following steps to verify if firewall rules are applied to target devices.
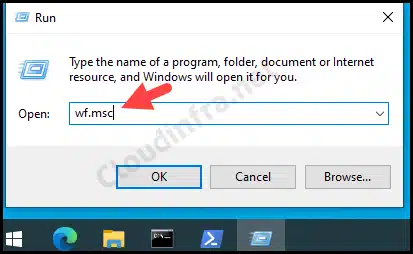
- Press the Windows key + R to open the Run dialog box.
- Type wf.msc to open Windows Defender Firewall with Advanced Security console.
- After the Intune device check-in process was completed, I could find the rule created under Monitoring > Firewall.
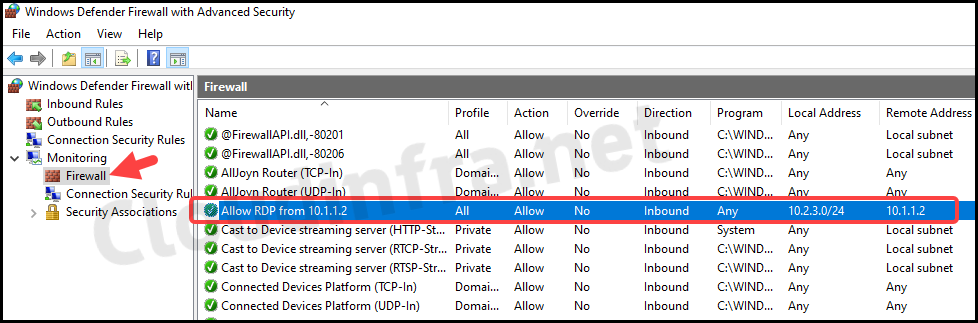
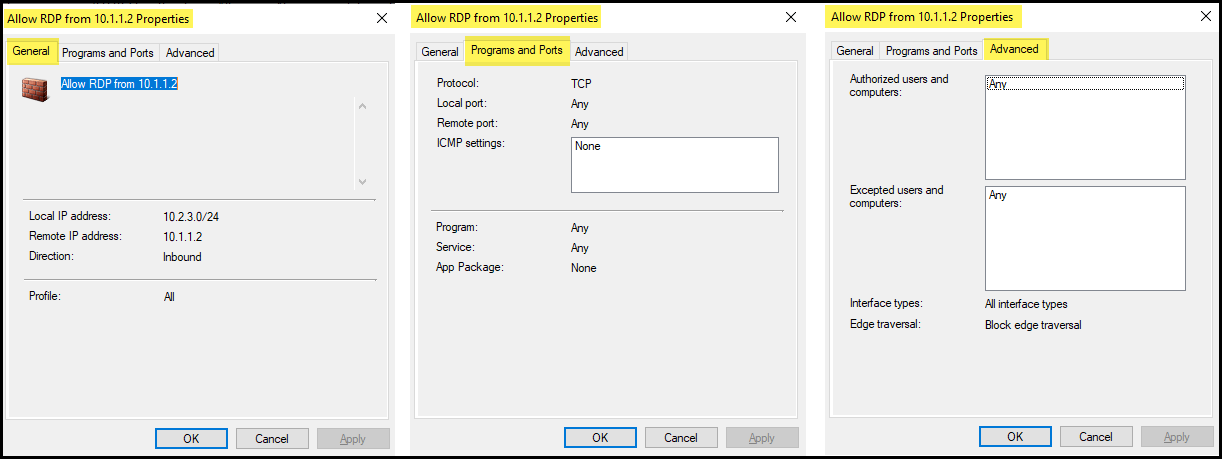
- You can double-click on the rule to view more details about the rule settings. As you can see from the screenshot below, the rule has been deployed successfully.
Manage Windows Defender Firewall using OMA-URI settings
You can also manage Windows Defender firewall rules using OMA-URI settings as well. To learn more about it, please refer to the link: Firewall CSP. To manage the Windows Defender firewall itself, refer to How to manage Windows Defender Firewall using Intune.
Information about All Firewall Settings
| All Firewall Settings |
|---|
| Enabled: Indicates whether the rule is enabled or disabled. If not specified – a new rule is disabled by default. Name: Specifies the friendly name of the firewall rule. Interface Types: Multiple interface types can be included in the string by separating each value with a “,”. Acceptable values are “RemoteAccess”, “Wireless”, “Lan”, and “All”. If more than one interface type is specified, the strings must be separated by a comma. File Path: The file path of an app is its location on the client device. For example, C:\Windows\System\Notepad.exe or %WINDIR%\Notepad.exe. You can define one application to be used in each Firewall rule. If you specify multiple conditions in a single rule, these will be treated as an AND operation. i.e program=svchost.exe AND service=mpssvc, etc. All of the app-related conditions in a single rule work to scope the traffic even further, so they must all correspond to the specific app/service. Remote Port Ranges: List of remote port ranges. Valid values include A valid port number between 0 and 65535. For example, a 200 A port range in the format of “start port – end port” with no spaces included, where the start port is less than the end port. For example, 300-320 If not specified, the default is “All ports.” When defining multiple local and remote port ranges, the Firewall rule will be evaluated as OR operations within an individual field, and AND operations across rule fields. i.e. (local port A OR local port B) AND (remote port A OR remote port B). When setting this field in a firewall rule, the protocol field must also be set to 6 (TCP) or 17 (UDP). Edge Traversal: Indicates whether edge traversal is enabled or disabled for this rule. The EdgeTraversal property indicates that specific inbound traffic can tunnel through NATs and other edge devices using the Teredo tunneling technology. The application or service with the inbound firewall rule must support IPv6 for this setting to work correctly. The primary application of this setting allows listeners on the host to be globally addressable through a Teredo IPv6 address. New rules have the EdgeTraversal property disabled by default. Local User Authorized List: Specifies the list of authorized local users for this rule. A list of authorized users cannot be specified if the authored rule targets a Windows service. If not specified, the default is all users. Network Types: Specifies the profiles to which the rule belongs: Domain, Private, Public. See FW_PROFILE_TYPE for the bitmasks that are used to identify profile types. If not specified, the default is All. Direction: Comma separated list. The rule is enabled based on the traffic direction as following. IN – the rule applies to inbound traffic. OUT – the rule applies to outbound traffic. If not specified the detault is OUT. Service Name: Short Windows service names are used when a service, not an application, sends or receives traffic. Service short names can be retrieved by running the Get-Service command from PowerShell. You can define one application to be used in each Firewall rule. If you specify multiple conditions in a single rule, these will be treated as an AND operation. i.e program=svchost.exe AND service=mpssvc, etc. All of the app-related conditions in a single rule work to scope the traffic even further, so they must all correspond to the specific app/service. Local Port Ranges: List of local port ranges. Valid values include A valid port number between 0 and 65535. For example, 200 A port range in the format of “start port – end port” with no spaces included, where the start port is less than the end port. For example, 300-320 If not specified, the default is “All ports.” When defining multiple local and remote port ranges, the Firewall rule will be evaluated as OR operations within an individual field, and AND operations across rule fields. i.e. (local port A OR local port B) AND (remote port A OR remote port B). When setting this field in a firewall rule, the protocol field must also be set, to either 6 (TCP) or 17 (UDP). Remote Address Ranges: List of remote addresses covered by the rule. Tokens are case insensitive. Valid tokens include:”*” indicates any remote address. If present, this must be the only token included. “Defaultgateway” “DHCP” “DNS” “WINS” “Intranet” (supported on Windows versions 1809+) “RmtIntranet” (supported on Windows versions 1809+) “Internet” (supported on Windows versions 1809+) “Ply2Renders” (supported on Windows versions 1809+) “LocalSubnet” indicates any local address on the local subnet. A subnet can be specified using either the subnet mask or network prefix notation. If neither a subnet mask nor a network prefix is specified, the subnet mask defaults to 255.255.255.255. A valid IPv6 address. An IPv4 address range in the “start address – end address” format with no spaces included, where the start address is less than the end address. An IPv6 address range in the “start address – end address” format with no spaces included, where the start address is less than the end address.If not specified, the default is “Any address.” Action: Specifies the action the rule enforces to block or allow network traffic. Description: Specifies the description of the rule. Policy App Id: Specifies one WDAC tag. This is a string that can contain any alphanumeric character and any of the characters “:”, “/”, “.”, and “_”. A PolicyAppId and ServiceName cannot be specified in the same rule. Package Family Name: Package family names can be retrieved by running the Get-AppxPackage command from PowerShell. You can define one application to be used in each Firewall rule. If you specify multiple conditions in a single rule, these will be treated as an AND operation. i.e program=svchost.exe AND service=mpssvc, etc. All of the app related conditions in a single rule work to scope the traffic even further, so they must all correspond to the specific app/service. Protocol: Select the protocol for this port rule. Transport layer protocols, TCP(6) and UDP(17), allow you to specify ports or port ranges. For custom protocols, enter a number between 0 and 255 representing the IP protocol. If not specified, the default is “Any.” ICMP Types And Codes: Select the protocol for this port rule. Transport layer protocols, TCP(6) and UDP(17), allow you to specify ports or port ranges. For custom protocols, enter a number between 0 and 255 representing the IP protocol. If not specified, the default is “Any.” Local Address Ranges: List of local addresses covered by the rule. Valid tokens include:”*” indicates any local address. If present, this must be the only token included. A subnet can be specified using either the subnet mask or network prefix notation. If neither a subnet mask nor a network prefix is specified, the subnet mask defaults to 255.255.255.255.A valid IPv6 address.An IPv4 address range in the format of “start address – end address” with no spaces included, where the start address is less than the end address.An IPv6 address range in the format of “start address – end address” with no spaces included, where the start address is less than the end address. If not specified, the default is “Any address.” |