In this post, I will show you how to import ADMX templates into Intune. Administrative Templates (ADMX/ADML) are widely used to manage Windows and third-party application settings in traditional Group Policy. In Microsoft Intune, you have two main approaches for managing Windows settings and third-party vendor products like Google Chrome or Zoom app, etc.
- Settings catalog (recommended where available): Intune includes many administrative templates built in, so you can configure them without importing ADMX files. This is the first place where you should be looking for a setting you want to configure.
- Import custom or partner ADMX/ADML (public preview): If you do not find the setting in the Settings catalog, check and confirm if a particular setting is available in Vendor provided ADMX template file. Download ADMX and ADML files from the product vendor’s website and import it into Intune.
Contents
Download ADMX Template Files
ADMX is the template file, and ADML is the corresponding language file (for example, en-US). You must download both files from application vendor’s website. Most application vendors provide ADMX template files and make them available for download to support policy-based management of their products. For example, Zoom provides ADMX template files here and regularly keeps them up to date. However, some applications, such as Notepad++, do not have ADMX template files. This is important to keep in mind, as ADMX templates may not be available for every application.
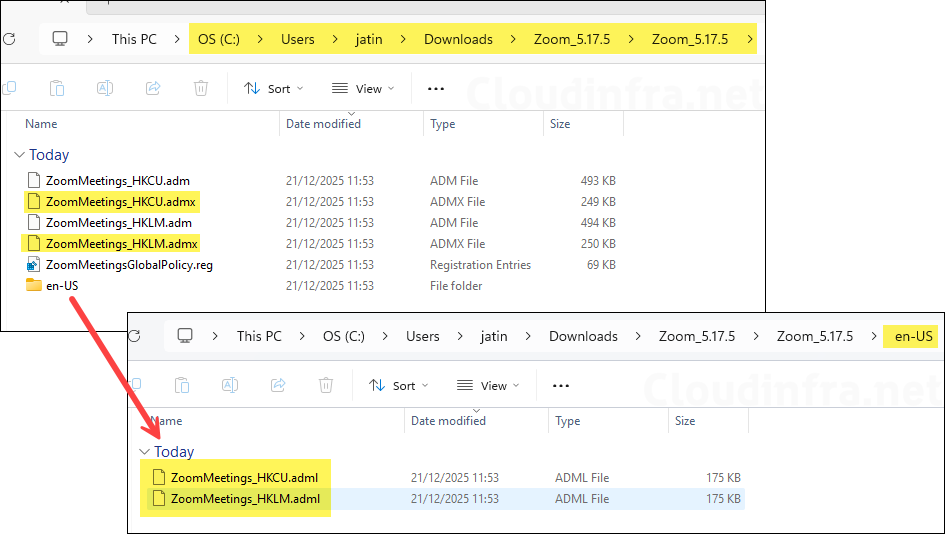
To demonstrate the import process, I have downloaded Zoom ADMX templates. It’s downloaded as a zip file; extract its contents into a folder. Use the files with .admx file extension, as it’s a modern XML-based template format. .adm is a legacy text-based template format.
ZoomMeetings_HKCU.admx defines Zoom policies that apply per-user (written under the HKCU registry node), while ZoomMeetings_HKLM.admx defines machine-wide policies that apply to all users on the device (written under the HKLM registry node). You will also need the respective corresponding .ADML file for the import. Zoom currently only supports the English-US (en-US) language for importing the template files. Open the folder en-US to get the .adml file.
Check for Dependencies
Some ADMX template files are dependent on other ADMX template files. This is an important check to make sure that the template files are successfully uploaded in Intune. If you do not import the dependent ADMX template file first, ADMX file upload will fail and will show you this error: NamespaceMissing: Microsoft.Policies.Windows. Please upload it first.
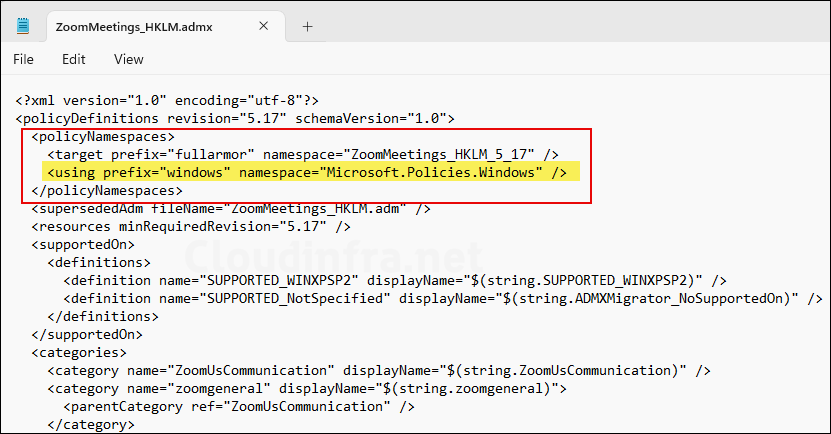
To determine whether an ADMX template depends on another ADMX template, open the ADMX template file in Notepad and review the <policyNamespaces> section. Under this section, look for the <using prefix=””> tag, which indicates a dependent namespace.
Below screenshot shows ZoomMeetings_HKLM.admx template file opened in Notepad. It depends on Microsoft.Policies.Windows namespace with the prefix windows. This means you must first upload the windows.admx template file into Intune, followed by ZoomMeetings_HKLM.admx or ZoomMeetings_HKCU.admx.
Because windows.admx is a common dependency for many ADMX templates, Microsoft has stated that it may be included natively in Intune in the future, eliminating the need for manual import. However, there is currently no ETA on when this will be available. For now, you can download the latest version of windows.admx from the link: Download Windows 11 Administrative Templates. For more information, refer to the link: NamespaceMissing: Microsoft.Policies.Windows. Please upload it first.
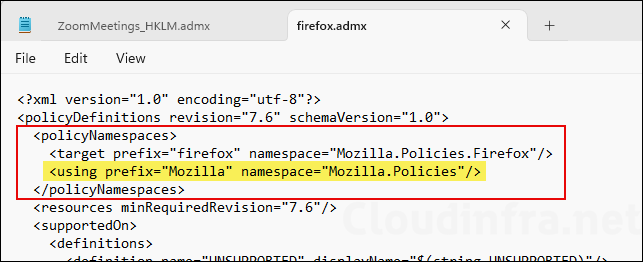
Let’s take another example of Mozilla firefox browser. You can download Mozilla Firefox policy templates from here and import it in Intune. Before importing firefox.admx, open the file to check whether there are any dependency prerequisites.
As shown in below screenshot, firefox.admx depends on Mozilla.Policies namespace, with the prefix defined as Mozilla. This means you must first upload the mozilla.admx and mozilla.adml template files into Intune and only then upload the firefox.admx and firefox.adml files; otherwise, the upload will fail.
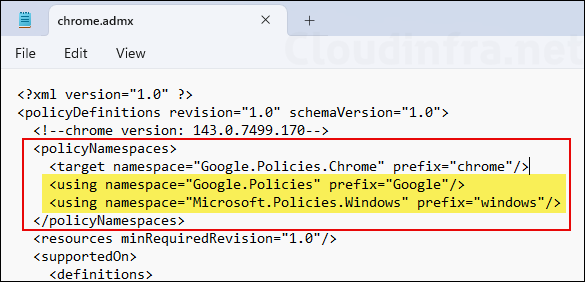
Similarly, when you want to import the Google Chrome ADMX templates into Intune, you will find that chrome.admx depends on both windows.admx and google.admx. Therefore, you must upload these two ADMX template files first before importing chrome.admx into Intune.
Import ADMX Templates in Intune
Now that you have downloaded the application’s ADMX templates along with all required dependent ADMX files, import the prerequisite ADMX templates first, followed by the main ADMX template file. For demonstration, I will use the ZoomMeetings_HKLM.admx and ZoomMeetings_HKLM.adml template files. Since these templates depend on windows.admx, I will import it first.
Similarly, when importing chrome.admx into Intune, first import google.admx and google.adml, along with windows.admx and windows.adml. For firefox.admx, import the mozilla.admx and mozilla.adml files first.
To manage ADMX templates in Intune, sign in to Intune admin center with an account that has at least Policy and Profile Manager role. For creating a custom role in Intune, refer to the post How To Create Custom RBAC Role In Intune.
Import the Dependency Prerequisite (windows.admx)
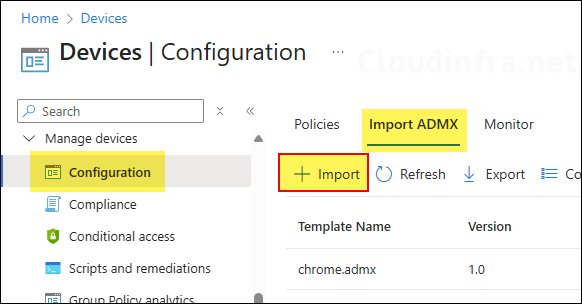
- Sign in to the Intune admin center > Devices > Configuration > Under the Import ADMX tab, click + Import.
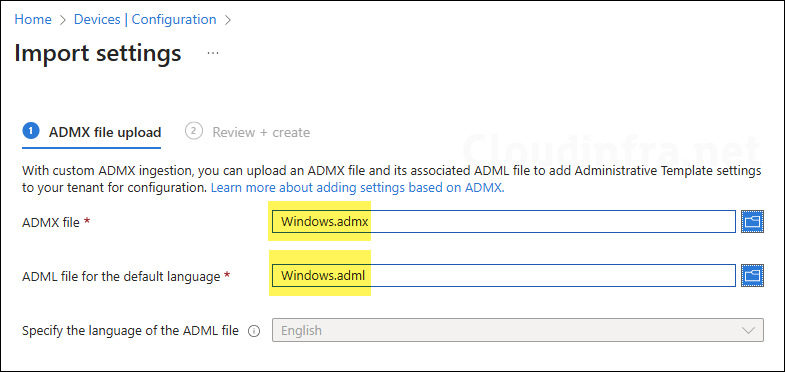
- If you have installed the latest Windows 11 ADMX templates on your computer, it will typically install it under C:\Windows\PolicyDefinitions (for windows.admx) and C:\Windows\PolicyDefinitions\en-US (for windows.adml). Browse to these files and import them into Intune.
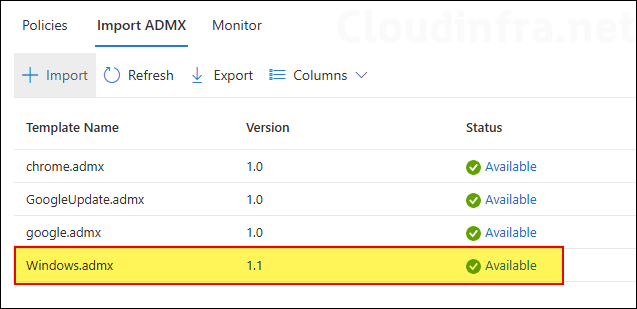
- When Windows ADMX template files are imported successfully, their status will show as Available with a green check.
Import Zoom ADMX Template Files in Intune
Now that the Zoom ADMX template dependency (windows.admx) has been successfully uploaded into Intune, we can proceed with uploading the Zoom ADMX template files.
- Sign in to the Intune admin center > Devices > Configuration > Under the Import ADMX tab, click + Import.
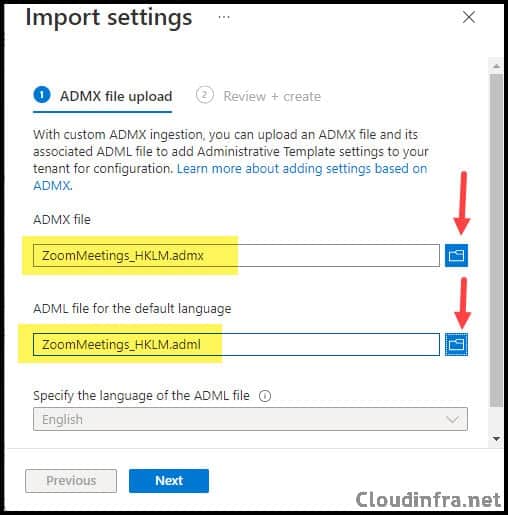
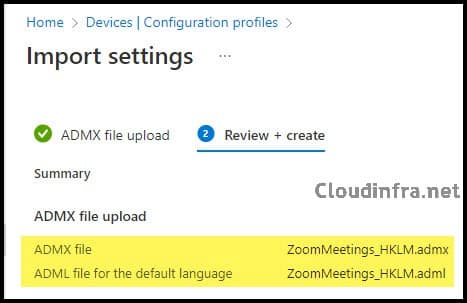
- Browse to ZoomMeetings_HKLM.admx and ZoomMeetings_HKLM.adml files. Click Next.
- On the Review + Create tab, click Create to upload the files.
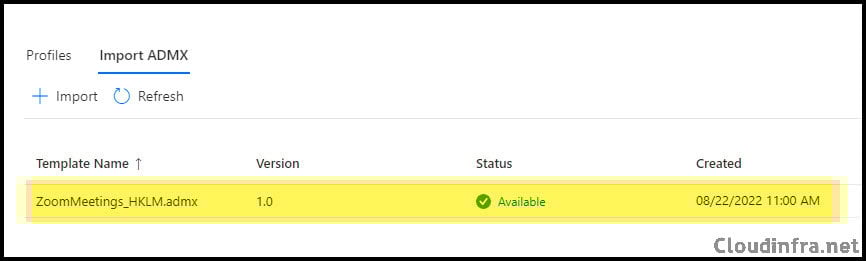
- After the upload process, the status will change to Available.
Using ADMX Template Settings
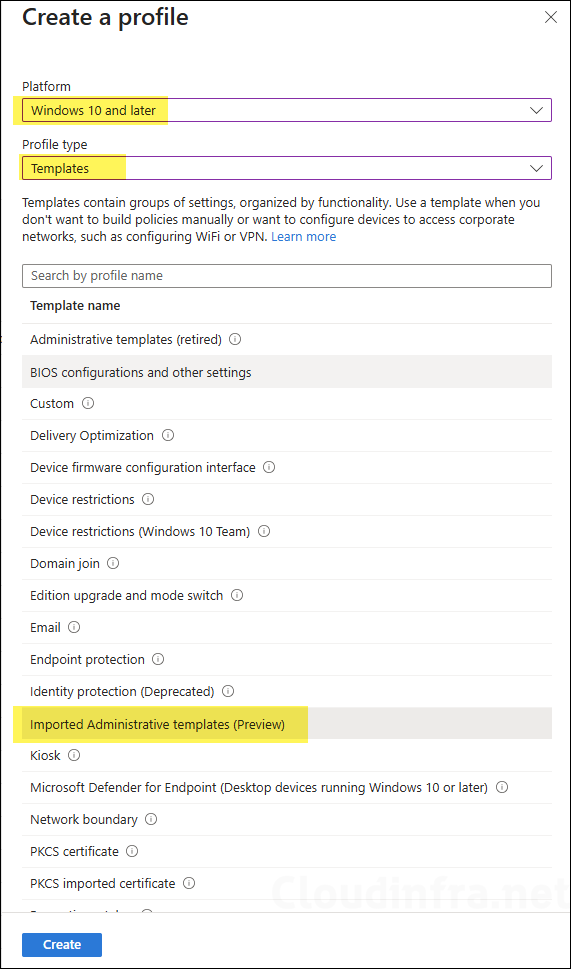
After uploading the ADMX template files into Intune, you can use those templates to create configuration profiles. Intune provides a template called Imported Administrative Templates, which is currently in public preview. To demonstrate the usage, I will create a device configuration profile in Intune to show you Zoom ADMX template file settings.
- Sign in to the Intune admin center > Devices > Configuration > Create > New Policy.
- Select Platform: Windows 10 and later. Select Profile type: Templates.
- Select Template name: Imported Administrative Templates (Preview).
- Click Create.
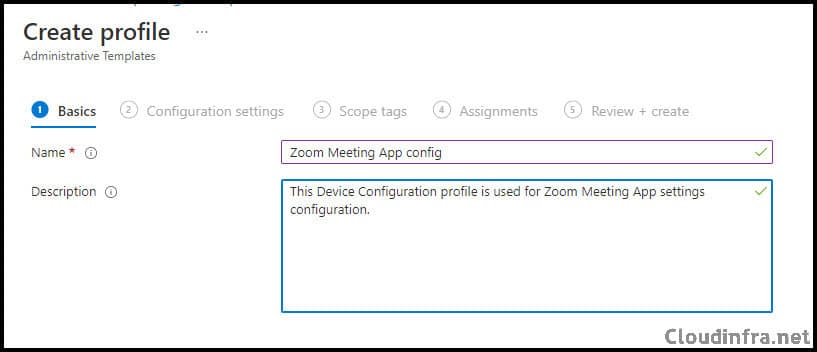
- On the Basics Tab, provide a name and description of the profile.
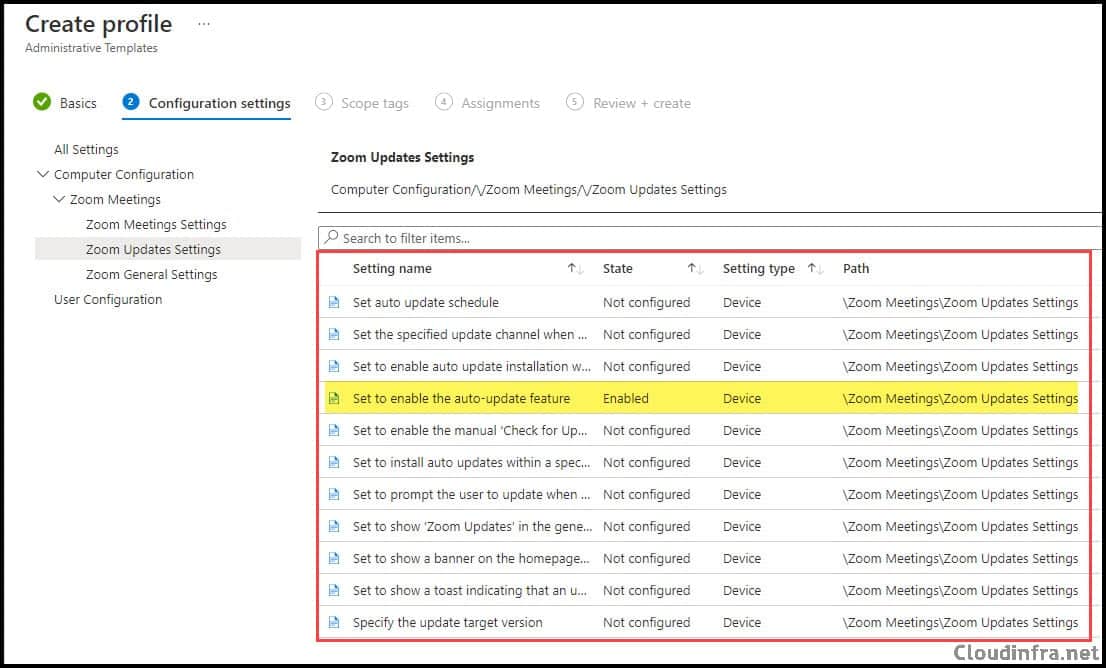
- On the Configuration settings tab, you will see the Computer configuration and User configuration nodes on the left-hand side, similar to how they appear in Active Directory Group Policy. Expand the relevant nodes and locate the settings you want to configure on the right-hand side.
- Scope tags (optional): A scope tag in Intune is an RBAC label you add to resources (policies, apps, devices) to limit which admins can see and manage them. For more information, read: How to use Scope tags in Intune.
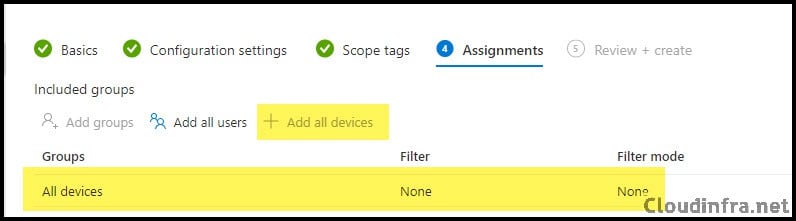
- Assignments: Assign the policy to Entra security groups that contain the target users or devices. As a best practice, pilot with a small set first; once validated, roll it out more broadly. For guidance on assignment strategy, see Intune assignments: User groups vs. Device groups.
- On the Review + create tab, review the deployment summary and click on Create.
Deleting ADMX Template from Intune
When you import a custom or third-party ADMX/ADML into Intune, Intune stores it as an uploaded definition file and then exposes its settings through Imported Administrative templates (Preview) profiles. Deleting an imported ADMX is straightforward only when there is no configuration profile dependent on it.
There are scenarios when deletion fails because the ADMX is still referenced by one or more configuration profiles or because other imported ADMX files depend on it as a prerequisite namespace. Check dependency ordering for removal (delete the ADMX that depends on another first, then delete the prerequisite).
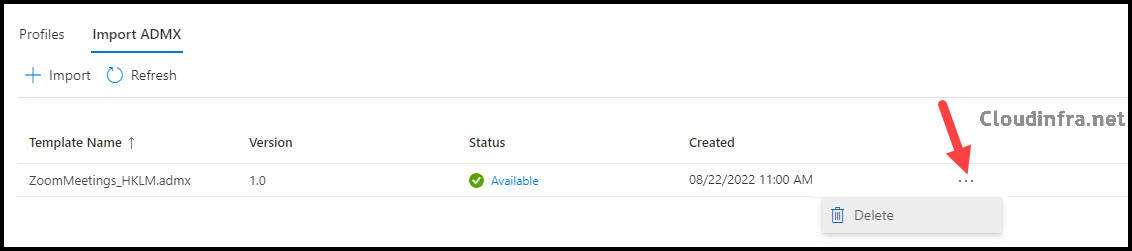
Below screenshot shows the option to delete an ADMX template file in Intune. Under the Import ADMX tab, click on the three dots next to the template you want to delete and select Delete to remove it from Intune.
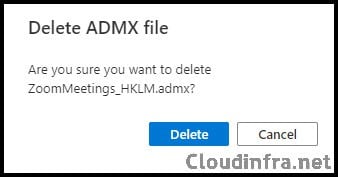
On the confirmation prompt, click on Delete to confirm deletion.
Troubleshooting
Follow below troubleshooting guidance to resolve the most common issues with respect to importing ADMX template files into Intune.
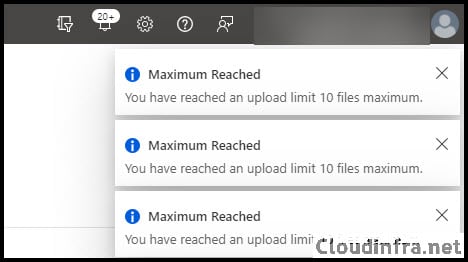
Maximum limit reached error
Previously, you could upload up to 10 ADMX files in Intune, with a file size limit of 1 MB per file. This limit has now been increased to 20 ADMX template files. If you try to upload more than 20 ADMX files, you will receive an error message similar to the one shown below.
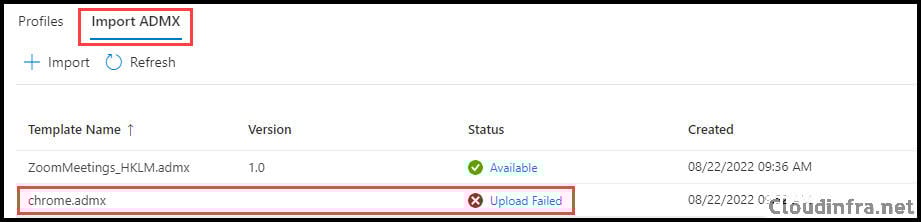
Upload failed Error
You may encounter an Upload failed error when importing an ADMX template into Intune. This often occurs when the ADMX template depends on another template, such as windows.admx. As explained earlier in this post, the solution is to import the dependent ADMX file first, followed by the main ADMX template file. Below is the exact error you may see on the screen for chrome.admx file.
The upload of this ADMX file has failed. To continue, you must delete this upload, address the action in the error details, and try again.
Error Details:
ADMX file referenced not found. NamespaceMissing:Google.Policies. Please upload it first.
ADMX Template Update Fails
When you try to upgrade or update an existing ADMX template file, the operation may fail if the template is referenced by device configuration profiles. This happens because the template is still in use. To update the ADMX template, you must first delete any configuration profiles that use it, remove the imported ADMX template file from Intune, import the updated ADMX template, and then recreate the device configuration profiles. For more information and different approaches, refer to the link: Import custom and third-party partner ADMX templates in Microsoft Intune – Microsoft Intune | Microsoft Learn.
Deletion of an imported ADMX fails
When you try to delete an imported ADMX template, it may fail if one or more imported administrative template profiles still reference the template (even if unassigned). To safely delete the ADMX template, follow the steps below:
- Export the device configuration profiles with settings created using imported administrative templates.
- Delete all profiles created under Imported Administrative templates (Preview) that use the ADMX template.
- Delete dependent ADMX templates first, then delete the prerequisite ADMX last. (For example, delete the ZoomMeetings_HKLM.admx template first and then delete windows.admx last).
- Retry deletion after a short propagation delay.
- If the portal still fails, use Microsoft Graph as a last resort to delete the uploaded definition file objects.
Namespace missing or dependency errors during import
To fix namespace missing error, refer to the post NamespaceMissing: Microsoft.Policies.Windows. Please Upload It First ADMX Import Intune.
References
- Import custom and third-party partner ADMX templates | Microsoft Learn.
- Use ADMX templates on Windows devices in Microsoft Intune – Microsoft Intune | Microsoft Learn.
Download Links of ADMX Template Files
- Windows 11 25H2: Download Windows 11 Administrative Templates.
- Firefox: Releases · mozilla/policy-templates · GitHub.
- Google Chrome: Download And Import Google Chrome ADMX Into Intune.
- Microsoft 365 apps/ MS Office: Download Administrative Template files (ADMX/ADML) for Microsoft Office from Official Microsoft Download Center.