
Microsoft has recently introduced a new Intune feature called Deployments, which is currently in public preview. With Deployments, you can create reusable and controlled rollouts for apps and policies. It uses a ring-based approach, which you may already be using in Intune for app deployments, policy deployments, or Windows update deployments.
In a ring-based deployment approach, you create multiple groups and assign devices to those groups based on the rollout stage, such as testing, pilot, early adopters, and production. The production group typically contains most or all organization devices. Without Intune Deployments, you need to manually add and remove these groups from app or policy assignments as the rollout progresses. You also do not have a simple built-in option to pause or resume the rollout if an issue is identified.
Intune Deployments automates phased assignments by assigning the configured groups to the selected payload according to the schedule and ring order you set in the admin center. Assignments progress over time, regardless of whether the deployment succeeds or fails on devices in an earlier ring. You must monitor the results and decide when to pause the deployment or resume it.
Contents
How Deployments Work in Intune
To understand how Intune Deployments works, think of it as a controlled rollout workflow that connects three main components: payload, deployment plan, and deployment.
First, you create or use an existing payload that you want to deploy. This can currently be a Win32 app or a device configuration policy. Next, you create a deployment plan, which defines the rollout structure, including the deployment rings, group assignments, excluded devices, and wait times between each ring. Finally, you create a deployment, which connects the payload with the deployment plan and starts the phased rollout.
Once the deployment begins, Intune automatically assigns the payload to each ring based on the configured schedule. For example, it can start with the Test Ring, wait for the configured duration, then move to the Pilot Ring, followed by Early Adopters, and finally the Production Ring. If an issue is found during the rollout, you can pause the deployment, investigate the problem, and resume it when ready. This removes the need to manually update assignments at each stage and provides a more structured and automated way to manage app and policy rollouts.
Example of Deployments
Let’s take a simple example to understand the Intune Deployments workflow. Suppose you want to deploy a Win32 app to all Windows devices in your organization, but you do not want to target every device at the same time. First, create the Win32 app that you want to deploy. This app becomes your payload.
Next, create Microsoft Entra ID groups for phased rollout and add devices to these groups based on their rollout purpose, as shown in the table below. In this example, I have created multiple groups and prefixed group names with Deployment Plan – so they are easier to identify in Microsoft Entra ID and Intune. You can use any meaningful naming convention that works for your environment.
| Group Name | Purpose |
|---|---|
| Deployment Plan – Excluded Devices | Contains devices that should be excluded from the deployment, such as unsupported, sensitive, or temporarily blocked devices. |
| Deployment Plan – Test Ring | Contains a small set of test devices used to validate the payload before wider rollout. |
| Deployment Plan – Pilot Ring | Contains selected pilot devices or users to confirm the deployment works as expected in a real-world scenario. |
| Deployment Plan – Early Adopters Ring | Contains early adopter users or devices that receive the deployment before the broader production rollout. |
| Deployment Plan – Production Ring | Contains the main production device group where the payload is deployed after successful validation in earlier rings. |
You can then configure the deployment plan so that the app is first assigned to the Deployment Plan – Test Ring. After a defined wait period, such as one day, Intune moves to the Deployment Plan – Pilot Ring. The rollout continues to the Deployment Plan – Early Adopters Ring, and finally to the Deployment Plan – Production Ring.
After the payload and deployment plan are ready, create a deployment to connect them. Once the deployment starts, Intune automatically manages the phased rollout based on the plan. This means you do not need to manually update the app assignments for the payload. If an issue is found during testing or pilot deployment, you can pause the deployment, troubleshoot the issue, and resume the rollout when ready.
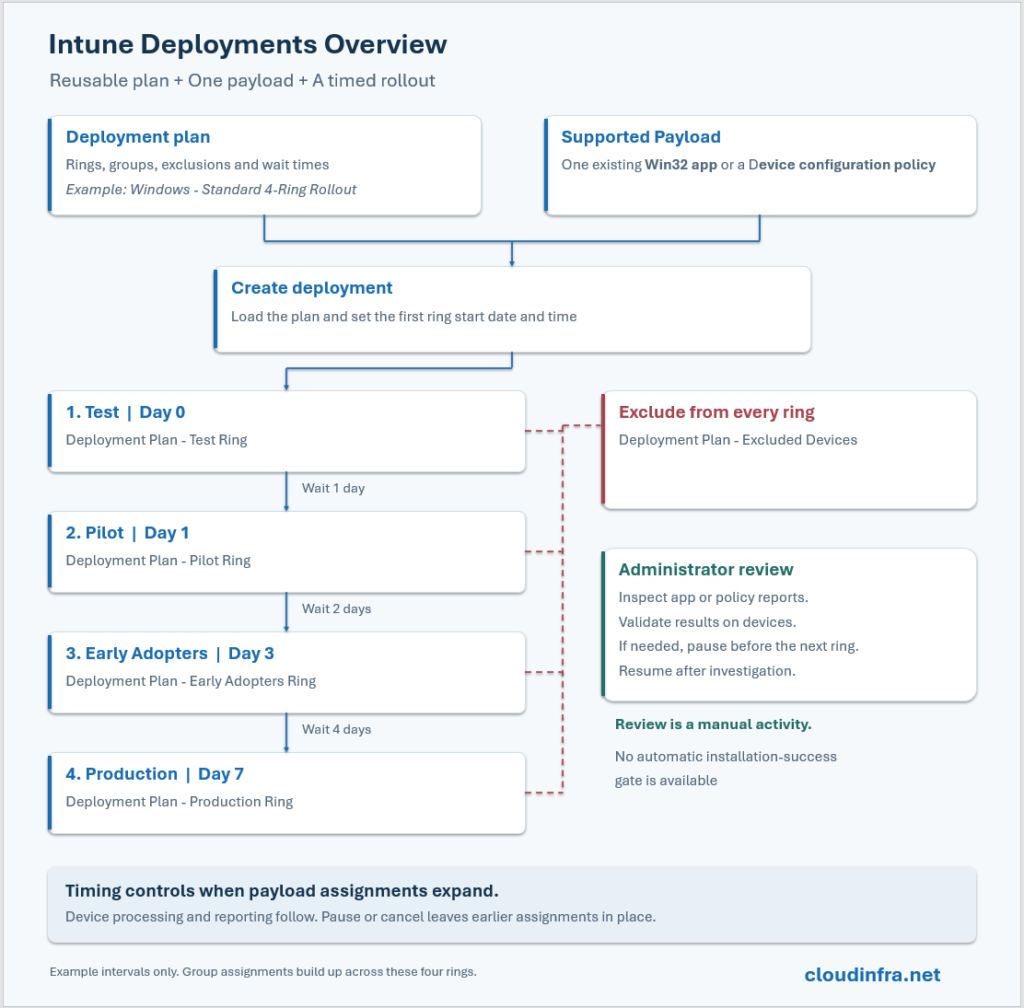
The image below shows an example of the Intune Deployments workflow. It illustrates the overall process explained in the previous section, including how the payload, deployment plan, deployment rings, exclusions, wait times, and final deployment work together to support a controlled phased rollout.
Deployments Limitations
Using Deployments in Intune has some limitations. Not all app types and deployment scenarios are currently supported. For example, only a single payload can be used per deployment. The below lists the current limitations for deployments in Intune.
- Public preview: Deployments feature in Intune is currently in public preview.
- Supported platform: Deployments currently support Windows 10 and later devices.
- Supported policy payloads: Only Settings catalog and Endpoint security policies are supported for device configuration deployments.
- Supported app payloads: Only Windows app (Win32) and Enterprise App Catalog apps are supported.
- App assignment intent: Only the Required install intent is supported. Available and Uninstall intents are not supported.
- Enterprise App Catalog updates: Updates using supersedence are supported, but Automatically update is not supported with deployments.
- Single payload per deployment: A deployment can include only one payload.
- Payload reuse limitation: The same payload cannot be used in another scheduled or active deployment.
- Payload must already exist: The supported app or policy must already exist in Intune before you create a deployment.
- Ring assignment requirement: Each deployment ring must have at least one group assignment.
- Minimum ring interval: Deployments require at least a one-hour interval between rings.
- Deployment plan does not contain the payload: A deployment plan only defines the rollout structure, rings, groups, exclusions, filters, and wait times. It does not include or deliver the payload itself.
- Deployment settings cannot be fully edited after creation: After a deployment is created, you can update the name and description, but you cannot modify the selected payload, ring names, schedule, groups, or scope tags from the deployment.
- Exclude groups apply to all rings: Any exclude groups configured in the deployment plan or deployment apply across all rings.
- Virtual group limitation: If you use All users or All devices, that virtual group automatically becomes the final ring and replaces all groups in the required assignments with the virtual group.
- Virtual groups cannot be mixed with Entra security groups: All users or All devices cannot be combined with Microsoft Entra security groups in the same ring.
- Assignment collisions can pause a deployment: If the same group exists in the payload assignment and in a deployment ring, Intune detects an assignment collision. If this happens during ring activation, the deployment enters an error state and is paused until the collision is resolved.
- Direct changes to payload assignments take precedence over the deployment.
- When a virtual-group ring is activated, the virtual group replaces the payload’s previous Required include-group assignments. Existing excluded assignments are preserved.
- Cancel does not remove existing assignments: Canceling a deployment stops future ring progression, but it does not remove assignments already added to the payload by completed rings. You must remove those assignments manually from the payload.
- Deleted groups can affect deployments: If a ring contains a deleted Microsoft Entra group, the deployment can enter an error state. Soft-deleted groups must be restored or removed before the deployment can continue.
- Deployments page sorting limitation: The Deployments page does not currently support sorting options. The list is sorted based on when a ring starts in an active deployment.
- Search limitation: Search on the Deployments page currently searches only by deployment name.
- Multi-Admin Approval visibility: If a deployment is created for a payload protected by a Multi-Admin Approval access policy, the deployment does not appear in the Deployments list until the approval is completed.
- Multi Admin Approval status: To view the Multi Admin Approval status for a deployment, open the deployment or check it from Tenant administration > Multi Admin Approval or Admin tasks.
Prerequisites
- Ensure you have appropriately licensed Intune-managed Windows devices and an existing supported payload.
- Create Microsoft Entra security groups and add the required devices to the groups that will be assigned to deployment rings.
- To create deployment plans, your account must have Deployment plan > Create permission, along with Read permission to access deployment plans.
- For app deployments, your account must have Mobile apps > Read and Assign permissions.
- For configuration policy deployments, your account must have Device configurations > Read and Assign permissions.
Step 1: Create a Deployment Plan
Follow the steps below to create a deployment plan in Intune:
- Sign in to the Intune admin center > Devices > Manage devices > Deployments > Deployment plans > click on + Create plan.
- On the Basics tab, as an example, I will name it Windows – Standard Four-Ring Rollout. Add a description and select Next.
- On the Deployment schedule tab, select from one of the below platforms:
- Windows 10 and later: Choose this for a Windows rollout. You can add Windows-specific filters while creating the plan, such as targeting particular device models.
- All platforms: Create a more general plan. You choose the filters later, when you select the app or policy payload to deploy.
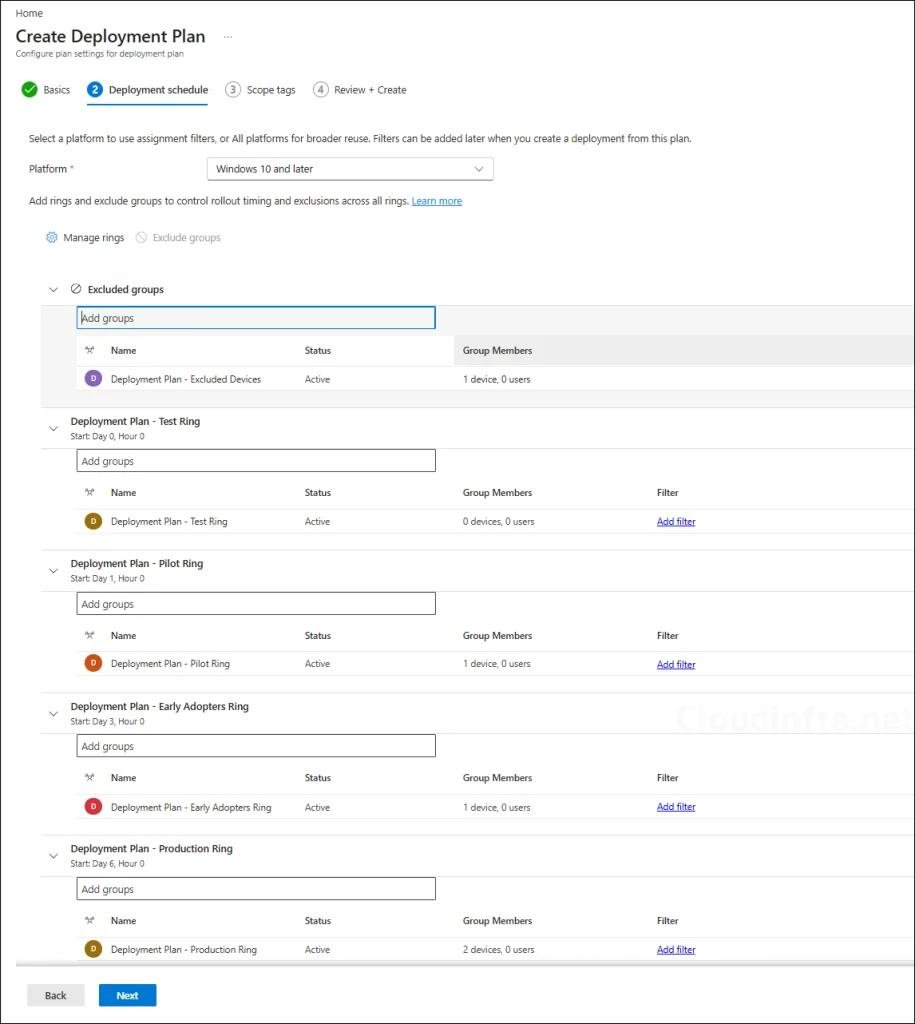
- Select Add rings. Name the first ring. For example: Deployment Plan – Test Ring.
- You can create more rings like Pilot, Early Adopters, and Production rings, etc., as per your requirements. Configure the inter-ring waits, then Save. The minimum interval is one hour.
- Assign an entra group to each of the rings.
- If you have certain devices to exclude from your deployment, under the Exclude groups, add the group. For example: Deployment Plan – Excluded Devices. This applies across every ring.
- If available and required, add the assignment filters. Select Next, configure scope tags, and continue.
- On Review + create, verify the plan and select Save.
If you change a deployment plan, those changes apply only to new deployments. Existing deployments keep their original settings.
Step 2: Prepare the Payload
As of writing this post, only Windows app (Win32 app), Enterprise App Catalog apps, Settings catalog, and endpoint security policies are supported for device configuration deployments. In Intune Deployments terminology, this is called a payload. Ensure that the payload already exists in Intune before creating the deployment.
Step 3: Create the Deployment
- Sign in to the Intune admin center > Devices > Manage devices > Deployments and select Create on the Deployments page.
- Enter a name and description, then Next.
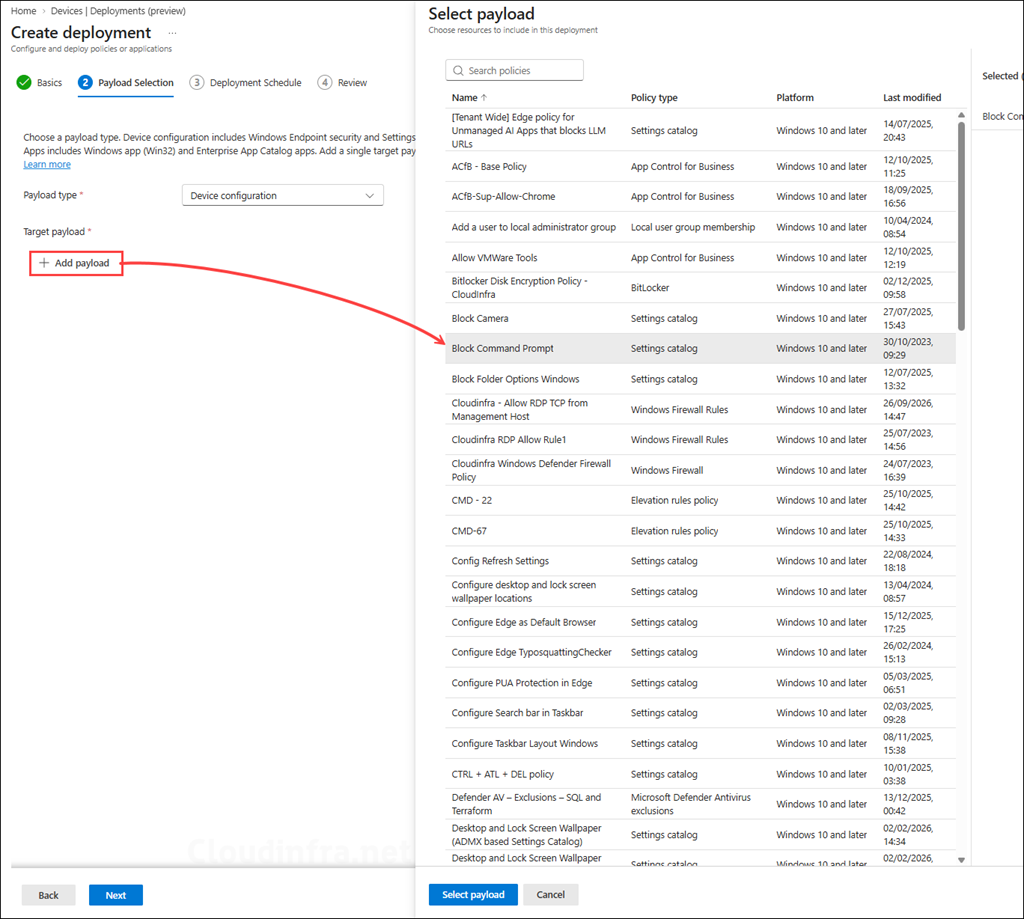
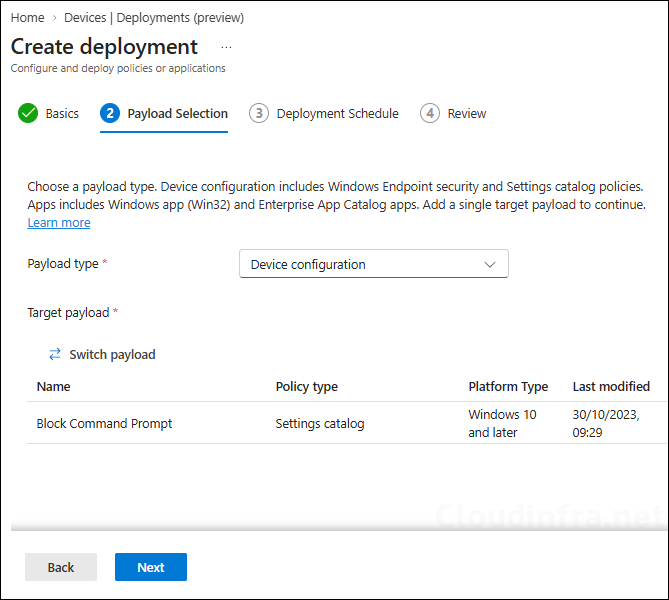
- Choose the Payload type and click on Add payload, choose the object, and select Select payload.
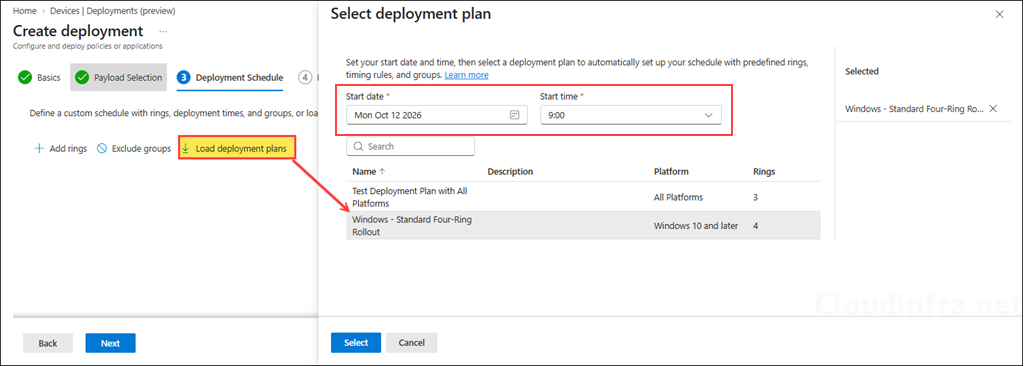
- On the Deployment schedule tab, use the Load deployment plans option to select the pre-created standard deployment plan called Windows – Standard Four-Ring Rollout. If you do not have a pre-created deployment plan, you have the option to click on + Add rings and configure a one-time schedule for this deployment. Set the start date and time to define when the deployment should begin.
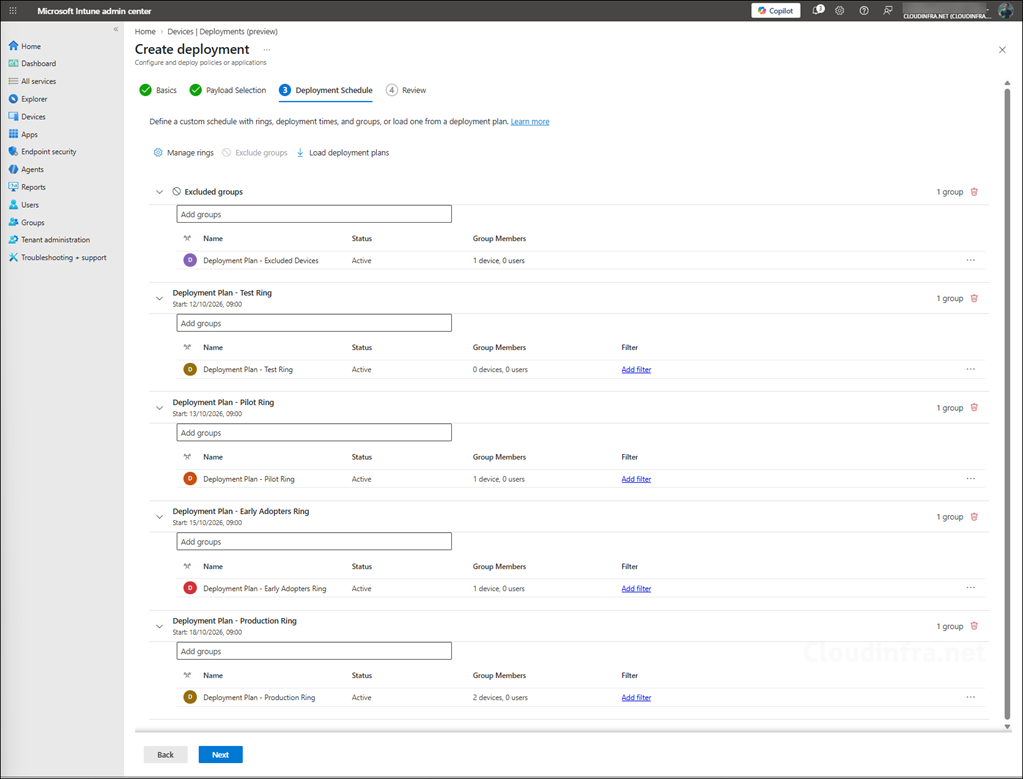
- The selected deployment plan will be loaded and displayed on the page. The deployment plan is already configured with the required groups. However, if you want to add one-time additional groups manually, you can add them here. You can also click Add filter to configure assignment filters for the deployment. Click Next.
- On the Review tab, re-confirm the deployment summary, and click Create.
Using “All Users” or “All Devices” Virtual Group
Below are some important points to remember when using the All users or All devices virtual group in one of the deployment plan rings.
- Adding All users or All devices to a ring automatically makes that ring the final ring in the deployment plan.
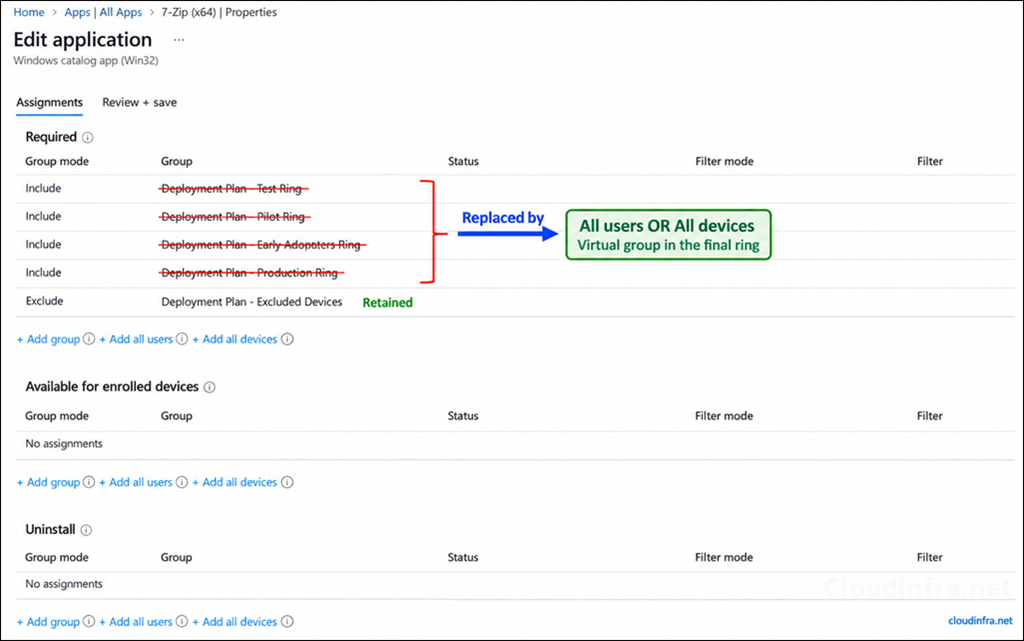
- When the final ring activates, the virtual group replaces the app or policy’s previous Required include-group assignments, including assignments added by earlier rings. Existing exclude assignments remain unchanged.
The screenshot below shows that when the final deployment ring containing All users or All devices activates, the virtual group replaces the previous Required include-group assignments, including those added by earlier rings.
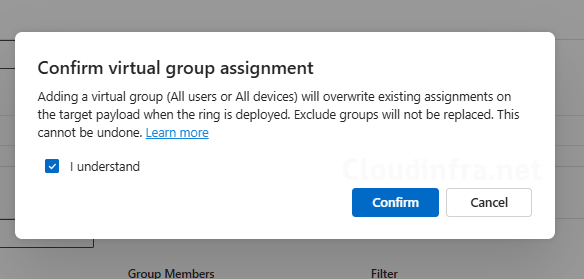
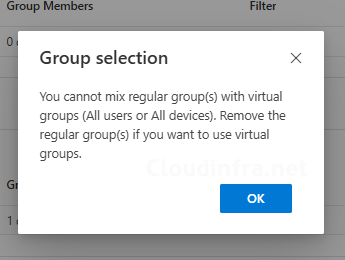
- You cannot combine a virtual group with Microsoft Entra security groups in the same ring. If you try to do that, you will get below error.
Deployments Monitoring
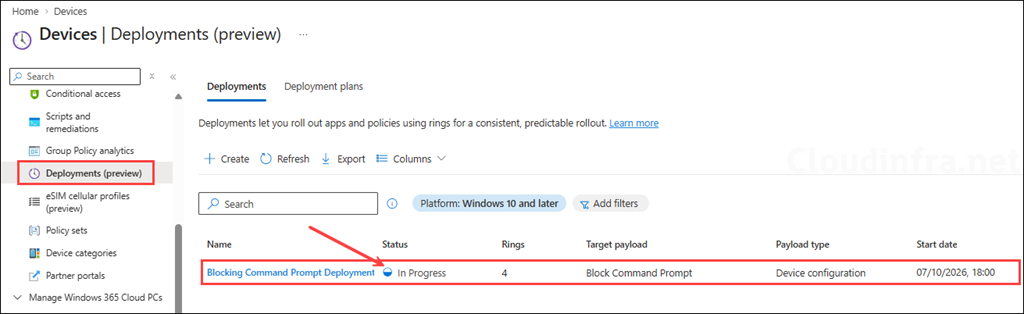
Let’s start by monitoring the deployment from the Deployments page in the Intune admin center. From this page, you can quickly check the deployment status and view the number of rings configured for the deployment.
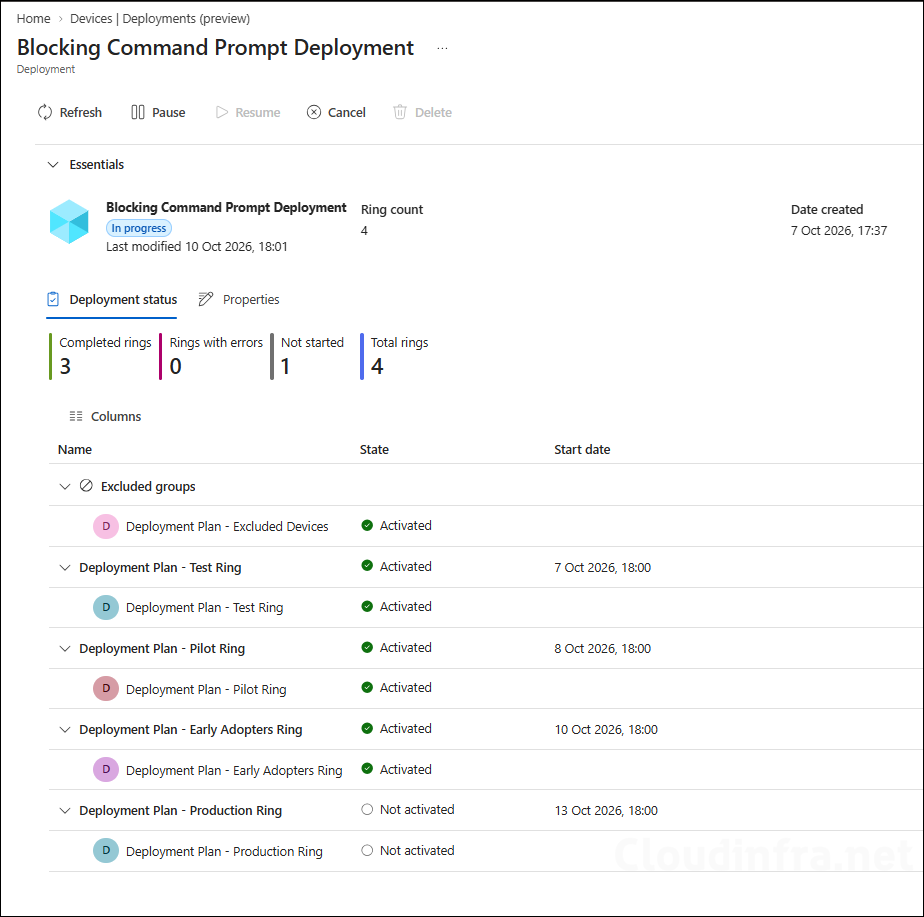
Open the deployment to manage and monitor it further. On the specific deployment page, you can pause, resume, or cancel the deployment. You can also review the overall deployment status from the Deployment status tab and check whether each deployment ring has been activated.
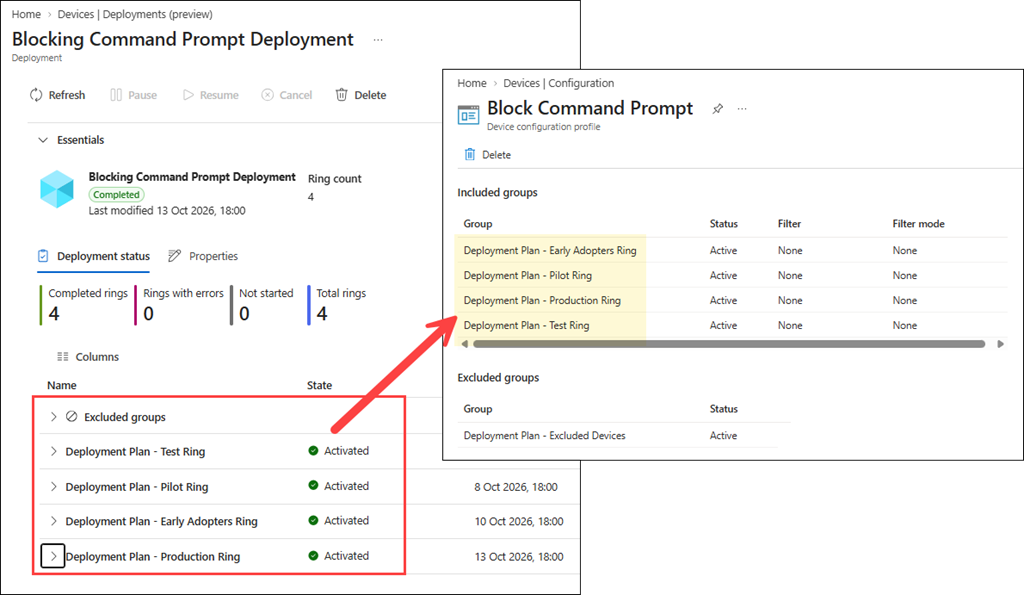
A deployment in Intune is an automated way to manage payload assignments. In the screenshot below, you can see that each ring has been activated, and the groups corresponding to each ring have been added to the Block Command Prompt payload. If you configured any excluded groups in the deployment plan, those groups will also be added to the payload as exclusions.
Troubleshooting
Audit Logs
Audit logs record activities performed by a deployment, such as ring activation and deployment cancellation or completion. They can also include the ID of the ring being activated.
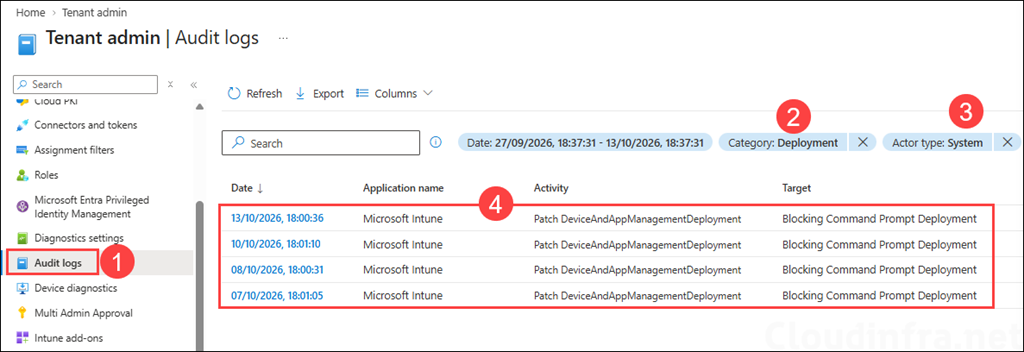
- Go to Intune admin center > Tenant administration > Audit logs, then filter by Category: Deployment and Actor type: System to view the changes made according to your deployment configuration.
The screenshot below shows the audit logs for our Block command prompt deployment, including the group assignments added as the deployment progressed.
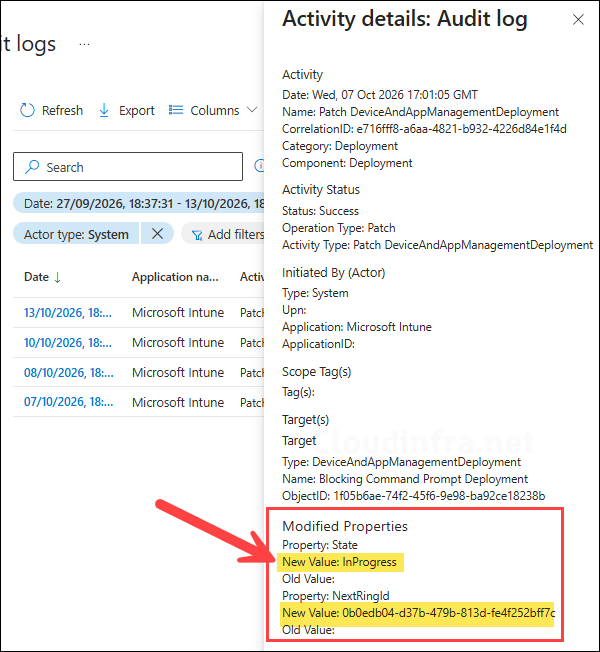
Click each audit log entry to view more details, including whether the deployment was in progress or completed at that time, and the next ring ID, if available.
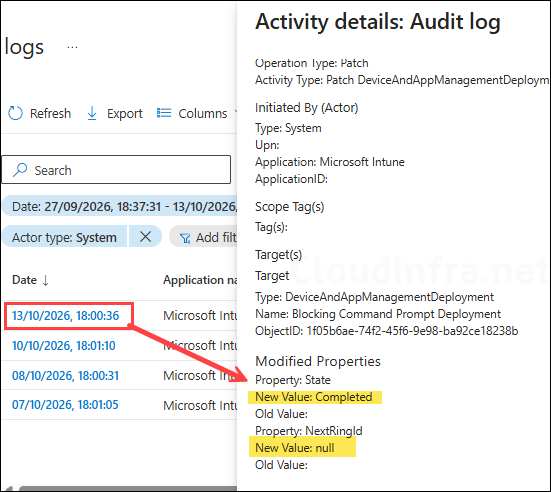
If the deployment has already completed, check its latest audit log entry. The status will show Completed, and NextRingId will be null, indicating that there are no more rings to activate.
Final Notes
Below are some important notes about deployments in Intune. The feature is currently in public preview, so Microsoft may introduce improvements, additional features, and support for more payload types in future updates. Review the points below to understand its current limitations and common issues.
- Assignment collisions: A collision occurs when the same group is assigned directly to the payload and also included in a deployment ring. When this happens, the deployment shows an error and is paused until the issue is resolved. To fix the collision, remove the duplicate group assignment from either the payload assignments or the proposed rollout.
- Pause and Cancel do not undo earlier assignments: They stop future rings from activating. Groups added by earlier rings continue to be assigned to the app or policy.
- Editing deployment after creation: You can change a deployment’s name and description, but you cannot change its selected payload, ring names, schedule, or groups. Review these carefully before creating it.
- Deleted groups can stop a deployment: To fix it, restore soft-deleted groups and resume the deployment. For permanently deleted groups, cancel or delete the affected deployment and create a replacement if needed.
- Rings advance by schedule: Progression is time-based, rather than dependent on successful installation across the previous ring. Monitor app or policy results before the next ring starts.
- Minimum interval between rings: Deployments require at least one hour between ring activations.
- One payload per deployment: A deployment supports one app or policy, and that payload cannot be used in another scheduled or active deployment simultaneously.
- App assignments support Required only: Available and Uninstall intents are unsupported. Enterprise App Catalog automatic updates are also unsupported, although updates through supersedence are supported.
- Virtual groups change existing targeting: A ring containing All users or All devices becomes the final ring. When activated, it replaces previous required include-group assignments while preserving exclusions.
- Direct payload changes affect the rollout: Editing the underlying app or policy can affect devices in earlier rings too. Direct assignment changes take precedence over deployment targeting.
- Missing apps, policies, or deployments: Check your Read and Assign permissions and scope tags. A deployment awaiting Multi Admin Approval will not appear in the deployment list until approved.
- Preview search and sorting limitations: The Deployments page searches by deployment name only and does not currently provide sorting controls.
