In this post, I will show you how to enroll Android Enterprise devices that are Corporate-Owned, Business-Only (COBO), also referred to in Microsoft documentation as corporate-owned, fully managed devices. It is an Android device that is owned by the organization and intended only for work or business use.
A COBO device is usually given to employees by the company, and the organization has full management control over the device. This means IT admins can configure security settings, deploy apps, enforce compliance policies, restrict personal use, wipe the device, and control how the device is used.
Unlike a BYOD device, where the user owns the device and Intune only manages a separate work profile, a COBO device is managed at the full device level. The user should not use it as a personal phone or tablet because the organization manages the whole device.
Contents
Key Elements of a COBO Device
- Corporate-owned device: The device is purchased and owned by the organization.
- Business-only use: The device is intended only for work-related tasks.
- Fully managed by Intune: Microsoft Intune can manage the entire Android device, not just a work profile.
- User-associated: In most cases, the device is assigned to a specific user who signs in with their work or school account.
- No personal profile: The device is not designed for personal apps, personal accounts, or personal data.
- Stronger IT control: Admins can enforce device restrictions, password requirements, app installation rules, network settings, and compliance policies.
- Factory reset usually required: COBO devices are normally enrolled from a new or factory-reset state.
Common Examples of COBO Devices
- A company-issued Android phone for an employee.
- A corporate tablet used by a field engineer.
- A managed Android device used by sales staff.
- A business-only mobile device used to access Outlook, Teams, Edge, and line-of-business apps.
- A secure Android device used in regulated environments where personal use is not allowed.
COBO vs. BYOD vs. COPE
Let’s put COBO Android devices into focus alongside BYOD and COPE device types. The table below provides a comparison of the different Android enrollment types and shows where COBO fits in comparison.
| Device Type | Device Ownership | Usage |
|---|---|---|
| BYOD (Bring Your Own Device) | User-owned | Personal and work use with a separate work profile |
| COPE (Corporate-Owned, Personally Enabled) | Company-owned | Work use with some personal use allowed |
| COBO (Corporate-Owned, Business-Only) | Company-owned | Business use only |
| COSU (Corporate-Owned, Single-Use) | Company-owned | Kiosk, shared, or single-purpose use |
Let’s begin with the steps to configure enrollment for Android Enterprise corporate-owned, fully managed user devices in the Intune admin center. To enhance both security and the user experience, first create a device compliance policy for Android devices. Additionally, create a device configuration policy to apply recommended device restrictions, such as blocking screenshot capture.
To further improve the user experience, create app configuration policies for the applications deployed to the devices. This ensures that when users launch the apps, they are automatically preconfigured with your organization’s settings.
Step 1: Create an Entra Security Group
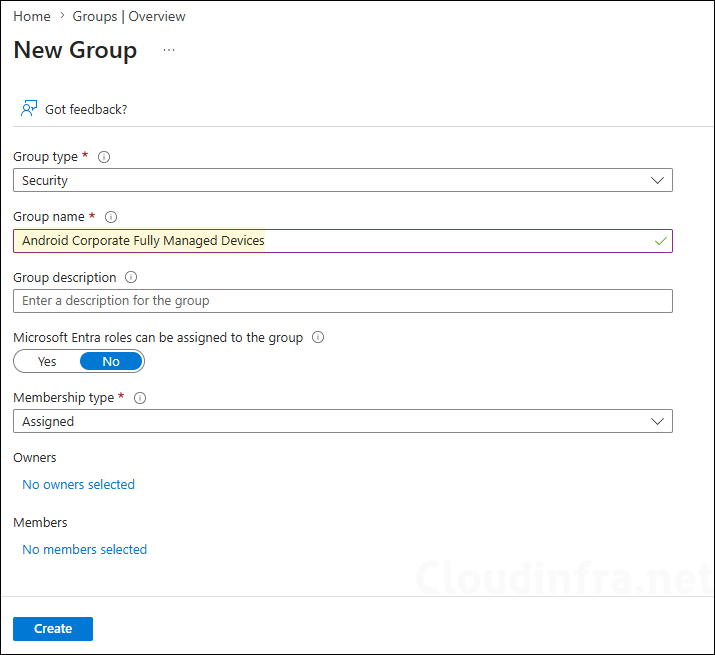
The first step is to create a Microsoft Entra security group that will contain your Android devices after enrollment. Do not manually add devices to this group; keep it empty for now. In the next step, we will configure enrollment time grouping, which will automatically add devices to this group during enrollment.
For this setup, I created a Microsoft Entra security group named Android Corporate Fully Managed Devices. You can use any group name that aligns with your organization’s naming standards or requirements.
Step 2: Enrollment Time Grouping
We will use enrollment time grouping for the security group created in the previous step. This means that when users or administrators enroll an Android device, it is automatically added to the group. You can then use this group to deploy apps and policies to those devices. This helps streamline the deployment process, improves the user and administrator experience, reduces post-enrollment latency, and speeds up time to productivity.
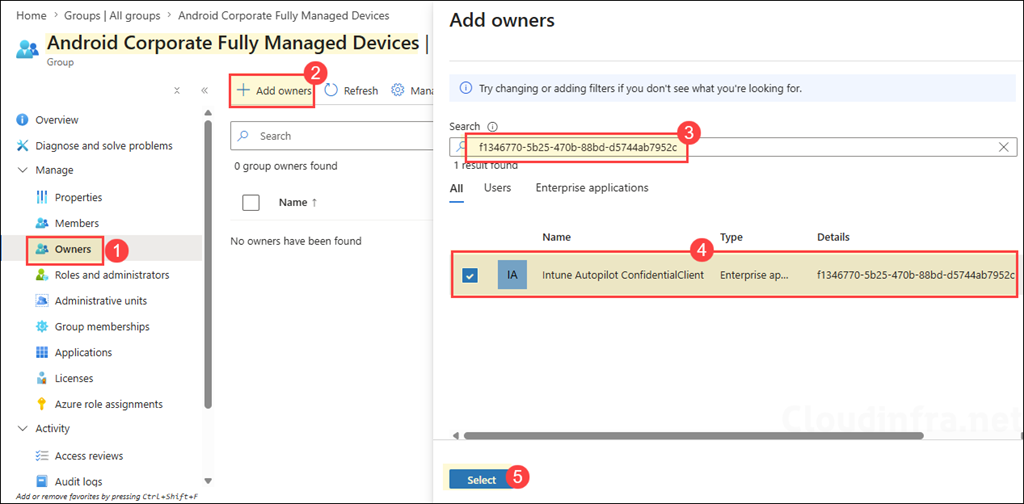
The first step for enrollment time grouping is to create an Entra security group, which we already completed in Step 1. The second step is to assign the Intune Provisioning Client service principal, with the AppID f1346770-5b25-470b-88bd-d5744ab7952c, as the owner of the group.
In some tenants, the service principal may appear as Intune Autopilot ConfidentialClient instead of Intune Provisioning Client. As long as the AppID is f1346770-5b25-470b-88bd-d5744ab7952c, it is the correct service principal.
Step 3: Create a Corporate-Owned, Fully Managed Device Enrollment Profile for Android
Now, let’s begin the admin configuration required to support corporate-owned, fully managed Android devices in the Intune admin center. First, we will create an enrollment profile and assign it to company-owned Android devices via the group we created in the previous step. This step generates an enrollment token or QR code that users can use to enroll their Android devices.
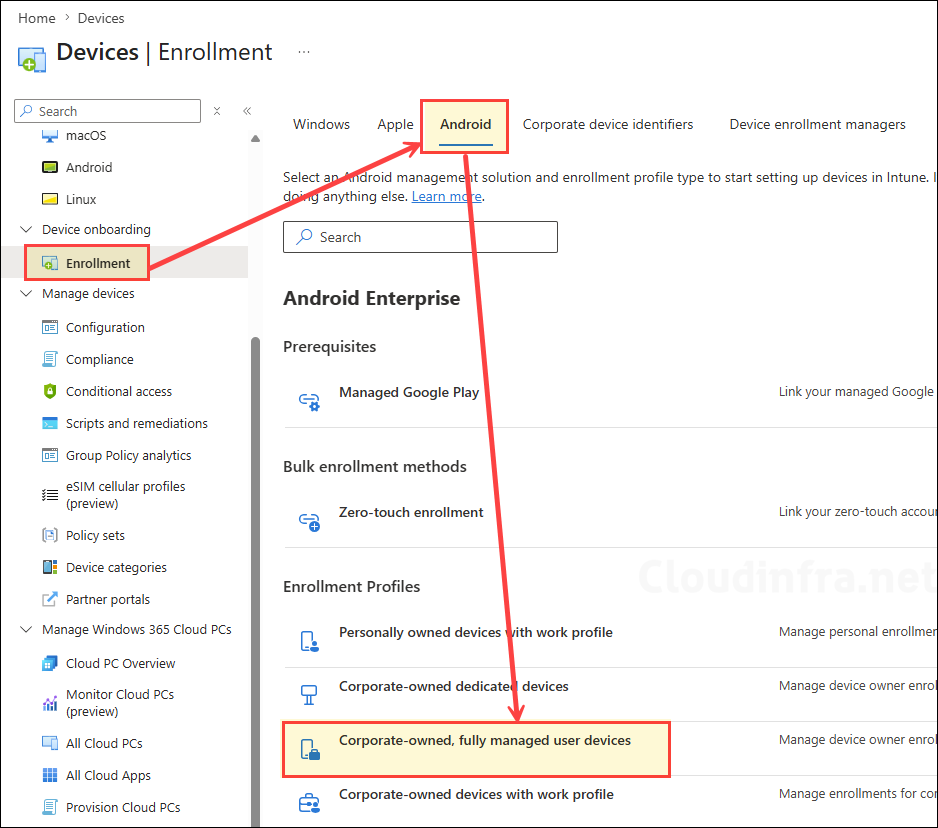
- Sign in to the Microsoft Intune admin center. Go to Devices > Enrollment.
- Select the Android tab. Under Android Enterprise > Enrollment Profiles, select Corporate-owned, fully managed user devices.
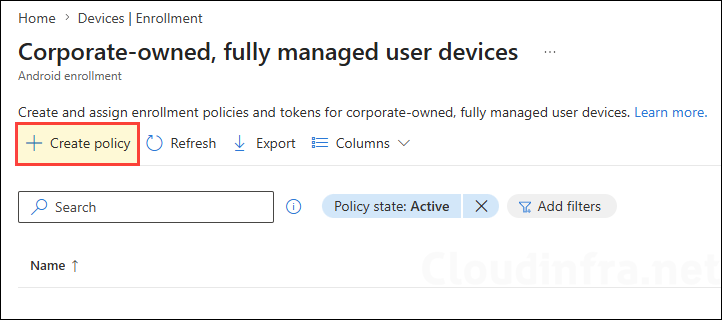
- Select Create profile.
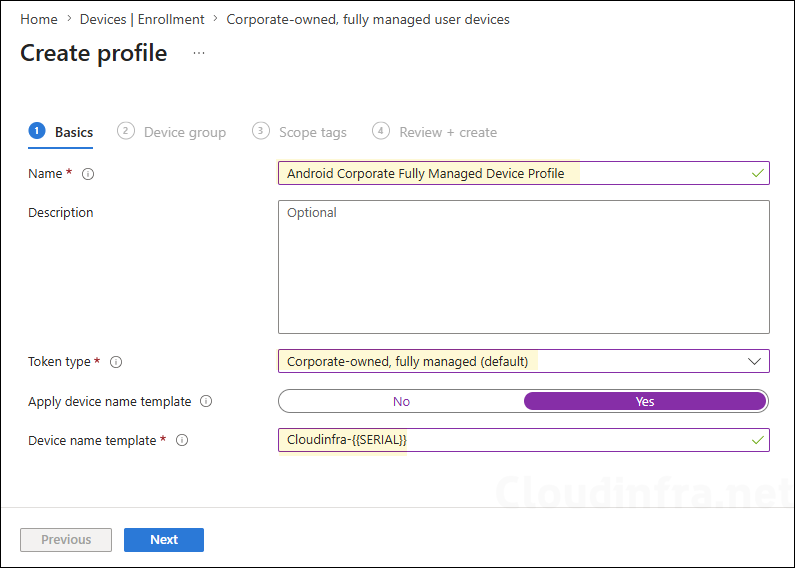
- Enter a profile name, for example, Android Corporate Fully Managed Device Profile.
- Token type: Corporate-owned, fully managed (default).
- Apply device name template: If not configured, by default devices will be named by properties of the device such as the deviceID, enrollment type, and time of enrollment. Select Yes to configure.
- Device name template: Create a unique name for your devices. Names must be 63 characters or less, and can contain letters (a-z, A-Z), numbers (0-9), and hyphens. Variables supported: {{SERIAL}}, {{SERIALLAST4DIGITS}}, {{DEVICETYPE}} (i.e. AndroidForWork or AndroidEnterprise), {{ENROLLMENTDATETIME}}, {{rand:x}} for x random integers where x is a whole number under 10. {{USERNAME}} or {{UPNPREFIX}} on user-affiliated devices for user’s full name or alias.
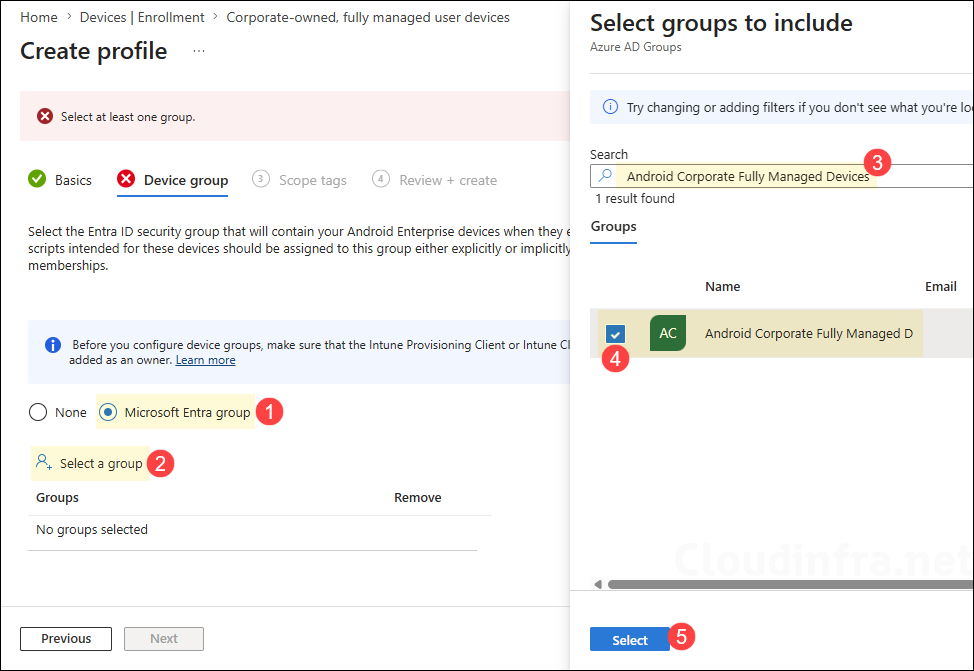
- Device group: Select the Entra ID security group that will contain your Android Enterprise devices when they enroll. The policies, apps, and scripts intended for these devices should be assigned to this group either explicitly or implicitly through the group’s own memberships.
Since we have already created and configured an assigned Entra security group, we will use it in the device enrollment profile. Select the Microsoft Entra group option, click Select a group, search for the required group, and then click Select to add it.
Alternatively, you can also create a dynamic device Microsoft Entra group based on the enrollmentProfileName property to group the devices that are enrolling with the same profile. For more information, refer to the link: #Step 3: Create dynamic Microsoft Entra group.
- Scope tags (optional): A scope tag in Intune is an RBAC label that you assign to resources such as policies, apps, and devices to control which administrators can view and manage them. For more information, see How to use scope tags in Intune.
- Review + create: Review the deployment summary and click Create.
Step 4: Get the Enrollment Token/QR Code
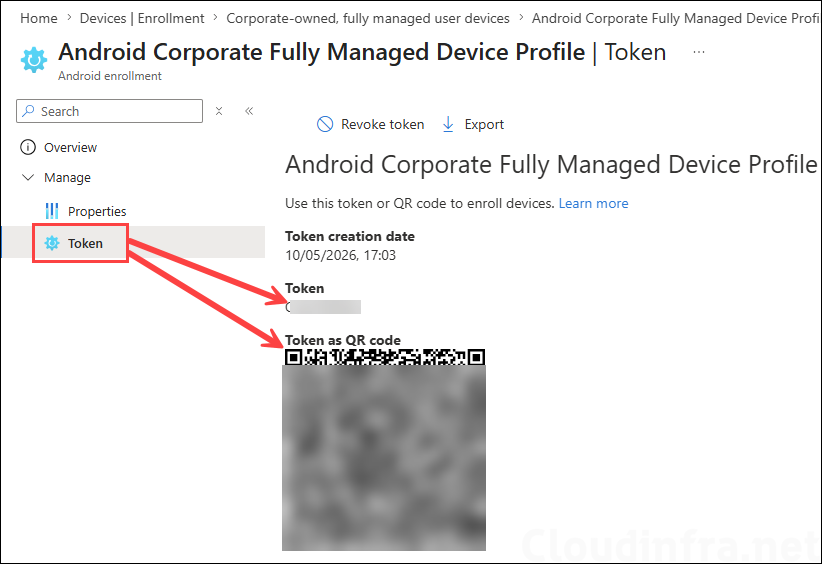
Once the enrollment profile is created, it automatically generates a token and QR code required for enrolling Android devices. Provide the token or QR code to the end users or administrators who will be enrolling the company-owned Android devices.
To retrieve the enrollment profile token, click the corporate-owned, fully managed device profile that you created.

Under Manage, click Token and copy the token code or QR code required for enrolling Android devices.
Step 5: Enroll Fully Managed Android Device
We have already completed the required configuration to support the enrollment process. Let’s now enroll an Android device as a fully managed device.
Existing or Old Device:
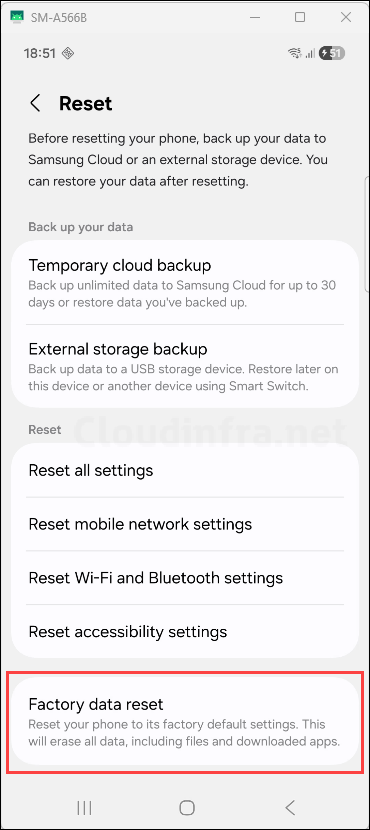
- You must perform a factory reset on the device. On most Android devices, go to Settings > System > Reset options > Erase all data / Factory reset.
- On Samsung devices, go to Settings > General management > Reset > Factory data reset. Then tap Reset device and Erase all data.
Brand New Device:
- For a brand-new Android device, a factory reset is usually not required. Power on the device and confirm that it is showing the first Android setup screen, such as Start or Get started. Follow the video for the steps to enroll the device.
- Do not tap the start button. Tap 6 times on the home screen to launch the QR code setup and start the enrollment process. The below video shows the enrollment steps from the user’s side. You can also view this video here: https://www.youtube.com/shorts/h2EGcHQEiA4.
Android Device Status on Intune Admin Center
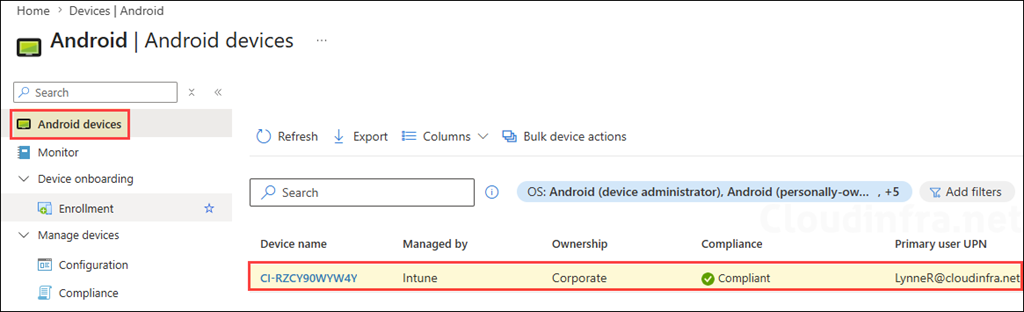
After enrolling the Android device, let’s verify the device object in the Intune admin center. Go to Intune admin center > Devices > Android > Android devices and verify that the enrolled device is listed. Furthermore, note the device naming convention. We configured CI-{{SERIAL}} as the naming convention, and the device has been renamed accordingly.
Enrollment Time Grouping in Action
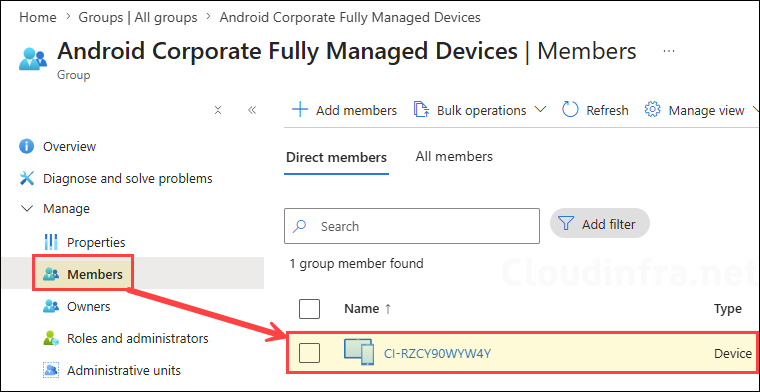
The Android device we just enrolled was automatically added to the Entra security group that we configured in the Android Corporate Owned Fully Managed device profile using the enrollment time grouping.
Android Device Status on Entra Admin Center
Let’s now check the status of the device object in the Entra admin center. Go to Entra admin center > Entra ID > Devices and verify that the newly enrolled Android device is listed. The device should appear as Microsoft Entra registered, with the MDM column showing Microsoft Intune.
