
Microsoft Intune can help configure Windows devices to select their time zone automatically. This is useful for employees who travel between regions and need their devices to display the correct local time.
Automatic time zone detection depends on Windows location services. Windows can use signals such as nearby Wi-Fi access points, GPS, mobile networks, and IP addresses to determine the device’s location.
In this guide, I will explain how to enable automatic time zone settings using an Intune configuration policy and a PowerShell script. I will also cover how to assign a specific time zone to devices that remain in one region.
Contents
Automatic Time Zone vs. a Specific Time Zone
Choose the configuration that matches how your devices are used.
| Configuration | Suitable for | Behaviour |
|---|---|---|
| Automatic time zone | Travelling employees and mobile devices | Windows determines the time zone using location information. |
| Specific time zone | Devices assigned to a particular office or region | Intune applies a Windows time zone ID, such as GMT Standard Time. |
Configure Time Zone setting specifies a particular time zone. It does not enable location-based automatic detection. Furthermore, Set time automatically and Set time zone automatically are separate Windows settings. Clock synchronisation and time zone selection serve different purposes.
Prerequisites
- Windows devices enrolled in Microsoft Intune.
- Permissions to create configuration profiles and deploy PowerShell scripts.
- A Microsoft Entra device group for the deployment.
Use a small test group first. Avoid assigning a fixed time zone policy and automatic time zone configuration to the same devices.
Configure Time Zone on Windows to Automatic
You can use the following steps to configure Windows devices to set the time zone automatically using the Intune admin center.
Step 1: Configure Location Access
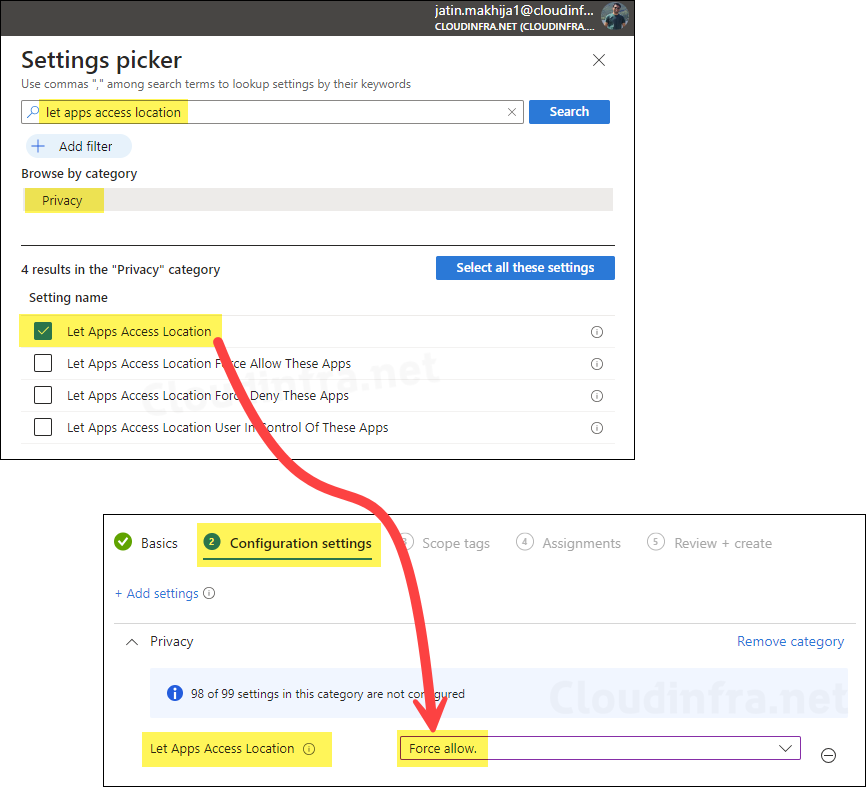
The first step is to enable Location Services for applications by configuring the Policy CSP: Privacy/LetAppsAccessLocation setting. Although Microsoft recommends setting this policy to User in control, automatic time zone detection requires access to the device’s location. Therefore, configure LetAppsAccessLocation to Force allow to ensure Windows can determine the device’s location and automatically set the correct time zone.
Force allow applies to Windows app location access; it is not a permission limited to the time zone feature
The Let Apps Access Location setting supports the following configuration values:
| Setting | Value | Behaviour |
|---|---|---|
| User in control | 0 | Users decide whether Windows apps can access location. |
| Force allow | 1 | Windows apps can access location, and users cannot change the policy-controlled setting. |
| Force deny | 2 | Windows apps cannot access location. |
- Sign in to the Intune admin center.
- Go to Devices > Configuration > Create > New policy.
- Select:
- Platform: Windows 10 and later
- Profile type: Settings catalog
- On the Basics tab, enter a name, such as Windows – Automatic Time Zone Location Access.
Configuration Settings
- Click on + Add settings, and search for let apps access location.
- Select the Let Apps Access Location checkbox and set it to Force allow.
- Scope tags (optional): A scope tag in Intune is an RBAC label you add to resources (policies, apps, devices) to limit which admins can see and manage them. For more information, read: How to use scope tags in Intune.
- Assignments: Assign the policy to Entra security groups that contain target devices. As a best practice, pilot with a small set first; once validated, roll it out more broadly. For guidance on assignment strategy, see Intune assignments: User groups vs. Device groups.
- Review + create: Review the deployment summary and click Create.
Step 2: Create a PowerShell Script
The script configures the following registry values:
- To enable or disable Automatic Time Zone on a Windows device, configure the
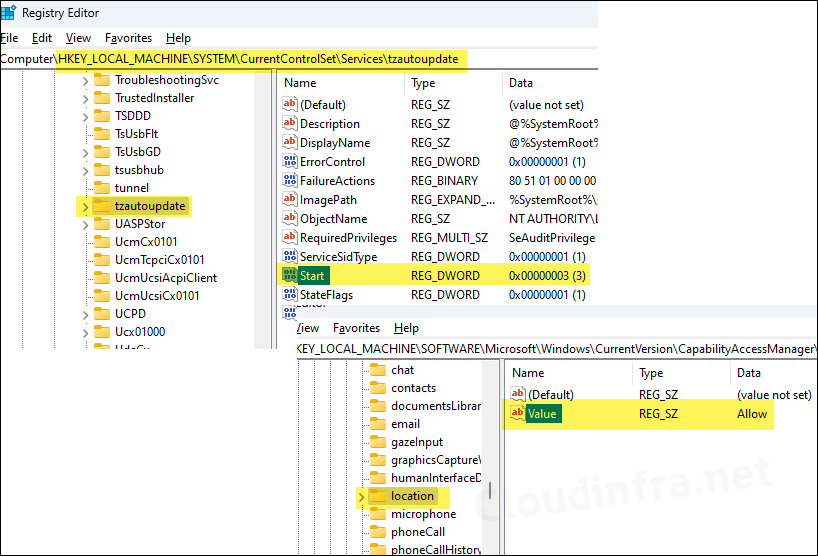
Startregistry value located at HKEY_LOCAL_MACHINE\SYSTEM\CurrentControlSet\Services\tzautoupdate. Set theStartvalue as shown below to either enable or disable automatic time zone detection.
| Value | Data |
|---|---|
| 3 | Enable Set time zone automatically |
| 4 | Disable Set time zone automatically |
- To enable Location Services on a Windows device, configure the
Valueregistry entry located at HKEY_LOCAL_MACHINE\SOFTWARE\Microsoft\Windows\CurrentVersion\CapabilityAccessManager\ConsentStore\location. Set theValueentry as shown below to enable location access.
| Data | Meaning |
|---|---|
| Allow | Location Service ON |
| Deny | Location Service OFF |
There are several ways to configure registry values using Intune. You can deploy a PowerShell script or use Intune device remediations. In this guide, I will use the PowerShell script method because it is a simple one-time configuration with a low risk of configuration drift. If you prefer, you can also use Intune device remediations by making a few modifications to the script to detect and remediate the registry settings as needed.
- Sign in to the Intune admin center > Devices > Scripts and remediations > Platform scripts.
- Click on Add > Select Windows 10 and later from the drop-down.
- On the Basics tab, enter a name and description of the policy. Click on Next to proceed to the script settings.
Script settings
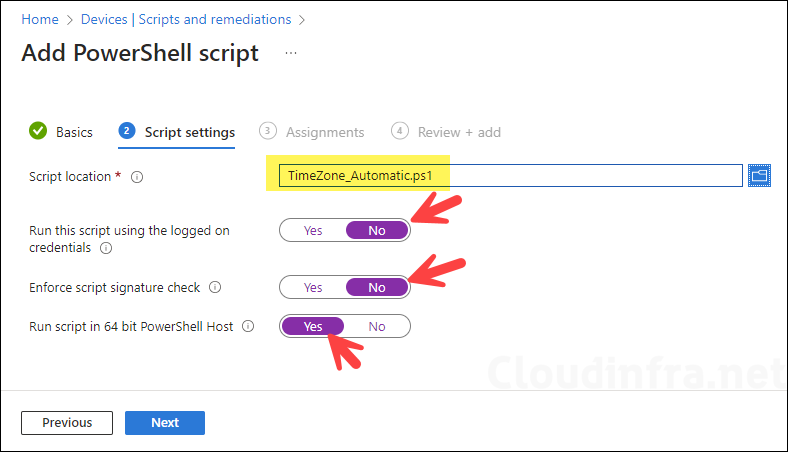
Download the PowerShell script from from my GitHub repository: Timezone_Automatic_v1.ps1 and deploy it on the target devices via Intune.
- Script location: Browse and select Timezone_Automatic_v1.ps1 script.
- Run this script using the logged on credentials: No
- Enforce script signature check: No
- Run script in 64 bit PowerShell Host: Yes
- Scope tags (optional): A scope tag in Intune is an RBAC label that you assign to resources such as policies, apps, and devices to control which administrators can view and manage them. For more information, see How to use scope tags in Intune.
- Assignments: Assign the policy to Microsoft Entra security groups that include the target users or devices. As a best practice, start with a small pilot group, and once validated, expand the assignment more broadly. For guidance on assignment strategy, see Intune assignments: User groups vs. Device groups.
- Review + create: Review the deployment summary and click Create.
Verify PowerShell Script Execution
To quickly verify that the PowerShell script executed successfully, restart one of the target devices and wait a few minutes for the script to run. Then, open the Registry Editor (regedit) and verify that the registry entries have been updated to the expected values. If the registry values match the configured settings, the script has been applied successfully.
- HKLM:\SOFTWARE\Microsoft\Windows\CurrentVersion\CapabilityAccessManager\ConsentStore\location should be set to Allow
- HKLM:\SYSTEM\CurrentControlSet\Services\tzautoupdate\Start should be set to 3.
Alternatively, you can run the following PowerShell commands to verify that the registry values have been configured correctly.
Get-ItemPropertyValue -Path 'HKLM:\SYSTEM\CurrentControlSet\Services\tzautoupdate' -Name 'Start'

Get-ItemPropertyValue -Path 'HKLM:\SOFTWARE\Microsoft\Windows\CurrentVersion\CapabilityAccessManager\ConsentStore\location' -Name 'Value'
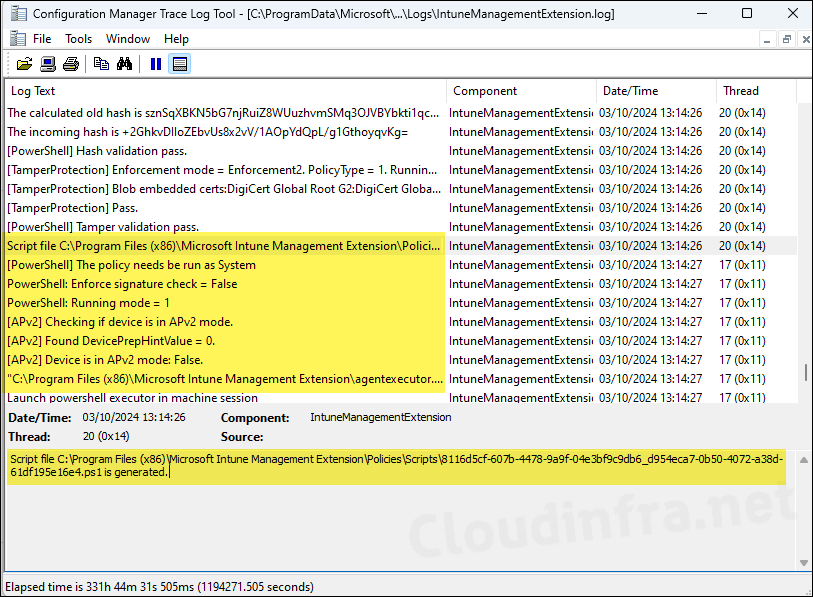
You can also review IntuneManagementExtension.log file for more details about the PowerShell script execution. Open the log file, search for the Policy ID associated with the Intune PowerShell script deployment, and review the relevant log entries to confirm whether the script ran successfully. This step is optional. If the registry values have already been updated as specified in the script, it confirms that the script executed successfully.
End User Experience
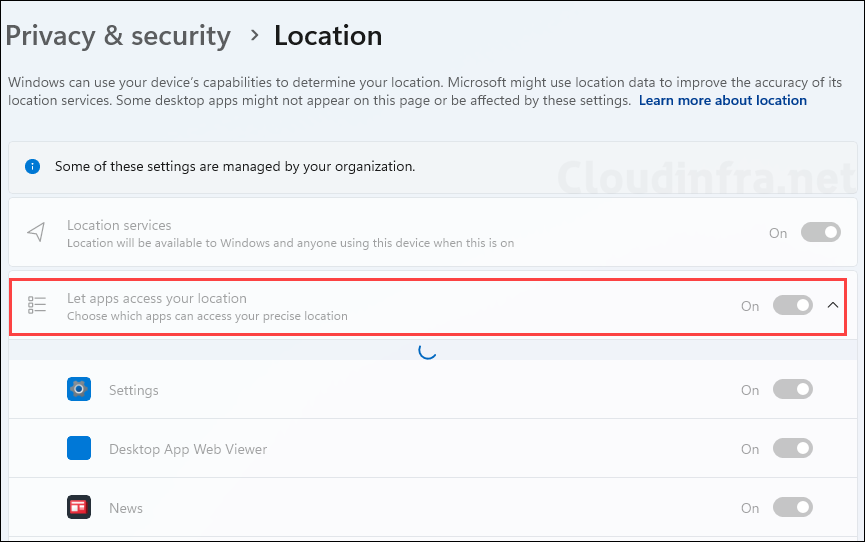
- Open Settings > Privacy & security > Location.
- Confirm that Location services is enabled.
- Check the effective Let apps access your location setting.
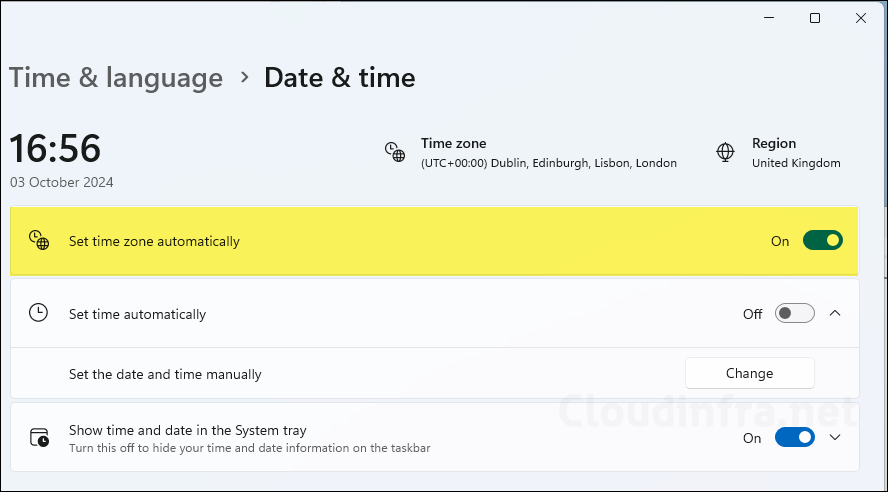
- Open Settings > Time & language > Date & time.
- Confirm that Set time zone automatically is enabled.
Set a Specific Time Zone Using Intune
For devices that should use a particular regional time zone, use Configure Time Zone settings catalog policy.
- Sign in to the Intune admin center.
- Go to Devices > Configuration > Create > New policy.
- Select:
- Platform: Windows 10 and later
- Profile type: Settings catalog
- On the Basics tab, enter a policy name.
Configuration Settings
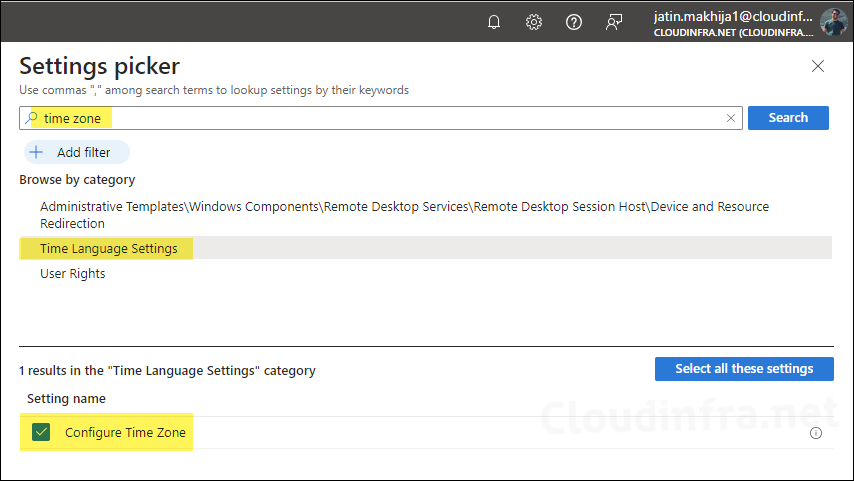
- Click on + Add settings, and search for time zone.
- Select Time language settings and then select Configure Time Zone
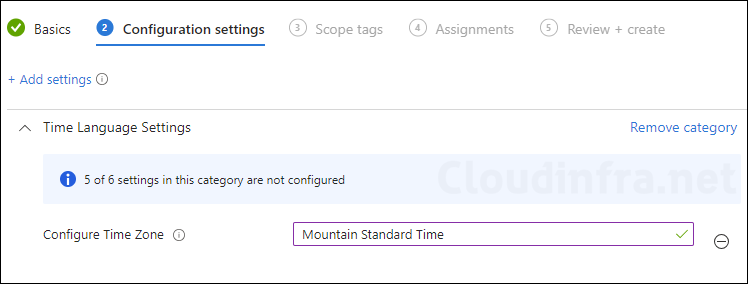
- Enter the Time Zone ID value in the text box. For instance, you can input Mountain Standard Time.
To find the time zone ID of any country, jump to the section: How to find the time zone ID of any country.
| Region | Windows time zone ID |
|---|---|
| United Kingdom | GMT Standard Time |
| India | India Standard Time |
| United Arab Emirates | Arabian Standard Time |
| Japan | Tokyo Standard Time |
| US and Canada — Pacific Time | Pacific Standard Time |
- Scope tags (optional): A scope tag in Intune is an RBAC label you add to resources (policies, apps, devices) to limit which admins can see and manage them. For more Information, read: How to use scope tags in Intune.
- Assignments: Assign the policy to Entra security groups that contain the target users or devices. As a best practice, pilot with a small set first; once validated, roll it out more broadly. For guidance on assignment strategy, see Intune assignments: User groups vs. Device groups.
- Review + create: Review the deployment summary and click Create.
End User Experience
To speed up your testing, manually kickstart Intune sync using GUI or use PowerShell.
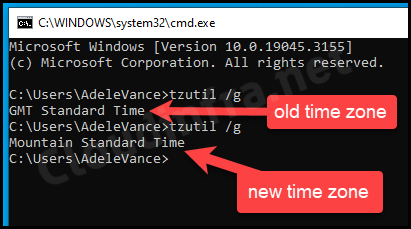
I first tested the specific time zone configuration method to verify that the policy was applied correctly. Initially, the device was configured with GMT Standard Time. After the policy was deployed, the time zone changed to Mountain Standard Time.
Running the tzutil /g command confirmed that the device was now using Mountain Standard Time, indicating that the policy had been applied successfully.
Find the Time Zone ID of any Country
When configuring a specific time zone on Windows devices, you must specify the correct Windows Time Zone ID for the target region. There are several ways to find the required time zone ID. Let’s look at the available methods.
1. Use Windows time zone utility (tzutil.exe)
The Windows Time Zone Utility (tzutil.exe) is a built-in command-line tool located at C:\Windows\System32\tzutil.exe. It is included with Windows 10 and Windows 11 and provides an easy way to view, configure, and manage the time zone settings on a Windows device.
- Click on the Start button and search for Command Prompt.
- In the Command Prompt window, type the following command:
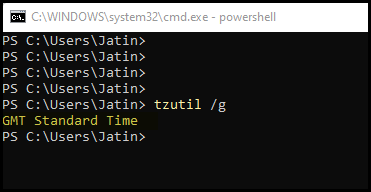
tzutil /g. - This will provide the current time zone ID set on your device.
- To find the Windows Time Zone ID for any region, run the
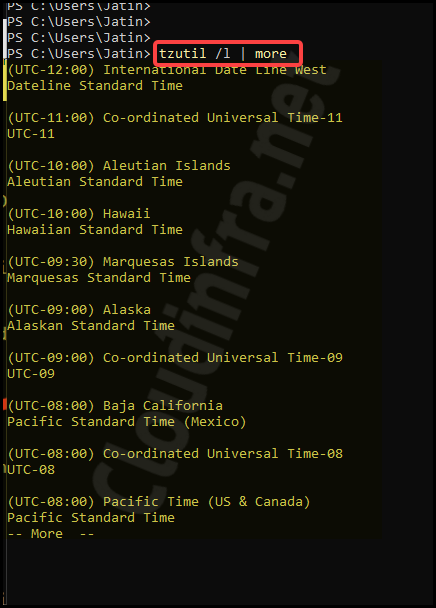
tzutil /lcommand in a Command Prompt or PowerShell window. The command displays a list of all available Windows time zones, allowing you to identify the appropriate Time Zone ID required for your configuration.
Use tzutil /l | more to display one output screen at a time.
2. Use PowerShell to find the Time Zone ID
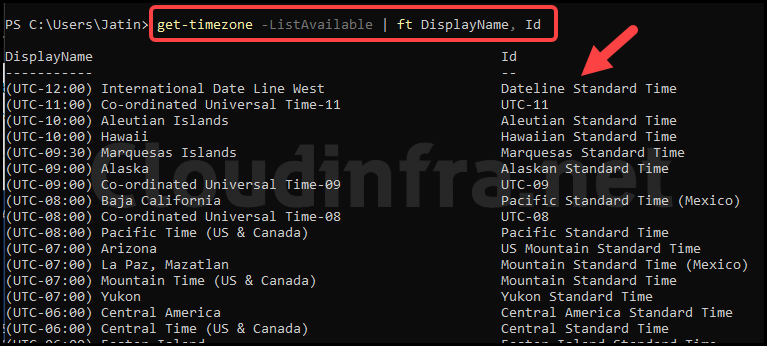
You can also use PowerShell to retrieve Windows Time Zone ID information. The Get-TimeZone cmdlet provides an easy way to view the current time zone configured on your device, along with its corresponding time zone ID, which you can use when configuring time zone settings in Intune or PowerShell.
Get-Timezone
get-timezone -ListAvailable | ft DisplayName, Id
3. Use Registry Editor to find Time zone ID
Another way to obtain the Windows Time Zone ID is by using the Registry Editor (regedit). Navigate to the registry key that stores the current time zone configuration and check its value to identify the Time Zone ID configured on the device.
- Click on Start and search for Registry Editor.
- In the Registry Editor, navigate to HKEY_LOCAL_MACHINE\SYSTEM\CurrentControlSet\Control\TimeZoneInformation.
- On the right-hand side, look for the
TimeZoneKeyNameregistry entry. - The value of TimeZoneKeyName represents the Time Zone ID currently configured on your device.
4. Using Microsoft documentation (TimeZones)
The easiest way to find the Windows Time Zone ID for any country or region is to refer to Microsoft’s Time Zones documentation. It contains a comprehensive table of all supported Windows time zone IDs, making it easy to find the value you need for your configuration. I recommend bookmarking this page for quick reference in the future.
Conclusion
In this blog post, we explored different methods for configuring the time zone on Windows devices managed by Intune. Depending on your organization’s requirements, you can configure devices to use a specific time zone or automatically detect the time zone based on the device’s location. I hope this guide has been informative and helps you successfully configure time zone settings on Windows devices using Microsoft Intune.

Good Job, Man…many thanks for this