In this post, I will show you how to uninstall the Zoom Workplace desktop app from Windows 10/11 devices using Microsoft Intune. We will look at two practical options:
- Option 1: Use a PowerShell script.
- Option 2: Use Zoom’s official CleanZoom utility, wrapped as a Win32 app.
You can use these approaches when 1) you want to cleanly remove Zoom from many Intune-managed devices, 2) Zoom may be installed per-user under AppData\Roaming, under C:\Program Files\Zoom, or under C:\Program Files (x86)\Zoom, and 3) you want a silent, automated process with no end-user interaction.
If you deployed Zoom originally as a Win32 or LOB MSI app in Intune, you can also easily uninstall it by assigning an uninstall group in the uninstall section of the Intune app deployment. For more complex “clean slate” scenarios (mixed installs, leftover files, broken client), the script and CleanZoom-based methods are more reliable. CleanZoom is provided as a ZIP file. After extracting the zip file, you will find cleanzoom.exe file, which will be used to remove the application. Let’s explore both options.
Contents
Option 1: Use a PowerShell Script to Uninstall Zoom
To remove the Zoom app using a PowerShell script, follow below steps:
Step 1: Download PowerShell script
I have created a PowerShell script and tested it to ensure it effectively removes the Zoom app. You can download the removeZoom.ps1 script from my GitHub repository, Powershell-Scripts/Zoom/removeZoom.ps1, and save it somewhere on your device. This PowerShell script does not require changes; you can deploy it as is. Once the deployment is complete, Zoom app will be removed from the users devices.
Step 2: Deploy PowerShell Script
To deploy the PowerShell script using the Intune admin center, I have created a step-by-step guide that explains how to deploy PowerShell scripts with Intune. Use this guide to deploy the script to remove Zoom app.
Option 2: Use CleanZoom Utility to Uninstall Zoom
Zoom provides an official uninstaller utility called CleanZoom for Windows. It is designed for a clean uninstall of the Zoom Workplace app and related components. For more information about CleanZoom, refer to the link: Uninstalling and reinstalling the Zoom application.
When you run CleanZoom with /silent switch, it will perform below tasks:
- Removes the Zoom Workplace app/Zoom desktop client.
- Removes the Zoom plugin for Outlook (but not the Outlook add-in, Chrome/Firefox extensions, or Google Workspace add-on)
1. Download CleanZoom
- Download the latest CleanZoom.zip from Zoom asset URL: https://assets.zoom.us/docs/msi-templates/CleanZoom.zip.
- Extract the contents of the zip file to find CleanZoom.exe in the folder. We will use this exe for clean removal of the Zoom app.
2. Create a PowerShell Script
Now, let’s create a PowerShell script file. I’m using cleanzoom.exe in the script below with the /silent switch. This combination ensures the Zoom client is uninstalled from the device silently, without user interactions or prompts displayed on the screen.
- Create a file called ZoomUninstall.ps1 and add the following line to the script:
ZoomUninstall.ps1
ZoomUninstall.ps1
.\cleanzoom.exe /silent3. Create IntuneWin File
Follow these steps to create an Intunewin file.
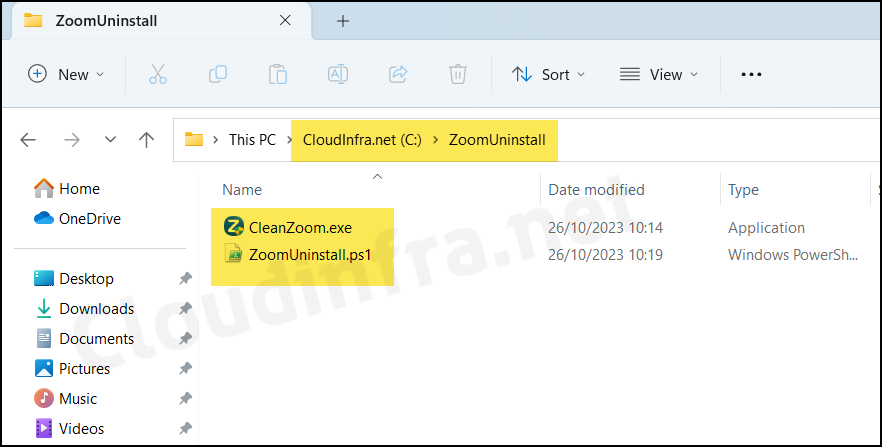
- Create an empty folder and place CleanZoom.exe and PowerShell script into this folder [as shown in below screenshot].
- Download the Microsoft Win32 Content Prep Tool (
IntuneWinAppUtil.exe) from Microsoft’s GitHub repository if you do not already have it. - Extract its contents into a folder. For simplicity, I have renamed the extracted folder as IntuneContentPrepTool.
- Repackage the source folder ZoomUninstall to .intunewin file using IntuneWinAppUtil.exe.
- Source Folder: C:\ZoomUninstall
- Setup File: ZoomUninstall.ps1
- Output folder: C:\output
- Catalog folder: Type N and press Enter.
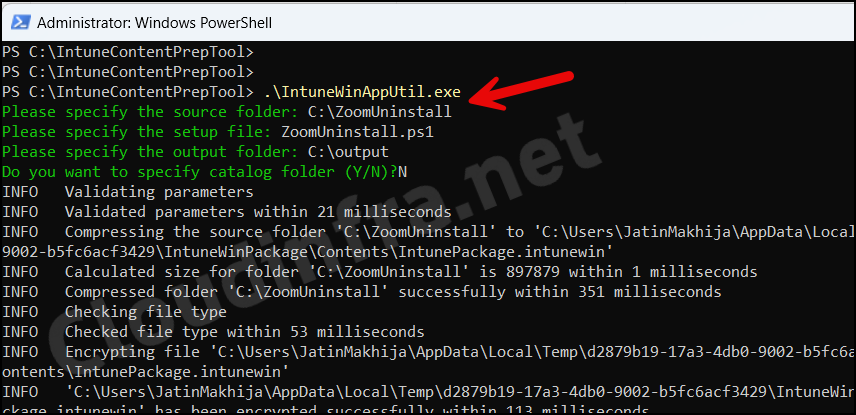
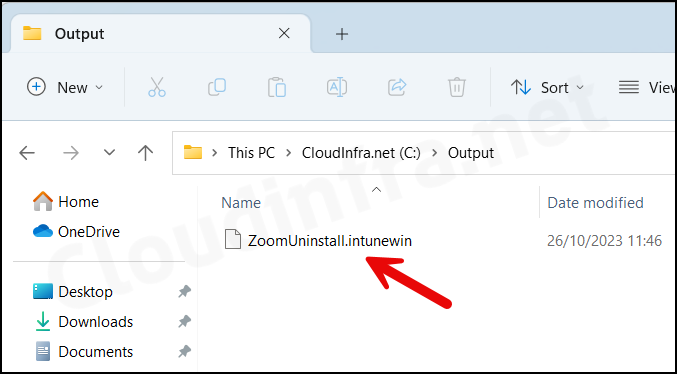
- Intunewin file will be generated under c:\output. This file will be used in the next step to create Win32 app deployment.
4. Create Win32 app in Intune
- Sign in to the Intune admin center at https://intune.microsoft.com.
- Go to Apps > All apps.
- Select + Create, then in App type choose Windows app (Win32).
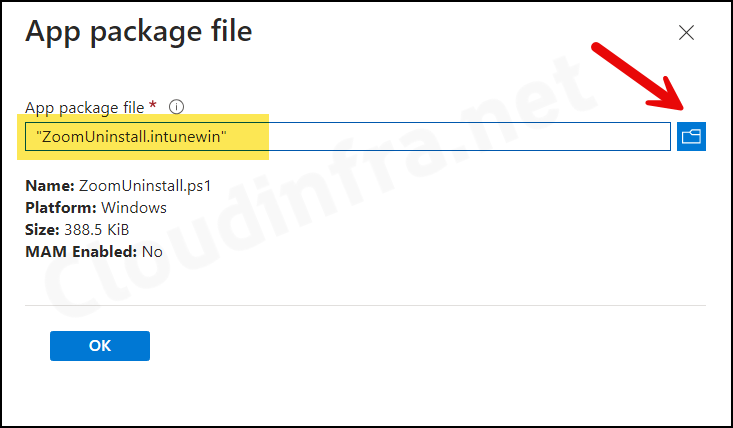
- Click on the Select app package file to select the ZoomUninstall.intunewin file package. Click OK.
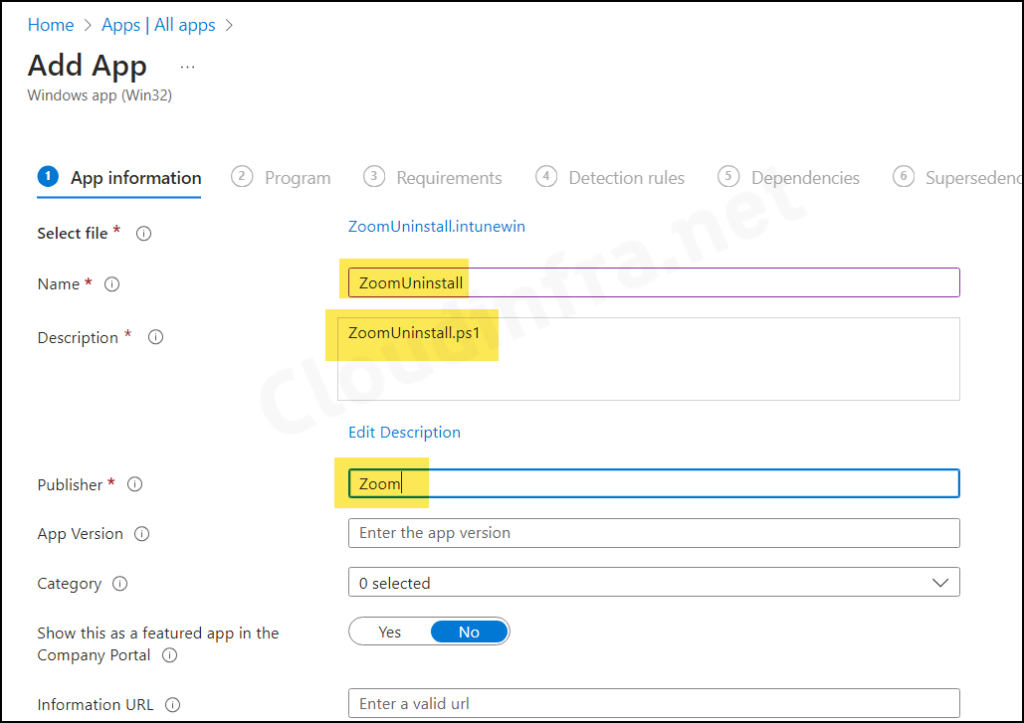
- On the App information page, provide below details:
- Name: Zoom Uninstall
- Description: Brief description of the app and version or keep default
- Publisher: Zoom
- Any optional information (category, logo, etc.) to match your requirements.
- Click Next.
- Program tab:
- Install command: powershell.exe -Executionpolicy Bypass -File .\ZoomUninstall.ps1
- Uninstall command: powershell.exe -Executionpolicy Bypass -File .\ZoomUninstall.ps1
- Installation time required (mins): Keep default
- Allow available uninstall: Keep default
- Install behavior: System
- Device restart behavior: No specific Action
- Specify return codes to indicate post-installation behavior: Keep default
- Requirements:
- Check Operating system architecture: Select Yes. Specify the systems the app can be installed on and check Install on x64 system.
- Minimum operating system: Choose the minimum Windows 10/11 version you support.
Click Next.
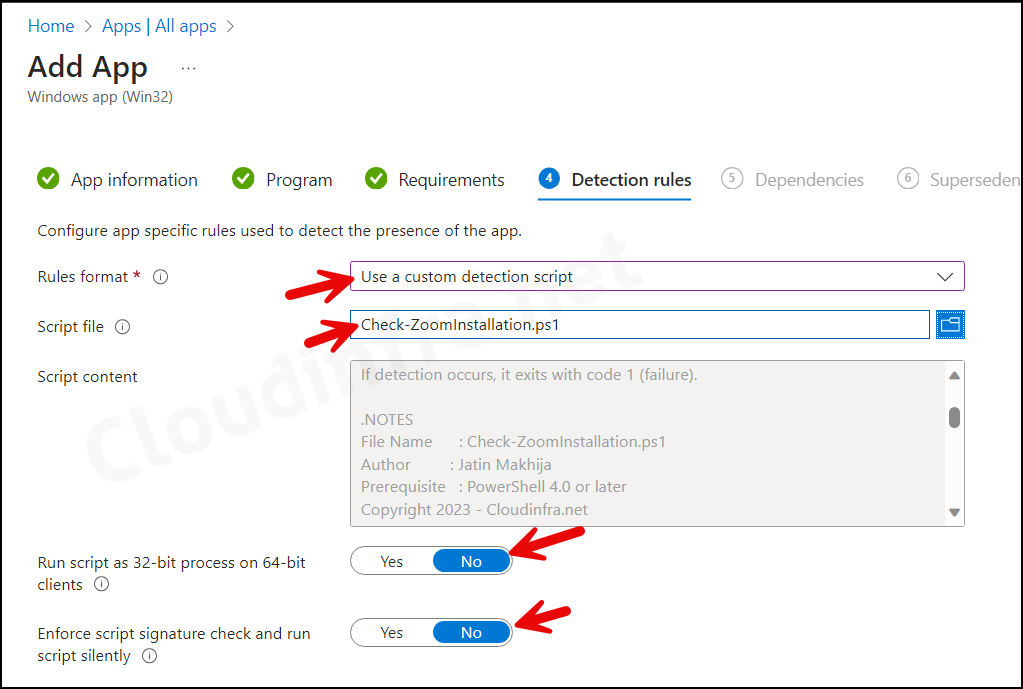
- Detection Rules: For detection rules, we will use a custom PowerShell script called Check-ZoomInstallation.ps1. You can copy below code into a file and name it Check-ZoomInstallation.ps1. You can also download this script from my GitHub repo link: Powershell-Scripts/Intune/Products/Zoom/Check-ZoomInstallation.ps1 · GitHub.
- Rule format: Use a custom detection script.
- Script file: Browse to Check-ZoomInstallation.ps1.
- Run script as 32-bit process on 64-bit clients: No
- Enforce script signature check and run script silently: No
Check-ZoomInstallation.ps1
<#
.SYNOPSIS
  Detection script for "Uninstall Zoom" Win32 app in Intune.

.DESCRIPTION
  Checks for Zoom in common machine-wide and per-user locations.
  - Returns exit code 1 if Zoom is detected (uninstall still needed).
  - Returns exit code 0 if Zoom is NOT detected anywhere (uninstall complete).

.NOTES
  File Name   : Check-ZoomInstallation.ps1
  Author      : Jatin Makhija
  Updated     : 2025-12 (Cloudinfra.net)
#>

$zoomFound = $false

# 1. Check common machine-wide install locations
$machinePaths = @(
    "C:\Program Files\Zoom\bin\Zoom.exe",
    "C:\Program Files\Zoom\bin",
    "C:\Program Files (x86)\Zoom\bin\Zoom.exe",
    "C:\Program Files (x86)\Zoom\bin"
)

foreach ($path in $machinePaths) {
    if (Test-Path -Path $path) {
        Write-Output "Detected Zoom at machine path: $path"
        $zoomFound = $true
        break
    }
}

# 2. Check per-user AppData\Roaming\Zoom if not already found
if (-not $zoomFound) {
    $userRoot = "C:\Users"

    if (Test-Path -Path $userRoot) {
        $excludedUsers = @('Public','Default','Default User','All Users','WDAGUtilityAccount')

        $users = Get-ChildItem -Path $userRoot -Directory -ErrorAction SilentlyContinue |
                 Where-Object { $_.Name -notin $excludedUsers }

        foreach ($user in $users) {
            $userZoomPaths = @(
                (Join-Path $user.FullName "AppData\Roaming\Zoom\bin\Zoom.exe"),
                (Join-Path $user.FullName "AppData\Roaming\Zoom\bin")
            )

            foreach ($p in $userZoomPaths) {
                if (Test-Path -Path $p) {
                    Write-Output "Detected Zoom for user '$($user.Name)' at: $p"
                    $zoomFound = $true
                    break
                }
            }

            if ($zoomFound) { break }
        }
    }
}

if ($zoomFound) {
    # Zoom is still installed somewhere – app state NOT achieved yet
    Write-Output "Zoom detected on this device – uninstall still required"
    exit 1
} else {
    # Zoom not found anywhere – uninstall state achieved
    Write-Output "Zoom not detected on this device – uninstall complete"
    exit 0
}
- Dependencies: Click Next.
- Supersedence: Click Next.
- Scope tags (optional): A scope tag in Intune is an RBAC label you add to resources (policies, apps, devices) to limit which admins can see and manage them. For more information, read How to use Scope tags in Intune.
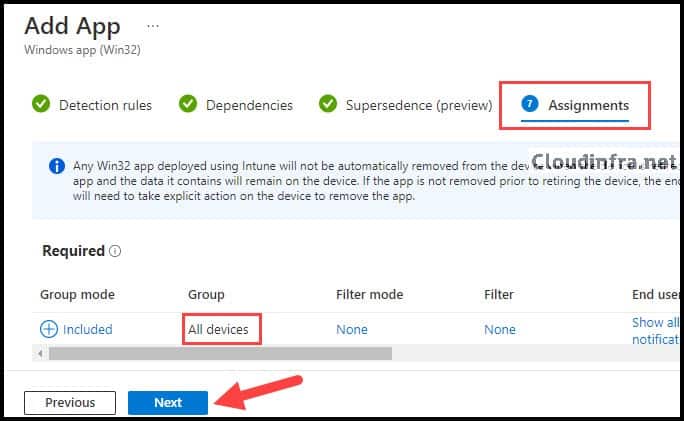
- Assignments: Assign the app to Entra security groups that contain the target users or devices. As a best practice, pilot with a small set first; once validated, roll it out more broadly. For guidance on assignment strategy, see Intune assignments: User groups vs. Device groups. For demonstration and testing, I will add All devices.
- Review + create: Review the deployment summary and click Create.
Monitoring Zoom Uninstallation Status
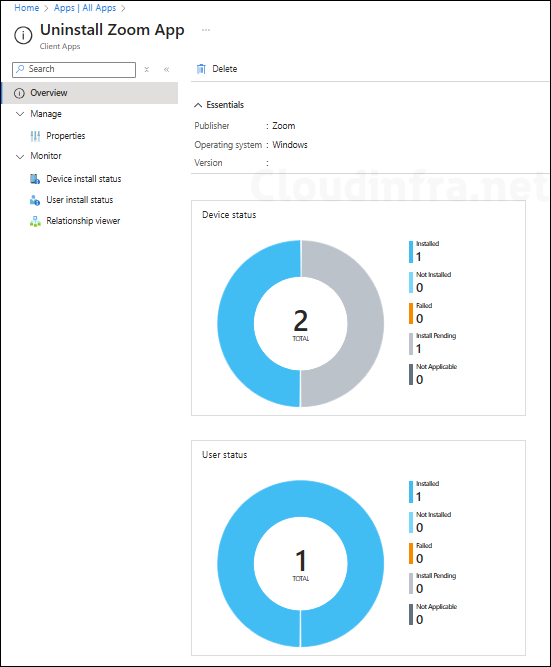
- From the Intune admin center, go to Apps > All apps.
- Search for the Zoom Uninstallation app you have created.
- Check the app status from the Overview page or for more and Device install Status or User install status.
Sync Intune Policies
The device check-in process might not begin immediately. If you’re testing this policy on a test device, you can manually kickstart Intune sync from the device itself or remotely through the Intune admin center.
Alternatively, you can use PowerShell to force the Intune sync on Windows devices. Restarting the device is another way to trigger the Intune device check-in process.
End User Experience
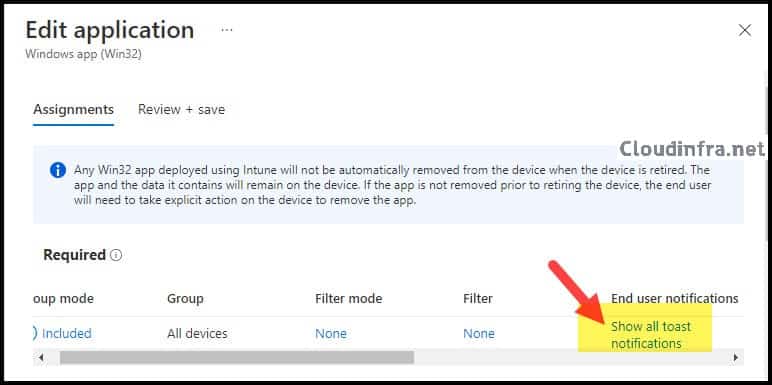
After successfully completing the deployment, Zoom will be silently removed from the target devices in the background. Users may see a pop-up notification related to the deployment, which is configurable using the Show all toast notifications setting.
Conclusion
In this post, you learned two ways to uninstall Zoom from Windows 10/11:
- Option 1: A PowerShell script deployment that removes Zoom from its standard locations.
- Option 2: A Win32 app that wraps Zoom’s official CleanZoom utility and uses a robust custom detection script to verify that Zoom has been fully removed.

What are you doing to avoid a uninstall and reinstall loop from occurring. I see you didn’t specify any requirements other than the system architecture and operating system
Hi Miguel,
Detection logic will check for the app installation. You could add a unique detection logic which will prevent this loop. I will test this scenario and update.
[UPDATE]:Post has been updated to fix this Issue.
Perfectly done. Worked out great Jatin. Thank you!!!
I tried this and for some reason it didn’t remove the Zoom install. I’ve rechecked the steps and ensured the code was correct, still no joy. I and trying this on a single test machine in a specific group, not All Devices (yet…)
Hey Dave, I’ve just updated the blog post. If Cleanzoom isn’t working for you, you can try using a PowerShell script as described in Option 1 and deploy it to your target devices. Hopefully, this will resolve the issue for you.
Thank you. After tinkering with ot a bit, I was finally able to get it to work. The install check script does take a long time for some reason, but eventually it does Uninstaller the Zoom client. Thank you.
I’m happy to hear it’s working! In the end, did you go with Cleanzoom [Option 2] or the PowerShell script [Option 1]?
I used the cleanzoom option. The issue I had was too many test groups, so like anything else, by removing the extra stuff I wasn’t using any more and simplifying the configuration to one machine, one group it worked fine. No with proof of concept, will broaden the coverage to the other machines we want to clean the Zoom client from. Thanks again – this was an easy to follow process. Your instructions were very thorough!
This only worked for me where the very first user folder had Zoom installed. If not detected in the first user folder, it just exits. In looking at your code, that looks like how you have it programmed. Any thoughts on how to fix it so it does loop if Webex is not found in the first user folder?
Hi, do you think this method can be used to remove 7-zip?
Hi, I wanted to use this script but in my environment Zoom is not installed under User-AppData-Roaming but rather C:\Program Files (x86)\Zoom\bin
Could this script be amended to look in C:\Program Files (x86)\Zoom\bin instead?
Thanks
I have this same issue. Where you able to find an amended version for this?
I have amended the script to check Program Files (x86) as well
# Get a list of user profiles under C:\Users\ (excluding ‘Public’)
$Users = Get-ChildItem “C:\Users\” | Where-Object { $_.Name -ne ‘Public’ } | Select-Object -ExpandProperty Name
# Iterate through each user’s profile
foreach ($User in $Users) {
try {
# Construct the user’s profile path
$ProfilePath = “$env:SystemDrive\Users\$User\AppData\Roaming”
# Check if Zoom is installed in the user’s profile
$ZoomInstalled = Test-Path -Path (Join-Path $ProfilePath ‘Zoom\bin’)
# Check if Zoom is installed in the Program Files directory
$ZoomInstalled2 = Test-Path -Path “C:\Program Files\Zoom\bin”
# Check if Zoom is installed in the Program Files (x86) directory
$ZoomInstalled3 = Test-Path -Path “C:\Program Files (x86)\Zoom\bin”
if (!($ZoomInstalled -or $ZoomInstalled2 -or $ZoomInstalled3)) {
# If Zoom is not detected, print a message and exit with code 0 (success)
Write-Output “CloudinfraOutput – Not Detected Zoom on $User’s PC”
Exit 0
} else {
# If Zoom is detected, continue to the next user profile
Write-Output “CloudinfraOutput – Detected Zoom on $User’s PC”
Exit 1
}
} catch {
# Handle any exceptions and log the error
Write-Output “Error checking $User’s profile: $_”
Exit 1
}
}
# If no detection occurred, exit with code 1 (failure)
Exit 1
Hello,
I could use some help (powershell n00b here):
The Check-ZoomInstallation.ps1 script does not appear to recurse correctly. When I check the IntuneManagement logs, or if I try to run it manually, the script stops processing at the first user account (defaultuser0) and does not check the rest of the child accounts.
I do not see the $User variable getting set in the code before the ‘foreach’ command is run.
Hi, I had a similar problem. It would only run the loop against the first user in the $users variable, then Exit.
To get round it I just removed line 38 ‘Exit 0’.
I’m not saying this is a fix, however it did the necessary for our environment
Ditto. Zoom installed at C:\Program Files\Zoom\bin\zoom.exe. No error message, but also didn’t uninstall. Used the *.ps1
Hi Just going with Option 1 but getting an error reported in Intune , but the script worked and removed Zoom on the device.
Hi,
I’ve adjusted the script. It now first checks all user profiles and program files to see if Zoom is installed. If so, it returns 1 (Exit 1). Only after the for-each loop does it report that Zoom is not present in any user profile (Exit 0).
Here’s the script:
# Get a list of user profiles under C:\Users\ (excluding ‘Public’)
$Users = Get-ChildItem “C:\Users\” | Where-Object { $_.Name -ne ‘Public’ } | Select-Object -ExpandProperty Name
# Iterate through each user’s profile
foreach ($User in $Users) {
try {
Write-Output “Aktueller User $User”
# Construct the user’s profile path
$ProfilePath = “$env:SystemDrive\Users\$User\AppData\Roaming”
# Check if Zoom is installed in the user’s profile
$ZoomInstalled = Test-Path -Path (Join-Path $ProfilePath ‘Zoom\bin’)
# Check if Zoom is installed in the Program Files directory
$ZoomInstalled2 = Test-Path -Path “C:\Program Files\Zoom\bin”
if ($ZoomInstalled -or $ZoomInstalled2) {
# If Zoom is detected, continue to the next user profile
Write-Output “CloudinfraOutput – Detected Zoom on $User’s PC”
Exit 1
}
} catch {
# Handle any exceptions and log the error
Write-Output “Error checking $User’s profile: $_”
Exit 1
}
}
if (!($ZoomInstalled -or $ZoomInstalled2)) {
# If Zoom is not detected, print a message and exit with code 0 (success)
Write-Output “CloudinfraOutput – Not Detected Zoom on any User’s PC”
Exit 0
}
# If no detection occurred, exit with code 1 (failure)
Exit 1