In this post, I will show you the steps to enable/disable built-in administrator account via Intune. Windows includes a built-in local Administrator account (well-known RID 500). It cannot be deleted, but it can be renamed or disabled. In some environments, you may need to enable it temporarily (for example, to support break-glass access or to use it as a Windows LAPS-managed local admin).
This guide shows the most reliable Intune method (settings catalog), and in another post, remediation-based method to handle the most common failure: the account cannot be enabled because its current password does not meet password policy requirements.
Contents
When should you enable the built-in Administrator account
Enabling the built-in administrator account increases the attack surface because it is a well-known target. If you enable it, treat it as a controlled admin access path: rotate its password, limit who can retrieve it, and consider whether you should instead use Windows LAPS automatic account management to manage a dedicated local admin account rather than relying on RID 500.
Method 1: Enable/Disable Built-in Administrator Account Using a Settings Catalog Policy
A simple and effective way to enable or disable built-in local administrator account is to create a settings catalog policy. Let’s take a look at the steps:
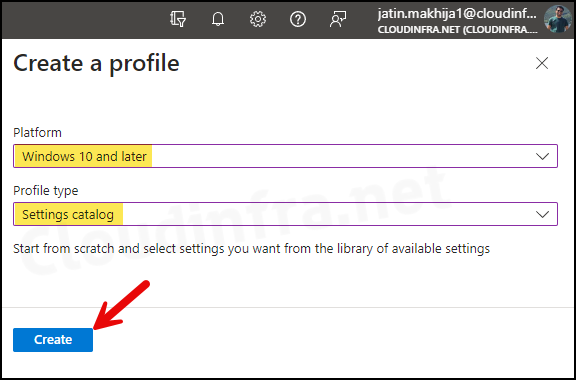
- Sign in to the Intune admin center > Devices > Configuration > + Create > New Policy.
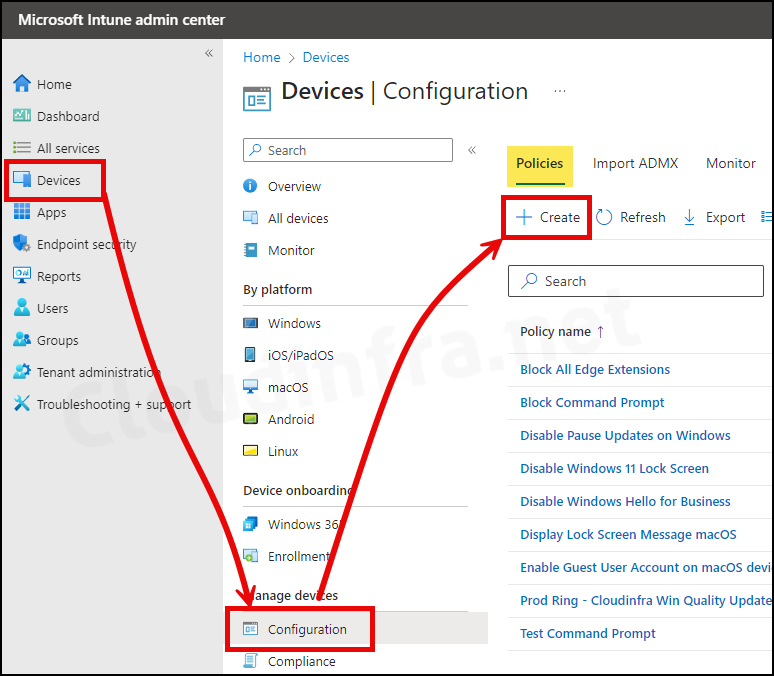
- Select Platform as Windows 10 and later. Profile type as Settings Catalog.
- Click on the Create button.
- Basics: Provide a name and description of the profile. Click on Next.
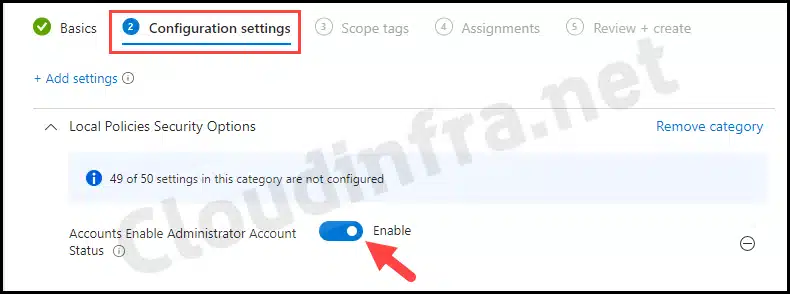
- Configuration settings: Click on the Add settings link, search for Local Policies Security Options, and select and enable Accounts Enable Administrator Account status setting to enable the built-in account. If you want to disable the local administrator account, then keep the setting in the disabled state.
The OMA-URI setting, which is used in the background for managing built-in local administrator accounts, is ./Device/Vendor/MSFT/Policy/Config/LocalPoliciesSecurityOptions/Accounts_EnableAdministratorAccountStatus
Policy CSP – LocalPoliciesSecurityOptions
- Scope tags (optional): A scope tag in Intune is an RBAC label that you assign to resources such as policies, apps, and devices to control which administrators can view and manage them. For more information, see How to use scope tags in Intune.
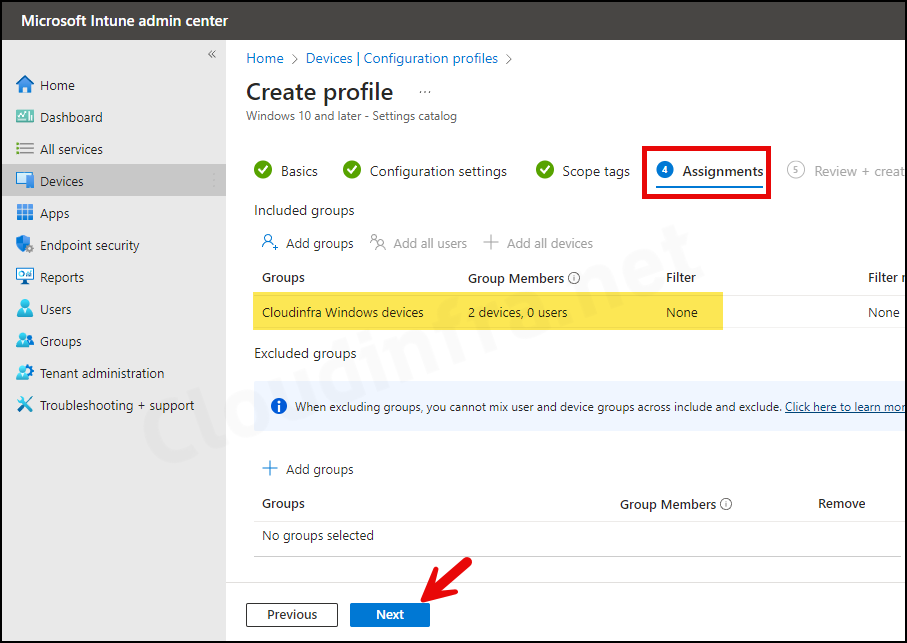
- Assignments: Assign the policy to Microsoft Entra security groups that include the target users or devices. As a best practice, start with a small pilot group, and once validated, expand the assignment more broadly. For guidance on assignment strategy, see Intune assignments: User groups vs. device groups.
- Review + create: Review the deployment summary and click Create.
Sync Intune Policies
The device check-in process might not begin immediately. If you’re testing this policy on a test device, you can manually kickstart Intune sync from the device itself or remotely through the Intune admin center.
Alternatively, you can use PowerShell to force the Intune sync on Windows devices. Restarting the device is another way to trigger the Intune device check-in process.
Monitoring Deployment Progress
- Sign in to the Intune admin center > Devices > Configuration.
- Choose the Device Configuration profile you want to work with, and at the top of the page, you’ll see a quick view of the Success, Failure, Conflict, Not Applicable, and In Progress status.
- Click on View report to access more detailed information.
End User Experience
Let’s check the result of this policy from one of the target devices:
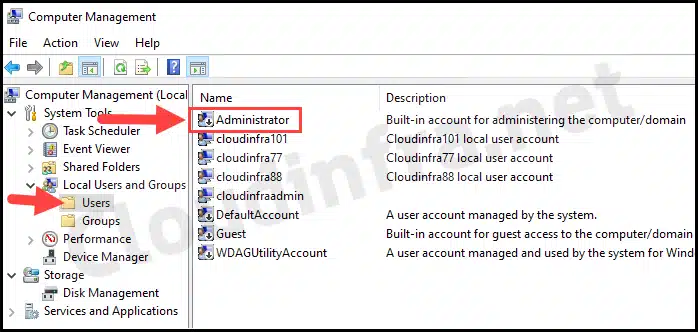
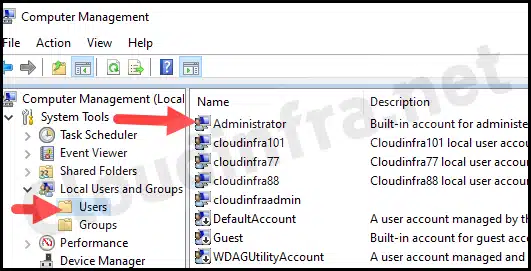
- Go to Start > search for Computer Management.
- Then go to Local Users and Groups > Users.
- Check the status of the Administrator Account; it should now be Enabled as per our settings catalog policy.
Method 2: Enable/Disable Built-in Administrator Account Using Intune Device Remediations
Another option to enable or disable the built-in administrator account is to use Intune device remediations. This involves using detection and remediation scripts. I have explained the process in my other detailed step-by-step guide; refer to the link: Enable/Disable Local Admin Using Intune Remediations.
Troubleshooting
If you try to re-enable the Administrator account and its current password does not meet password requirements, the enable action fails and an administrator must reset the password first. The deployment’s status may show an Error Code 65000 and the Event Viewer logs also show that the deployment has failed.
- Open Start > Event Viewer. Navigate to Applications and Services Logs > Microsoft > Windows > DeviceManagement-Enterprise-Diagnostics-Provider > Admin and search for the Event ID 404. Below is an example log that shows the error when trying to enable the account.
MDM ConfigurationManager: Command failure status. Configuration Source ID: (7CCD9C30-BFE5-4CE3-97C8-FC5E16474D01), Enrollment Name: (MDMDeviceWithAAD), Provider Name: (Policy), Command Type: (Add: from Replace or Add), CSP URI: (./Device/Vendor/MSFT/Policy/Config/LocalPoliciesSecurityOptions/Accounts_EnableAdministratorAccountStatus), Result: (Unknown Win32 Error code: 0xc000006c).
Error Event ID 404
The error message provided doesn’t help much. On the device itself, I got the Error Event ID 404, and in the Intune admin center, the error code shows as 65000. This means that the account does not meet the password complexity requirements, and therefore it was not enabled.
To resolve this issue, refer to the blog post Enable/Disable Local Admin Account Using Intune Remediations, which shows a different way of enabling a built-in administrator account by setting a complex password first to meet the password complexity requirements.
Verify Administrator Account Status via Windows Registry
In most scenarios, checking the Windows registry to verify policy deployment is not necessary. The Intune admin center is the recommended place to monitor policy status. However, as an advanced troubleshooting step, you can review the Windows registry to confirm whether the policy has been applied successfully.
- Open the Registry Editor.
- Navigate to HKEY_LOCAL_MACHINE\SOFTWARE\Microsoft\PolicyManager\providers\AdministratorGUID\default\Device\LocalPoliciesSecurityOptions.
- You will find a registry entry named Accounts_EnableAdministratorAccountStatus on the right-hand side with the value 1. This confirms that Intune successfully enabled the built-in administrator account.
Conclusion
In this blog post, we learned the steps to enable or disable the built-in local administrator account. If you enable the local administrator account, ensure that it meets the required password complexity rules. Otherwise, you may see Error 65000 in the Intune admin center after deploying the device configuration profile. Else, use the Intune device remediations approach.
Hello,
How did you set the password of local administrator account to meet the complexity requirement? Manually resetting it or by Intune? Is the complexity requirement of Local Security Policy or Intune?
Regards
I did changed the password manually on the device but if you have a perform this on devices in bulk then you could create a powershell script and using that change password of the Administrator account to meet complexity requirements. I believe its a local security policy which does not allow a simple password for Administrator account.
[Update]: I have created a blog post on how to Enable/Disable built in Administrator account using Intune Proactive Remediations which used Powershell scripts. Hope this will help you to fix this issue: https://cloudinfra.net/enable-disable-local-admin-using-intune-remediations/
Hi Jatin,
This policy doesn’t work when Security Baselines are configured. Do you know which Security Baseline setting is blocking this Configuration Profile?
https://learn.microsoft.com/en-us/intune/intune-service/protect/security-baseline-settings-mdm-all?pivots=mdm-november-2021
Kind regards,
Wander
Under Local Policies Security Options you have to change “User Account Control Behavior of the Elevation Prompt for Standard Users” to “Prompt for credentials”.