In this post, I will show you 6 ways to block email address or domain in Microsoft 365. Blocking known bad senders is a common requirement for spam, phishing, and business email compromise (BEC) response. Microsoft 365 provides multiple layers where you can block an email address or domain, ranging from tenant-wide enforcement to per-user mailbox controls.
If you want to whitelist or allow a sender instead of blocking, you can refer to the blog post Bypass spam filtering in Microsoft 365.
Note
Contents
Ways to Block an Email Address or Domain in Microsoft 365
Below are five common ways to block an email address or domain in Microsoft 365, listed from most to least recommended:
- Tenant Allow/Block List (TABL) (recommended for tenant-wide blocking)
- Outlook Blocked Senders list (per-user mailbox blocking)
- Anti-spam policy block lists (policy-scoped sender/domain blocking)
- Exchange Online mail flow rules (transport rules) (conditional blocking with granular logic)
- IP Block list (Connection Filter Policy) (least recommended due to higher risk and broader impact).
Which method should you use?
If you want a tenant-wide block that is managed centrally and aligns with Microsoft’s current recommendation, start with the Tenant Allow/Block List (TABL). TABL provides a way to override filtering verdicts, and it also blocks outbound email from your users to the blocked domain or address.
Use mailbox-level (Outlook) blocks only when the problem is limited to a few users. Use transport rules when you need granular conditions beyond From domain/address, Use IP blocking only when you have high confidence in the sending infrastructure and you understand the blast radius.
Option 1: Using Tenant Allow/Block list
Tenant Allow/Block List (TABL) is available in the Microsoft Defender portal and supports tenant-wide blocking for domains and email addresses. To manage TABL, a user must have the following roles:
- Organization Management or Security Administrator role.
- Security Operator role group (Tenant AllowBlockList Manager).
What happens when you block a sender in TABL?
Email from blocked domains and addresses is treated as high-confidence phishing and quarantined. Users also cannot send email to those blocked domains/addresses and will receive an NDR (550 5.7.703).
550 5.7.703 Your message cannot be delivered because one or more recipients are blocked by your organization's tenant recipient block policy.
Adding a Sender to Block List
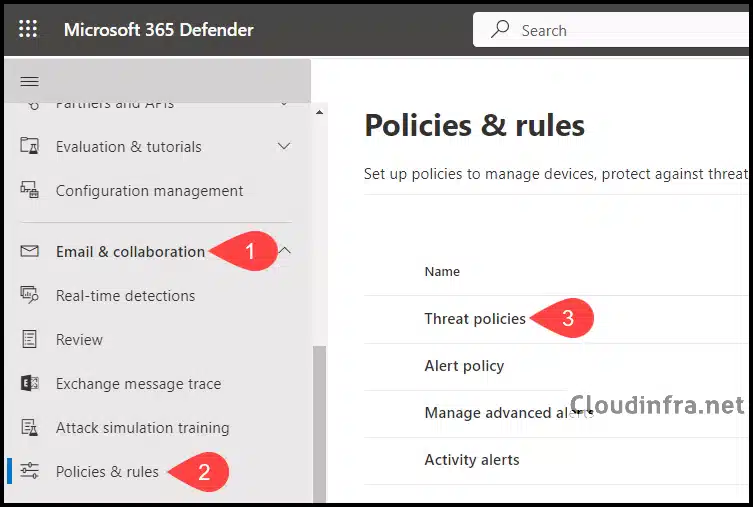
- Sign in to the Microsoft 365 Defender portal as a security administrator or global administrator.
- Under Email & collaboration > Policies & rules.
- Click on Threat policies.
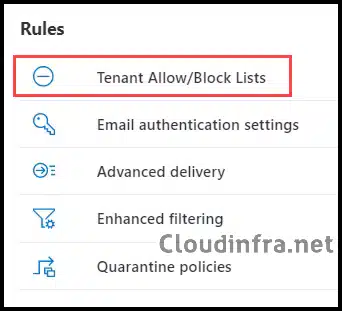
- Under Rules, click on Tenant Allow/Block Lists
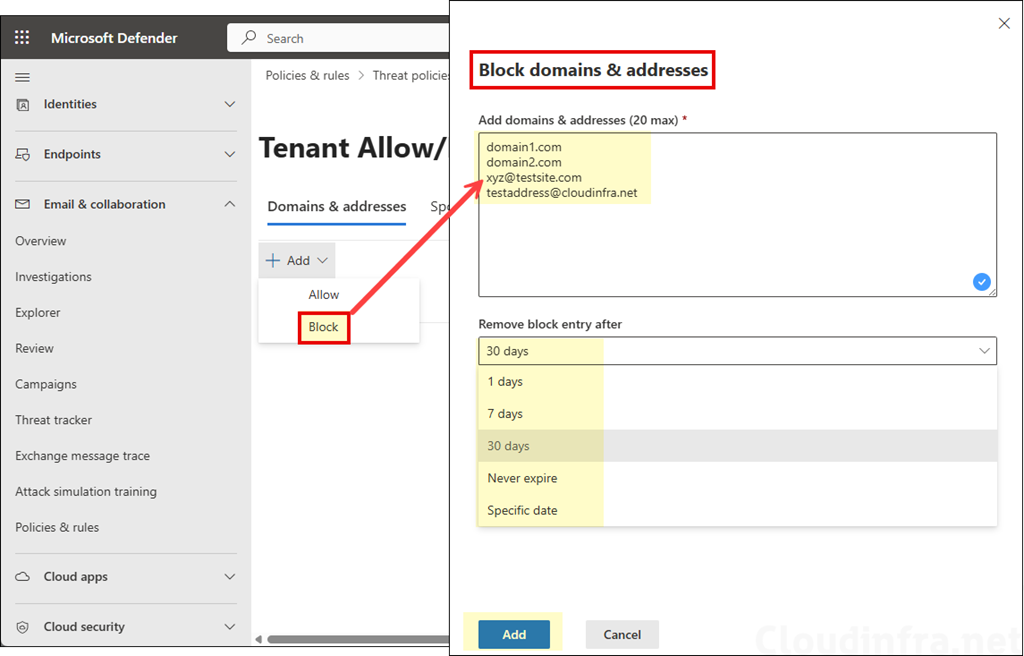
- Under Domains & Addresses, click + Add and select Block and add the domain and email addresses one per line. You can add up to 20 domains or email addresses. Then configure Remove block entry after setting. Note that a Never expire option is also available for block entries. When this option is selected, block entries are never removed automatically and must be deleted manually from the block list.
Blocking cloudinfra.net does not automatically block marketing.cloudinfra.net unless you add the subdomain separately or use wildcard syntax.
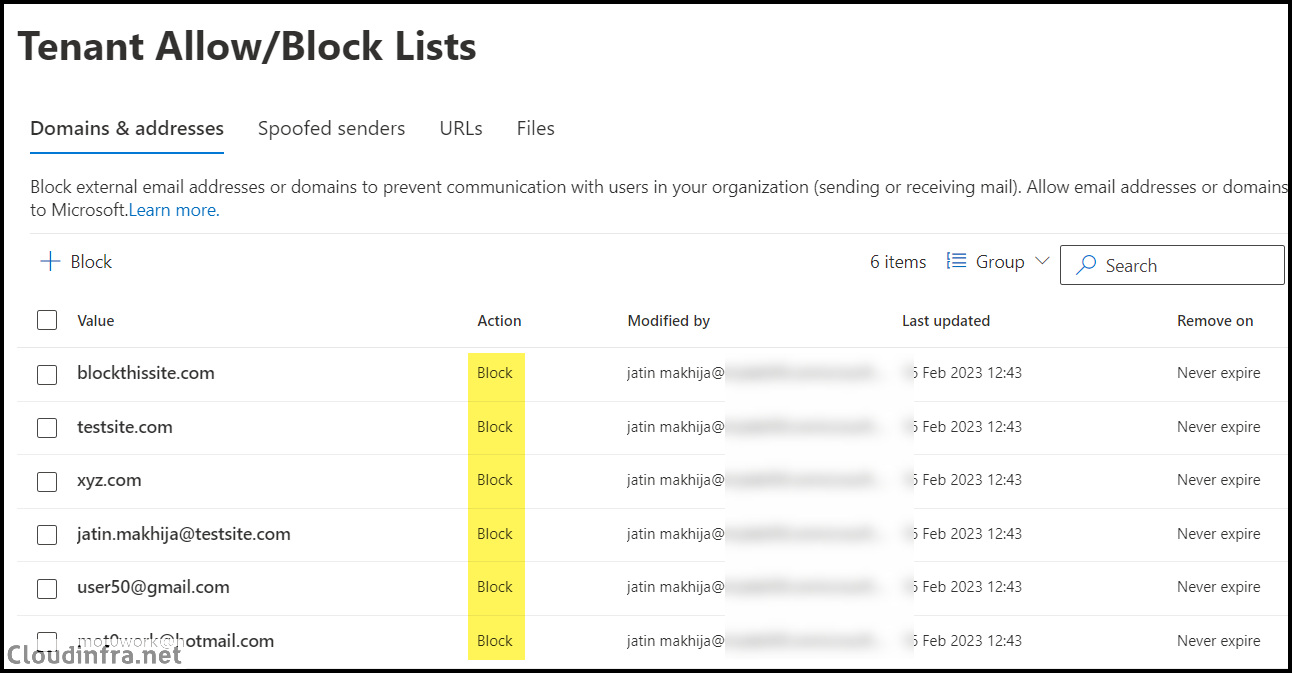
- After adding all the block entries, verify the block list.
Add a Sender to Block List Using PowerShell
To add a sender to TABL block list, you will first have to install and import Microsoft Exchange PowerShell module and then use New-TenantAllowBlockListItem cmdlet to modify the TABL block list.
New-TenantAllowBlockListItems Syntax
New-TenantAllowBlockListItems -ListType Sender -Block -Entries "DomainOrEmailAddress1","DomainOrEmailAddress1",..."DomainOrEmailAddressN" <-ExpirationDate Date | -NoExpiration> [-Notes <String>]Install Exchange Online PowerShell Module
Install-module -Name ExchangeOnlineManagementConnect to Exchange Online
Connect-ExchangeOnlineExample 1: Adding two domains to the block list
New-TenantAllowBlockListItems -ListType Sender -Block -Entries "blockdomain1.com","blockdomain2.net" -NoExpiration
Example 2: Adding an email address and a domain to the block list
New-TenantAllowBlockListItems -ListType Sender -Block -Entries "xyz@test.com","domain3.net" -NoExpiration
Option 2: Using Outlook Blocked Sender’s list
This method is mailbox-specific. It is best when only a few users are affected and you do not want a tenant-wide change. Users can add senders/domains in Outlook (web or desktop) using junk email settings. Note that the server-side policies can still block messages before they reach the mailbox.
For example, if you want to block the sender email address shop@xyz.net for the users alex@cloudinfra.net and john@cloudinfra.net, you must add shop@xyz.net individually to the blocked senders list in both Alex’s and John’s mailboxes.
Users can add senders to their blocked senders list. If you need to manage a user’s blocked senders list as an administrator, you can do so using PowerShell cmdlets. For more detailed information, refer to the article How to Block an Email Address or Domain in Outlook.
Option 3: Using Anti-spam policies
Anti-spam policies allow you to manage blocked senders and blocked domains in inbound policies. TABL mostly replaces these lists, so use them when you specifically need anti-spam policy behavior. When you use default inbound anti-spam policy to add a sender or domain to the block list, it will automatically apply to all users.
To configure a block sender list using anti-spam policies through the Microsoft 365 Defender portal or PowerShell, refer to the post Block sender or domain by using anti-spam policies.
Option 4: Using Exchange Online Transport rule
Transport rules are useful when you want more control, for example, block only when the sender is external, block only when the subject contains certain terms, or block only when message originates from a specific connector, partner, or route.
To block a sender or domain using Exchange Online rules, refer to the step-by-step guide: How To Block An Email Address Or Domain In Exchange Online.
Option 5: Using IP Block List of Anti-spam Policies
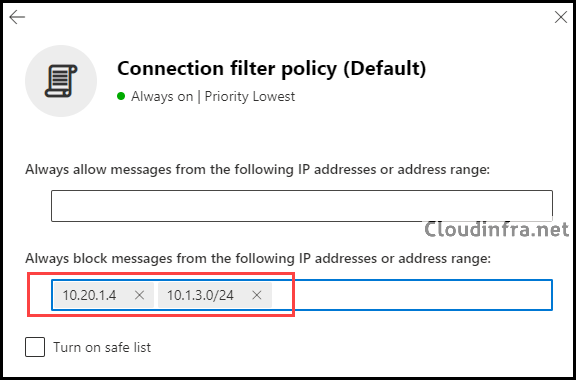
Use this option only if you are confident that the sender’s source IP range is definitely malicious, as IP-level blocks can have a broader impact than blocking a specific sender or domain. An IP block list prevents all incoming messages from the specified source email servers.
You must specify the source server IP address or a range of IP addresses in CIDR format, for example, 10.20.1.4/24. Any email sent from an IP address added to the block list is rejected outright. It is not marked as spam; instead, the message is rejected and not delivered.
Steps:
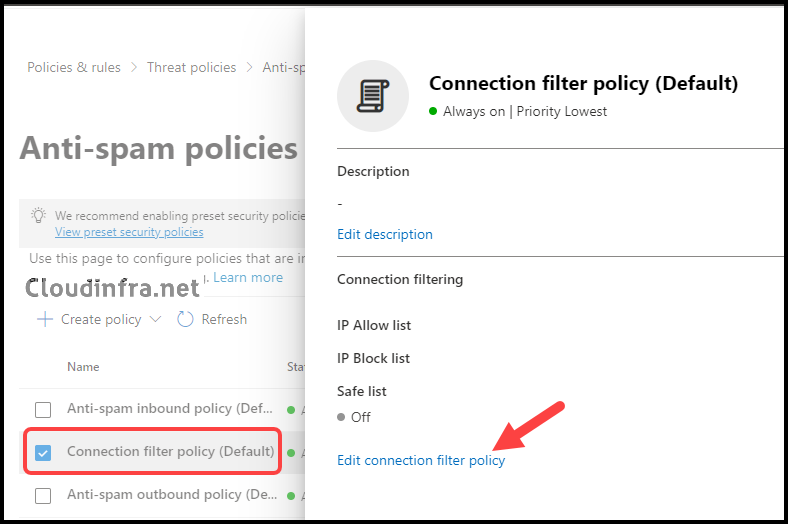
- Sign in to the Microsoft 365 Defender portal, either as a security administrator or global administrator.
- Under Email & collaboration > Policies & rules.
- Click on Threat policies.
- Click on Anti-spam under Policies.
- Select the Connection filter policy (Default) and click Edit connection filter policy.
- In the Connection filter policy (Default), locate the section labeled Always block messages from the following IP addresses or address range. Add a single IP address, like 10.20.1.4, or an IP range, such as 10.1.3.0/24, to the block list.
- After making changes, click Save and Close to save and exit the configuration.
Adding an IP to Block List Using PowerShell
You can use below commands to add an IP address or CIDR range to the block list using PowerShell. If you have not already installed the Exchange Online PowerShell module, you must install it before using the Connect-ExchangeOnline command.
PowerShell
Connect-ExchangeOnline

# Add a single IP to the block list (preserve existing entries)
Set-HostedConnectionFilterPolicy -Identity Default `
  -IPBlockList @{Add="203.0.113.45"}

# Verify
Get-HostedConnectionFilterPolicy -Identity Default | Format-List IPBlockList
Option 6: Block Sender/Domain With Admin Submission
When handling a suspicious message, Microsoft allows you to submit it for analysis and block the sender/domain directly from the admin submission flyout, which creates a tenant block entry. Use the link https://security.microsoft.com/reportsubmission and click Submit to Microsoft for analysis.