Microsoft 365/Exchange Online is a widely used suite of productivity tools that provides organizations with powerful email capabilities. However, unwanted messages from particular senders or domains can be a significant issue, as with any email service.
Fortunately, Microsoft 365/Office 365 offers several ways to block email addresses or domains to prevent these messages from reaching your inbox. Whether you are dealing with spam, phishing attempts, or unwanted promotional emails, there are various methods you can use to block senders and domains.
This blog post discusses five ways to block email addresses or domains in Microsoft 365/Office 365, helping you keep your inbox clean and organized.
We’ll look at ways to help you stop unwanted emails in Office 365, including using the built-in block sender feature, creating transport rules, and setting up anti-spam policies.
| Want to Whitelist a sender instead of blocking them? |
|---|
| If you’re interested in whitelisting or allowing a sender, you can refer to this blog post titled Bypass spam filtering in Microsoft 365/Office 365 which is also referred to as the process of adding a sender to the Safe Sender’s list. |
Here are the ways you can block an email address or domain in Microsoft 365/Office365:
- Tenant Allow/Block list. [Most Recommended option]
- Outlook Blocked Sender’s list.
- Block Sender or domain by using anti-spam policies.
- Create mail flow rules/transport rules in Exchange Online.
- IP Block list from anti-spam policies (connection filtering policy).[Least Recommended Option]
Table of Contents
Option 1 – Using Tenant Allow/Block list
Office 365 provides a Tenant Allow/Block list feature that allows administrators to manage email traffic to their organization more effectively. This feature allows you to block or allow email messages from specific domains or addresses.
This feature allows you to create a list of trusted domains and email addresses to send messages to your organization while blocking all other senders. This can be useful for blocking spam or phishing attempts from certain senders or domains.
The maximum number of allowed entries for domains and email addresses is 500, and the maximum number of block entries is 500 (1000 domain and email address entries total).
Who can manage the Tenant Allow/Block List?
To manage the Tenant Allow/Block list, a user should belong to the following groups/roles:
- Organization Management or Security Administrator role group (Security admin role)
- Security Operator role group (Tenant AllowBlockList Manager).
Effects of Using Tenant Allow/Block List
When a sender is blocked via the Tenant Allow/Block list, all their emails are tagged as high-confidence spam (SCL = 9). This results in the messages being treated as spam and the actions specified in your Anti-Spam Inbound policy are applied to them.
When internal users attempt to send emails to blocked domains, they’ll receive an email notification with the message: 550 5.7.703 Your message cannot be delivered because one or more recipients are blocked by your organization’s tenant recipient block policy.
Add a Sender to the Tenant Block senders list
Let’s check the steps to add a sender to the Tenant Block Senders list
- Sign in to the Microsoft 365 Defender portal either as a Security administrator or Global administrator.
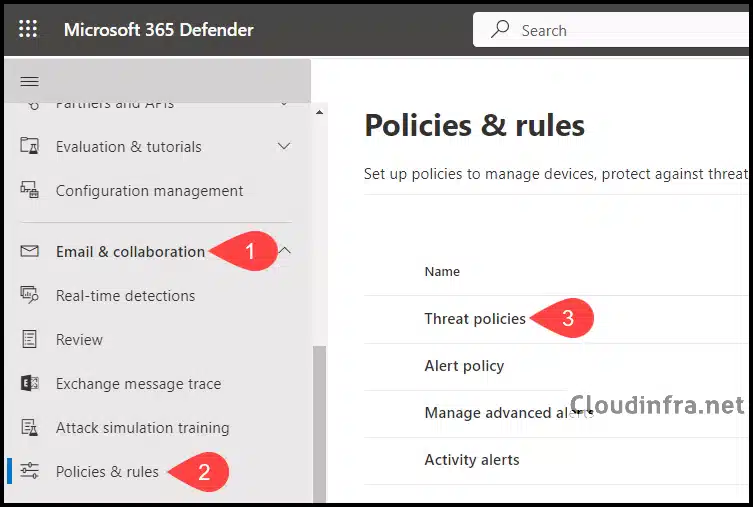
- Under Email & collaboration > Policies & rules.
- Click on Threat policies.
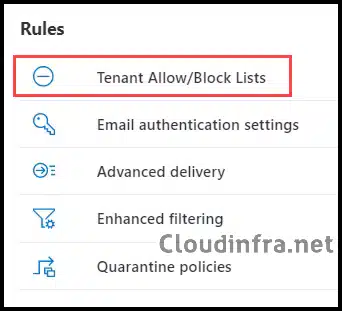
- Under Rules, click on Tenant Allow/Block Lists
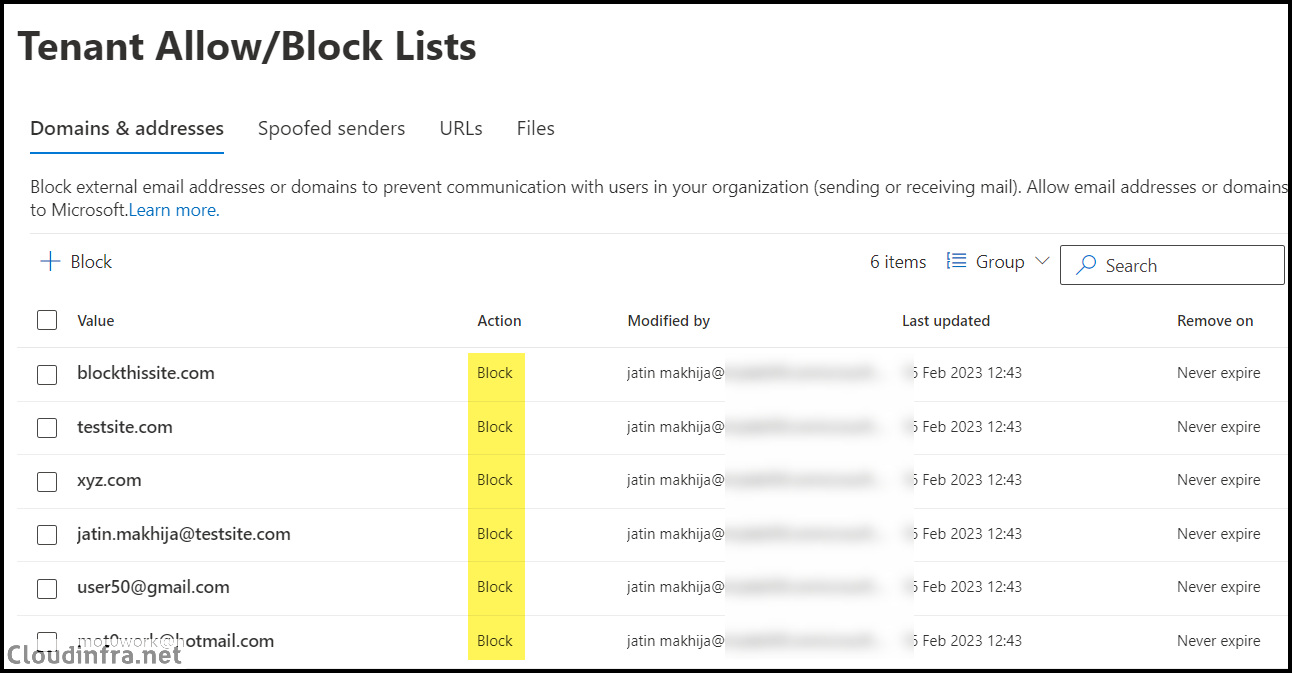
- Click + Block, then input all the email addresses or domains you wish to block. You can set a duration for when to remove block entries, such as 1 day, 7 days, or 30 days, or even specify a custom date.
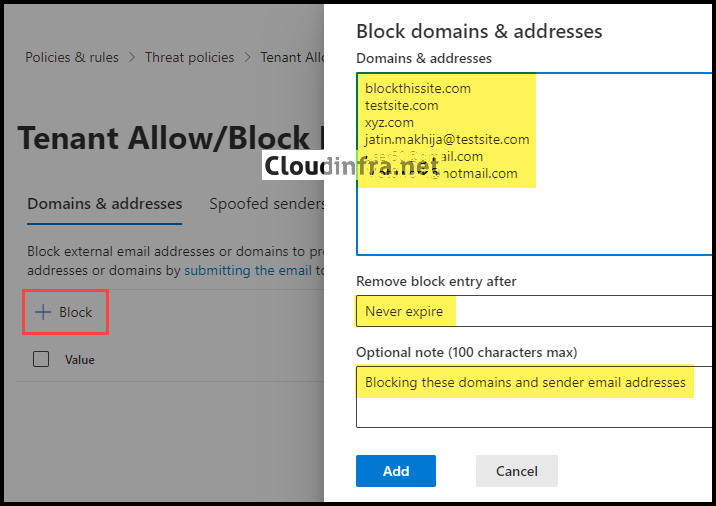
- Once you’ve clicked on Add, all the entries will be included. You can verify the block list of senders by going to the Domain & Addresses tab within the Tenant Allow/Block list.
Add a Sender to the Tenant Block senders list using Powershell
You can utilize PowerShell to manage the Tenant Block Sender list. The cmdlet you’ll need is New-TenantAllowBlockListItems.
New-TenantAllowBlockListItems -ListType Sender -Block -Entries "DomainOrEmailAddress1","DomainOrEmailAddress1",..."DomainOrEmailAddressN" <-ExpirationDate Date | -NoExpiration> [-Notes <String>]
Examples:
Install Exchange Online Powershell Module
Install-module -Name ExchangeOnlineManagement
Connect to Exchange Online
Connect-ExchangeOnline
Example 1: Adding two domains in the Tenant Block List
New-TenantAllowBlockListItems -ListType Sender -Block -Entries "blockdomain1.com","blockdomain2.net" -NoExpiration

Example 2: Adding an email address and a domain in the Tenant Block List
New-TenantAllowBlockListItems -ListType Sender -Block -Entries "xyz@test.com","domain3.net" -NoExpiration

Option 2 – Using Outlook Blocked Sender’s list
If you’re receiving numerous spam emails from a specific sender or domain, targeting only a few recipients in your organization, and prefer not to use the Tenant Allow/Block List, you can create a block sender list in Outlook.
It’s important to note that the block sender’s list is specific to each user’s mailbox and unique for every user. For instance, if you wish to block the sender’s email address shop@xyz.net for users alex@cloudinfra.net and john@cloudinfra.net, you’ll need to individually add shop@xyz.net to the block sender’s list in the mailboxes of both Alex and John.
Users can add senders to their block list using the Outlook desktop client or Outlook for the web (Outlook Web App). If you, as an administrator, need to create a block sender list for a user’s mailbox, you can achieve this by using PowerShell cmdlets. For more in-depth information on this process, refer to the article How To Block An Email Address Or Domain In Outlook.
Option 3 – Using Anti-spam policies
You can also utilize anti-spam policies to block email addresses or domains. Creating a custom Inbound anti-spam policy allows you to apply the rule to a specific group or the entire domain. However, if you opt for the default Inbound anti-spam policy, the rule will be applied to all users.
You can configure a block sender list using anti-spam policies through either the Microsoft 365 Defender portal or PowerShell. For more detailed information on the implementation and examples, refer to the article Block sender or domain by using anti-spam policies.
Option 4 – Using Exchange Online Transport rule
Using a transport rule in Exchange Online, you can effectively block messages from a specific sender by defining conditions and actions applied to inbound messages.
You can define criteria such as the sender’s email address or domain, message subject, body, attachments, or header fields. Based on these criteria, you can set up actions such as blocking, rejecting, quarantining, or redirecting the message.
Creating a transport rule to block a sender helps safeguard your organization’s email system by preventing spam, phishing, or malicious messages from infiltrating it. This ensures that your employees receive only the messages necessary for their work.
The post How To Block An Email Address Or Domain In Exchange Online provides a more detailed guide on how to implement blocking an email address or domain in Exchange Online.
Option 5 – Using IP Block List of Anti-spam Policies
Although it’s Microsoft’s least recommended option, you can still use the IP block list to prevent all incoming messages from specific source email servers. You need to specify the IP address of the source server(s) and define a range of IP addresses in CIDR format, like 10.20.1.4/24.
Any email sent from the email server’s IP address you add to the block list will be outright rejected. It won’t be marked as spam; instead, it will be rejected without delivery.
We will use the default Anti-spam policy known as the Connection filter policy (Default) to configure the IP block list. Please follow these steps to add an email server’s IP address to the block list of the anti-spam policy:
- Sign in to the Microsoft 365 Defender portal either as a Security administrator or Global administrator.
- Under Email & collaboration > Policies & rules.
- Click on Threat policies.
- Click on Anti-spam under Policies.
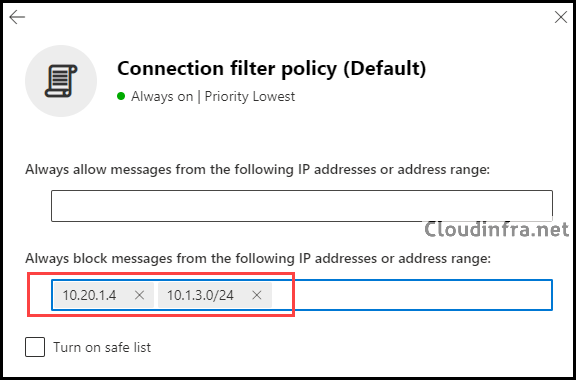
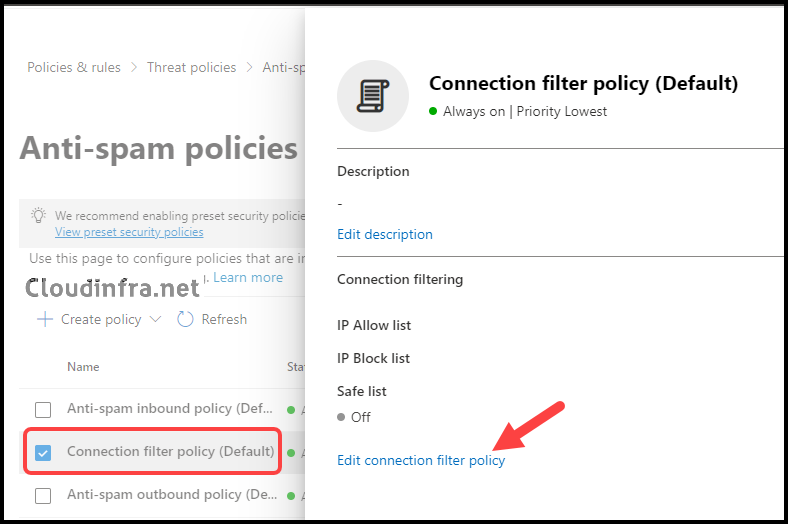
- Select the Connection filter policy (Default) and click Edit connection filter policy.
- In the Connection filter policy (Default), locate the section labeled Always block messages from the following IP addresses or address range Add a single IP address, like 10.20.1.4, or an IP range, such as 10.1.3.0/24, to the block list.
- After making changes, click Save and Close to save and exit the configuration.