In this blog post, I will walk you through the steps to block an email address or domain via anti-spam policies in Microsoft 365. Blocking a noisy sender or a malicious domain is a common operational task. While Microsoft’s primary recommended method for blocking senders is the Tenant Allow/Block List (TABL), the blocked sender and blocked domain lists in anti-spam policies are still useful when you specifically want messages to be treated as high-confidence spam (SCL = 9) and handled according to your spam policy actions.
Through Exchange Online Protection (EOP), inbound email is automatically protected against spam. Default inbound and outbound anti-spam policies are preconfigured for all tenants. Although administrators can modify these default policies, the default policy cannot be deleted.
If the default anti-spam policies do not meet specific requirements, you can create custom anti-spam policies with tailored settings. Custom policies take precedence over the default policies, and you can control their priority to ensure the desired policy is applied.
Contents
When to use Anti-spam policy blocklists
- You want the message to be classified as High confidence spam (SCL = 9) and processed by your spam policy actions.
- You want the flexibility to scope the policy to specific users/groups using custom policy targeting and priority.
Permissions Required
To manage anti-spam policies, you typically need a role that can manage Exchange Online and Defender email policies (for example, Security Administrator or Organization Management, depending on your RBAC model).
- To create/update/delete an anti-spam policy, you must be a member of the Organization Management or Security Administrator role.
- For read-only access to anti-spam policies, you need to be a member of the Global Reader or Security Reader role.
Impact of Blocking Senders with Anti-Spam Policies
When you block a sender’s email or domain using anti-spam policies, the email is designated as high-confidence spam. The policy-defined action is then enforced on the sender’s email.
- The message is marked as High confidence spam (SCL = 9).
- The final action depends on your anti-spam policy configuration (for example, quarantine, delete, or move to Junk). In Standard and Strict preset security policies, High confidence spam is quarantined.
- Matching is based on the From (P2 / 5322.From) address only.
For example, if the High Confidence Spam action is configured to move the message to the Junk Email Folder, the email will be rerouted to the user’s junk email folder. You can apply below actions to an email identified as high-confidence spam.
- Add X-header
- Prepend subject line with text
- Redirect message to email address
- Delete message
- Quarantine message
Method 1: Block an email address or domain using Microsoft Defender Portal
You have the option to either create a new inbound anti-spam policy for blocking the sender or utilize an existing default anti-spam inbound policy to add the sender to the block list. I’ll use the Anti-spam inbound policy (Default), which is already existing and can’t be removed. However, you can customize its settings to match your organization’s requirements. Let’s check the steps:
- Sign in to the Microsoft 365 Defender portal, either as a security administrator or global administrator.
- Under Email & collaboration > Policies & rules.
- Click on Threat policies.
- Click on Anti-spam under Policies.
- Select the Anti-spam inbound policy (Default) and scroll down to the bottom of the policy to select Edit Allowed and blocked senders and domains.
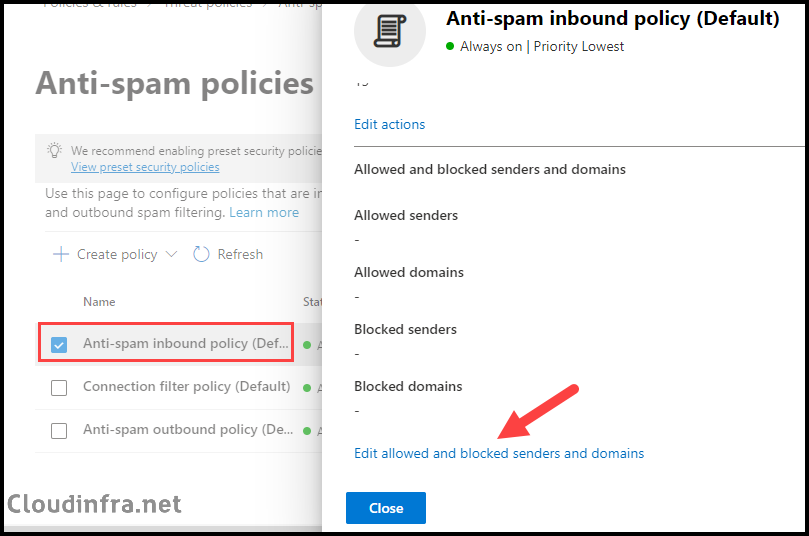
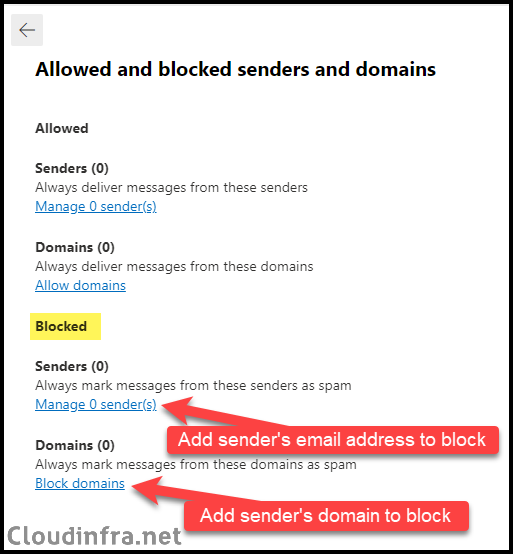
- Under the Blocked section, you will find the Manage Senders and Block Domains link.
- Manage senders: Add the sender’s email address to block.
- Block Domains: Add domains to block.
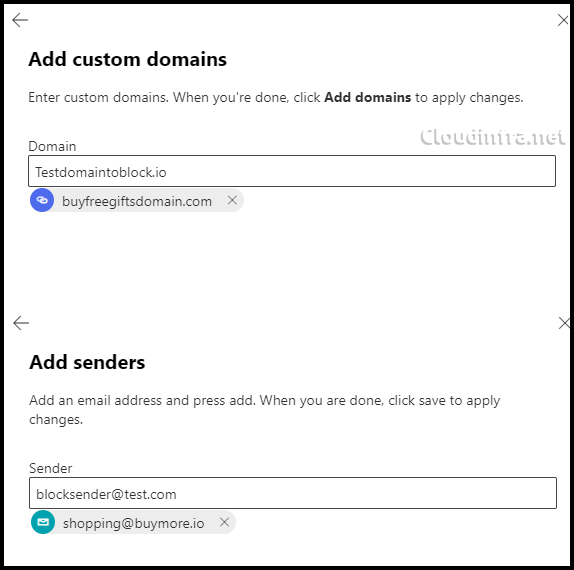
- Example:
Method 2: Add an email address or domain to the Block Senders list of Anti-spam policies using PowerShell
PowerShell is the best method for bulk administration and for managing more than 30 entries in the anti-spam policies. It’s important to note that the list capacity is approximately 1,000 entries. First, Install Exchange Online PowerShell module. If it’s already installed, you can proceed with connecting to Exchange Online using the Connect-ExchangeOnline cmdlet. Launch PowerShell with administrative privileges and execute the following commands:
Install Exchange Online PowerShell module
Install-Module ExchangeOnlineManagement
Connect to Exchange Online
Connect-ExchangeOnline
Identify the policy you will edit
Get-HostedContentFilterPolicy | Select-Object NameExample: Add an email address and domain to the block list [overwrite existing list]
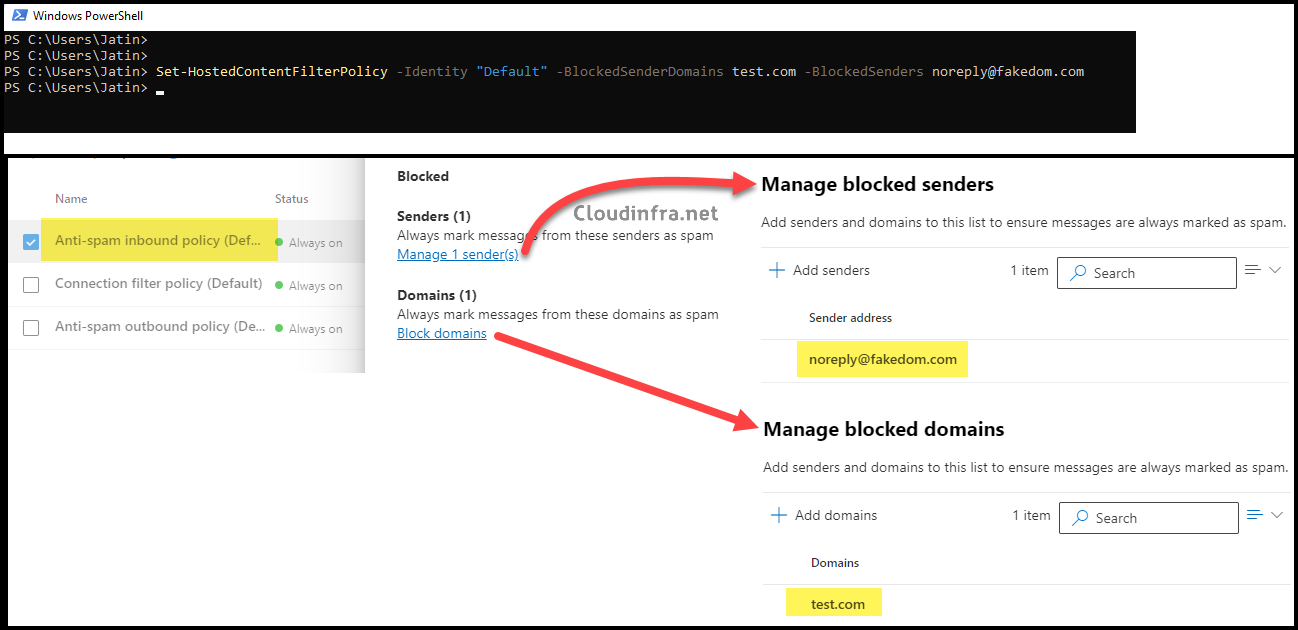
Set-HostedContentFilterPolicy -Identity "Default" -BlockedSenderDomains test.com -BlockedSenders noreply@fakedom.com
Example: Append an email address and domain to existing block senders list
Set-HostedContentFilterPolicy -Identity "Default" -BlockedSenderDomains @{Add=”x0ej.com”} -BlockedSenders @{Add=”noreply_123@gmail.com”}

Verify blocked sender and blocked domain lists
Get-HostedContentFilterPolicy -Identity "Default" | Format-List Blocked*Remove an email address or domain from the Block senders list of Anti-spam policy with PowerShell
Using the default anti-spam policy, we learned how to add a sender to the block list. Using PowerShell, let’s remove an email address and a domain from the list. Use the following command for this task.
Change the sender’s email address or domain that you want to remove from the list, and then execute the command. To confirm the blocked sender’s users or domains, you can utilize the Get-HostedContentFilterPolicy -Identity Default | fl Block* command.
Example: Remove sender email address and a domain from the Block List
Set-HostedContentFilterPolicy -Identity "Default" -BlockedSenderDomains @{Remove="test.com"} -BlockedSenders @{Remove="noreply@fakedom.com"}

Verify Block Sender email and domain list
Get-HostedContentFilterPolicy -Identity Default | fl Block*
Conclusion
Blocked senders and blocked domains in Microsoft 365 anti-spam policies remain a valid control when you want messages classified as High confidence spam (SCL = 9) and handled by your spam actions. Configure entries in the Defender portal for small lists, but use PowerShell for bulk operations or more than 30 entries. For Microsoft’s primary recommended tenant-wide blocking method, consider using the Tenant Allow/Block List first.