
This post is Part 2 of the Apple Business with Intune setup series. In Part 1, we started the configuration from scratch by signing up for Apple Business, verifying the organization, verifying the company domain, creating the Apple MDM Push Certificate, and configuring the Enrollment Program Token.
In this part, we will continue the setup by creating and configuring Automated Device Enrollment (ADE) profiles (formerly DEP) for both iOS/iPadOS and macOS devices. These enrollment profiles define how company-owned Apple devices are enrolled into Intune and what the user experience would be during the enrollment process.
https://cloudinfra.net/setup-apple-business-with-intune-part-1
Contents
Step 7: Create Automated Device Enrollment Profile
In the previous step, we created an Enrollment Program Token to connect Apple Business with Intune. The next step is to create an enrollment profile, which defines how company-owned Apple devices will be enrolled in Intune during the setup process.
Create Automated Device Enrollment (ADE) Profile for iOS/iPadOS
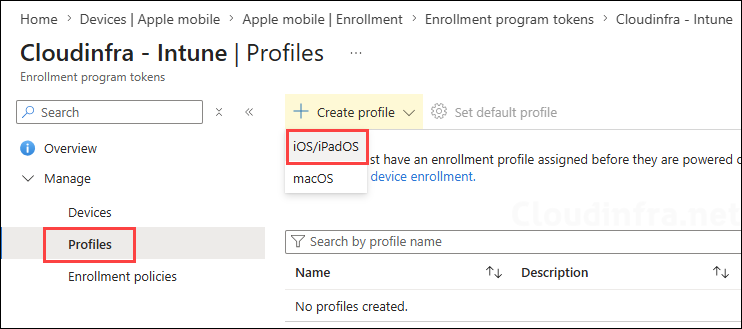
To create an enrollment profile, go to Intune admin center > Devices > Apple > Enrollment > Enrollment program tokens. Select the token, go to Profiles, click Create profile, and select iOS/iPadOS.
This will create an enrollment profile for iOS/iPadOS devices. In the next section, we will also create an enrollment profile for macOS devices.
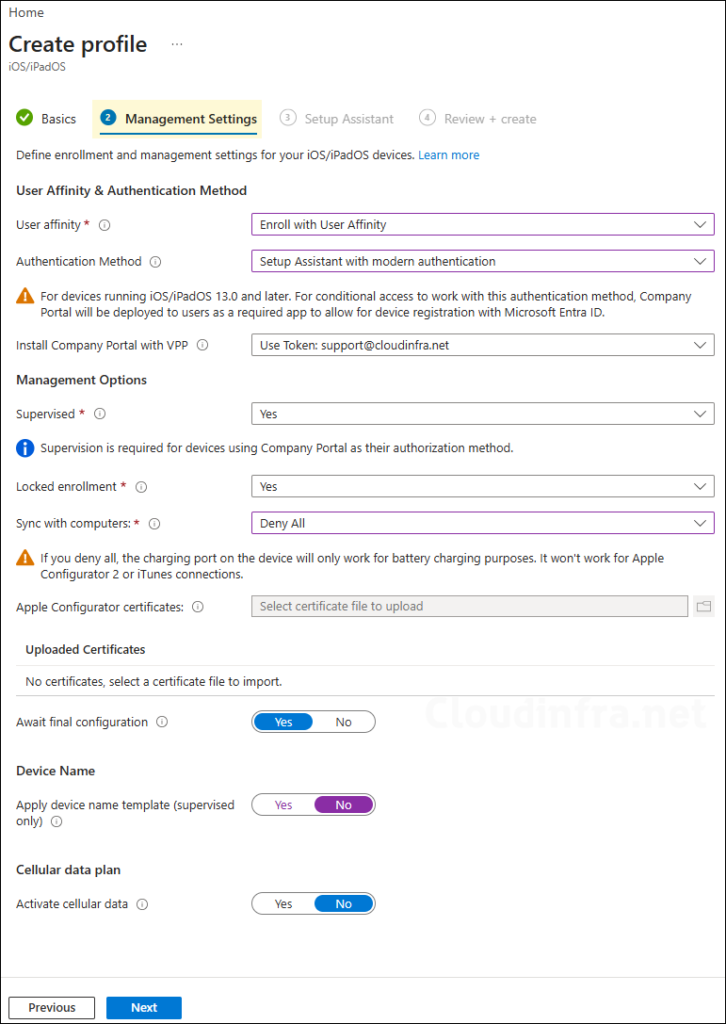
- Basics tab: Provide a name and description. For example: Cloudinfra-iOS-London-Enrollment Profile.
- Management Settings:
- User Affinity & Authentication Method:
- User affinity:
- Select Enroll with User Affinity for user-assigned iPhones and iPads.
- Select Enroll without User Affinity for shared, kiosk, POS, or utility devices.
- Authentication Method:
- For user affinity scenarios, select Setup Assistant with modern authentication where possible. Microsoft recommends this method for ADE scenarios with user device affinity.
- Install Company Portal with VPP:
- If you have configured the VPP or Content Token and synced with Intune, then select the token, which will be used to install the Company Portal app.
- User affinity:
- Management Options:
- Supervised: Supervised devices provide more management options and disable activation lock by default. Select Yes for company-managed devices.
- Locked enrollment: Select Yes to prevent users from removing the management profile from the device.
- Sync with computers: If you don’t want to allow iOS/iPadOS to sync with computers, then select Deny All; else select Allow All or Allow Apple Configurator by certificate as per your requirement.
- Await final configuration: Select Yes to ensure that the Setup Assistant screen will wait for Intune check-in and ensure that critical device configuration policies are applied before user can see the home screen.
- Device Name: Configure the device name template if required, for example:
{{DEVICETYPE}}-{{SERIAL}}. - Cellular data plan: Configuring this option will send a command to activate cellular data plans for your eSIM-enabled cellular devices. Your carrier must provision activations for your devices before you can activate data plans using this command. You can also perform this action any time after device enrollment. If you select yes, you will need to provide Carrier activation server URL.
- User Affinity & Authentication Method:
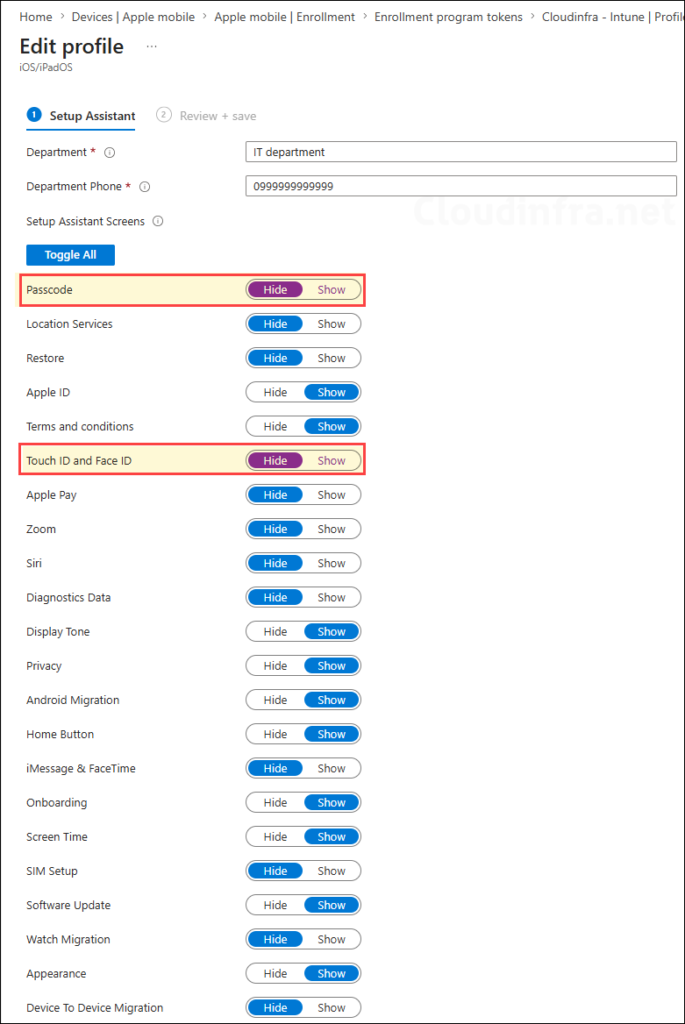
- On the Setup Assistant tab, provide the department name and department phone and configure the screens to show or hide during automated device enrollment for iOS/iPadOS.
Passcode, Touch ID, and Face ID Setup Assistant screens do not function correctly on iOS/iPadOS 14.5 and later. Therefore, it is recommended to hide these screens when configuring the enrollment profile.
If you need to enforce passcode requirements on enrolled devices, configure them separately using an Intune device configuration policy or a compliance policy that includes passcode settings.
Important
- Review + create: Review the profile summary and click Create.
Create Automated Device Enrollment Profile for macOS
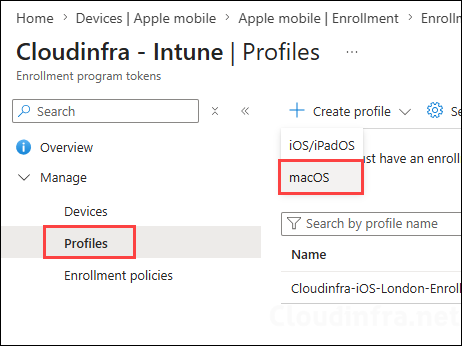
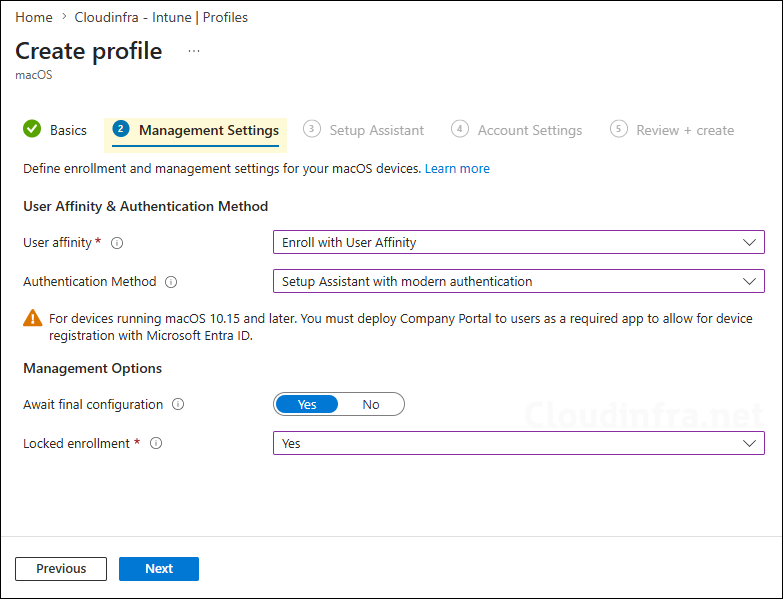
You can also create an automated device enrollment profile for macOS devices as well. To create an enrollment profile for macOS, go to Intune admin center > Devices > Apple > Enrollment > Enrollment program tokens. Select the token, go to Profiles, click Create profile, and select macOS.
- Basics tab: Provide a name and description. For example: Cloudinfra-macOS-London-Enrollment Profile.
- Management Settings:
- User Affinity & Authentication Method:
- User affinity:
- Select Enroll with User Affinity for user-assigned macOS.
- Select Enroll without User Affinity for shared, kiosk, POS, or utility devices.
- Authentication Method:
- Select Setup Assistant with modern authentication: This method requires users to complete all Setup Assistant screens and sign in to the Company Portal app with their Microsoft Entra credentials before they can access resources.
- User affinity:
- Management Options:
- Locked enrollment: Select Yes to prevent users from removing the management profile from the device.
- Await final configuration: Select Yes to hold the device in Setup Assistant until the first device sync completes to allow settings to come down to the device while it is being provisioned.
- User Affinity & Authentication Method:
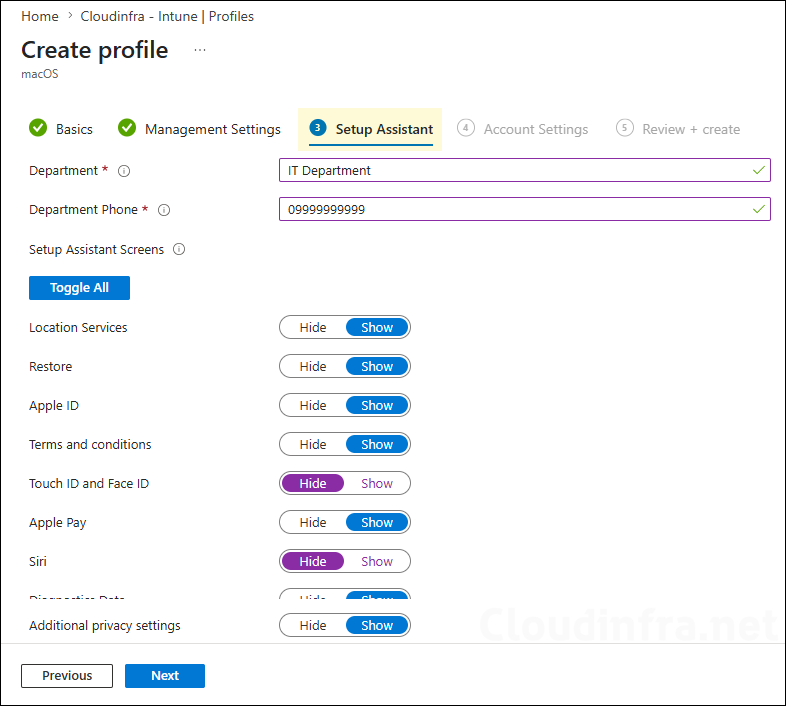
- On the Setup Assistant tab, provide the department name and department phone and configure the screens to show or hide during automated device enrollment for macOS.
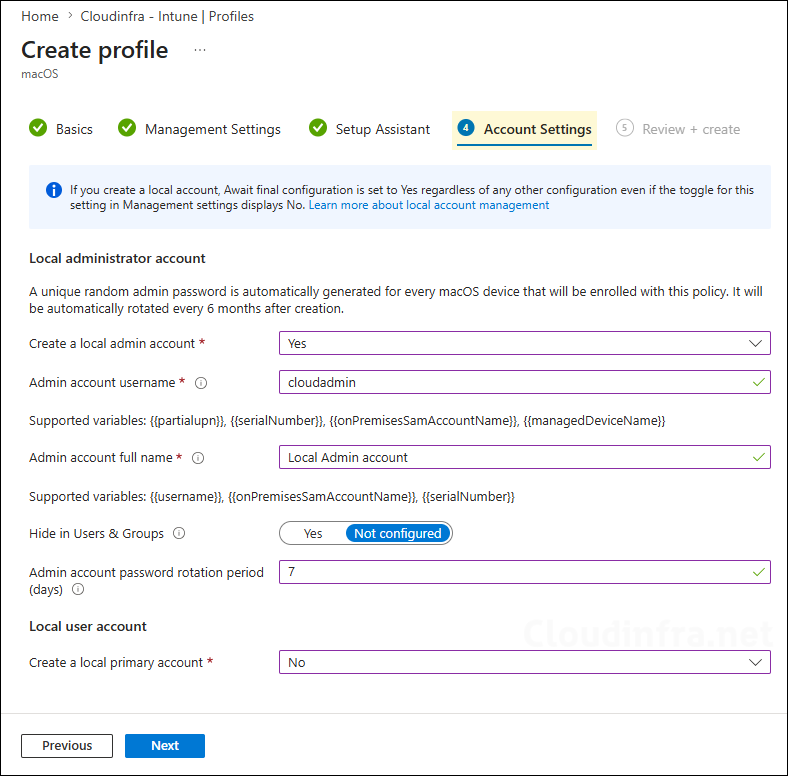
- On the Account Settings tab, you can optionally create a local administrator account or a standard user account on the target macOS devices.
- When you create a local administrator account, it is managed using Microsoft Local Administrator Password Solution (LAPS). Laps automatically generates a unique, strong, randomized 15-character alphanumeric password for each device. The password is securely stored and encrypted in Intune. By default, Intune rotates LAPS-managed administrator passwords every six months; you can specify a different password rotation period during configuration.
- If you choose to create a local administrator or standard user account from this section, ensure that Await final configuration is set to Yes. This setting is required for the account creation process to complete successfully during device enrollment.
- Review + create: Review the profile summary and click Create.
Step 8: Configure Enrollment Types (Optional)
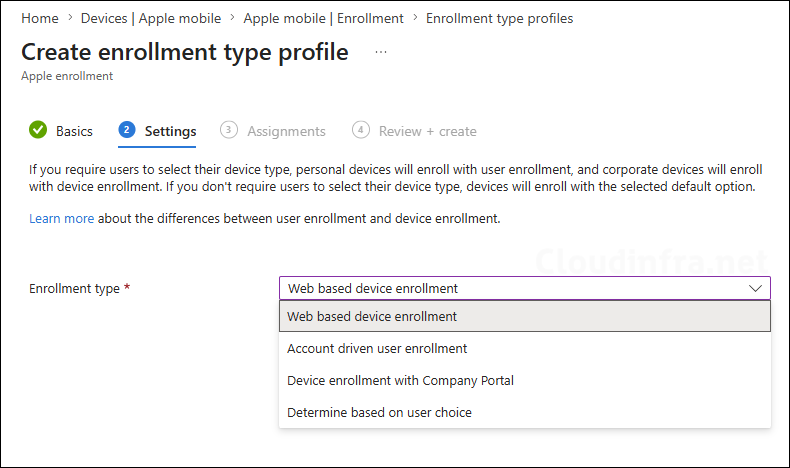
Enrollment Types in Intune provide additional Apple enrollment methods for scenarios where Automated Device Enrollment is not being used or where alternative enrollment experiences are required.
Microsoft recommends using web-based enrollment with Just-in-Time (JIT) registration and Single Sign-On (SSO) as the preferred enrollment method, as it provides the most secure experience and supports device attestation. Enabling web-based enrollment also improves the user experience by eliminating the need for users to install the Company Portal app during the enrollment process.
Step 9: Configure Enrollment Notifications (Optional)
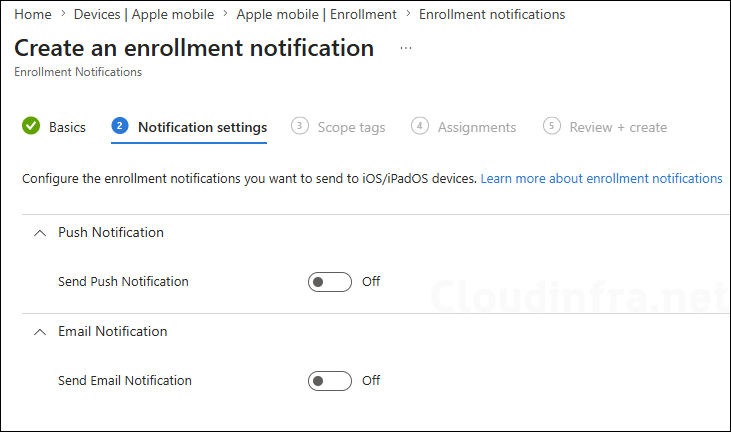
Enrollment Notifications in Intune allow administrators to send customized email notifications or push notifications to notify users of newly enrolled devices. You can add a custom message and use tenant branding with the message. To configure enrollment notifications, go to the Intune admin center > Devices > Apple mobile > Enrollment > Enrollment notifications.
Step 10: Configure Device Platform Restrictions
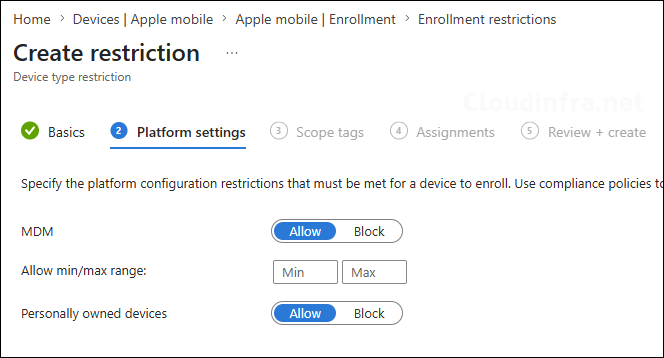
Device Platform Restrictions in Intune allow administrators to control which Apple devices can enroll based on platform, operating system version, and device ownership. Go to Intune Admin Center > Devices > Apple mobile > Enrollment > Device platform restrictions to configure. Here you can also configure the minimum and maximum iOS versions, and if you do not want users to enroll personally owned or BYOD-type devices, then set that to Block.
Step 11: Add Devices in Apple Business and Sync with Intune
Apple Business normally receives device information automatically when your organisation purchases iPhones and iPads directly from Apple, an Apple Authorized Reseller, or a supported mobile network provider. However, you may also have corporate devices purchased from another retailer or devices that were acquired before Apple Business was configured. For adding such devices, you can use Apple Configurator. For more details, refer to the link: Add iOS Devices to Apple Business using Apple Configurator.
Step 12: Assign Enrollment Profile
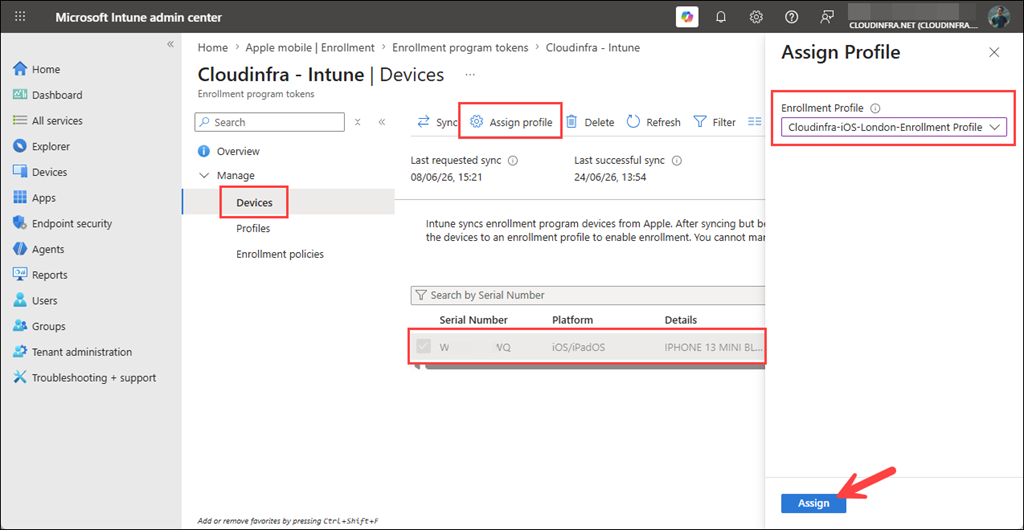
After you see the device in Intune, you can assign the enrollment profile to the device. Go to the Intune admin center > Devices > Apple > Enrollment > Enrollment program tokens. Select the token and go to Devices. Select the device and click on Assign profile. Then select the Enrollment profile and click Assign.
If you have configured a default enrollment profile for iOS/iPadOS or macOS devices, the profile will be assigned automatically when the device synchronizes with Intune. In that case, you do not need to manually select the device and assign an enrollment profile.
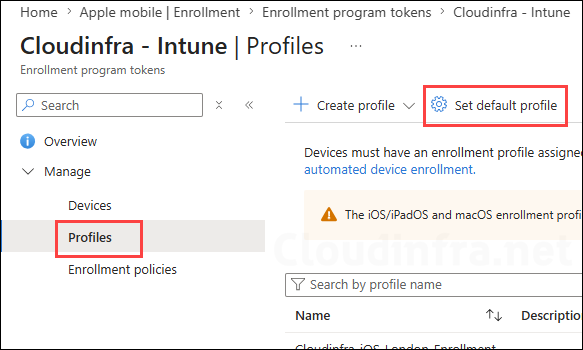
To configure a default profile, go to Intune admin center > Devices > Apple > Enrollment > Enrollment program tokens. Select the enrollment token, navigate to Profiles, click Set default profile, and then choose the default profile for your iOS/iPadOS and macOS devices.
Step 13: Enroll Apple Devices in Intune
Finally, we can enroll company-owned iOS/iPadOS/macOS Apple devices in Intune. The devices must be erased and reset to their factory default settings before the enrollment process. I have documented the complete step-by-step enrollment process on an iOS device to show you the user experiences during enrollment. For detailed instructions, refer to the post Enroll Company-Owned iOS Devices in Intune.
