This post is about showing you the initial setup of Microsoft Intune MAM and MDM. Microsoft Intune is Microsoft’s cloud-native endpoint management solution that helps you manage both Mobile Device Management (MDM) and Mobile Application Management (MAM) from a single place. In this post, I will walk you through the initial setup of Intune MDM/MAM and show you how to get your tenant ready for managing devices and apps.
From a licensing perspective, Intune Plan 1 is the baseline requirement for using Intune MDM and MAM. Intune Plan 1 is included in Microsoft 365 E3 and E5, Enterprise Mobility + Security (EMS) E3 and E5, Microsoft 365 Business Premium, and Microsoft 365 F1/F3, as well as in education SKUs like Microsoft 365 A3/A5. For more information, refer to the link Microsoft Intune Plans and Pricing.
Recently, Microsoft has also announced that additional advanced Intune capabilities that previously required separate add-on licenses will be rolled into the core Microsoft 365 E3 and E5 suites. Features such as Intune Remote Help, Intune Advanced Analytics, and Intune Plan 2 will be added to Microsoft 365 E3. Microsoft 365 E5 will also gain Intune Endpoint Privilege Management, Intune Enterprise Application Management, and Microsoft Cloud PKI, further strengthening the built-in endpoint management and security story in these suites. For more information on these latest license changes, refer to this TechCommunity link: Microsoft 365 adds advanced Microsoft Intune solutions at scale – Microsoft Intune Blog.
Contents
Key Features of Microsoft Intune
- Manage mobile devices across corporate-owned and BYOD scenarios.
- Apply App Protection Policies (APP) to secure and manage applications and data.
- Manage Windows 11, macOS, and supported Linux devices from a single console.
- No on-premises infrastructure required, fully cloud-based.
- Use Intune as a standalone cloud solution or in co-management with Configuration Manager.
- Integrate with Microsoft 365 MDM to provide a unified management experience.
- Get rich reporting and logging for devices, apps, and policies.
- Deploy custom line-of-business (LOB) applications to Windows 11 and mobile devices.
- Protect access to apps and data using Conditional Access policies.
- Integrate with third-party Mobile Threat Defense (MTD) solutions such as Better Mobile, Zimperium, and Lookout for Work.
Intune License Requirements
At a minimum, you need Intune Plan 1 to use core MDM/MAM features. Intune Plan 1 is included in:
► Microsoft 365 E5 ► Microsoft 365 E3 ► Enterprise Mobility + Security E5 ► Enterprise Mobility + Security E3 ► Microsoft 365 Business ► Microsoft 365 F3 ► Microsoft 365 Government G5 ► Microsoft 365 Government G3 ► Microsoft 365 A3 / A5.
Recent licensing changes (Intune in Microsoft 365 E3/E5): Microsoft has announced changes that bring more Intune capabilities directly into Microsoft 365 E3 and E5 with a slight price increase. For more information on these changes, including the new pricing, refer to the link: Advancing Microsoft 365: New capabilities and pricing update | Microsoft 365 Blog.
- Microsoft 365 E3 will include:
- Intune Plan 1
- Intune Plan 2 capabilities (core advanced management features)
- Intune Remote Help
- Intune Advanced Analytics
- Microsoft 365 E5 will include everything in E3 plus:
- Intune Endpoint Privilege Management (EPM)
- Intune Enterprise Application Management
- Microsoft Cloud PKI
- Microsoft Security Copilot
Some very advanced or niche features may still require Intune Suite or other add-on SKUs, but for most organizations, Microsoft 365 E3/E5 now includes the main Intune capabilities out of the box.
Note
General Guidelines for Intune Setup
- An active Microsoft 365 / EMS / Intune subscription that includes Intune Plan 1 (for core MDM/MAM).
- A Microsoft Entra ID tenant with at least one Global Administrator or Intune administrator account.
- User accounts created in Entra ID and assigned Intune licenses.
- Your custom domain added and verified in Microsoft 365 / Entra ID (e.g. cloudinfra.net) if you don’t want to use the onmicrosoft.com domain.
- Supported client operating systems for management (e.g. Windows 11, iOS/iPadOS, Android, macOS, supported Linux distributions).
- Network access to required Microsoft Intune, Entra ID, and Microsoft 365 endpoints (no firewall/proxy blocks, SSL inspection exclusions where required): Network endpoints for Microsoft Intune – Microsoft Intune | Microsoft Learn.
- Supported OS and Browsers with Intune: Supported OS and Browsers in Intune.
- Compliance and security baseline decisions
- App deployment strategy defined (line-of-business apps, store apps, web apps, and App Protection Policies for MAM).
- For iOS/iPadOS management:
- An Apple MDM Push certificate (APNs) using an Apple ID.
- (Optional) Apple Business Manager / Apple School Manager if using ADE (DEP) or VPP.
- For Android management:
- Managed Google Play binding for Android Enterprise.
- (Optional but recommended) Device enrollment strategy planned (Autopilot for Windows, enrollment restrictions, device categories, group structure, naming standards).
- (Optional) Integration plans for Defender for Endpoint, Mobile Threat Defense solutions, or other security tools if you intend to use them with Intune.
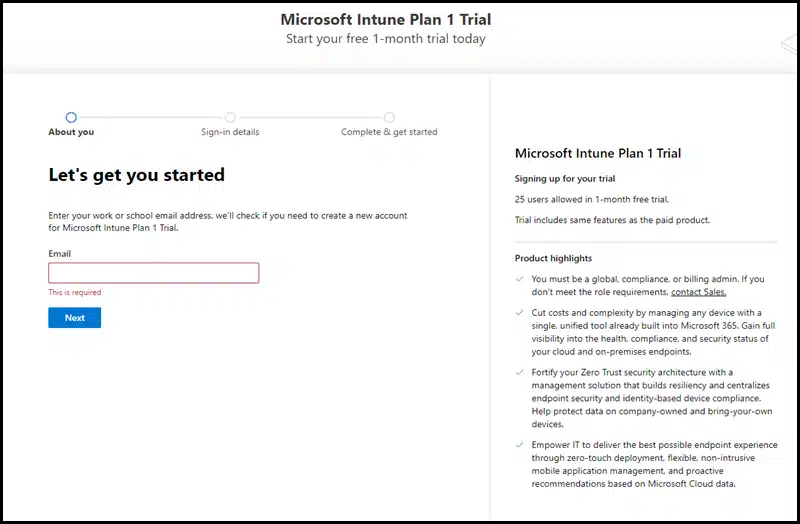
Step 1: Sign up for Intune
If you are already signed up for Microsoft Intune, you can skip this step. This step is for getting started with the Microsoft Intune Plan 1 trial, which allows up to 25 users. After the trial ends, you can decide whether you want to continue using this tenant. To sign up for a 30-day free Intune trial, use the link: Sign-up for Intune.
Step 2: Assign Licenses to Users
After completing Intune trial sign-up, create Entra ID users. If you are in a hybrid Entra ID scenario, you can sync users from your on-premises Active Directory to Entra ID using Microsoft Entra Connect. Once the users are created or synced, assign Intune licenses to the users.
- Microsoft Intune admin center: https://intune.microsoft.com.
- Intune for Education: https://intuneeducation.portal.azure.com/
Intune admin portal URLs
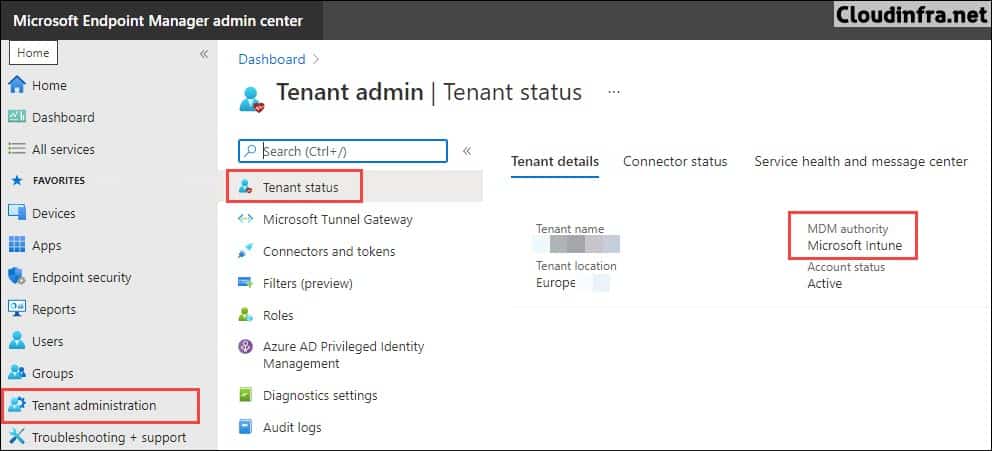
Step 3: Set MDM Authority
MDM Authority determines how and where you manage your devices. It is a prerequisite and a part of the initial configuration before you can enroll any device to Intune. By default, Intune free trial sets your MDM authority to Intune.
- Sign in to the Intune admin center > Select Tenant Administration -> MDM Authority to verify the MDM Authority status.
Step 4: Setup Device Enrollment
You will need to configure device enrollment for each platform you plan to manage using Intune. For example, to manage Apple devices, set up Apple device enrollment; to manage Android devices, set up Android device enrollment; and similarly, configure Windows device enrollment.
Setup Apple Device Enrollment
To manage Apple iOS/iPadOS devices using Intune, you must start with the configuration of Apple MDM Push certificate on Intune admin center. This is required for both BYOD (MAM) and MDM (fully managed, supervised) scenarios. If you want to use Apple Business Manager (ABM), then you will have to first register the iOS/iPadOS device to ABM and then sync it to the Intune portal; thereafter, create enrollment program tokens and then setup the automated device enrollment profile.
Refer to this step-by-step guide, which will walk you through setting up the Apple MDM Push certificate on Intune: Create Apple MDM Push Certificate for Intune. To setup Intune enrollment for iOS/iPadOS devices in ABM, refer to the link Tutorial – Use Apple Business Manager to enroll iOS/iPadOS devices in Intune – Microsoft Intune | Microsoft Learn.
Setup Android Device Enrollment
Refer to this guide for setting up Android device enrollment: Setup Android Device Enrollment in Intune.
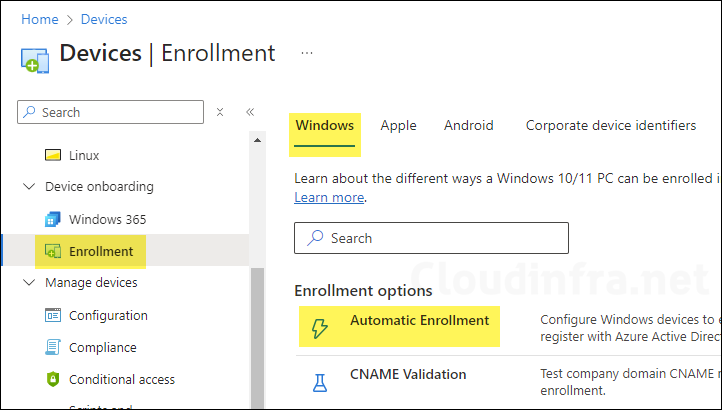
Setup Windows Enrollment
There are multiple ways to enroll your Windows devices into Intune. I have written a guide dedicated to explaining all of these methods of enrollment; you can read about those methods here: Enroll Windows Devices in Intune.
To simplify the Windows devices enrollment into Intune, configure MDM automatic enrollment in Intune. This enables devices to enroll automatically when they join or register in Microsoft Entra ID. If you’re enrolling Windows devices by using MDM automatic enrollment, you don’t have to worry about configuring CNAME records for your MDM server. The MDM server is configured by default when you enable MDM automatic enrollment in your tenant.
Although configuring CNAME validation in Intune is optional, I will still show you how to set it up if you need it. After that, I will walk you through configuring MDM automatic enrollment.
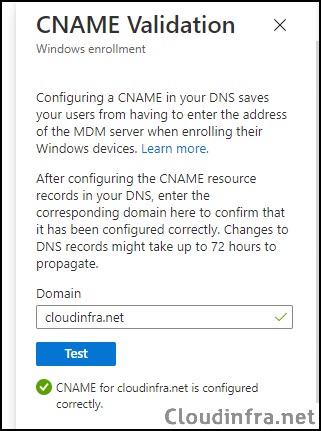
Configure CNAME Validation (Optional)
To configure the CNAME validation enrollment option in Intune, follow below steps:
- Sign in to the Intune admin center > Go to Devices > Enrollment > Windows.
- Click on CNAME Validation under Enrollment options.

- Sign in to your domain’s external DNS server and create the CNAME record shown below. This record redirects enrollment requests to the Intune servers. If you do not configure CNAME validation, users enrolling their devices will be prompted to manually enter the Intune server name during the enrollment process.
| Type | Name | Points to | TTL |
|---|---|---|---|
| CNAME | enterpriseenrollment.cloudinfra.net | enterpriseenrollment-s.manage.microsoft.com | 3600 |
- Below screenshot shows a CNAME record entry created on my DNS server for CNAME Validation.

- After you add a CNAME record to your DNS server, you may have to wait for up to 24 hours for DNS propagation. Once the DNS validation is completed, go to Intune Admin Center > Devices > Enrollment > Windows > CNAME Validation, enter your domain name, and click Test to validate.
- If you get an error, it could be because the DNS CNAME record has not been propagated yet; wait for a couple of hours and try again. It should show a green tick with a message saying CNAME for <domain name> is configured correctly.
| Important |
|---|
| If the company uses more than one UPN suffix, you need to create one CNAME for each domain name and point each to EnterpriseEnrollment-s.manage.microsoft.com. |
Enable Automatic Enrollment
To enable automatic enrollment of Entra-registered, Entra-joined, or Entra hybrid-joined devices into Intune, follow below steps:
- Sign in to the Intune admin center. Go to Devices > Enrollment > Windows > Automatic Enrollment.
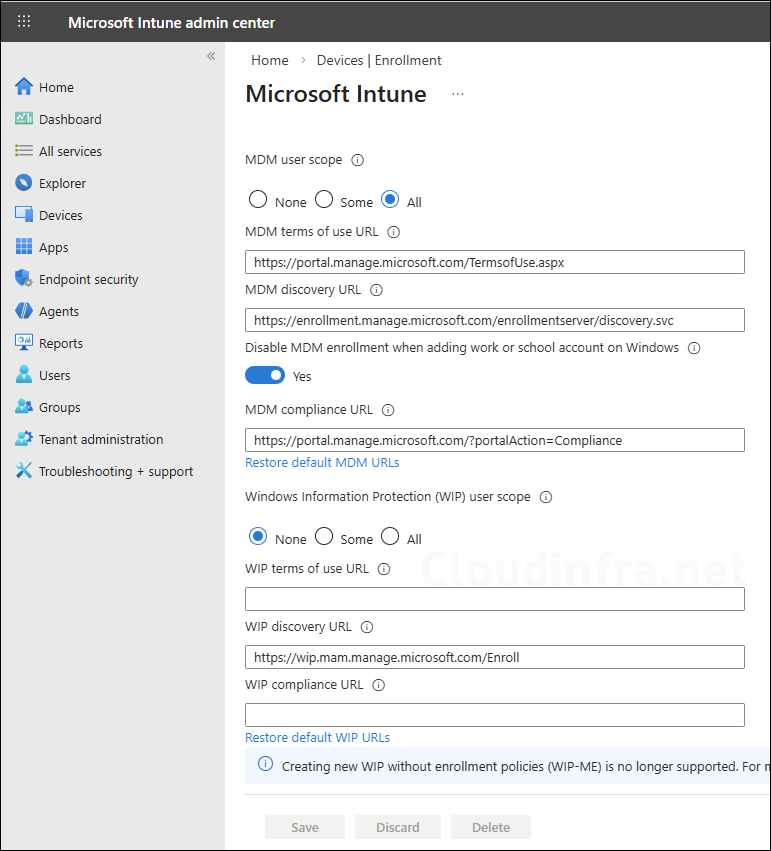
- Configure MDM User Scope: This setting enables automatic MDM enrollment for Entra users so that you can manage their devices in Intune. If you set this to All, automatic MDM enrollment will be enabled for all users in your organization. This means that when a device is registered or joined to Entra, it will be automatically enroll in Intune.
- None: Automatic MDM device enrollment will be disabled.
- Some: Select this option if you want to enable automatic MDM enrollment for a selected group of users.
- All: Enable automatic MDM enrollment for all users.
- Configure Windows Information Protection (WIP) user scope: set this to None. If WIP user scope is set to any other value, make sure the selected users aren’t a part of the MDM user scope. For more information, read Enable MDM automatic enrollment for Windows – Microsoft Intune | Microsoft Learn.
A new setting, Disable MDM enrollment when adding a work or school account, is currently in public preview and allows admins to control MDM enrollment for Entra-registered devices. It removes the MDM enrollment option during the app-initiated “Add work or school account” flow, allowing users to sign in without accidentally enrolling the device into Intune. Users will no longer see the screen that enrolls a personal device into Intune, which means they cannot accidentally enroll personal devices.
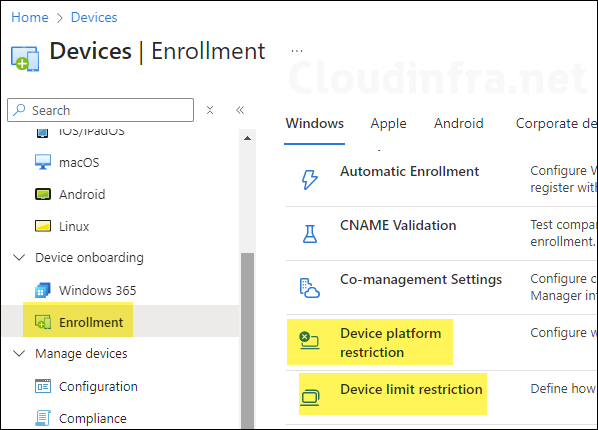
Step 5: Configure Device Platform Restrictions
You can control which devices can enroll in Intune by setting up a device platform restriction policy. You can also limit the number of devices a user can enroll in Intune by using a device limit restriction policy. The maximum number of devices a user can enroll in Intune is 15. If a user attempts to enroll a 16th device, they will receive error code 80180014.
- Device platform restriction: Use this to restrict devices from enrolling in Intune. You can create a new device platform restriction policy in Intune admin center or use the default policy that’s already available. You can create up to 25 device platform restriction policies.
- Device limit restriction: Use this to restrict the number of devices a user can enroll in Intune.
To create or use an existing device platform restriction policy, sign in to the Intune admin center > Go to Devices > Enrollment > Device platform restriction.
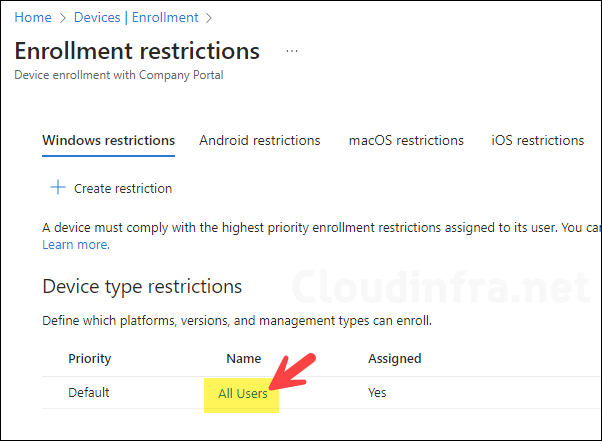
After you click Device Platform Restriction, you will see that a default platform restriction policy is already created and applied to All users. You can modify this existing policy and configure the platform restrictions according to your requirements, or you can create a new policy and assign it a higher priority than the default policy. This ensures that your custom device platform restriction policy is applied to the assigned users instead of the default one.
Modifying Existing Default Device Platform Restriction Policy
To keep things simple, I will modify the existing default device platform restriction policy, which is applied to all users. In this default policy, I will block personal device enrollment for iOS, macOS, and Windows devices and allow only company-owned corporate devices to enroll into Intune.
At the time of enrollment, Intune automatically assigns corporate-owned status to devices that are:
- Enrolled with a device enrollment manager account (all platforms).
- Enrolled with the Apple Device Enrollment Program, Apple School Manager, or Apple Configurator (iOS/iPadOS only).
- Identified as corporate-owned before enrollment with an international mobile equipment identifier (IMEI) numbers (all platforms with IMEI numbers) or serial number (iOS/iPadOS and Android)
- Joined to Entra ID with work or school credentials. Devices that are Entra registered will be marked as personal.
- Set as corporate in the device’s properties list.
- After enrollment, you can change the ownership setting between Personal and Corporate.
How a device is classified as Corporate Device in Intune
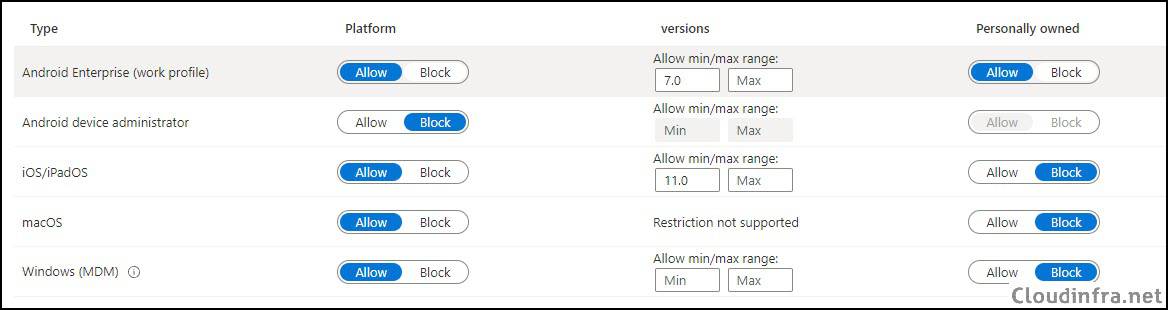
- Sign in to the Intune admin center > Devices > Enrollment > Device platform restriction > Click on All Users to open Default policy settings.
- Click on Properties and then click Edit next to Platform settings.
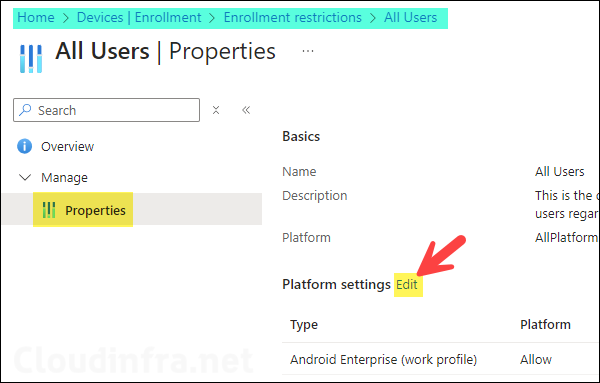
- Android Enterprise (work profile): You can allow or block Android device platform enrollment into Intune, and you can also choose whether to allow or block personally owned Android devices. Please note if you want to create a work profile on Android devices, set the personally owned toggle to Allow. For more information, refer to the link: Introduction to Android Work Profile.
- Android device administrator: It’s a legacy way of managing Android devices. Google deprecated Android device administrator management in 2020, and Intune will end support for device administrator devices with access to Google Mobile Services at the end of 2024. I would recommend keeping it blocked.
- iOS/iPadOS: You can allow or block iOS/iPadOS device platform enrollment into Intune and choose whether you want to allow personal iOS/iPadOS devices. Under the Personally owned column, select Block to block personal iOS/iPadOS device enrollment into Intune.
- macOS: Allow or block the macOS device platform. Under the Personally owned column, select Block to block personal macOS device enrollment in Intune.
- Windows (MDM): Similar to other platforms, you can use the toggle switch to allow or block Windows platform device enrollment in Intune. Typically you would set this to Allow, and under the Personally owned column, select Block.
Step 6: Create Device Compliance Policies
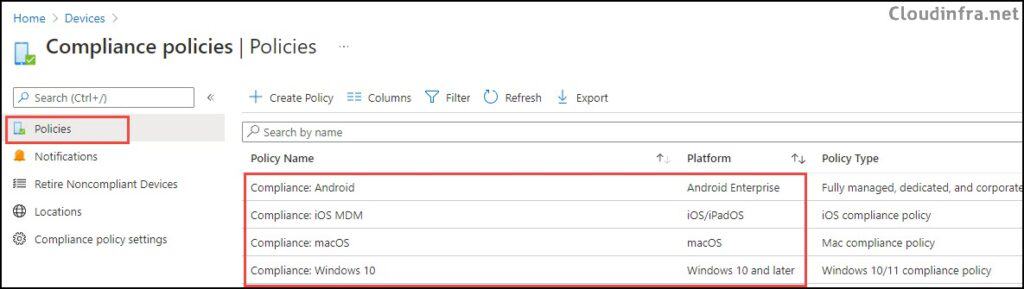
Device compliance policies are platform-specific rules and settings that are assigned to managed devices. Each device is evaluated against these rules and classified as either compliant or non-compliant. I recommend creating at least one device compliance policy for each platform: Windows, iOS/iPadOS, Android, and macOS. To create a device compliance policy, follow below steps:
- Sign in to the Intune admin center > Devices > Compliance > Create Policy.
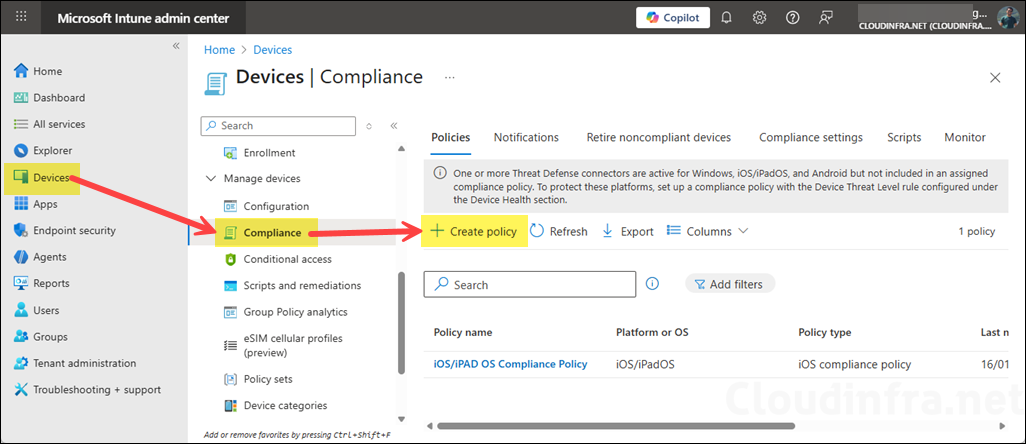
- Create a device compliance policy for each device platform you are managing using Intune (as shown below).
Step 7: Create Device Configuration Profiles
You can easily manage device settings on the Intune-managed devices by creating a device configuration profile in Intune. For example, you can create a device configuration profile to enable or disable startup boost in edge browser, configure a desktop and lock screen wallpaper, or manage Windows 11 settings, taskbar widgets, etc.
To create a device configuration profile, you can use:
- Security baselines: Its available on Intune admin center, which are basically preconfigured Microsoft-recommended security settings.
- Settings Catalog: To configure device features and settings, you can use the Settings catalog. It contains all the settings you can configure using Intune available in one place.
- Templates: Templates are logical groups of settings designed for a specific purpose, such as Kiosk, Wi-Fi, or VPN configurations. Related settings are grouped into a single template to make it easier to configure and manage them.
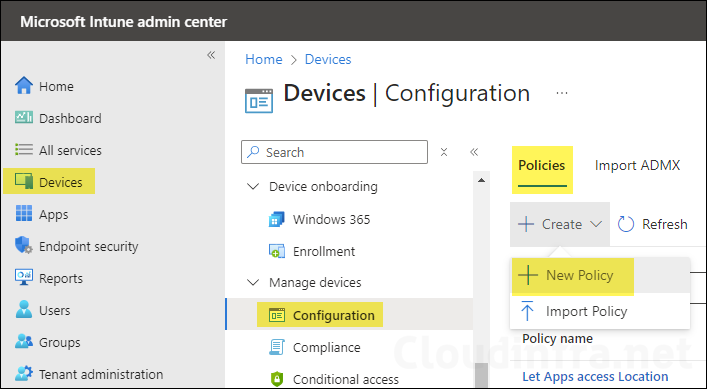
To create a device configuration profile. Sign in to the Intune admin center > Devices > Configuration > + Create > New Policy. I have created several blog posts to configure various settings on Windows and macOS devices. You can refer to any blog posts below to understand the process step-by-step.
- Set Desktop and Lock Screen Wallpaper Using Intune.
- Set Desktop Wallpaper on macOS Using Intune.
- Disable Web Search in Start Menu using Intune.
- Set Time Zone to Automatic on Windows using Intune.
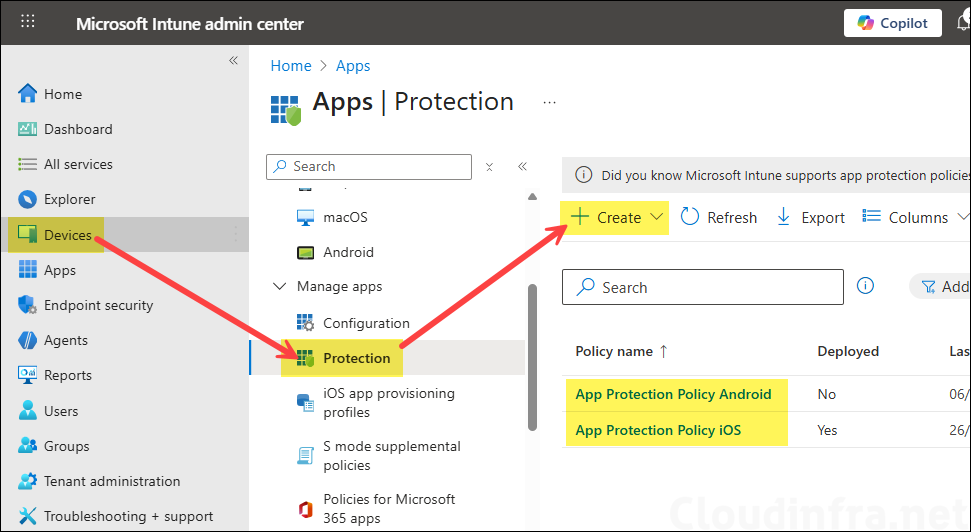
Step 8: Create App Protection Policies (MAM/BYOD)
App protection policies allow you to protect corporate data on mobile devices. You can create app protection policies and assign them to the managed apps. The policies define how the data is accessed and shared on the BYOD device. For example, you can prevent users from copying any data from the managed app to their unmanaged personal apps and require users to create a PIN for managed apps. For more information on app protection policy, refer to the link: App Protection Policies Overview – Microsoft Intune | Microsoft Learn.
To create an App protection policy, sign in to the Intune admin center > Apps > Protection > Create. You can create an App protection policy for each platform and include the apps you want to protect on BYOD devices.
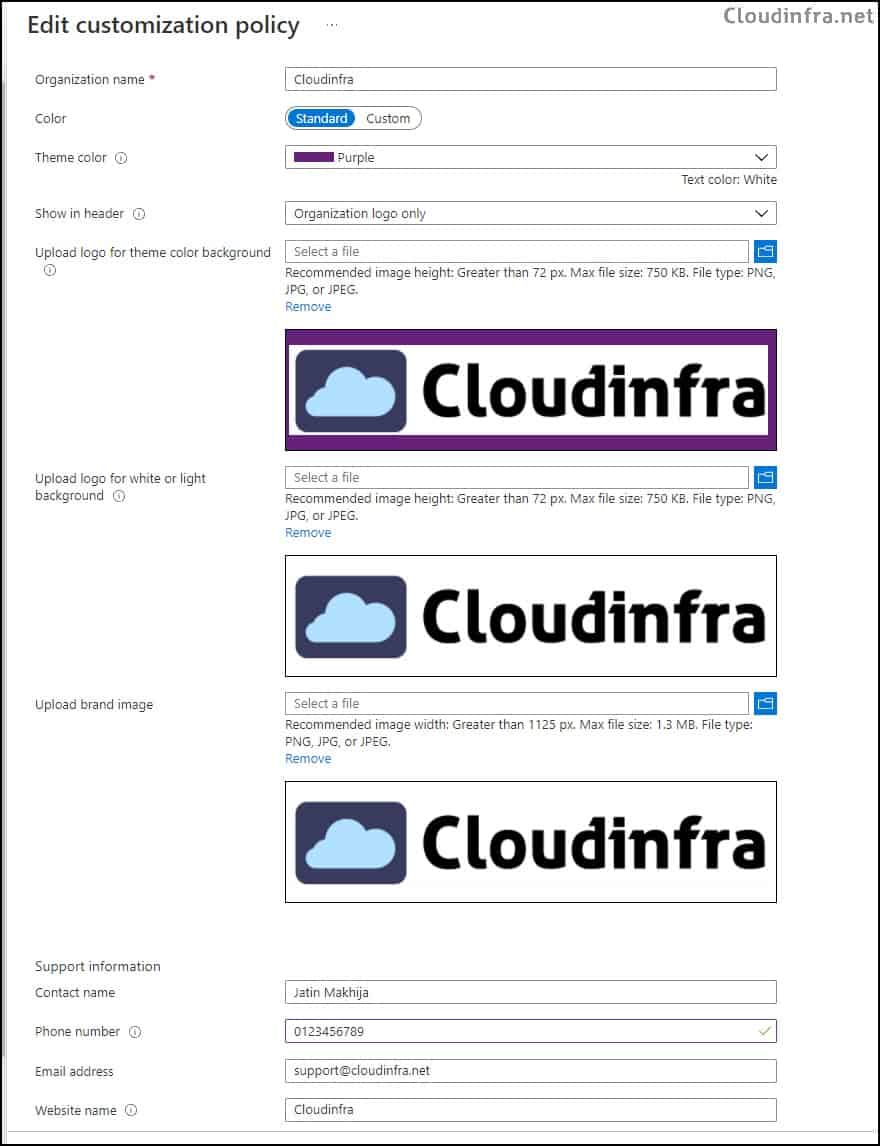
Step 9: Configure Company Branding
You can personalize the user experience by customizing the look of the Company Portal. This includes adding your company logo, choosing a theme color, setting a background image, and providing contact details for your helpdesk and company website. To learn more about customizing the user experience on Intune, refer to the link: How to Configure the Intune Company Portal Apps, Company Portal Website, and Intune App – Microsoft Intune | Microsoft Learn
To configure the customization policy, follow below steps:
- Sign in to Intune admin center > Tenant administration > Customization under End user experiences.
- There’s a default policy that comes pre-configured and can’t be removed, but you can modify it. Below screenshot shows that I’ve adjusted the theme color, added the company logo, and included support information for my organization.
Step 10: Deploy Applications Using Intune
You can add and deploy applications to Intune-managed Windows, iOS, and Android devices. For iOS and Android devices, you first have to add the apps via the iOS Store, VPP Store, or Managed Google Play to Intune and then assign the apps to the users and devices.
App Deployment on Windows Devices
For Windows devices, there are several ways to deploy the apps using Intune; for MSI apps, you can use the line-of-business (LOB) app method, or for EXE apps, you can use the Windows app (Win32) app deployment method. Below are the links to some of the guides that show different app deployment strategies for Windows.
App Deployment on macOS Devices
There are several ways to deploy apps on macOS devices. Depending on the application installer, you can use either the DMG or PKG deployment method in Intune. Below are links to guides that walk you through the complete deployment process for both PKG and DMG apps.
Adding iOS Store Apps
You can manage iOS app deployments by adding apps from the iOS Store and then assigning them to users or devices. I have written a guide that explains how to add, assign, and delete iOS Store apps in Intune. Refer to the link: Manage iOS Store apps.
Adding Google Play Store Apps
Similar to iOS, you must first add the apps you want to manage in Intune through the Managed Google Play Store. I have written a guide that explains how to add or remove Google Play Store apps for Android in Intune. Refer to the link: Add/Remove Android Managed Google Play Store Apps on Intune.
Step 11: Setup Work Profile on BYOD Android Devices
If you want to manage personally owned (BYOD) Android devices, the best approach is to use a work profile. A work profile separates work data from personal data on the enrolled device. To learn how to set up a work profile on Android, refer to the link: Setup Work Profile on Android For Intune.
Step 12: Enroll macOS Devices in Intune
You can enroll both personally owned and company-owned macOS devices in Intune, but the enrollment process is different for both. For a personally owned device, you can simply install the Company Portal app and begin the enrollment process, provided that personal device enrollment is not blocked in the device platform restriction policy discussed earlier in this post. I have written a detailed step-by-step guide on how to enroll a personally owned macOS device into Intune. Refer to the link: Enroll Personal/BYOD macOS Device in Intune.
Refer to this link for the guidance on enrolling company-owned macOS devices in Intune: Set up enrollment for macOS devices – Microsoft Intune | Microsoft Learn.
Troubleshooting
If you encounter any issues during device setup or enrollment in Intune, use the reference links below to help with troubleshooting.