In this blog post, I will show you the steps to Uninstall Snipping tool from Windows 10/11 devices. Snipping Tool is an integrated screen capture utility on Windows 10/11 devices. If this tool is not in use in your organization, and you can get rid of it completely. Instead of completely removing this tool, you can also disable it. Refer to this guide for more details on disabling snipping tool on Windows 11 devices.
Contents
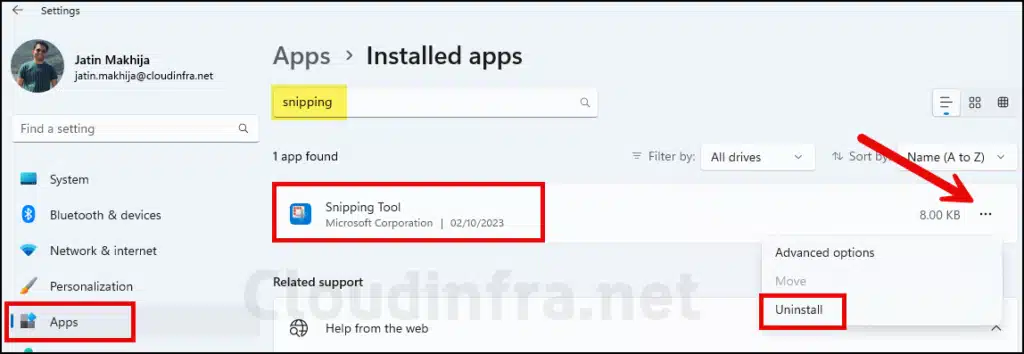
Method 1: Uninstall Snipping tool using Settings App
- Press Windows + I keys to open the Settings app on Windows 10/11
- Click on Apps > Installed Apps and search for Snipping Tool using the search box.
- To remove/uninstall this tool, click the three dots on the right-hand side, and select Uninstall.
Method 2: Uninstall Snipping tool using Winget
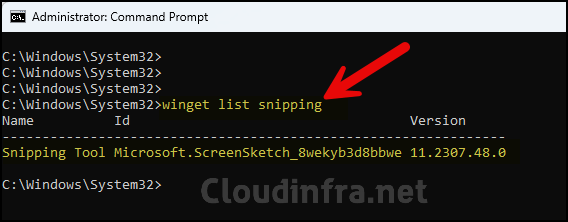
You can also utilize the winget list command display’s a list of all installed apps on your device. Review this list to locate the Snipping Tool and version number. Alternatively, use winget list snipping command to access this information.
2.1 Find Snipping tool version using Winget
winget list snipping
C:\Windows\System32>winget list snipping
Name          Id                                   Version
---------------------------------------------------------------
Snipping Tool Microsoft.ScreenSketch_8wekyb3d8bbwe 11.2307.48.0
2.2 Uninstall Snipping tool using Winget
Now that we have identified the version number of the Snipping Tool installed on the device, Use winget uninstall command to remove the Snipping Tool from this device.
winget uninstall --name Snipping Tool --version 11.2302.48.0

Method 3: Uninstall Snipping tool using PowerShell
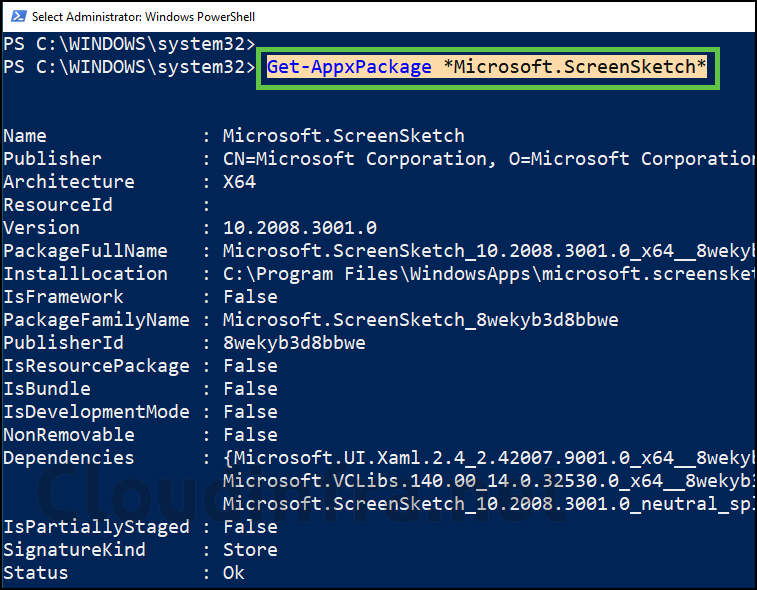
To uninstall the Snipping tool on Windows 10/11 device, we first need to check *Microsoft.ScreenSketch* using Get-AppxPackage *Microsoft.ScreenSketch* command.
Get-AppxPackage *Microsoft.ScreenSketch*
Launch PowerShell console as an administrator and execute below command to remove snipping tool.
Get-AppxPackage *Microsoft.ScreenSketch* | Remove-AppxPackage

Get Snipping tool back after Uninstalling
If you’ve uninstalled the Snipping Tool from your Windows 10 or 11 device and want to reinstall it, you can use one of the below methods:
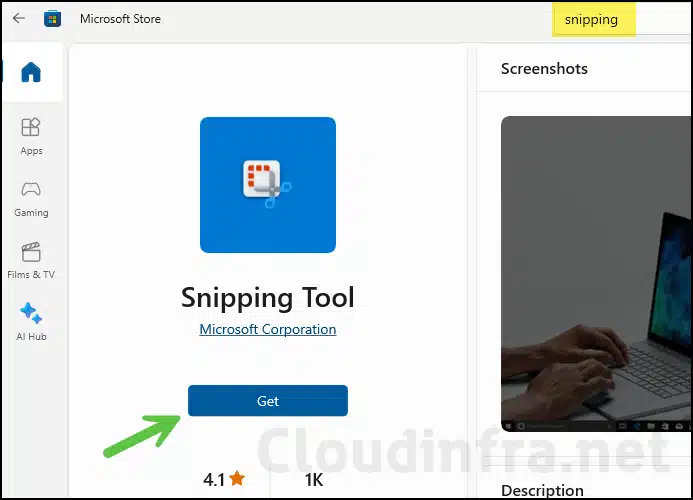
Method 1: Use Microsoft Store to Install Snipping tool
- Launch the Microsoft Store app using the Start Menu.
- Search for the Snipping tool and click on Get to install the tool on your device.
Method 2: Use Winget to Install Snipping tool
As we had used the winget command to uninstall the Snipping tool previously; you can also utilize the same command to install the application back on the device. You can use below command to install the Snipping tool using winget.
winget install 9MZ95KL8MR0L
FAQs
How to disable Snipping tool using Registry?
– Open Registry Editor > Navigate to HKEY_LOCAL_MACHINE\SOFTWARE\Policies\Microsoft\TabletPC. Create a new DWORD registry entry called DisableSnippingTool and set its value to 1 to disable it. Please make sure to restart your device to complete the process.
How to disable Print screen from opening Snipping tool?
By default, the print screen keyboard button opens up the Windows Snipping tool. You can turn off this feature by using below steps:
Option 1
– Open Settings App > Accessibility > Keyboard > Turn off the toggle for Use the Print screen button to open screen snipping.
Option 2
– Open Registry editor > Navigate to HKEY_CURRENT_USER\Control Panel\Keyboard. On the right-hand side, you will find PrintScreenKeyForSnippingEnabled DWORD registry entry. Set its value to 0 to turn it off. Make sure to sign out and sign in in to complete the process.
How to disable Snipping tool using Intune?
To disable the Snipping tool using Intune, create a device configuration profile and use the Settings Catalog policy setting Do not allow Snipping Tool to run. Deploy this setting on Windows devices via an Entra security group.