In this post, I will show you the steps to force lock screen after user inactivity via Intune. Auto-locking a Windows session after inactivity is a baseline control for reducing walk-up risk and casual data exposure. In Intune, there are two different mechanisms for forcing a screen lock: DeviceLock (MaxInactivityTimeDeviceLock) and Security Options (Interactive logon: Machine inactivity limit). I will show you both these options, with my preferred approach being to use the security options approach due to strict lock enforcement.
If you are using Active Directory Group Policy instead of Intune to manage your devices, I have covered the steps that focus specifically on locking the Windows screen after user inactivity using Group Policy. For more details, refer to the post Lock Computer Screen After Inactivity Using GPO.
Contents
Method 1: Using Interactive Logon Machine Inactivity Limit
The first method is to use the Security Options (Interactive logon: Machine inactivity limit) along with Screen saver settings to force a machine to automatically lock and password protect after X seconds.
- Sign in to the Intune admin center > Devices > Configuration > + Create > New Policy.
- Platform: Windows 10 and later. Profile type: Settings catalog.
- Basics: Provide a name and description of the profile.
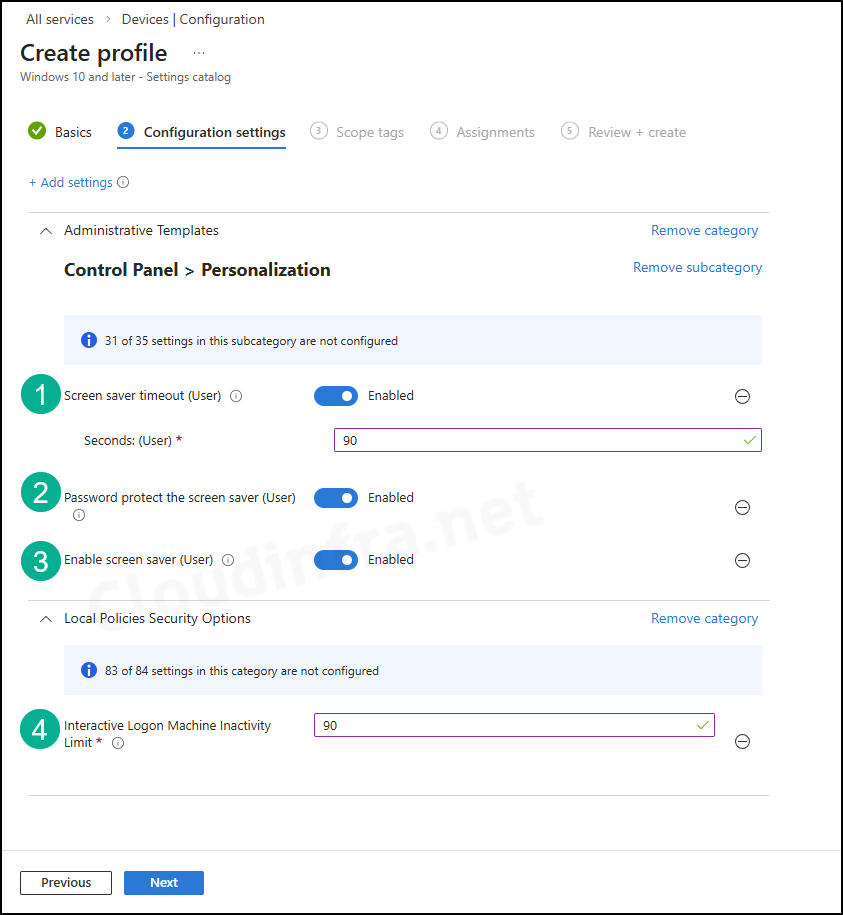
- Configuration settings: Click on + Add settings and add the below settings using the Settings picker.
- Interactive Logon Machine Inactivity Limit: Enter a value in seconds. For example, providing a value of 900 seconds will set a 15-minute inactivity limit. The value must be between 0 and 599940. If it’s set to zero (0), the setting is disabled.
- Enable screen saver (User): Enable
- Password protect the screen saver (User): Enable
- Screen saver timeout (User): Keep it the same as what you have set for the Interactive Logon Machine Inactivity Limit value.
- Scope tags (optional): A scope tag in Intune is an RBAC label that you assign to resources such as policies, apps, and devices to control which administrators can view and manage them. For more information, see How to use scope tags in Intune.
- Assignments: Assign the policy to Microsoft Entra security groups that include the target users or devices. As a best practice, start with a small pilot group, and once validated, expand the assignment more broadly. For guidance on assignment strategy, see Intune assignments: User groups vs. Device groups.
- Review + create: Review the deployment summary and click Create.
Method 2: Using MaxInactivityTimeDeviceLock Policy
- Sign in to Intune admin center > Devices > Windows > Configuration > Create > New Policy.
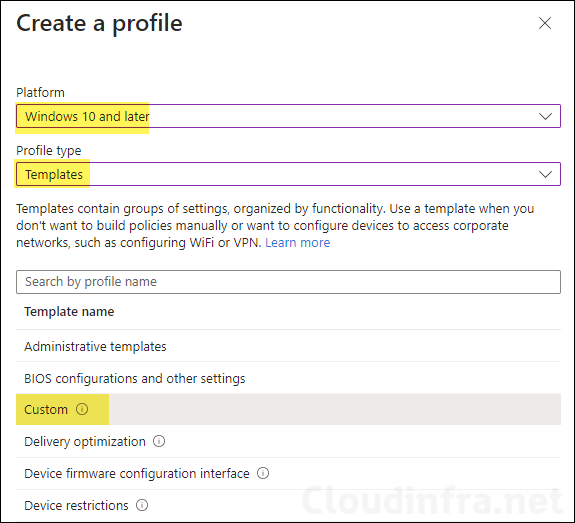
- Platform: Windows 10 and later. Profile type: Templates.
- Template name: Custom
- Basics tab: Provide a name and description of the policy and click Next.
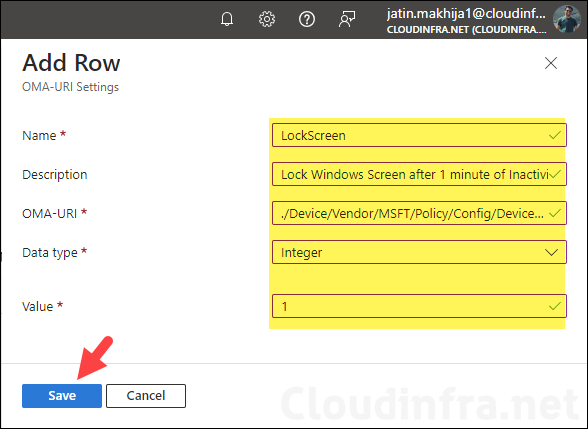
- Configuration settings: Click on Add button to add OMA-URI Setting:
- Name: LockScreen
- Description: Lock Windows Screen after 1 minute of Inactivity
- OMA-URI: ./Device/Vendor/MSFT/Policy/Config/DeviceLock/MaxInactivityTimeDeviceLock
- Data type: Integer
- Value: 1 (this value is in minutes)
- Click on Save to proceed to the next step.
MaxInactivityTimeDeviceLock OMA URI is applicable for Windows 10, version 1507 and later, and OS Editions Pro, Enterprise, Education, Windows SE, IoT Enterprise/IoT Enterprise LTSC. For more details, please refer to the link: DeviceLock Policy CSP | Microsoft Learn.
Note
- Scope tags (optional): A scope tag in Intune is an RBAC label that you assign to resources such as policies, apps, and devices to control which administrators can view and manage them. For more information, see How to use scope tags in Intune.
- Assignments: Assign the policy to Microsoft Entra security groups that include the target users or devices. As a best practice, start with a small pilot group, and once validated, expand the assignment more broadly. For guidance on assignment strategy, see Intune assignments: User groups vs. Device groups.
- Applicability Rules: Add the rules for applying this policy. For example: Assign this profile only if the OS edition is Windows 11 Enterprise. Intune will only apply the profile to devices that meet the combined criteria of these rules.
- Review + create: Review the deployment summary and click Create.
Please note that a device restart is required for this policy to take effect.
Note
Sync Intune Policies
The device check-in process might not begin immediately. If you’re testing this policy on a test device, you can manually kickstart Intune sync from the device itself or remotely through the Intune admin center.
Alternatively, you can use PowerShell to force the Intune sync on Windows devices. Another way to trigger the Intune device check-in process is by restarting the device.
Monitoring Lock Screen Intune Policy
- Sign in to the Microsoft Intune admin center > Devices > Windows > Configuration.
- Select the Device Configuration profile you want to work with, and at the top of the page, you’ll see a quick view of the Success, Failure, Conflict, Not Applicable, and In Progress status.
- Click on View report to access more detailed information.
End User Experience
After the device configuration profile is deployed and the system is rebooted, the screen locks automatically after the idle time configured in the policy. Once the device is on the lock screen, the user can sign in again using their Microsoft Entra ID credentials.
[Update] I monitored this policy for a day and can confirm that it is working as expected. However, with the idle time set to 1 minute for testing, the screen locks too frequently and becomes inconvenient. As a result, I have updated the setting to a more practical duration of 15 or 30 minutes.
Verifying Screen Lock Intune Policy via Event Logs
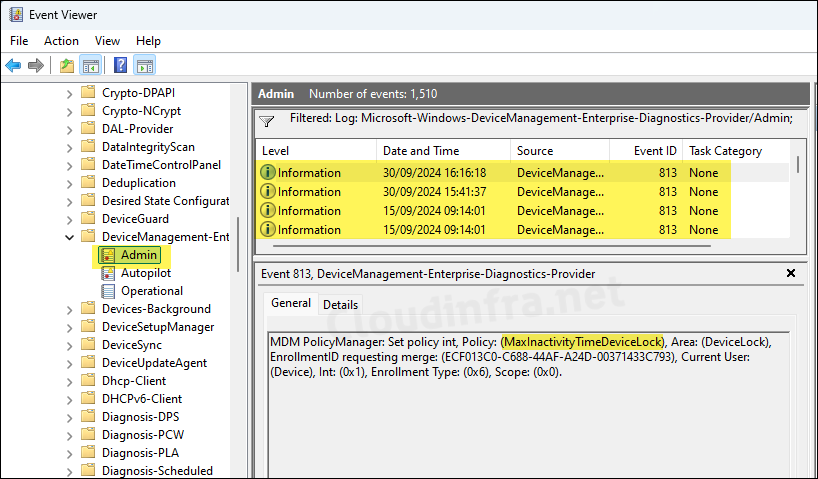
- Open Start > Event Viewer. Navigate to Applications and Services Logs > Microsoft > Windows > DeviceManagement-Enterprise-Diagnostics-Provider > Admin. Look for events with Event ID 813 or 814 to check and confirm if the policy is applied.
MDM PolicyManager: Set policy int, Policy: (MaxInactivityTimeDeviceLock), Area: (DeviceLock), EnrollmentID requesting merge: (ECF013C0-C688-44AF-A24D-00371433C793), Current User: (Device), Int: (0x1), Enrollment Type: (0x6), Scope: (0x0).
Event ID 813
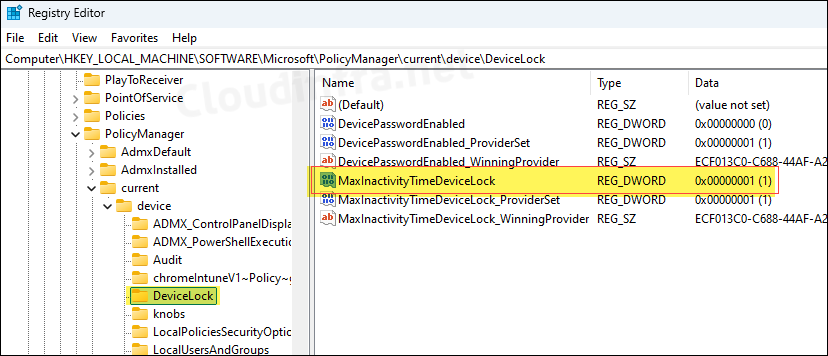
Verifying Screen Lock Intune Policy via Registry
Once the Intune policy is applied, it will also update a registry entry at the following path: HKEY_LOCAL_MACHINE\SOFTWARE\Microsoft\PolicyManager\current\device\DeviceLock. Look for the MaxInactivityTimeDeviceLock registry entry on the right-hand side and confirm that its value matches the one you configured in the policy.
Troubleshooting
- Conflicting policy sources: Hybrid devices can have on-prem GPO setting inactivity lock or screensaver policies that conflict with Intune.
- Screen saver not enabled (for Interactive logon method): The lock is invoked via screen saver behavior, so ensure your screen saver policies are enabled and password protected.
- Device Reboot: A restart is often the quickest way to test the policy.
Hi Jatin, Thanks for the article. I have a question on the differences of your method vs the one I’m using. I am testing this and under Administrative Templates Control Panel>Personalization I have set the password protect screen saver (User) enabled and set the screensaver timeout (User) to 15 minutes. After syncing and rebooting, it does work but wondering if your method would be better or not.
Thanks