This is a technical step-by-step guide which demostrates how to deploy PFX Certificates using Intune to managed users/devices. The deployment method is refered to as PKCS Imported certificate. The certificate is first imported in Intune and then a device configuration profile is used to deploy the certificate.
PKCS #12 (Personal Information Exchange Syntax Standard) also known as PFX, is a standard for securely storing and distributing cryptographic keys and certificates to end user devices. PFX certificate files are password protected and can be used for email encryption, email signing or to fulfil any other requirement of certificate-based authentication (CBA).
Unlike PKCS and SCEP certificate deployment, PFX certificate deployed on end user devices is not unique. That means the same certificate is generally deployed on multiple devices.
You can generate a public/private key pair (PFX file) either using Internal on-premises certificate authority (CA) or buy it from a third party vendor like Digicert, Comodo or any other certificate provider. You can also create a self-signed certificate (.pfx) and deploy it using Intune.
Trusted root certificate or intermediate certificate must also be pre-deployed on end-user devices when using Internal On-premises Certificate Authority (CA) for creating the certificate public/private key pair. When you buy a certificate from third party vendors, there is generally no such requirement, as most common third party vendors trusted root certificates are already installed on Windows systems.
Note
Contents
PFX Certificate Deployment Process
To deploy PFX certificates, we will use the PKCS Imported Certificate deployment method available in the Intune Admin Center. As the name implies, this method requires the certificate to be imported into Intune first before it can be deployed to user devices.
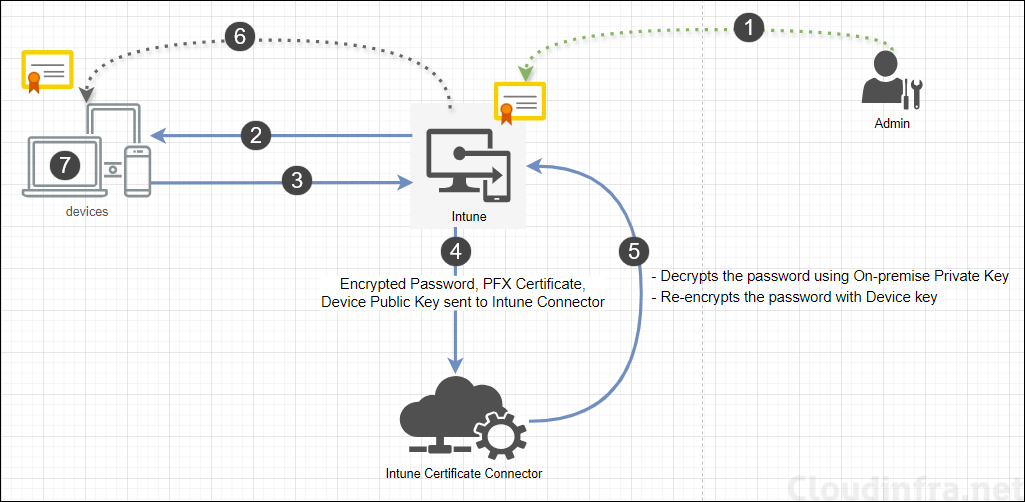
Infrastructure Requirements
We will require below components to support the deployment of PFX certificates using Intune:
- Intune Certificate Connector: Its a software installed on a Windows server.
- Public/Private key pair (Certificate in PFX file format): A password protected certificate file in .pfx extension for deployment.
- Entra App registration: An application registered in Entra ID with required permissions.
- Imported PKCS Certificate Deployment.
- Intune-managed user/device.
1. Download and Install Intune Certificate Connector
Intune Certificate Connector is an essential component for delivering imported PFX certificates to Intune-managed devices. When a device requests an imported PFX certificate, the encrypted password, certificate file, and the public key (of the requesting device) are sent to the connector.
Intune Certificate Connector decrypts the PFX certificate file password and re-encrypts it using the device’s public key. Intune then sends the certificate to the device. Since the password of the PFX file is encrypted with the device’s public key, the device can use its private key to decrypt the password and install the certificate.
Let’s begin with downloading the Intune Certificate Connector and install it on a Windows server. You need to ensure that the server meets Intune certificate connector prerequisites. I would be using an AD domain joined Windows server 2025 server with Desktop experience enabled.
I would recommend using a dedicated server for Intune certificate connector software and no other roles or services should be deployed on it. This will help in troubleshooting, if there are any issues related to the certificate deployment.
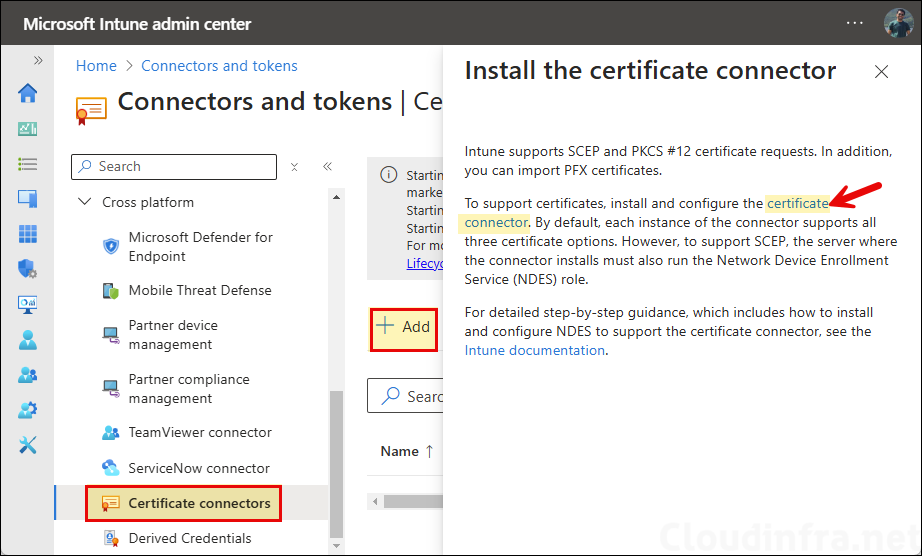
- Sign in to the Intune admin center > Tenant administration > Connectors and tokens > Certificate connectors > Click on Add and then click on certificate connector to download Intune certificate connector software.
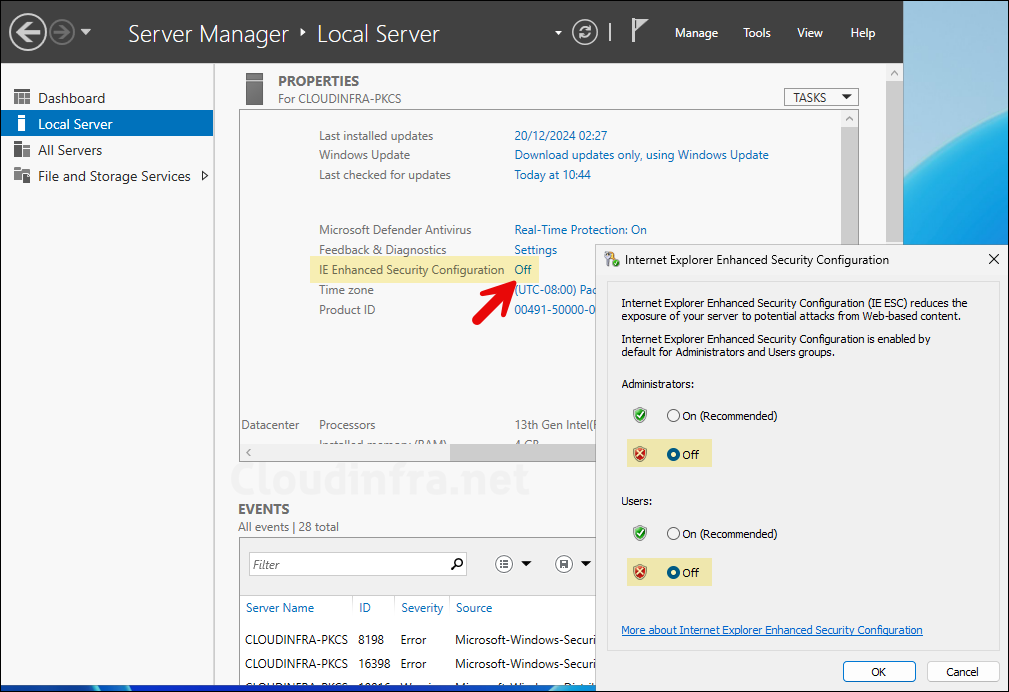
- Login to the server on which you want to Install Intune Certificate Connector software. Open Server Manager > Local Server > Ensure that the IE Enhanced Security Configuration is turned off.
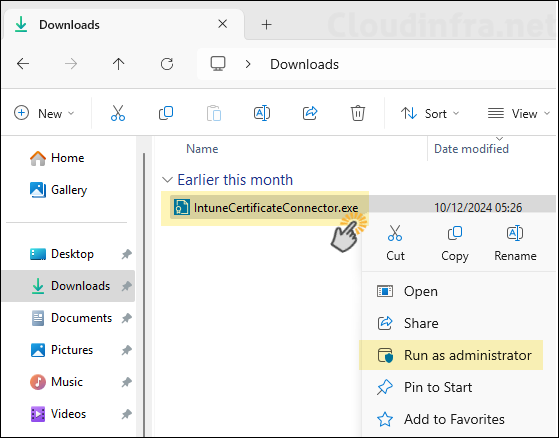
- Copy the IntuneCertificateConnector.exe file on to the Windows server. Right-click on the file and click on Run as administrator.
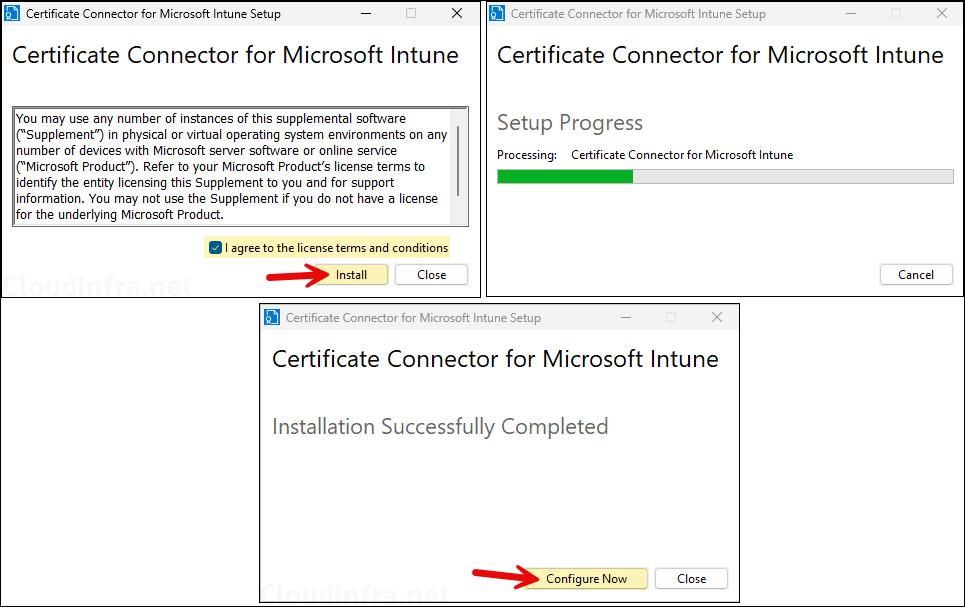
- Click on Install button after accepting the license terms. Once the installation is completed successfully. Click on Configure Now.
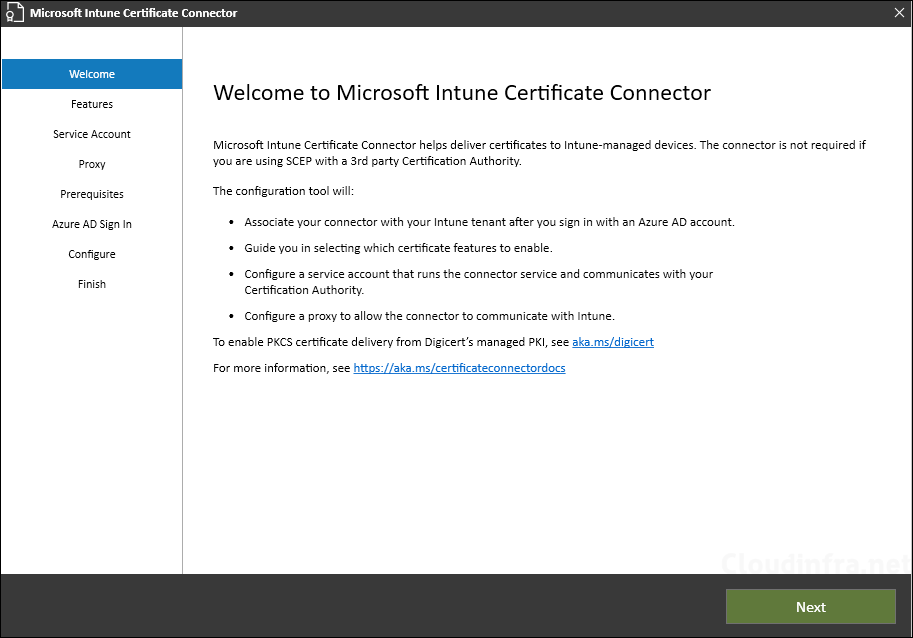
- Click Next.
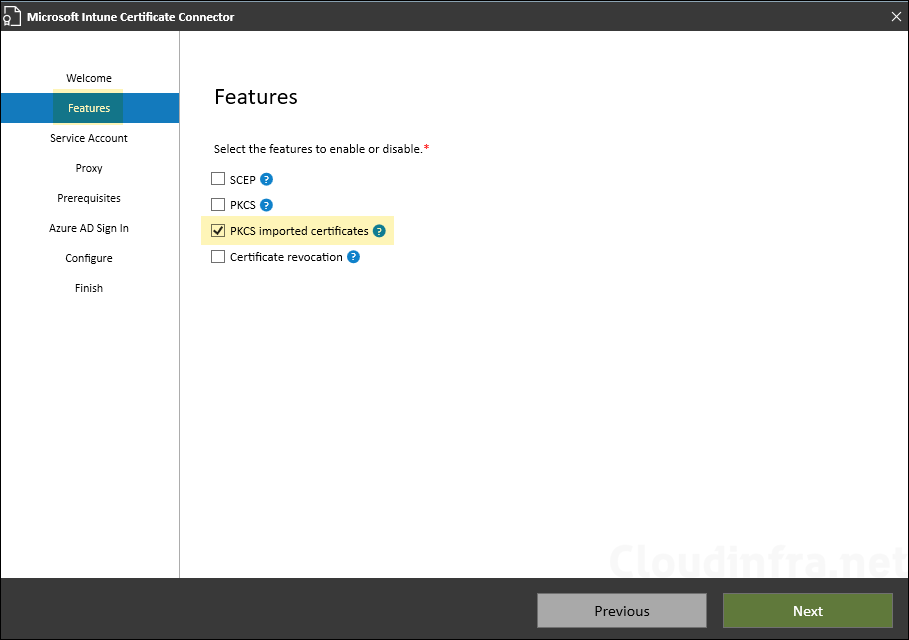
- Select PKCS imported certificates feature and click on Next.
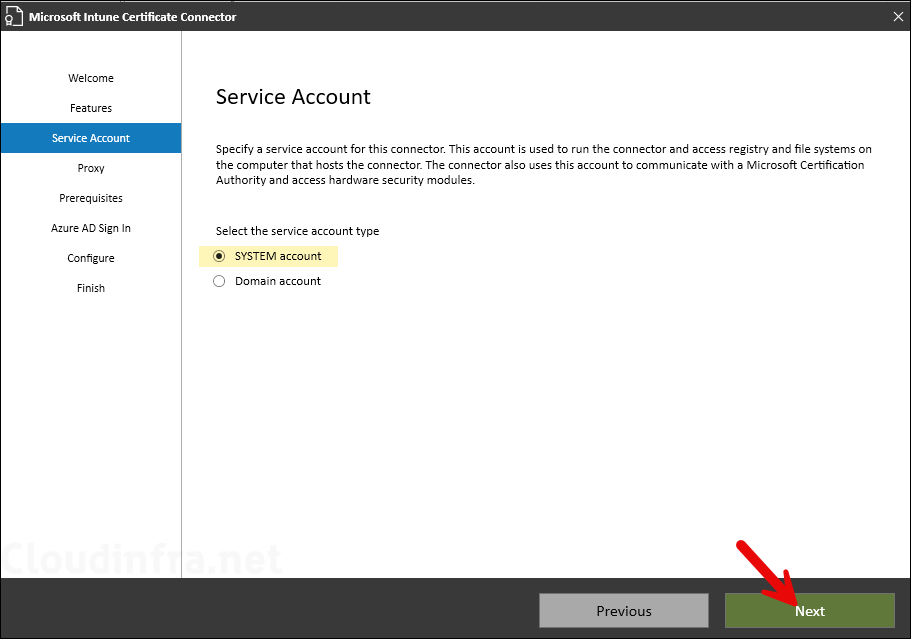
- Select SYSTEM account and click Next. This will configure Intune certificate connector services to run under Local System account.
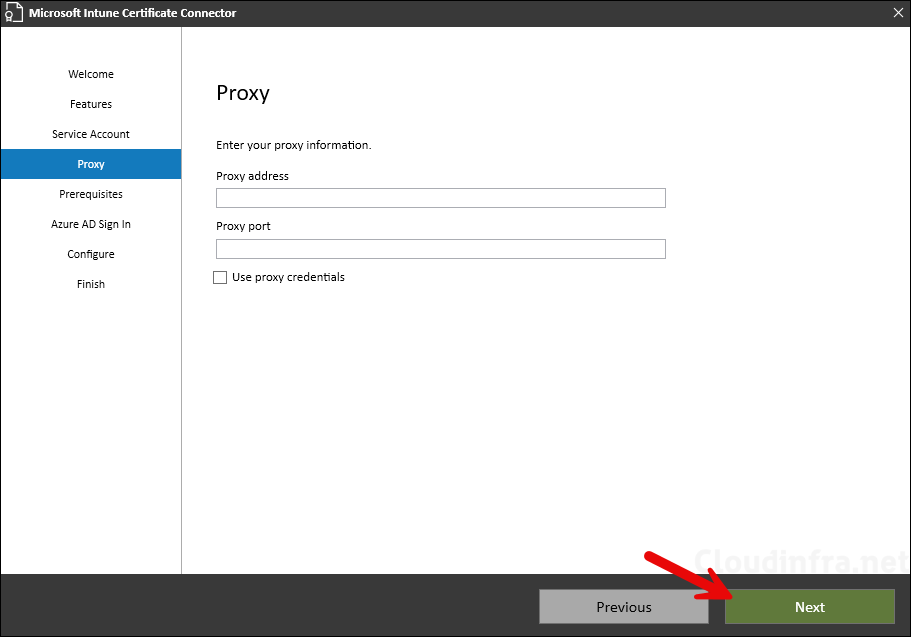
- If the Intune Certificate Connector server is behind a proxy then you can provide the proxy web address and port number and click Next. As I am not using any proxy server for the internet traffic, I will leave it blank and click on Next.
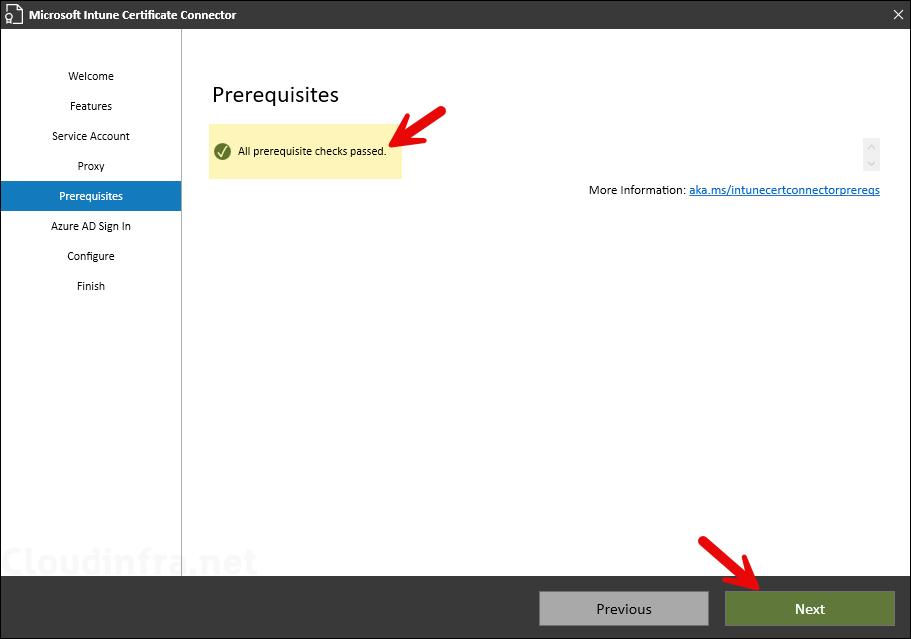
- Intune Certificate Connector software will check if the server meets all Prerequisites. Once its verified, you will get a message All prerequisite checks passed. Click Next. Intune certificate connector prerequisites.
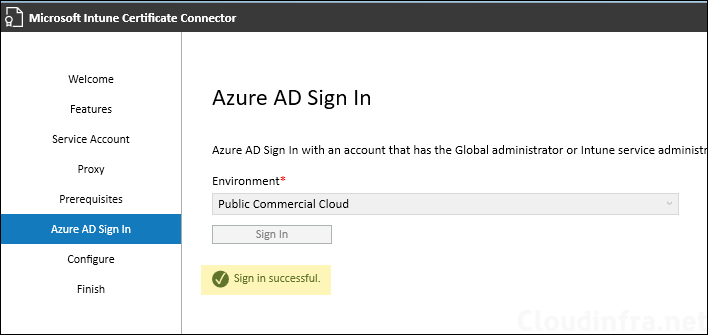
- Select Environment as Public Commercial cloud and click on Sign in using an account with Intune administrator role.
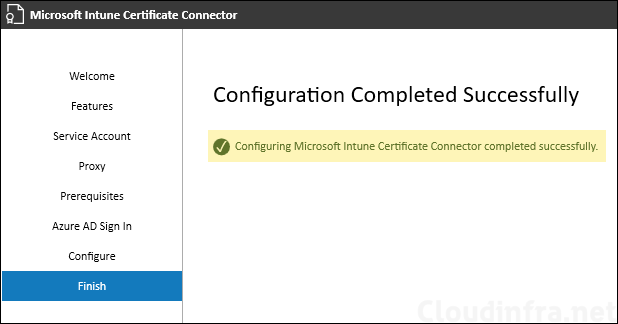
- Configuring Microsoft Intune Certificate Connector completed successfully.
2. Create a Self Signed Certificate
A certificate that you want to distribute to client devices must be created and exported in PFX file format and password protected. There are several ways to create a certificate, such as using an on-premises AD Certificate Authority, a third-party certificate vendor like DigiCert or Comodo, or by generating a self-signed certificate.
For the purpose of demonstrating PFX certificate deployment, I will create a Self-signed certificate that includes the Enhanced Key Usage requirements for both Client Authentication and Server Authentication. If you have already created and exported the certificate with its required intended purpose in a .pfx file, then you can skip to the next step.
- Sign in to any Windows device and Open PowerShell as administrator.
- Execute below commands to create a Self-signed certificate and export it into a PFX file.
When you execute below PowerShell commands, a Self-signed certificate will be created with the common name VPNClientCert and a key length of 2048. By default, the Enhanced Key Usage will include Client Authentication and Server Authentication. You can change the values in the PowerShell command and update it to create a certificate as per the business requirements. For example, change the Common Name, Key length, CertStoreLocation or Intended purpose etc.
Export-PfxCertificate cmdlet will be used to password-protect and export the certificate in a .pfx file. The exported file will be saved in the C:\ drive with the name VPNClientCert_PrivateKey.pfx. This certificate file will be used later for importing it to Intune. Therefore, copy the certificate file somewhere on Intune certificate connector server and keep the password secure.
Create a Self-signed Certificate (.pfx)
$cert = New-SelfSignedCertificate -CertStoreLocation "cert:\CurrentUser\My" -Subject "CN=VPNClientCert" -KeyExportPolicy Exportable -KeyLength 2048

$password = ConvertTo-SecureString -String "S3cur3P@ss2024!" -Force -AsPlainText

Export-PfxCertificate -Cert cert:\CurrentUser\My\$($cert.Thumbprint) -FilePath "C:\VPNClientCert_PrivateKey.pfx" -Password $password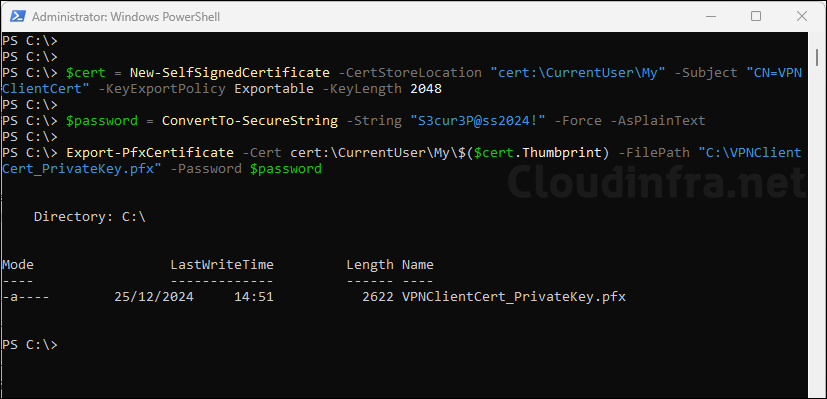
To create the certificate in Local machine certificate store you can change the
-CertStoreLocationparameter to Cert:\LocalMachine\My.Note
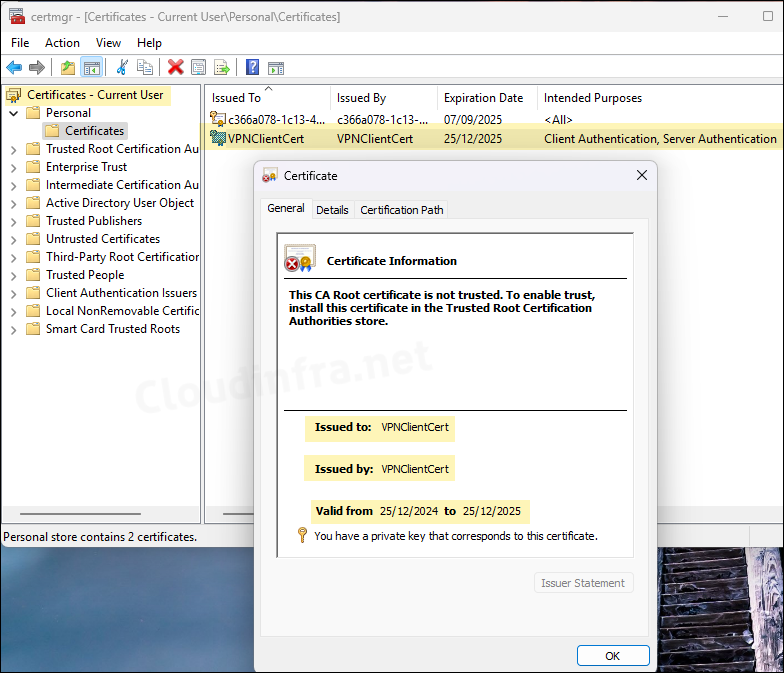
As the certficate has been created in cert:\CurrentUser\My location. You can go to the location (certmgr.msc > Personal > Certificates) and check if the certificate is created. We have already exported the password protected certificate at C:\VPNClientCert_PrivateKey.pfx location.
On the device where you have created the Self-signed certificate, it will also show it under cert:\CurrentUser\My (certmgr.msc > Personal > Certificates). As we have already exported the certificate in a .pfx file, the certificate in user store is not required and can be deleted.
3. Build PFXImport PowerShell Project
Now that we have created a certificate and exported it in PFX file format, the next step is to import the certificate into Intune so it can be distributed to Intune-managed devices.
To import the certificate into Intune, we will use the Microsoft-provided PFXImport PowerShell Project, which is based on Microsoft Graph. The project’s source code is available for download on GitHub. Before using it for the import process, we first have to manually build the project solution using Visual Studio. Let’s go through the steps:
- Sign in to a Windows 11 device.
- Download and Install Visual Studio.
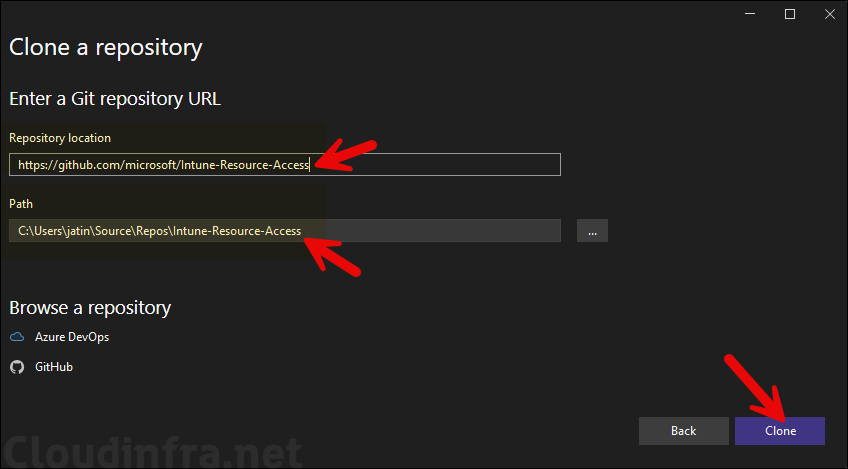
- After Visual Studio launches, Click on Clone a repository on Get started page.

- Provide Repository location as https://github.com/microsoft/Intune-Resource-Access.git and click on Clone.
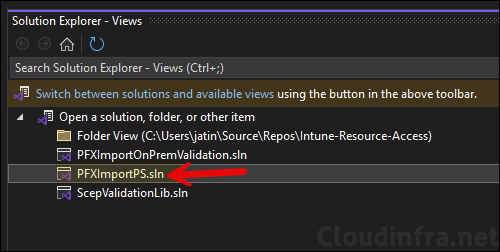
- To open the Project solution. Double-click on PFXImportPS.sln file.
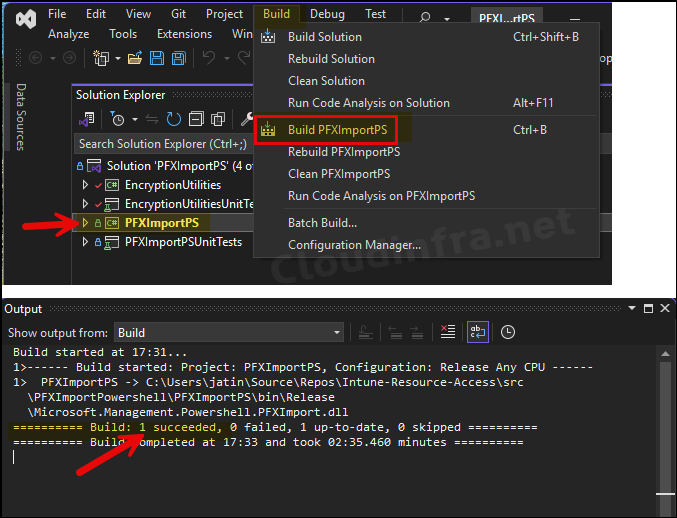
- Select PFXImportPS and go to Build > Build PFXImportPS to build the project. Alternatively, You can also right-click on PFXImportPS project and click on Build.
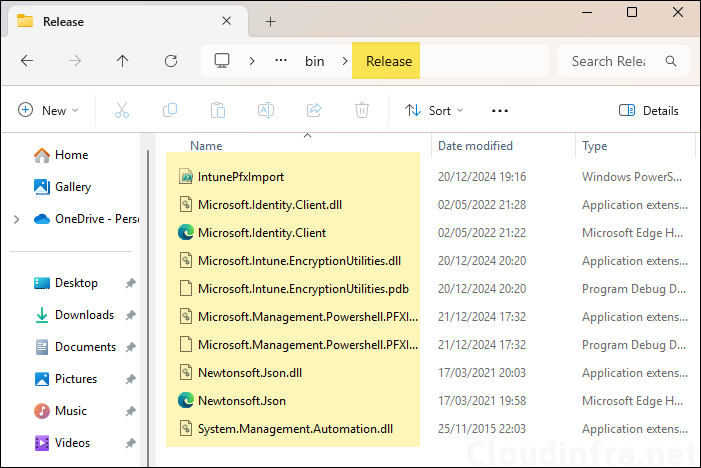
- After Build process is completed successfully, Go to the location C:\Users\jatin\source\repos\Intune-Resource-Access\src\PFXImportPowershell\PFXImportPS\bin and open the Release folder. You will find a Powershell module file IntunePfxImport.psd1 along with other supporting files.
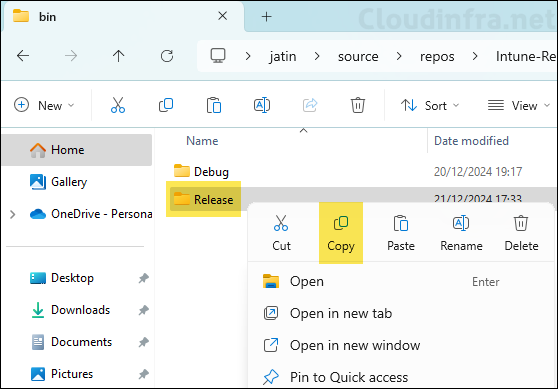
- Copy the Release folder and paste is somewhere on the Intune Certificate Connector server.
4. Create an Entra App Registration
We will need to create an Entra app registration and assign permissions required for the Import process. Let’s check the steps:
- Sign in to the Entra admin center > Identity > Applications > App registrations.
- Click on New registration.
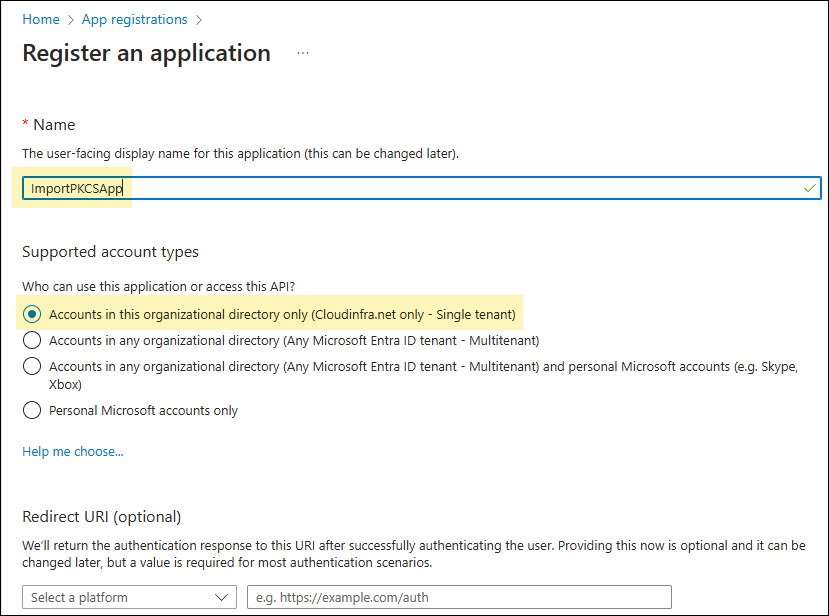
- Provide the display name of the application and select Accounts in this organizational directory only (<tenant> only -Single tenant). Click Register.
- After the app is created, click on API permissions > Click on Add a permission > Microsoft Graph > Delegated permissions and add below permissions.
- DeviceManagementConfiguration.ReadWrite.All
- User.Read.All
- Click on Grant admin consent for <tenant name>.

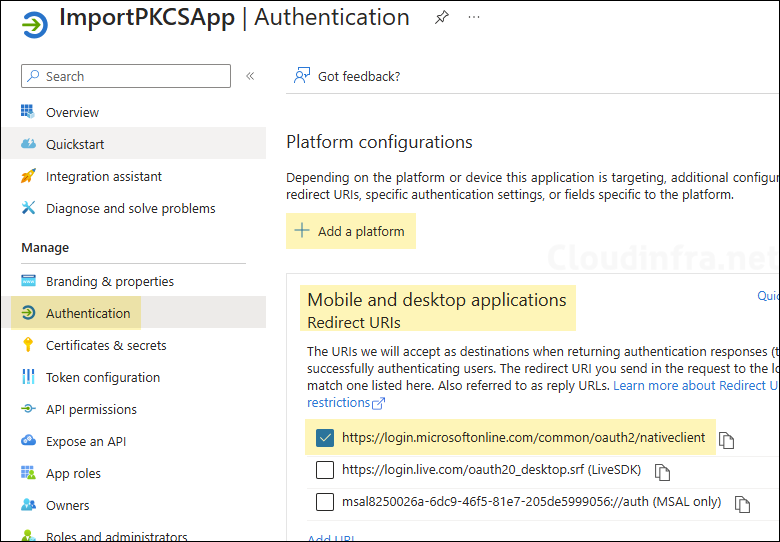
- Click on Authentication > Add a platform. Add Mobile and desktop applications platform and select https://login.microsoftonline.com/common/oauth2/nativeclient and click on Save.
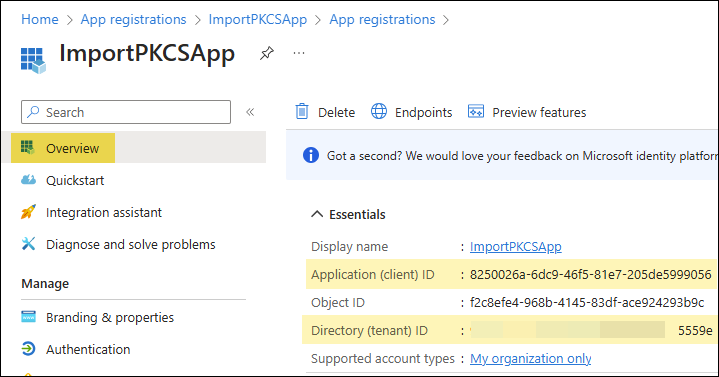
- Go to the Overview page of the app and copy the client ID and tenant ID. Save it somewhere in a notepad as we will use this information later.
5. Import PFX Certificate in Intune
We have all the information and files we need to start the PFX Certificate Import process in Intune. Let’s check the steps to Import PFX certificate file in Intune for users.
- Copy the PFX certificate file on Intune Certificate Connector server.
- Copy Release folder from ..\Intune-Resource-Access\src\PFXImportPowershell\PFXImportPS\bin on Intune Certificate Connector server.
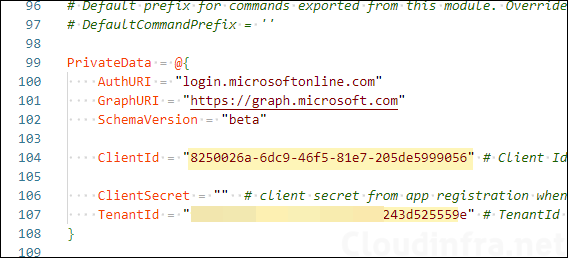
- Open IntunePfxImport.psd1 file located in the Release folder and update the ClientId and TenantId values as noted in the previous step and save the module.
- On Intune Certificate Connector server, Open PowerShell console as administrator and execute Add-IntuneKspKey command to create the encryption public key which will be used to encrypt the password of the PFX certificate file imported in Intune.
Create encryption public key on Intune Connector Server
cd C:\Temp\Release

Import-Module .\IntunePfxImport.psd1

Add-IntuneKspKey -ProviderName “Microsoft Software Key Storage Provider” -KeyName “PFXEncryptionKey”
- Execute below commands to Import the PFX certificate file in Intune.
Import IntunePfxImport.psd1 PowerShell module [Skip if the module is already imported]
cd C:\Temp\Release

Import-Module .\IntunePfxImport.psd1
Import VPNClientCert_PrivateKey.pfx certificate for JoniS@cloudinfra.net user
Set-IntuneAuthenticationToken -AdminUserName Jatin.makhija1@cloudinfra.net

$SecureFilePassword = ConvertTo-SecureString -String "S3cur3P@ss2024!" -AsPlainText -Force

$userPFXObject = New-IntuneUserPfxCertificate -PathToPfxFile "C:\VPNClientCert_PrivateKey.pfx" $SecureFilePassword "JoniS@cloudinfra.net" "Microsoft Software Key Storage Provider" "PFXEncryptionKey" "smimeEncryption"

Import-IntuneUserPfxCertificate -CertificateList $UserPFXObject
Verify If the Certificate is Imported in Intune
Get-IntuneUserPfxCertificate -Userlist JoniS@cloudinfra.net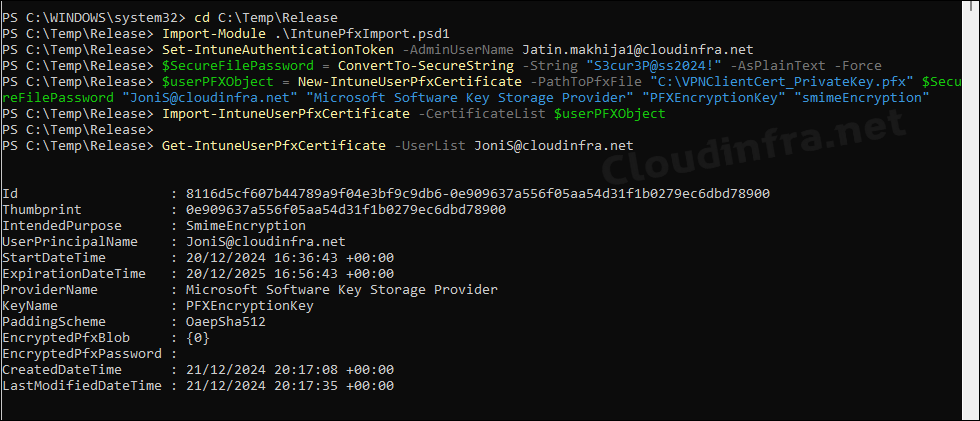
To assign the certificate to another user, In the same PowerShell session, simply specify the UPN of the target user in the below PowerShell command and import the certificate for that user as well. Once the certificate is imported, use the Get-IntuneUserPfxCertificate to confirm.
Assign the Certificate to another user (e.g., jatin.makhija@cloudinfra.net)
$userPFXObject = New-IntuneUserPfxCertificate -PathToPfxFile "C:\VPNClientCert_PrivateKey.pfx" $SecureFilePassword "jatin.makhija@cloudinfra.net" "Microsoft Software Key Storage Provider" "PFXEncryptionKey" "smimeEncryption"

Import-IntuneUserPfxCertificate -CertificateList $UserPFXObject
To summarize, we have Imported the .pfx certificate in Intune for JoniS@cloudinfra.net and jatin.makhija@cloudinfra.net users. Repeat the steps to import the certificate for other users who require this certificate on their device.
New-IntuneUserPfxCertificate Command Syntax
$userPFXObject = New-IntuneUserPfxCertificate -PathToPfxFile "<FullPathToPFX>" $SecureFilePassword "<UserUPN>" "<ProviderName>" "<KeyName>" "<IntendedPurpose>" "<PaddingScheme>" "<File path to public key file>"
6. Create PKCS Imported Certificate Deployment
After the PFX certificate is imported into Intune, create a PKCS Imported Certificate deployment in the Intune admin center. Assign this deployment to the same users who were assigned the certificate during the import process using the New-IntuneUserPfxCertificate cmdlet.
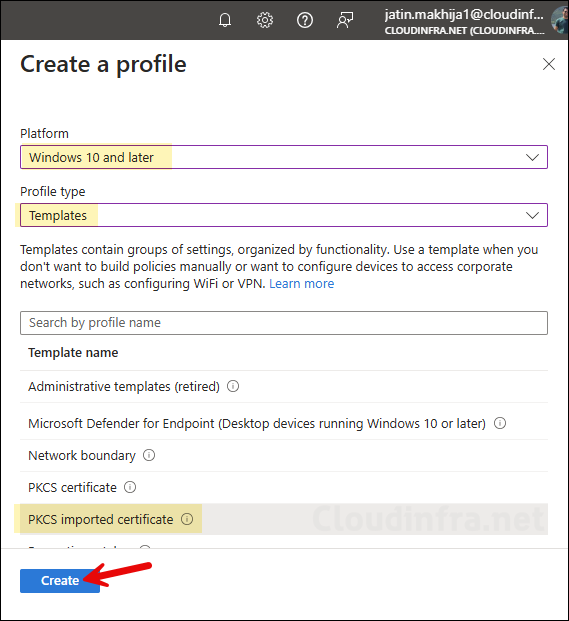
- Sign in to Intune admin center > Devices > Windows > Configuration > Create > New Policy.
- Platform: Windows 10 and later
- Profile type: Templates
- Click Create to begin with the creation of the device configuration profile.
- On the Basics tab, provide a Name and Description of the policy and click Next.
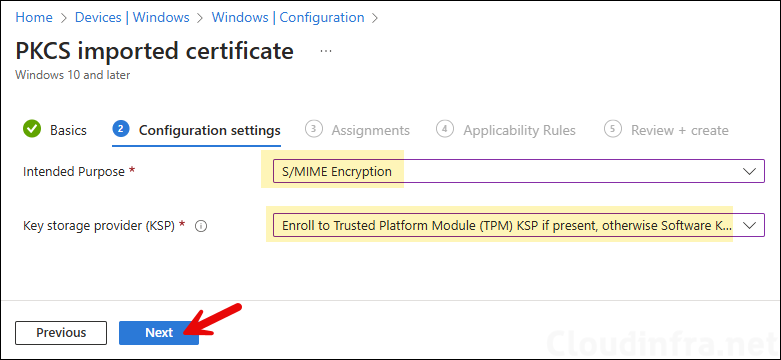
Configuration settings
- Intended Purpose: Provide the Intended purpose value of the certificate. The options are General purpose, S/MIME Encryption and S/MIME Signing. As we have created and imported the S/MIME encryption certificate, we will go with this option.
- Key storage provider (KSP): Select the option to confirm where the certificate key will be stored on the device. The most secure option is to select Enroll to Trusted Platform Module (TPM) KSP, otherwise fail, and most compatible option would be to choose Enroll to Trusted Platform Module (TPM) KSP if present, otherwise Software KSP.
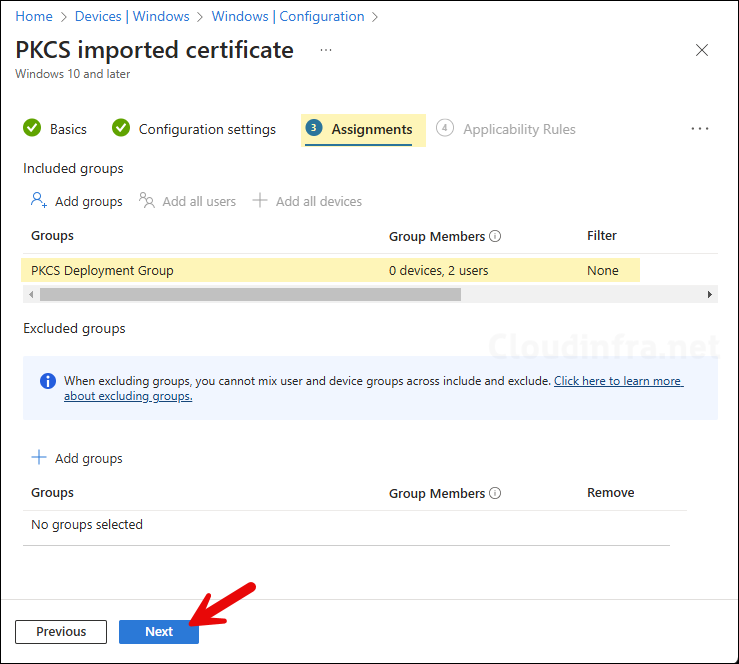
- Assignments: Assign the PKCS Imported certificate profile to an Entra security group containing the same users which are assigned the certificate while Importing into Intune. If the certificate is not assigned to the user at the time of Importing it in Intune, it will not be deployed even if that user is a part of the Entra security assignment group.
- Applicability Rules: Click Next.
- Click Create on Review + create tab to create the profile.
Sync Intune Policies
The device check-in process might not begin immediately. If you’re testing this policy on a test device, you can manually kickstart Intune sync from the device itself or remotely through the Intune admin center.
Alternatively, you can use PowerShell to force the Intune sync on Windows devices. Restarting the device is another way to trigger the Intune device check-in process.
Monitoring Deployment Progress
To monitor the deployment progress of a Device configuration profile, follow the below steps:
- Sign in to the Intune admin center > Devices > Configuration.
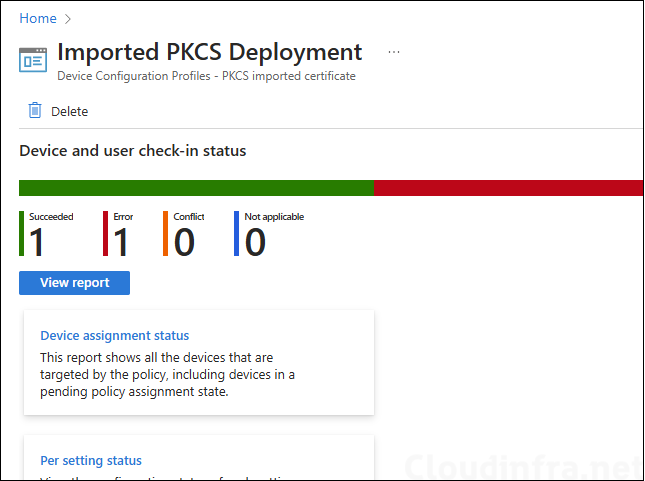
- Choose the Device Configuration profile you want to work with, and at the top of the page, you’ll see a quick view of the Success, Failure, Conflict, Not Applicable, and In Progress status.
- Click on View report to access more detailed information.
Below screenshot shows that the deployment is completed successfully for one user and failed for another user. This is because the certificate was not imported in Intune for one of the user in the Entra security assignment group. You will need to import the certificate for all users in the group using below PowerShell commands. After I have done this step, the deployment was completed successfully for all the users.
$userPFXObject = New-IntuneUserPfxCertificate -PathToPfxFile "C:\VPNClientCert_PrivateKey.pfx" $SecureFilePassword "jatin.makhija@cloudinfra.net" "Microsoft Software Key Storage Provider" "PFXEncryptionKey" "smimeEncryption"

Import-IntuneUserPfxCertificate -CertificateList $UserPFXObject
End User Experience
After Intune device check-in is completed successfully, you can check and confirm if the certificate is installed on users device by following below steps:
On a Windows Device
- Press Windows + R keys to open the Run dialog box.
- Type certmgr.msc to open Certificate management console in the user context.
- Navigate to Personal > Certificates to check and confirm if the certificate is deployed.
Below screenshot is from one of the devices where the certificate was successfully deployed. I also verified on another target user’s device, and the certificate was deployed successfully there as well.

On a Android Device
To check and confirm if the certificate has been deployed on users Android device. You can go to the Settings > Security and privacy > More security settings >Encryption and credentials. For more Information on Android device certificates, refer to the link: Add and remove certificates on Android.
On an iOS device
To check and confirm if the certificate has been deployed on users iOS device. You can go to Settings App > General > VPN & Devices Management > Management Profile > More Details.
Troubleshooting
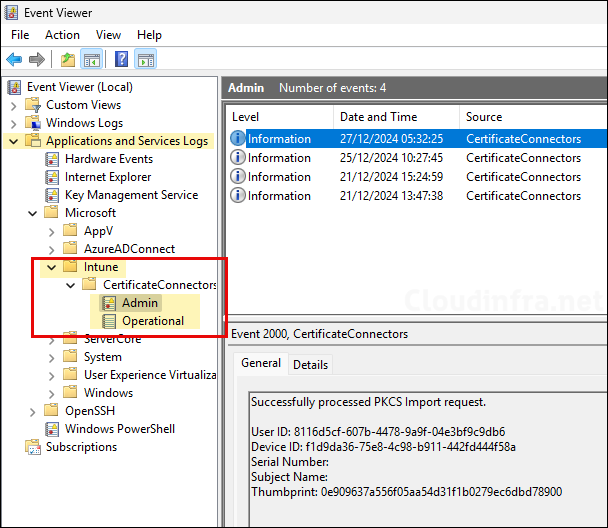
To troubleshoot any issues related to certificate delivery, you can check the event viewer logs on Intune Certificate Connector server. Go to Event Viewer > Application and Services Logs > Microsoft > Intune and go through Admin and Operational events. Filter the events with Errors to find the root cause of the issue.
