In this blog post, I will show you the steps to Enable/Disable Windows protected print mode using Intune. Microsoft is making printing safer and easier with Windows Protected Print Mode (WPP). This feature eliminates the need for third-party printer drivers, which can be challenging to maintain and may pose security risks if not kept up to date. Protected Print Mode provides a more secure and reliable driverless printing system, removing the need to manage printer drivers. This modern printing technology is designed to work only with Mopria certified printers. Therefore, before enabling WPP, ensure that all printers in your organization are Moria-certified.
After enabling WPP, if a printer is using a third-party print driver, it will be uninstalled. The print driver will be deleted and cannot be used while WPP is enabled. If this occurs, check if the printer is Mopria-certified and reinstall the printer, which will then use the modern print stack going forward. If the printer is not Mopria-certified, it will not work with WPP enabled. In this case, you will need to disable WPP and reinstall the printer.
As we know, enabling WPP provides security benefits, such as preventing the installation of third-party drivers and addressing other Windows print-related security issues. However, this change can be highly disruptive as it may delete printers from the target devices which does not meet the certification criteria.
Configuring Windows Protected Print Mode
Let’s explore the Intune Policy, which can be used to enable or disable Windows Protected mode.
- Sign in to Intune admin center > Devices > Windows > Configuration > Create > New Policy.
- Platform: Windows 10 and later
- Profile type: Templates.
- Template name: Custom
- Basics tab: Provide a Name and Description of the policy and click Next.
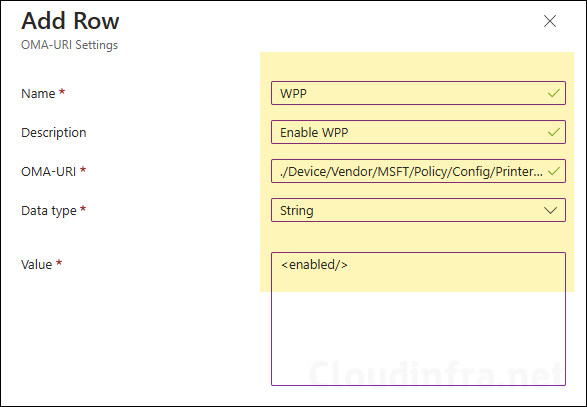
- Configuration settings: Click on Add button to add OMA-URI Setting:
- Name: WPP
- Description: Enable WPP
- OMA-URI: ./Device/Vendor/MSFT/Policy/Config/Printers/ConfigureWindowsProtectedPrint
- Data type: String
- Value: <enabled/>
- Click on Save to proceed to the next step.
Use the value of <disabled/> to disable the Windows Protected mode.

- Scope tags (optional): A scope tag in Intune is an RBAC label you add to resources (policies, apps, devices) to limit which admins can see and manage them. For more Information, read: How to use Scope tags in Intune.
- Assignments: Assign the policy to Entra security groups that contain the target users or devices. As a best practice, pilot with a small set first; once validated, roll it out more broadly. For guidance on assignment strategy, see Intune assignments: User groups vs. Device groups.
- Applicability Rules: Specify how to apply this profile within an assigned group. Intune will only apply the profile to devices that meet the combined criteria of these rules.
- Review + create: Review the deployment summary and click Create.
Monitoring WPP Policy
- Sign in to the Microsoft Intune admin center > Click on Devices > Windows > Configuration
- Choose the Device Configuration profile you want to work with, and at the top of the page, you’ll see a quick view of the Success, Failure, Conflict, Not Applicable, and In Progress status.
- Click on View report to access more detailed information.
Sync Intune Policies
The device check-in process might not begin immediately. If you’re testing this policy on a test device, you can manually kickstart Intune sync from the device itself or remotely through the Intune admin center.
Alternatively, you can use PowerShell to force the Intune sync on Windows devices. Another way to trigger the Intune device check-in process is by restarting the device.
End User Experience
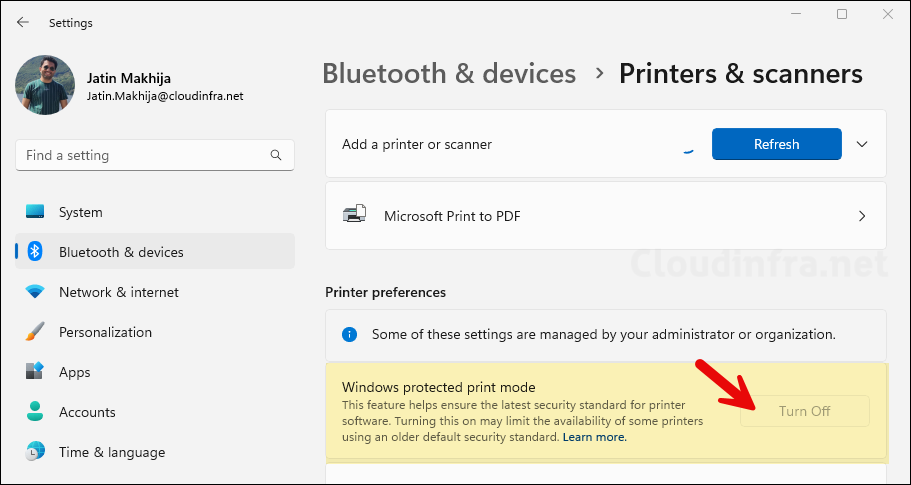
After the device configuration profile has been deployed successfully, you can check WPP by using Settings App > Bluetooth & devices > Printers & scanners. Windows Protected print mode setting is turned on and greyed out as it’s managed by Intune.

Windows Protected Print Mode FAQs
Refer to below link for reading about Windows protected print mode (WPP) FAQs: https://learn.microsoft.com/en-us/windows-hardware/drivers/print/windows-protected-mode-faq
