In this blog post, I will cover the steps to remove security tab from file explorer on Windows devices. When you right-click on any folder, file, shortcut, or storage drive and click on Properties, you will be able to access the Security tab. Security tab allows users to manage permissions on a folder, file, or drive. For example, you could use the security tab to provide access to a folder to specific users or groups or to completely deny access to them.
This post is similar to my last post, where I tested an Intune policy to disable or block access to Folder options in File explorer. You can read more about it here: Disable Folder Options In File Explorer Using Intune,
In an enterprise environment, removing the Security tab from file explorer helps prevent unauthorized users from viewing or modifying file and folder permissions. This reduces the risk of privilege escalation, accidental access changes, and potential security breaches, ensuring consistent permission management by IT administrators only.
Below are the details of the Intune policy setting that can be used to remove the Security tab from file explorer on Intune-managed Windows devices. This policy can be found in the Settings Catalog within the Intune Admin Center. Changing the Status to Enabled will remove the security tab.
| Profile type | Category | Setting | Status |
|---|---|---|---|
| Settings Catalog | Administrative Templates > Windows Components > File Explorer | Remove Security tab (user) | Enabled |
Contents
1. Remove Security tab from File Explorer via Intune
- Sign in to Intune admin center > Devices > Windows > Configuration > Create > New Policy.
- Platform: Windows 10 and later
- Profile type: Settings catalog
- Click Create.
- On the Basics tab, provide a Name and Description of the policy and click Next.
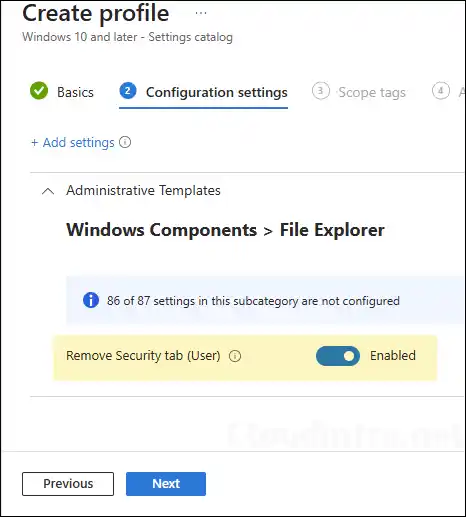
- On Configuration settings tab, click on + Add settings and use the Settings picker to search using remove security tab keyword and select Administrative Templates > Windows Components > File Explorer category. Select Remove Security tab (user) policy setting.
Removes the Security tab from File Explorer. If you enable this setting, users opening the Properties dialog box for all file system objects, including folders, files, shortcuts, and drives, will not be able to access the Security tab. As a result, users will be able to neither change the security settings nor view a list of all users that have access to the resource in question. If you disable or do not configure this setting, users will be able to access the security tab.
About Remove Security tab (user) policy setting

- Use the toggle switch to Enabled position and click Next.
- Scope tags (optional): A scope tag in Intune is an RBAC label you add to resources (policies, apps, devices) to limit which admins can see and manage them. For more Information, read: How to use Scope tags in Intune.
- Assignments: Assign the policy to Entra security groups that contain the target users or devices. As a best practice, pilot with a small set first; once validated, roll it out more broadly. For guidance on assignment strategy, see Intune assignments: User groups vs. Device groups.
- Review + create: Review the deployment summary and click Create.
Monitoring Remove Security Tab Intune Policy
- Sign in to the Intune admin center > Devices > Configuration.
- Select the Device Configuration profile you want to work with, and at the top of the page, you’ll see a quick view of the Success, Failure, Conflict, Not Applicable, and In Progress status.
- Click on View report to access more detailed information.
Sync Intune Policies
The device check-in process might not begin immediately. If you’re testing this policy on a test device, you can manually kickstart Intune sync from the device itself or remotely through the Intune admin center.
Alternatively, you can use PowerShell to force the Intune sync on Windows devices. Restarting the device is another way to trigger the Intune device check-in process.
End User Experience
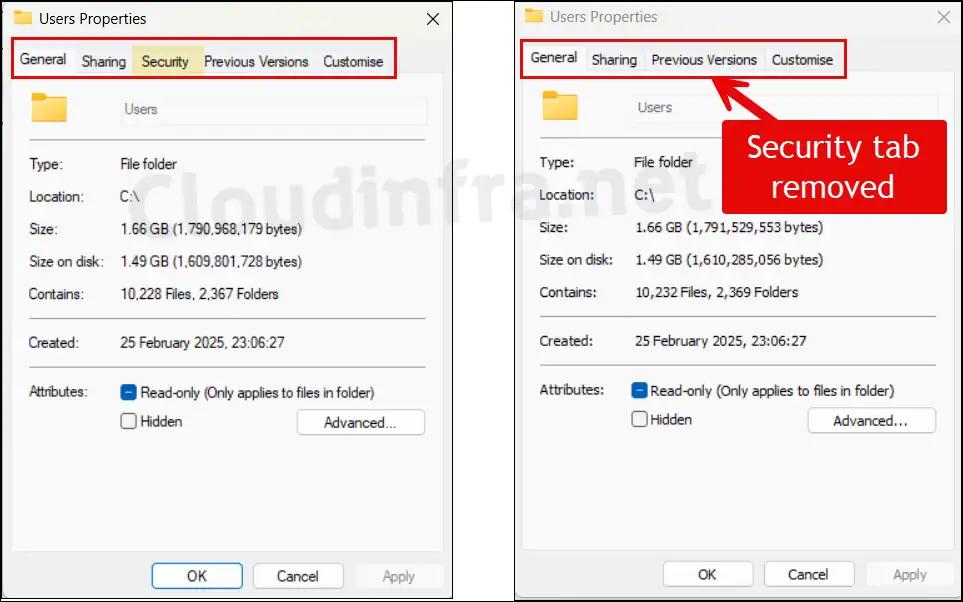
Once the Intune policy is applied successfully, users opening the Properties dialog box for all file system objects, including folders, files, shortcuts, and drives, will not be able to access the Security tab.
Below is a screenshot showing the before and after effect of applying the policy. You can access this screen by right-clicking any folder and selecting Properties.
- On the left, the Security tab is visible.
- On the right, after the policy is applied, the Security tab has been removed.
Other ways to remove Security tab from File Explorer
There are multiple ways to remove or hide the Security tab in File Explorer.
- For Entra hybrid-joined devices, you can create a Group Policy Object (GPO) on your Active Directory domain controller and deploy it to users.
- For a few unmanaged Windows devices, you can manually add a registry entry to hide the tab.
- You can also use a PowerShell script or Intune device remediations, though these methods are more complex compared to using a Settings Catalog policy in Intune.
Let’s explore each of these options one by one.
2. Remove Security Tab using GPO
- Login to a Domain controller and open Group Policy Management Console (gpmc.msc).
- Create a new GPO or open an existing one.
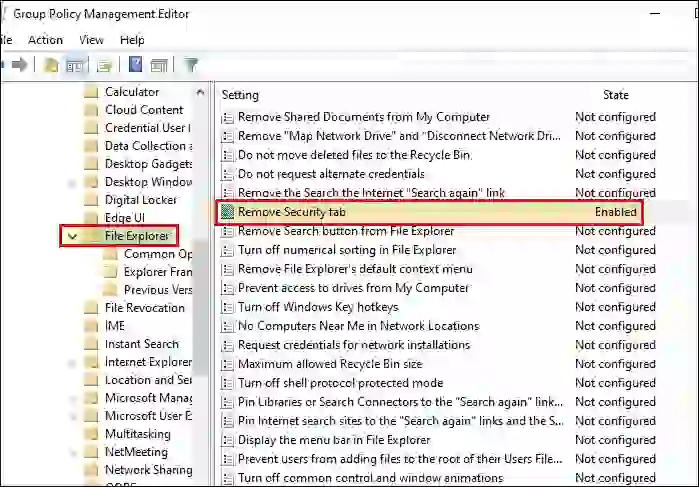
- Navigate to User Configuration\Administrative Templates\Windows Components\File Explorer. and on the right-hand side, find Remove Security tab setting. Open the setting and set it to Enabled.
- Link this GPO to an OU containing users.
- Restart of the target computer will be required. You can also open command prompt as administrator and run gpupdate /force to speed up the GPO processing on the client computer.
3. Remove Security Tab using Registry
You can also use registry editor on Windows devices to manually create a DWORD registry entry and remove or hide the Security tab from folder properties. You can use this option when you are dealing with few unmanaged devices. Let’s go through the steps:
- Open the Registry Editor (regedit).
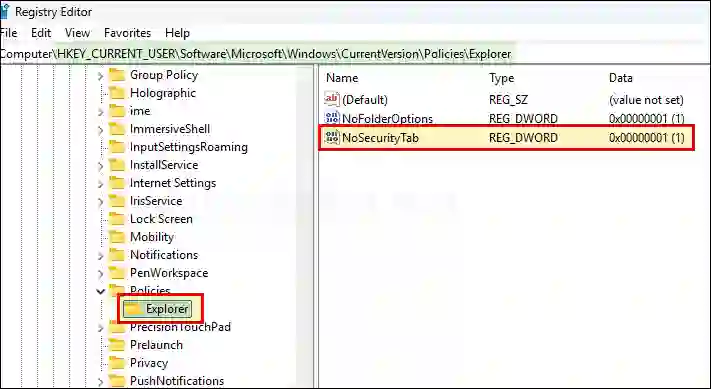
- Navigate to HKEY_CURRENT_USER\Software\Microsoft\Windows\CurrentVersion\Policies\Explorer and create a DWORD registry entry called NoSecurityTab and set its value to 1 to remove the Security tab. If you want to bring this tab back, then keep its value to 0 or delete this registry entry.
- Restart your computer after making the registry changes.
4. Remove Security Tab using PowerShell
You can also utilize below PowerShell script and create a DWORD registry entry called NoSecurityTab under HKCU:\SOFTWARE\Microsoft\Windows\CurrentVersion\Policies\Explorer registry key and set its value to 1.
NoSecurityTab.ps1
# Registry Path for creating the reg entry
$regPath = "HKCU:\SOFTWARE\Microsoft\Windows\CurrentVersion\Policies\Explorer"

# Ensure the registry path exists
if (!(Test-Path -Path $regPath)) {
    Write-Verbose "Registry path not found. Creating: $regPath"
    New-Item -Path $regPath -Force | Out-Null
}

# Define registry entry details
$regName = "NoSecurityTab"
$regValue = 1

# Set the registry value
New-ItemProperty -Path $regPath -Name $regName -Value $regValue -PropertyType DWord -Force | Out-Null

Write-Output "[$regName] has been set to $regValue under $regPath"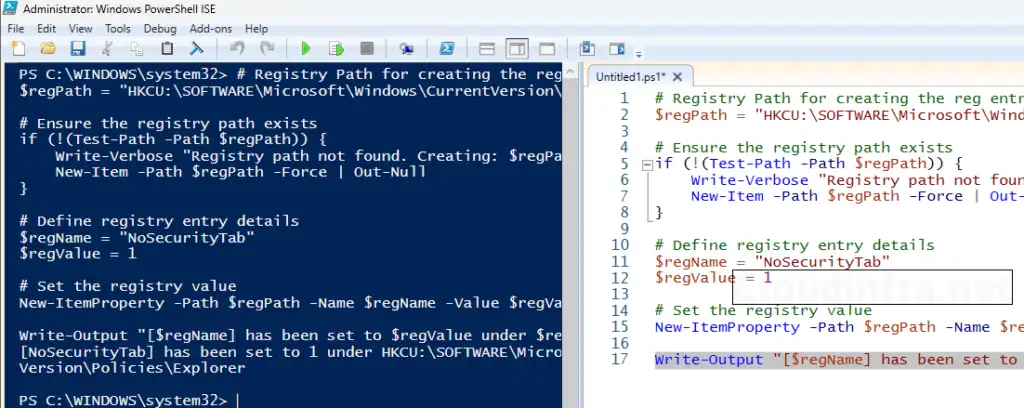
Conclusion
In a highly secure and managed environment, it is recommended to remove the Security tab from File Explorer to prevent unauthorized permission changes. If there are a few tech-savvy users who genuinely require access to this feature, consider creating a separate user group and excluding them from the policy.
For most standard business users, this tab is unnecessary, as it is primarily intended for IT administrators to troubleshoot file, folder, or drive permission issues. You could also consider removing the Security tab from kiosk type of devices.