In this blog post, I’ll walk you through the steps to configure NDES with gMSA for Intune. NDES stands for Network Device Enrollment Service and gMSA stands for Group Managed Service Account. Once NDES role is installed on a server, you need to configure it and specify a service account that NDES will use for its operations.
You can either create a standard user account in Active directory or a gMSA. Let’s check the difference between these two:
- Standard User Account: If you opt for a standard user account, you’ll need to manage it manually, including regularly changing its password. While you can enable the Password never expires option to simplify management, this approach is considered less secure and not recommended.
- Group Managed Service Account (gMSA): gMSA eliminates the need for manual password management, as the domain controller automatically handles password complexity and rotation. By default, domain controller will change gMSA password every 30 days. gMSAs are similar to computer accounts and can be assigned to specific servers or groups of servers. Once configured, it cannot be used by other servers, therefore providing additional security.
Please note that NDES can be configured to run using a gMSA, but you cannot use a gMSA with Intune certificate connector, as it’s not a supported configuration. For Intune certificate connector, you can either use a SYSTEM account or a standard user account.
Note
Contents
NDES Service Account
For NDES service account, gMSA is more secure and therefore the recommended option. In the following sections of this post, we will create a group managed service account (gMSA) and use it as NDES service account.
Creating gMSA for NDES
To create a Group managed service account, you will first need to create a KDC Root key on a domain controller and then use New-ADServiceAccount to create a gMSA. Let’s check the steps in more detail.
1. Create KDC Root Key
Before you can create a group managed service account (gMSA), you must create a Key distribution service (KDC) root key on a domain controller. Domain controllers will use this key to generate password of group managed service accounts (gMSA).
If your organization is already using gMSA, then KDC root key must have been created already. You can skip this step and proceed to the next step for creation of gMSA.
Note
- Login to a Domain controller as Domain admin or Enterprise admin.
- Open PowerShell console as administrator.
- Execute Add-KdsRootKey -EffectiveImmediately command.
After you execute Add-KdsRootKey -EffectiveImmediately command, domain controllers will wait for up to 10 hours before allowing you to create a group managed service account (gMSA). If you are operating in a test environment or only have one domain controller where AD replication is not a concern, you can execute below command. It will create KDC root key and enable you to create gMSA immediately, without the wait for 10 hours.
Add-KdsRootKey -EffectiveTime ((get-date).addhours(-10))

2. Create Group Managed Service Account (gMSA)
To create a gMSA, we will use the PowerShell cmdlet New-ADServiceAccount. We will only use three parameters with this cmdlet; Name, PrincipalsAllowedToRetrieveManagedPassword and DNSHostName. There are additional parameters available, such as ManagedPasswordIntervalInDays and KerberosEncryptionType etc.
If these parameters are not specified, default values are used. For example, if you do not specify the ManagedPasswordIntervalInDays parameter, the default value of 30 days will be used, meaning the password will be rotated every 30 days. For a complete list of parameters and their details, please refer to this link.
Login to a domain controller and launch PowerShell console as an administrator. Execute the following command after replacing values in below parameters according to your environment.
- Name: Provide a name of the gMSA.
- PrincipalsAllowedToRetrieveManagedPassword: Name of the server allowed to retrieve password of the service account. If you have multiple NDES servers, then provide the security group name containing NDES servers. We are only operating with one NDES server called CLOUDINFRA-NDES, therefore providing the hostname of the server with $ sign at the end.
- DNSHostName: DNS host name of the account. You can use <gMSA name>.<FQDN of domain>. For example: NDES_gMSA.corp.cloudinfra.net.
Create Group Managed Service Account (gMSA)
New-ADServiceAccount -Name NDES_gMSA -PrincipalsAllowedToRetrieveManagedPassword CLOUDINFRA-NDES$ -DNSHostName NDES_gMSA.corp.cloudinfra.net
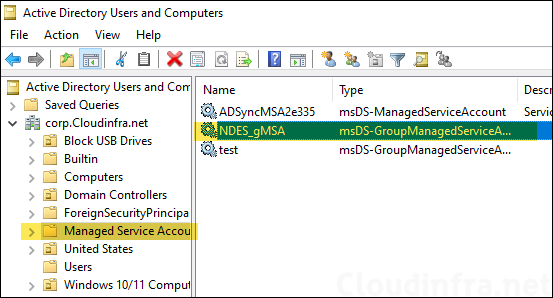
Once the gMSA is created, you can verify it in Active Directory Users and Computers (dsa.msc) console under Managed Service Accounts OU.
Install gMSA on NDES server
To Install gMSA on NDES server, we will use Install-ADServiceAccount PowerShell cmdlet. Let’s check the steps:
- Login to the NDES server.
- Open PowerShell console as administrator and execute below commands.
Install AD Management Tools
Add-WindowsFeature RSAT-AD-PowerShellInstall gMSA on NDES server
Install-ADServiceAccount NDES_gMSAConfirm if gMSA is Installed
Test-ADServiceAccount NDES_gMSA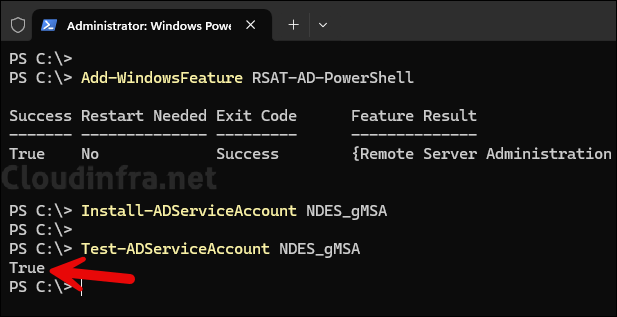
Configure NDES with gMSA
The service account we created in the previous steps needs to have below permission on NDES server:
- Must be a member of the local IIS_IUSRS group.
- Must have Request Certificate permission on configured Certificate authority (CA).
- Read and Enroll permissions for SCEP certificate template.
- If you are using a Load Balancer for NDES or a virtual name (e.g., CNAME) for all NDES servers, then you need to configure a Service principal name (SPN) in AD for the gMSA. This step is not required if you are only using a single NDES server.
Add gMSA to IIS_IUSRS local group on NDES server
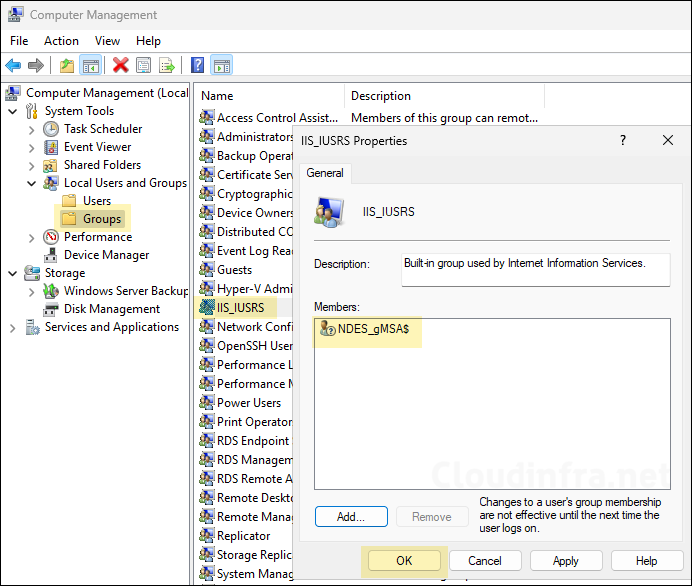
As per NDES configuration requirements, gMSA must be a member of IIS_IUSRS local group on the NDES server.
- Launch Computer Management console (
compmgmt.msc) on NDES server. - Navigate to Local Users and Groups > Groups.
- Double-click on IIS_IUSRS group and add NDES_gMSA$ account.
Provide Request Certificates Permission to gMSA on CA
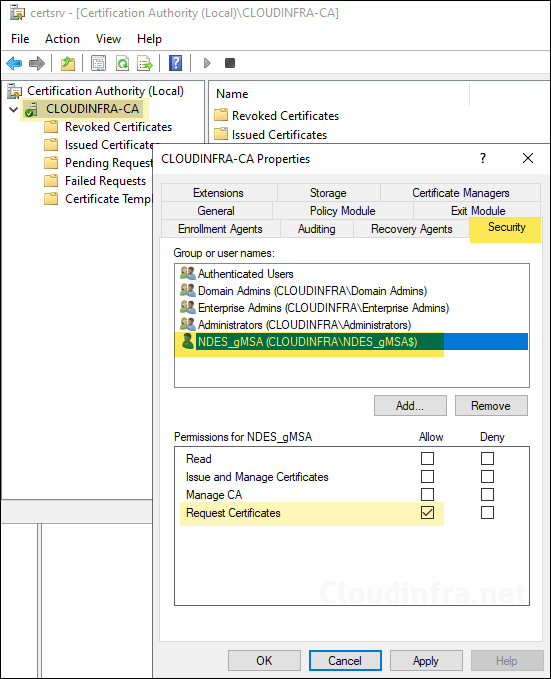
gMSA account must have Request Certificates permission on the Certificate authority so that it can request certificates on behalf of the end user.
- Login to the Certificate Authority (CA) server.
- Open Certificate Authority console. Right-click on the CA instance > Properties > Security tab. Add the gMSA account and provide Request Certificates permission.
Read and Enroll Permission to gMSA on SCEP Certificate Template
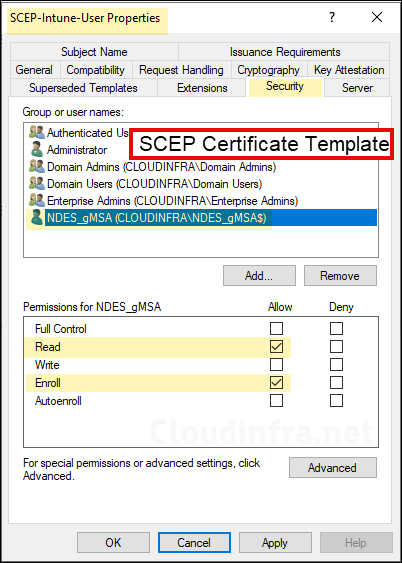
SCEP Certificate Template is the template which will be used to issue certificates to the MDM users/devices. When you create SCEP Certificate template on CA, provide Read and Enroll permission to NDES Service Account (e.g., NDES_gMSA$).
Configure gMSA in SCEP Application Pool
SCEP Pool in the IIS handles certificate enrollment requests from MDM devices. This pool must be configured to run with NDES service account.
- Press Windows + R keys to open the Run dialog box.
- Type
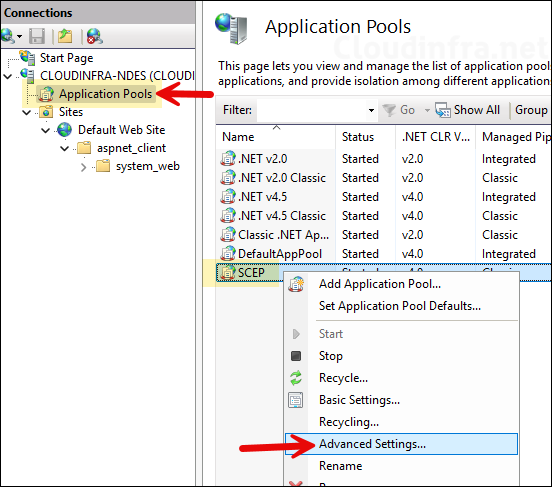
inetmgrand press Enter to open IIS management console. - Under Application Pools, right-click on SCEP > Advanced Settings.
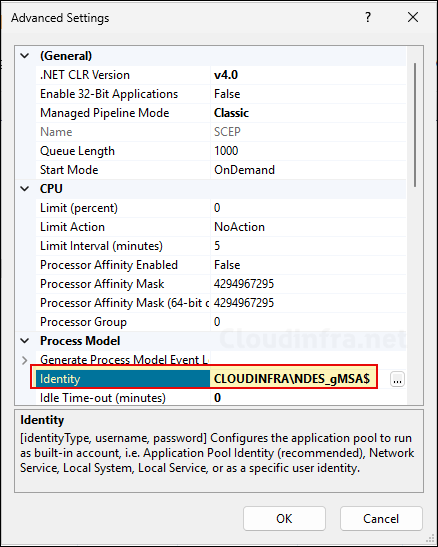
- Ensure that the Identity is set to the Group Managed NDES service account. Ensure that there is a
$sign at the end of the service account name.
Configure SPN in Active Directory for gMSA [Optional]
As mentioned earlier, If you are using a load balancer for NDES using a virtual name for NDES servers, then you must configure SPN in Active directory. As an example, let’s say you have two NDES Servers: NDES-01 and NDES-02, that are load balanced and using a virtual name called NDESServers.
When a user requests for a certificate using NDESServers virtual name, the request is automatically sent to the server with less load/traffic. Execute below command on a domain controller.
SPN Command
Setspn -s HTTP/<computerfqdn> <domainname\accountname>Example:
Setspn -s HTTP/NDESServers.corp.cloudinfra.net Cloudinfra\NDES-gMSA$
Setspn -s HTTP/NDESServers Cloudinfra\NDES-gMSA$
Read Permission for gMSA on RA Certificates
After you Install and Configure NDES role on a server. It will automatically enroll two RA (Registration authority) certificates. First one is CEP Encryption and second one is Exchange Enrollment Agent (Offline request).
By default, Enterprise admins and Domain admins have Enroll permission on CEP Encryption and Exchange Enrollment Agent (Offline request) certificate templates on Certificate Authority server. Therefore, it’s recommended to use a domain admin or Enterprise admin account while configuring NDES role.
CEP Encryption certificate is used for encrypting the communication between MDM client and NDES server. Exchange Enrollment Agent (Offline request) is used to digitally sign the NDES policy module validated enrollment request (CSR) and forward it to the Certificate authority (CA).
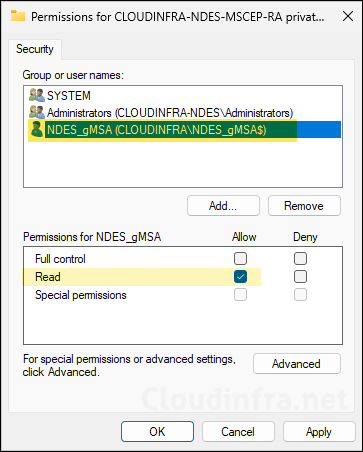
After RA certificates are installed on NDES server. NDES service account is automatically given Read permission on these certificates. You can verify it by using below steps:
- Login to the NDES server.
- Press Win + R to open the Run dialog box.
- Type
certlm.mscand press Enter to open Local Computer Certificate store. - Navigate to Personal > Certificates.
- You will find two RA certificates. Right-click on each one by one and click on All Tasks > Manage Private Keys.
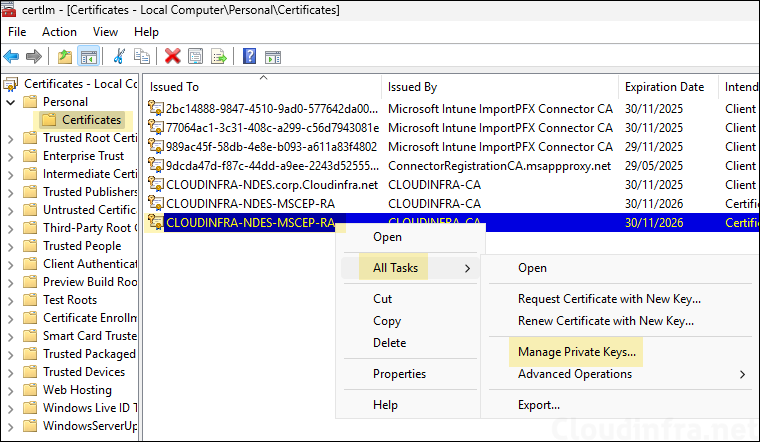
- Ensure that the NDES service account is given Read permission. Repeat the steps to check the permission on the other RA certificate as well.
Reboot NDES Server
Restart NDES server after making the changes. This will ensure that the key NDES services are restarted and changes are applied.
