In this blog post, we will explore the steps to enable/configure macOS firewall using Intune. Firewall is a key security feature in macOS that protects your system from unauthorized access and denial-of-service attacks. It also includes a setting called Stealth Mode. When enabled, Stealth Mode prevents the computer from responding to probing requests like ICMP/Ping, while still allowing it to handle incoming requests for authorized apps.
By default, the macOS built-in firewall is disabled, as Apple provides a robust security model through several layers of protection, including system integrity protection, sandboxing, Gatekeeper, and XProtect, which help prevent malicious software from starting/executing. Many users may not need to enable the firewall, particularly if they are using a private network behind a router with a built-in firewall.
However, turning on the macOS firewall can add an extra layer of security, especially if the user frequently connects to public or untrusted networks. It can block incoming connections to potentially vulnerable services on the Mac.
While Apple’s built-in security measures are strong, enabling the firewall is still recommended in certain use cases, particularly in public or less secure environments. If your macOS devices are enrolled in Intune, you can centrally enable and manage the firewall through the Intune admin center.
Contents
Different Options to Enable macOS Firewall using Intune
There are two ways to enable the firewall on a Mac device managed by Intune. The first method is through the Endpoint Security profile, and the second is by using the Device Configuration profile.
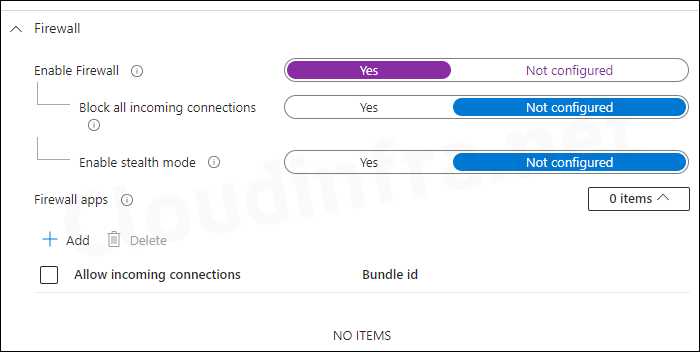
✅ Endpoint security profile – You can create an Endpoint Security profile to Enable the firewall, block all incoming connections, activate stealth mode, and configure firewall app whitelisting/blocklisting.
✅ Device configuration profile: You can create a Device Configuration profile to Enable the firewall, block all incoming connections, allow signed apps and built-in apps to receive incoming connections, enable logging, configure the level of firewall logging, and activate stealth mode.
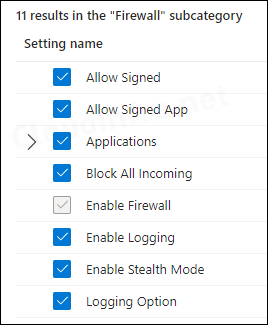
As shown in the screenshots above, you can configure the same firewall settings using either profile. However, the device configuration profile offers some additional settings. If you don’t need to configure these extra settings, I recommend using the Endpoint Security profile, as it will greatly simplify management and troubleshooting in case of any issues.
Option 1: Enable macOS Firewall using Endpoint Security Profile
Let’s create an Endpoint security profile first to enable macOS firewall and configure firewall settings.
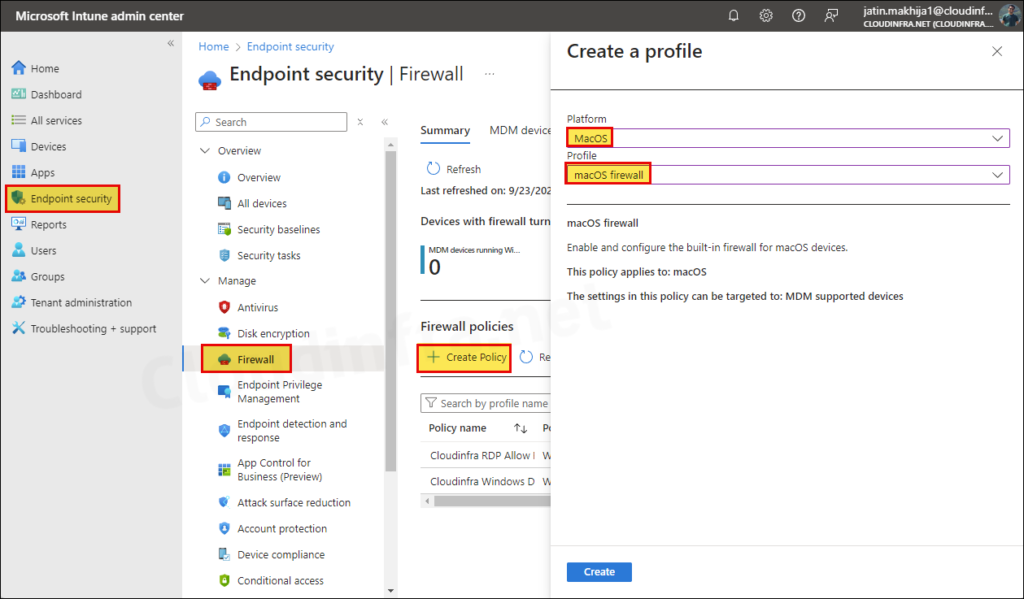
- Sign into the Intune admin center > Endpoint security > Firewall.
- Click on Create Policy.
- Select Platform as MacOS and Profile as macOS firewall.
- Click on Create button.
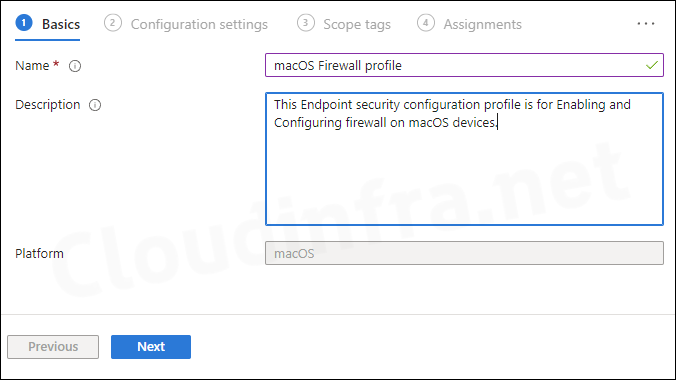
- Basics tab: Provide the Name and Description of the profile.
Configuration settings
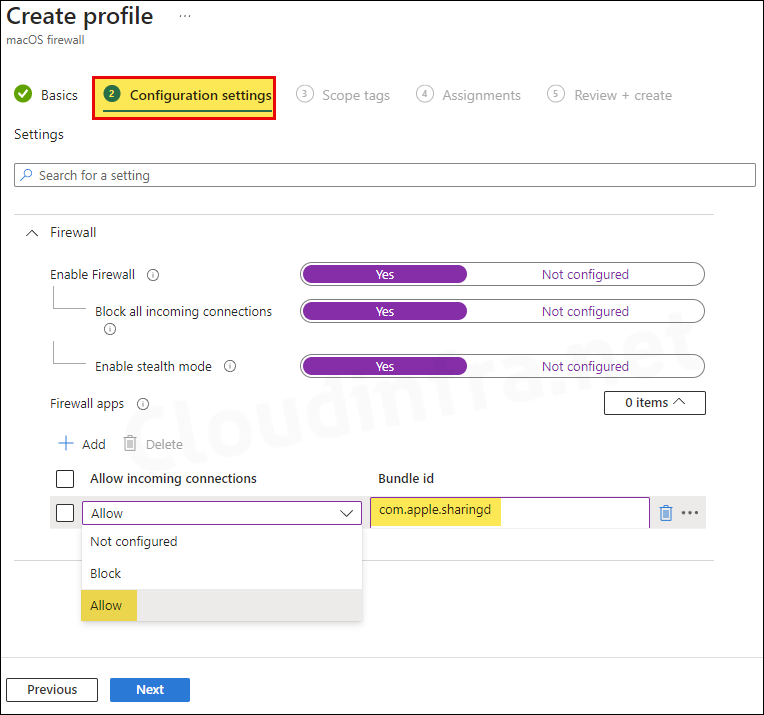
- Enable Firewall: To Enable the firewall, use the toggle switch and change it to Yes from Not configured state.
Enable Firewall to configure how incoming connections are handled in your environment.
- Block all incoming connections: Select Yes.
This will block all incoming connections except those required for basic Internet services such as DHCP, Bonjour, and IPSec. This will block all sharing services.
- Enable stealth mode: Select Yes
Enabling stealth mode prevents the computer from responding to probing requests. The computer still answers incoming requests for authorized apps.
- Firewall apps: If you choose to Block all incoming connections and notice that some essential apps like airdrop etc. aren’t working because they need incoming connections from internet, you can easily fix this. Simply click on the + Add, and Select Allow under incoming connections and provide its Bundle ID.
- Similarly, if you need to block incoming connections for specific apps, you can create a rule by selecting Block from the dropdown menu and entering the app’s Bundle ID.
Please note that this whitelisting or blocklisting rules are app based rules, not port based rules. Please get the bundle ID of the app first and then create a rule according to your requirement.
Note
- Scope tags (optional): A scope tag in Intune is an RBAC label you add to resources (policies, apps, devices) to limit which admins can see and manage them. For more Information, read: How to use Scope tags in Intune.
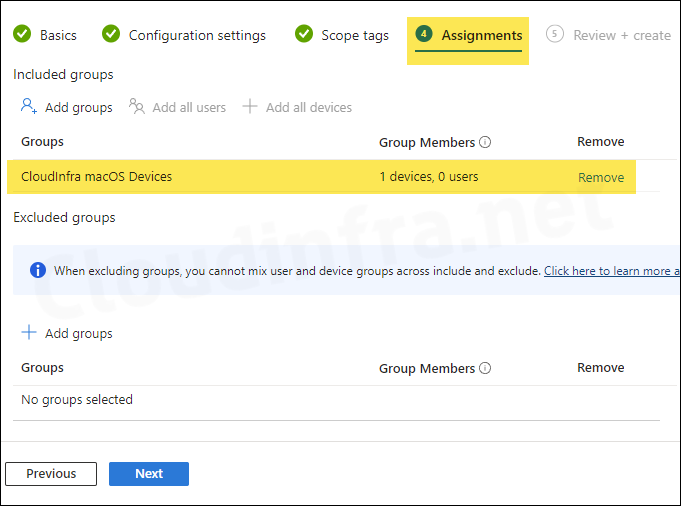
- Assignments: Assign the policy to Entra security groups that contain the target users or devices. As a best practice, pilot with a small set first; once validated, roll it out more broadly. For guidance on assignment strategy, see Intune assignments: User groups vs. Device groups.
- Review + create: Click on Create to create and deploy the macOS Firewall profile.
Option 2: Enable macOS Firewall using Device Configuration Profile
You can also create a device configuration profile to enable the firewall on a Mac using the Intune admin center. The end result will be the same as when using an Endpoint Security profile. However, there are some extra setting available in device configuration profile > Settings Catalog. Let’s explore the various settings available for enabling and configuring the macOS firewall through the device configuration profile.
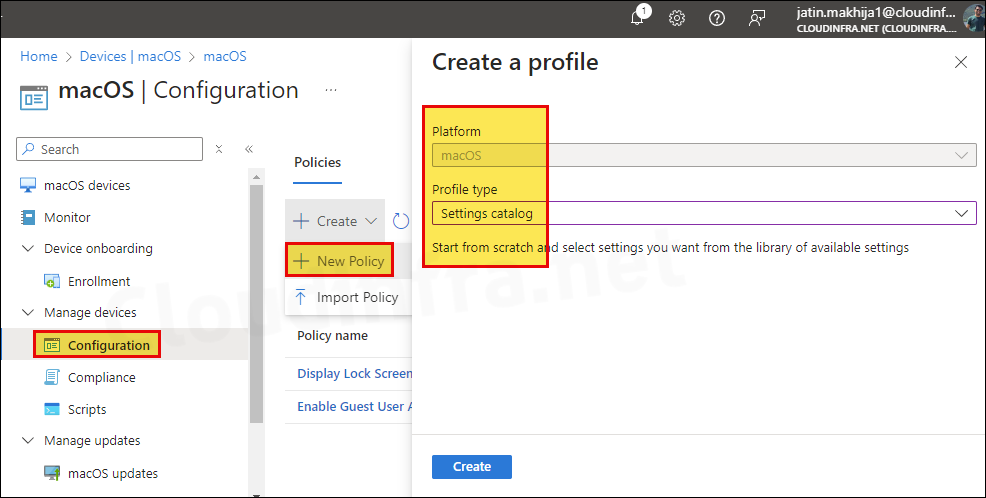
- Sign into the Intune admin center > Devices > macOS > Configuration > Create > New Policy.
- Basics tab: Provide the Name and Description of the profile.
Configuration settings
In the Configuration settings tab, click on + Add settings and use the settings picker to search for the keyword Firewall. Select the category Networking > Firewall.
This will display all the available settings related to the macOS firewall. Choose the settings you want to configure and exit the settings picker.
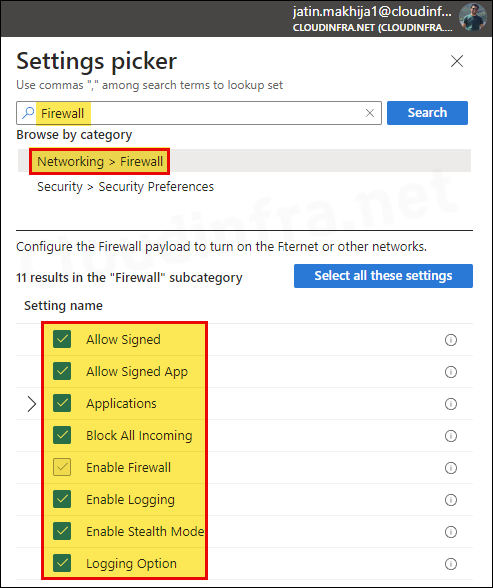
- Allow Signed: Allows built-in software to receive incoming connections. Available in macOS 12.3 and later.
- Allow Signed App: Allows downloaded signed software to receive incoming connections. Available in macOS 12.3 and later.
- Applications: Click on + Add to create a rule for allowing or blocking incoming connections.
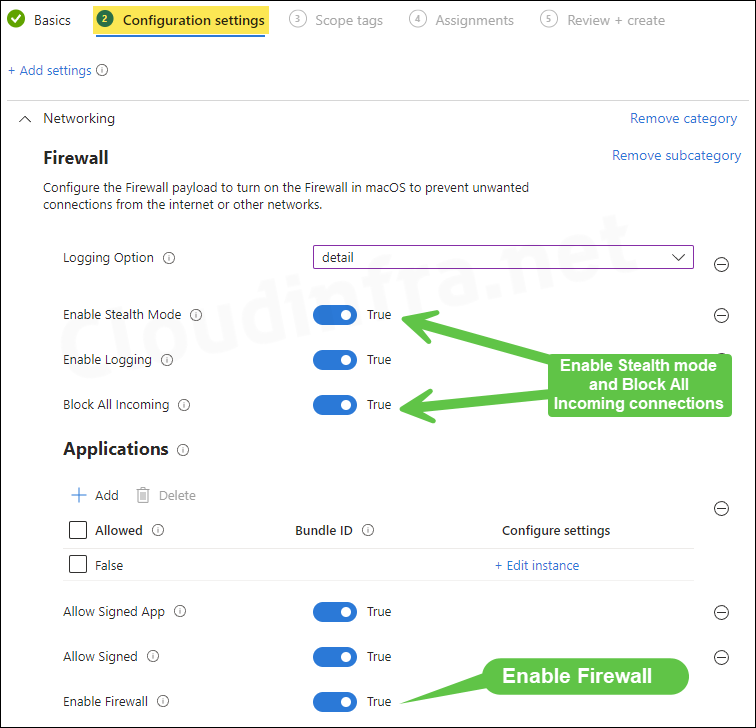
- Block All incoming: This will block all incoming connections except those required for basic Internet services such as DHCP, Bonjour, and IPSec. This will block all sharing services.
- Enable Firewall: Enables macOS built-in firewall.
- Enable Logging: If true, enables logging. Available in macOS 12 and later.
- Enable Stealth Mode: Enabling stealth mode prevents the computer from responding to probing requests. The computer still answers incoming requests for authorized apps.
- Logging Option: This specifies the type of logging. You have three options, throttled, brief or detail.
- Scope tags (optional): A scope tag in Intune is an RBAC label you add to resources (policies, apps, devices) to limit which admins can see and manage them. For more Information, read: How to use Scope tags in Intune.
- Assignments: Assign the policy to Entra security groups that contain the target users or devices. As a best practice, pilot with a small set first; once validated, roll it out more broadly. For guidance on assignment strategy, see Intune assignments: User groups vs. Device groups.
- Review + create: Review the deployment summary and click Create.
Sync Intune Policies
The device check-in process might not begin immediately. If you’re testing this policy on a test device, you can manually kickstart Intune sync from the device itself or remotely through the Intune admin center.
Alternatively, you can use PowerShell to force the Intune sync on Windows devices. Restarting the device is another way to trigger the Intune device check-in process.
End User Experience
Let’s see how the policy appears when it’s in effect on a Mac device. To check and confirm the status of the firewall on macOS, please follow these steps:
- Log in to the targeted Mac device.
- Open Settings > Network to check the status of the firewall.
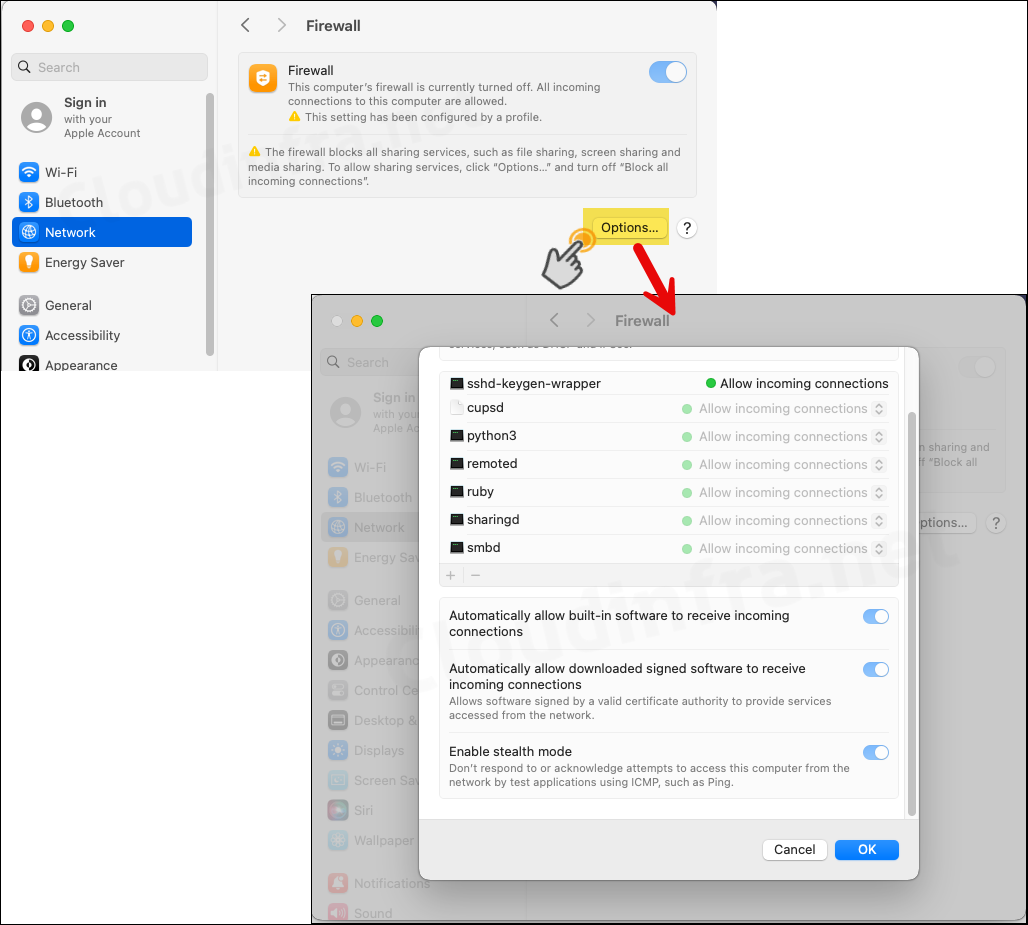
The screenshot below shows that the firewall is enabled, and the option to disable it is greyed out, indicating that it is currently being managed by the Intune profile.
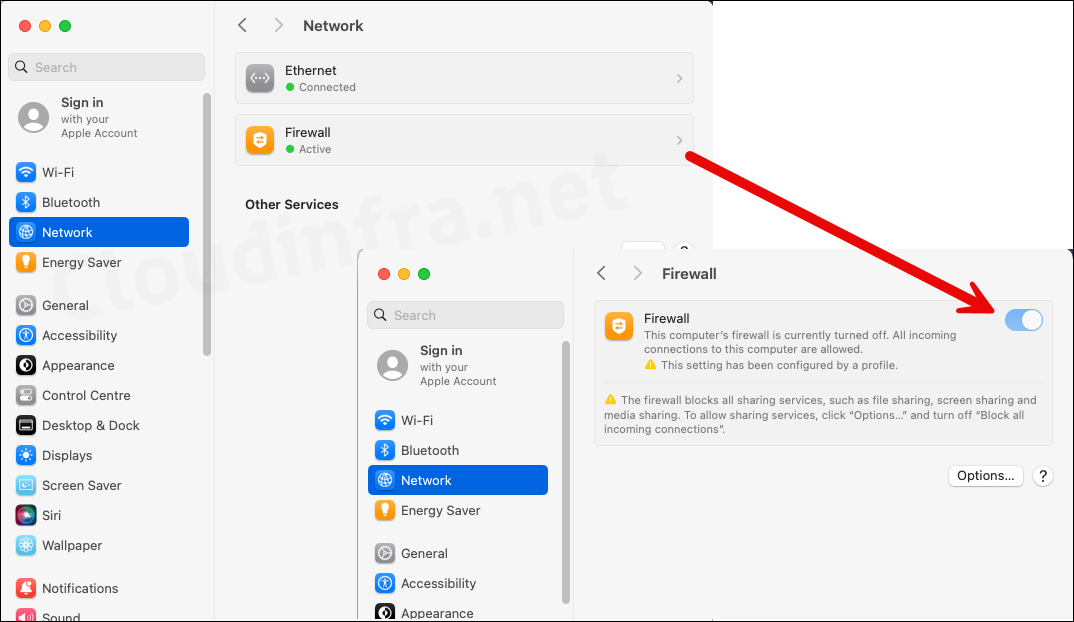
- Click the Options button to access additional firewall settings, such as Signed Apps, Stealth Mode, and more. As shown in the screenshot below, the settings are enabled according to the deployment profile and are greyed out, indicating they cannot be modified manually.
