In this blog post, I will walk you through the steps to configure default apps on Windows using Intune. Default apps determine which applications open specific file types and protocols, such as .pdf, .html, mailto, .docx, https etc. For example, if you configure .html files to open with Microsoft Edge, any HTML file you double-click will automatically open in Microsoft Edge.
Similarly, a saved document with a .pdf extension will be opened using Adobe Reader. You can also set a default web browser, such as Microsoft Edge or Google Chrome, to handle web links and web-related tasks. These default app settings optimize the user experience and make it more convenient to open files.
Intune can configure default file type and protocol associations using the Windows ApplicationDefaults Policy CSP. The core setting is DefaultAssociationsConfiguration, which applies the configured associations when a user signs in. Starting with Windows 11 22H2, you can also control how often associations are re-applied using the Version and Suggested attributes in the XML. Refer to my other post, which discusses this topic in more detail: Configure Edge as Default Browser using Intune.
Intune deploys a Base64-encoded Default App Associations XML into the device policy channel using the CSP path ./Device/Vendor/MSFT/Policy/Config/ApplicationDefaults/DefaultAssociationsConfiguration. The policy is device-scoped and processed on user sign-in.
Contents
Step 1: Create Default App Associations XML
To create a default app associations XML file, first configure the apps you want to set as default manually on a test or reference device, and then export the configuration to an XML file. Here are the steps:
- Sign in to any Windows 10 or Windows 11 device (reference machine).
- Manually set the default apps you want (examples: PDF reader, browser, mail client, video player).
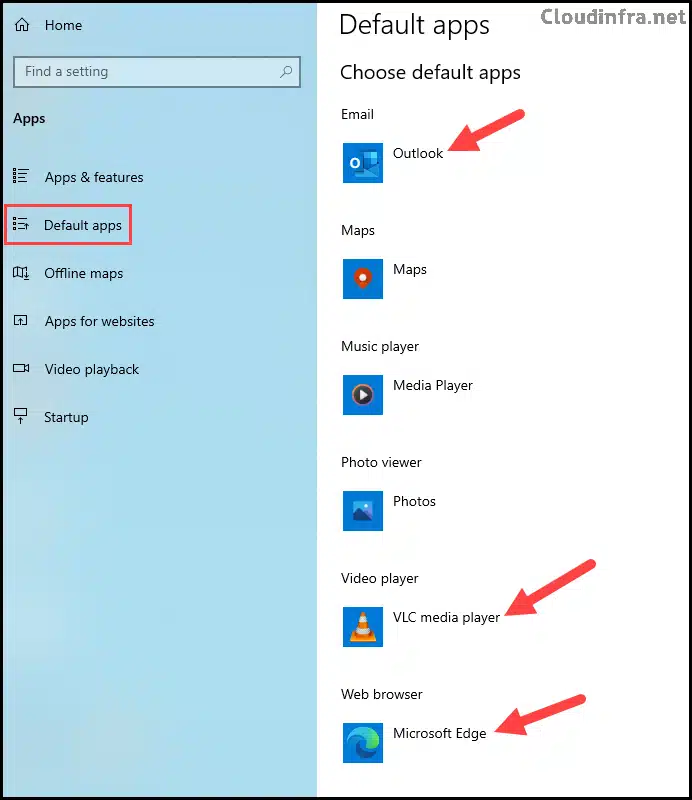
For example, let’s set the following default apps on a reference machine:
- Email: Outlook
- Video Player: VLC
- Web Browser: Microsoft Edge
Export App Associations XML File
The next step is to export the app associations XML file from a reference machine where we have configured our default apps manually.
- Create an empty folder anywhere in your system. For example: C:\temp.
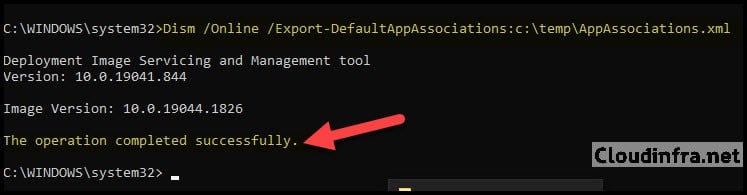
- Open the command prompt as an administrator and run below command:
Dism /Online /Export-DefaultAppAssociations:"C:\temp\AppAssociations.xml"
- Keep only the associations you want to manage. Open C:\Temp\AppAssociations.xml and remove anything you do not intend to control. Only keep the file extensions and protocols you want standardized. For our example scenario, open the C:\Temp\AppAssociations.xml file and delete all the app associations except for Microsoft Edge, VLC, and Outlook.
- Do not keep an association identifier mapped to an app if you do not want to open a specific file extension with that app. For example, if you do not want PDF files to open by default in Microsoft Edge, remove the corresponding line from the AppAssociations.xml file.
AppAssociations.xml
<?xml version="1.0" encoding="UTF-8"?>
<DefaultAssociations>
  <Association Identifier=".avi" ProgId="VLC.avi" ApplicationName="VLC media player" />
  <Association Identifier=".wmv" ProgId="VLC.wmv" ApplicationName="VLC media player" />
  <Association Identifier=".m4v" ProgId="VLC.m4v" ApplicationName="VLC media player" />
  <Association Identifier=".mkv" ProgId="VLC.mkv" ApplicationName="VLC media player" />
  <Association Identifier=".mov" ProgId="VLC.mov" ApplicationName="VLC media player" />
  <Association Identifier=".mp2v" ProgId="VLC.mp2v" ApplicationName="VLC media player" />
  <Association Identifier=".mp4" ProgId="VLC.mp4" ApplicationName="VLC media player" />
  <Association Identifier=".mp4v" ProgId="VLC.mp4v" ApplicationName="VLC media player" />
  <Association Identifier=".htm" ProgId="MSEdgeHTM" ApplicationName="Microsoft Edge" />
  <Association Identifier=".html" ProgId="MSEdgeHTM" ApplicationName="Microsoft Edge" />
  <Association Identifier=".pdf" ProgId="MSEdgeHTM" ApplicationName="Microsoft Edge" />
  <Association Identifier="http" ProgId="MSEdgeHTM" ApplicationName="Microsoft Edge" />
  <Association Identifier="https" ProgId="MSEdgeHTM" ApplicationName="Microsoft Edge" />
  <Association Identifier="read" ProgId="MSEdgeHTM" ApplicationName="Microsoft Edge" />
  <Association Identifier="mailto" ProgId="Outlook.URL.mailto.15" ApplicationName="Outlook" />
</DefaultAssociations>
Version and Suggested Attributes (Optional)
Starting in Windows 11 22H2, you can optionally use the Version and Suggested attributes in the XML to control how often associations are reapplied. For example, Suggested="true" only applies that association once per Version instead of at every sign-in.
- Version: The Version value is used to control when suggested associations are applied. If you increment the version number in the default app associations XML, the suggested associations will apply once. They will not apply again until the version number is incremented again.
- Suggested: By default, if you do not specify the Suggested attribute, it is interpreted as false. This means the default app association will be applied at every sign-in. If you set Suggested to true, the default app association will be applied only once. When you increase the Version number in the XML, any association where Suggested is set to true will be applied one additional time and will not apply again until the Version number is incremented again. This is a similar concept to the applyOnce attribute of Start menu layout configuration and the PinGeneration attribute when configuring taskbar pins on Windows 11.
Let’s modify AppAssociations.xml file to add version and suggested parameters and understand how it will work. Below is my updated XML file, which uses the Version and Suggested attributes. I am starting with Version=”1″ and adding Suggested=”true” for the Association Identifier=”.pdf”. This means the default app association for PDF will be applied only once. If a user later changes the PDF default app from Edge to another application, such as Adobe Reader, our Intune deployment will not reapply or overwrite this app association.
If you want to set the default PDF association back to Edge again, you will need to increase the Version number from 1 to 2 and redeploy the Intune policy. Increasing the Version number signals Intune to apply the default app association one more time until the Version number is incremented again.
For all other app associations where Suggested=”true” is not used, the default app associations will be applied at every sign-in. If a user changes any of these associations, they will be reset according to the XML file.
<?xml version="1.0" encoding="UTF-8"?>
<DefaultAssociations Version="1">
  <Association Identifier=".avi" ProgId="VLC.avi" ApplicationName="VLC media player" />
  <Association Identifier=".wmv" ProgId="VLC.wmv" ApplicationName="VLC media player" />
  <Association Identifier=".m4v" ProgId="VLC.m4v" ApplicationName="VLC media player" />
  <Association Identifier=".mkv" ProgId="VLC.mkv" ApplicationName="VLC media player" />
  <Association Identifier=".mov" ProgId="VLC.mov" ApplicationName="VLC media player" />
  <Association Identifier=".mp2v" ProgId="VLC.mp2v" ApplicationName="VLC media player" />
  <Association Identifier=".mp4" ProgId="VLC.mp4" ApplicationName="VLC media player" />
  <Association Identifier=".mp4v" ProgId="VLC.mp4v" ApplicationName="VLC media player" />
  <Association Identifier=".htm" ProgId="MSEdgeHTM" ApplicationName="Microsoft Edge" />
  <Association Identifier=".html" ProgId="MSEdgeHTM" ApplicationName="Microsoft Edge" />
  <Association Identifier=".pdf" ProgId="MSEdgePDF" ApplicationName="Microsoft Edge" Suggested="true" />
  <Association Identifier="http" ProgId="MSEdgeHTM" ApplicationName="Microsoft Edge" />
  <Association Identifier="https" ProgId="MSEdgeHTM" ApplicationName="Microsoft Edge" />
  <Association Identifier="read" ProgId="MSEdgeHTM" ApplicationName="Microsoft Edge" />
  <Association Identifier="mailto" ProgId="Outlook.URL.mailto.15" ApplicationName="Outlook" />
</DefaultAssociations>
Step 2: Encode App Associations XML to base64 format
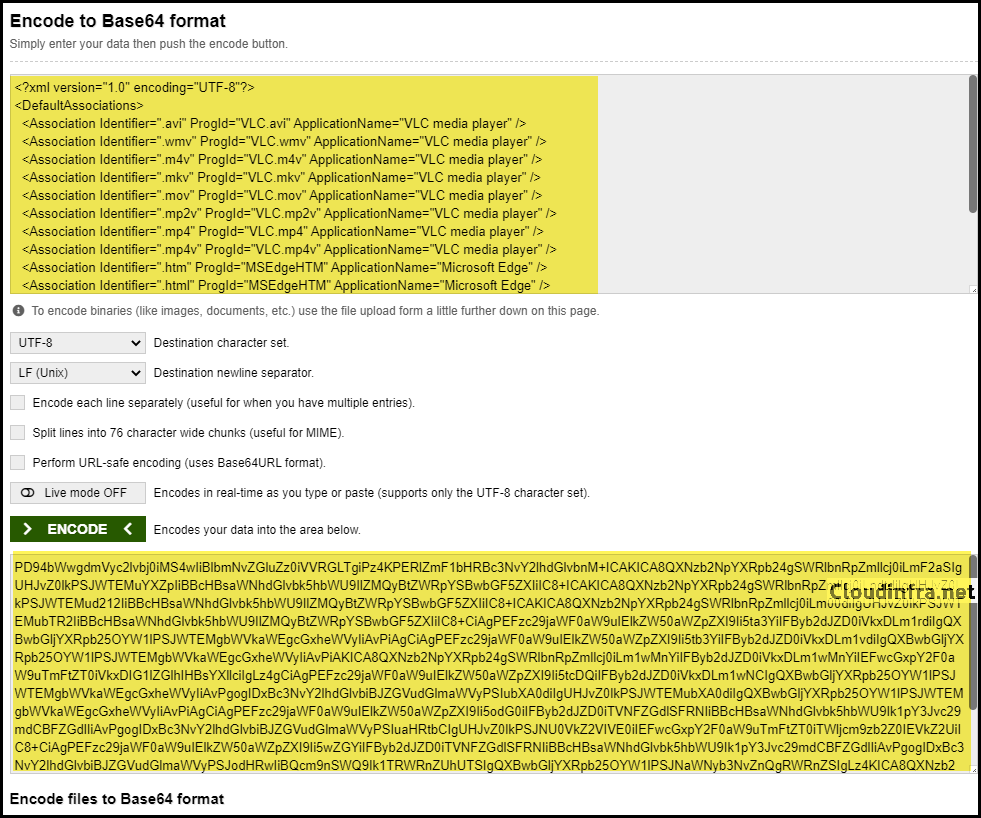
Intune uses the DefaultAssociationsConfiguration policy, which expects the XML content to be base64-encoded.
- Click on the base64encode link or use any of your preferred base64 encoder tool.
- Copy the entire contents of AppAssociations.xml.
- Paste the XML into the encoder and click Encode.
- Copy the base64 output and save it in a text file. You will paste this value into Intune in the next step.
Step 3: Create Intune Device Configuration Profile
We will now create a device configuration profile that uses the Default Associations Configuration setting in the Settings Catalog to configure the default apps.
- Sign in to the Intune Admin Center > Devices > Configuration > + Create > New Policy.
- Select Platform type as Windows 10 and later. Select Profile type as Settings Catalog.
- Click on Create.
- On the Basics tab, provide a name and description of the policy. Click Next.
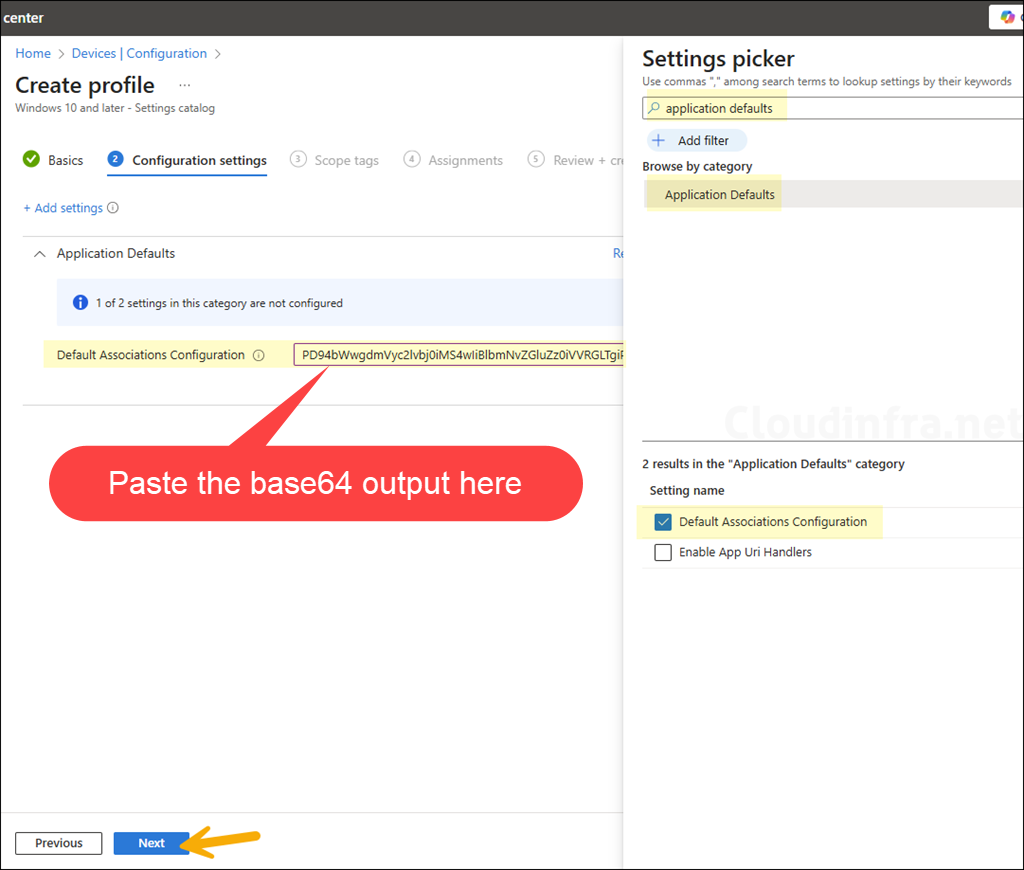
- On the Configuration settings tab, click + Add settings. In the Settings picker, search for
Application Defaults. Click on the Application Defaults category. Select Default Associations Configuration. Close the Settings picker. In the Default Associations Configuration text box, paste the base64 encoded value from Step 2.
It’s important to note that if you already have another device configuration profile with Default Associations Configuration, creating a new Default Association Configuration will result in a conflict, and the new configuration will not be applied. Ensure that only one device association configuration is applied to a device.
Note
- Scope tags (optional): A scope tag in Intune is an RBAC label you add to resources (policies, apps, devices) to limit which admins can see and manage them. For more information, read How to use Scope tags in Intune.
- Assignments: Assign the policy to Entra security groups that contain the target users or devices. As a best practice, pilot with a small set first; once validated, roll it out more broadly. For guidance on assignment strategy, see Intune assignments: User groups vs. Device groups.
- Review + Create: Review the policy and click on Create to create it.
Sync Intune Policies
The device check-in process might not begin immediately. If you’re testing this policy on a test device, you can manually kickstart Intune sync from the device itself or remotely through the Intune admin center.
Alternatively, you can use PowerShell to force the Intune sync on Windows devices. Restarting the device is another way to trigger the Intune device check-in process.
Monitoring Intune Policy Deployment
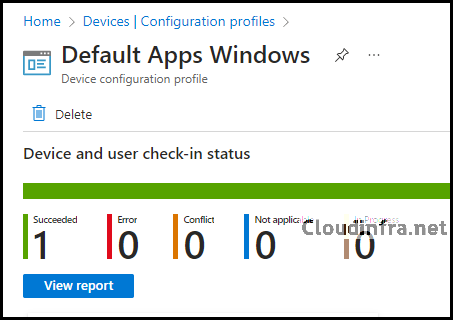
- In the Intune admin center, go to Devices > Configuration.
- Search for your device configuration profile (for example, Default apps windows).
- Open the profile and review the Overview and Device status / User status tabs for deployment results.
End User Experience
Once the policy is applied and the user signs in on the target device, default apps will be set as per the appassociations.xml file. There are several ways to confirm whether the policy has been applied on the device. Let’s go through those options:
1. Using Settings app
- Go to the Settings App on the target device. Click on Apps > Default Apps.
- You will find that the default apps are configured as per the Intune policy.
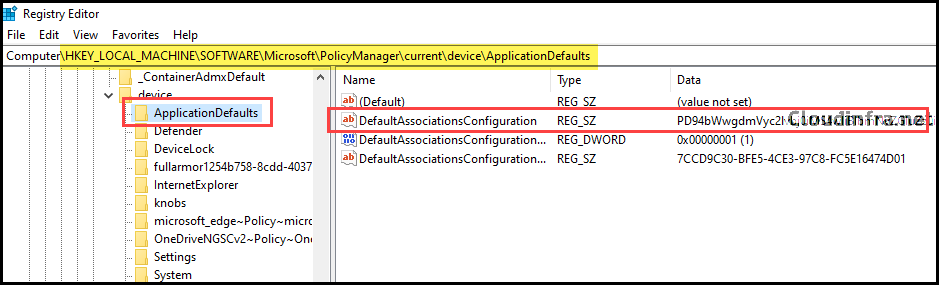
2. Using Windows Registry
Open the registry editor and navigate to HKEY_LOCAL_MACHINE\SOFTWARE\Microsoft\PolicyManager\current\device\ApplicationDefaults. Look for DefaultAssociationsConfiguration containing your Base64 string.
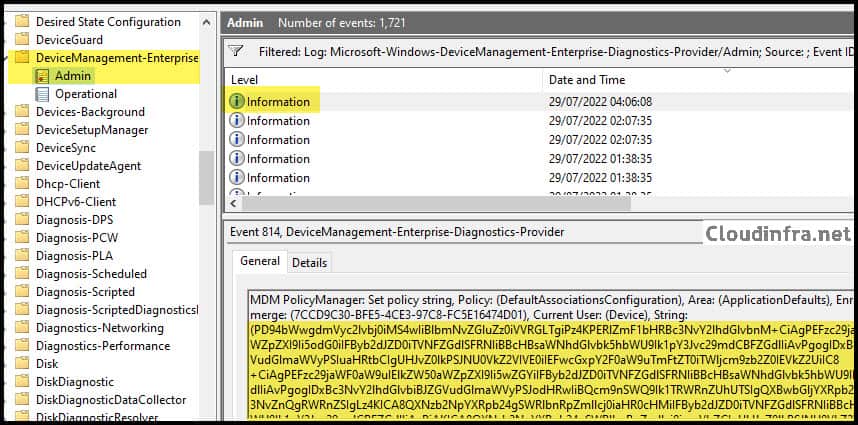
3. Using Event Viewer
Open Event Viewer > Applications and Services Logs > Microsoft > Windows > DeviceManagement-Enterprise-Diagnostics-Provider > Admin. Filter for the event (Event ID 814) that shows CSP policy processing for the DefaultAssociationsConfiguration setting.
Conclusion
The best-supported Intune approach for default apps on Windows is the ApplicationDefaults CSP using DefaultAssociationsConfiguration. Generate a clean associations XML, Base64-encode it, and deploy it via Settings catalog (preferred) or OMA-URI. For Windows 11 22H2 and later, use Version and Suggested to control whether defaults are enforced at every sign-in or applied only once per version.
You can also use an OMA-URI setting to configure default apps, but using the Settings Catalog option seems simpler. If you wish to use OMA-URI, then you can create a Custom device configuration profile and then Add below OMA-URI Setting:
| Name | DefaultAppsonWindows |
| Description | Set Default apps on windows devices |
| OMA-URI | ./Vendor/MSFT/Policy/Config/ApplicationDefaults/DefaultAssociationsConfiguration |
| Data type | String |
| Value | base64 encoded output value |
Hello Jatin,
Thanks for the article, I created the profile as per article and applied it on Hyper-V Virtual machine. Profile is successfully applied. Can see the in registry Key also in logs but in Default application for mailto is not changed to outlook. also in EventLog it is showing error like for enrollment ID requesting Set : The operating system drive is not protected by Bitlocker Drive Encryption.
Hi —
Does this device configuration make immediate changes for existing users? Or is this only for new user log-ins on the device?
Hi JoeZ,
1. Does this device configuration make immediate changes for existing users? – It may not be an immediate change for the user, At the next Intune Device check-in the Profile will be applied and default apps will be configured.
2. Is this only for new user log-ins on the device? – It will apply to all the users you have targeted under Assignments either via Azure AD group or by adding All Devices or All users.
Hello
Great guide thank you. I’ve followed everything but I cannot seem to get this to deploy? Intune doesn’t apply anything and states ‘not applicable’
I am targeting a security group which contains our test server
Any advice would be great~!
Hey Matt, thanks for the feedback. Could you please try adding a Windows 10 or Windows 11 device to this test group and see if it works? It will not be applicable to the servers.