This is a Step-by-step Windows 365 setup guide. Windows 365 is a cloud-based service that became generally available on August 2, 2021. This service provides cloud PCs to end users, which are highly available, easily scalable, and fully managed by Microsoft.
Windows 365 Cloud PC is a hosted service offered by Microsoft. When end users are provisioned with a Windows 365 Cloud PC, they gain access to a dedicated PC in the cloud, easily accessible from anywhere in the world.
Contents
Windows 365 Editions
Windows 365 is available in four different editions. Please find them below:
The most commonly used editions are Windows 365 Business and Windows 365 Enterprise. There are some differences between the two. Let’s have a look:
| Windows 365 Business | Windows 365 Enterprise |
|---|---|
| For smaller companies, it is limited to 300 seats per tenant. | Suitable for Large companies (unlimited seats) – No Licence cap. |
| Supports Microsoft Entra Join without Azure Vnet Support | Supports Microsoft Entra Join with or without Azure Vnet Support |
| There are no licensing pre-requirements to buy and deploy Windows 365 Business. | Each user must be licensed for Windows 10 or 11 Enterprise (when available), Microsoft Intune, and Microsoft Entra ID P1. |
| Provisioning is simplified and uses default configurations. | Provisioning is configurable and customizable to the needs of the organization. |
| Limited Support from Intune | Manage Cloud PCs using Intune, Entra ID, Defender for Endpoint. |
| No Custom Image Support, Only Gallery Images are supported. | Custom Images and Gallery Images are Supported when provisioning Windows 365 Cloud PCs. |
| Partner/Programmatic access not supported | Cloud PCs can be managed using Microsoft lighthouse, MS Graph and Windows 365 Powershell module. |
| Universal Print is not Supported | Universal Print is Supported |
| Security baseline policies are not supported | Security baseline policies are supported |
| Create a Support ticket from the M365 admin center | You can create a support ticket using Intune or the M365 admin center. |
Overall Steps Required to Setup Windows 365
- Purchase Windows 365 Licenses (Business/Enterprise/Frontline).
- Create an Azure Network connection (ANC): Optional.
- Create Provisioning Policies.
- Assign Windows 365 licenses to users.
- Send Instructions to users on how to access their Cloud PC.
1. Purchase Windows 365 Licenses
First, you must decide on the Windows 365 edition and purchase licenses. Cloud PCs cost per user per month fixed monthly fee type depending upon the Cloud PC specs. You can refer to the link: Windows 365 plans and pricing to get more details on Windows 365 Business and Enterprise pricing.
2. Create an Azure Network Connection (ANC): Optional
This step is optional and can be used if you do not want to connect Cloud PCs to a Microsoft-hosted network. Instead, you can create an Azure network connection (ANC), which facilitates connection with existing Vnet/Subnet in your Azure Subscription.
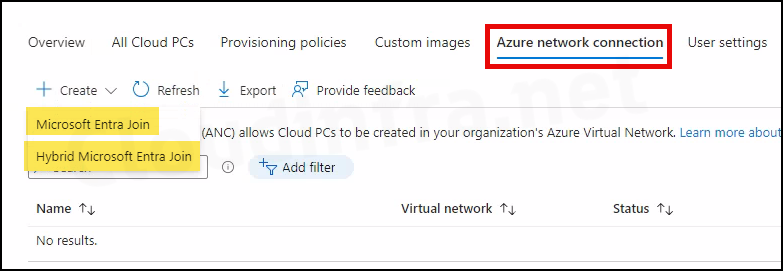
When creating Azure network connections, you will find two options: Microsoft Entra Join and Hybrid Microsoft Entra Join. Choose the option that aligns with your existing infrastructure.
- Microsoft Entra Join: This option is for fully cloud-based organizations without any On-prem Active Directory Domain Infrastructure.
- Hybrid Microsoft Entra Join: This option is for you if you have an existing Active Directory infrastructure and an Azure VNet/subnet for connecting the Cloud PCs. Using Hybrid Microsoft Entra Join, devices will be automatically connected to Entra ID.
- After selecting Microsoft Entra Join, proceed to the Network Details tab and provide the necessary information to complete the Azure Network Connection (ANC).
- Name: Provide the name of ANC.
- Join type: Microsoft Entra Join (Cannot be changed).
- Subscription: Select the Azure subscription.
- Resource Group: Select the Resource group where the Vnet resides.
- Virtual Network: Select the Virtual Network (Vnet) from the drop-down.
- Subnet: Finally, select the subnet and click on Next.
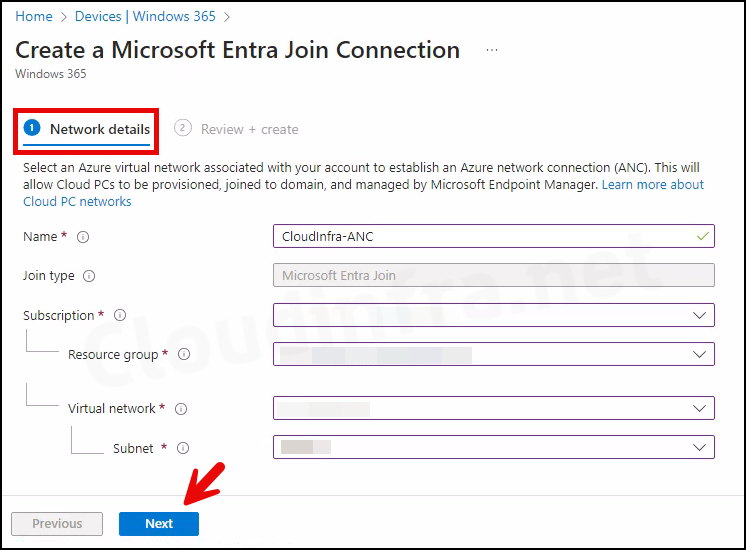
- Review + create: Review the selected ANC details and create the connection.
3. Create Provisioning Policies
Next step is to create provisioning policies for Windows 365 Cloud PCs. For detailed steps on creating provisioning policies for Windows 365, please refer to the Step-by-step guide: Create a Provisioning Policy for Windows 365.
4. Assign Windows 365 Licenses to Users
Now, assign Windows 365 licenses to users. There are two ways to assign a license to a user in Microsoft 365. The first method is a manual process where you manually sign in to the M365 admin center and assign the license. The second method is by creating an entra security group in Entra ID and using it to assign licenses to users.
For a production scenario, I recommend creating an Entra security group based on the license type you wish to assign. For example, for Windows 365 Enterprise 2 vCPU, 8GB, 128GB, you can create a security group named Windows365-2CPU-8GB-128GB. Proceed to the Licenses option and select this specific license for the group. Once you add a user to this group, a Windows 365 license will be automatically assigned to the user.
Manually Assign Windows 365 License to a User:
- Sign in to the Microsoft 365 admin center > Users > Active users.
- Search for the user account and click on it.
- Under the License and Apps tab. Find the Windows 365 license you want to assign.
- Select the License and then click on Save.

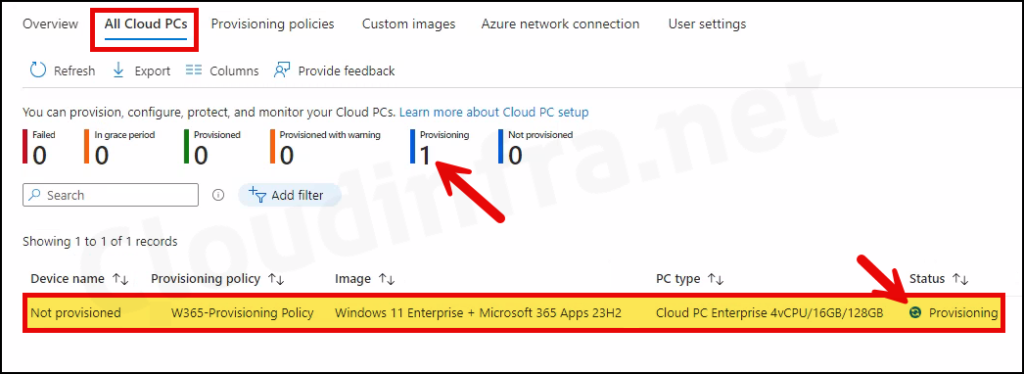
After a user is assigned the license, A Cloud PC will be provisioned automatically. To check the Cloud PC Provisioning status, Sign in to Intune admin center > Devices > Windows 365 > Under the All Cloud PCs tab, you will find the status.
As you can see in below screenshot, Status column shows that Cloud PC is Provisioning. For a Cloud PC that is getting provisioned, you will also find the following:
- Device name
- Provisioning Policy
- Image
- PC type
- User details
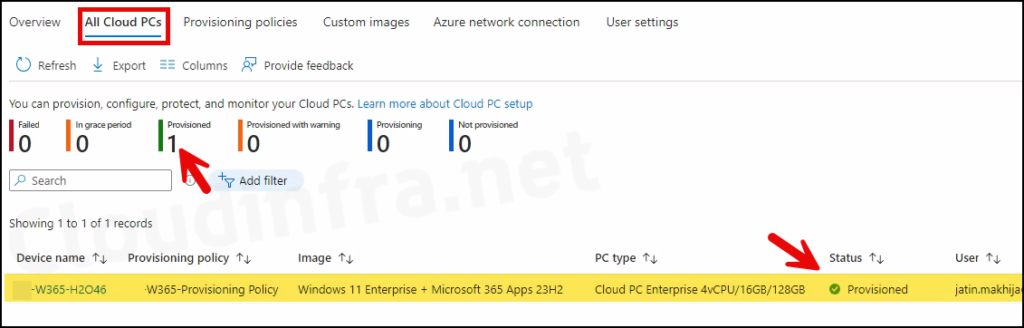
After a few minutes, Status will show as Provisioned, with the Device Name field also populated with the name of the Cloud PC assigned to the user.
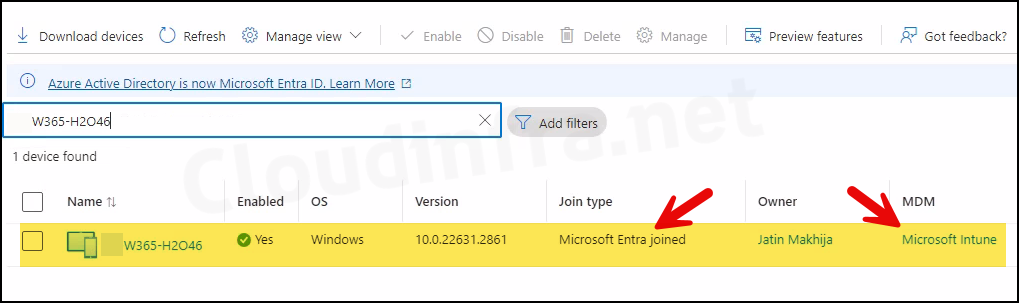
Please note, a device object for Windows 365 will also be created in Entra ID. To locate the device in the Entra admin center, follow the steps below:
- Sign in to the Entra admin center > Devices > All devices and search for the Windows 365 Cloud PC.
- Ensure that the device is Microsoft Entra Joined and managed by Intune.
5. Connect to your Windows 365 Cloud PC
There are various ways to connect to your Windows 365 Cloud PC. The blog post titled How to Connect and Access Windows 365 Cloud PC: 4 Ways discusses all the options listed below.
- Windows App: This app allows you to connect to various Microsoft remote desktop solutions, including Azure Virtual Desktop, Windows 365, Microsoft Dev Box, Remote Desktop Services, and Remote PCs.
- Windows 365 Web Client: The quickest method to connect without installing any application on your device is to use a web browser and access the Windows 365 web client. In some organizations where the Microsoft Store is blocked, preventing the download of the Windows App, using a web browser to connect to Windows 365 becomes the best option.
- Remote Desktop Client: Windows App and browser methods are preferable and recommended for connecting and accessing the Windows 365 Cloud PC. However, you could also use the Microsoft Remote Desktop Client to connect and access your Cloud PC. The Remote desktop client app lets users access and control a remote PC, including a Windows 365 Cloud PC.
- Using LG WebOS: If you use an LG TV with the latest webOS 23, you can connect to the Windows 365 Cloud PC. Launch the web client/browser on your LG TV and go to Home Office > Windows 365.