In this guide, I will show you the steps to setup and configure NDES and SCEP for deployment of certificates from Internal On-Premises Certificate Authority (CA) to Intune managed devices. Using NDES and SCEP, A certificate can be requested and issued to network devices without requiring domain credentials. The examples of such devices include Kiosks type devices, Network switches, Routers, MDM Windows or Mobile devices managed by Intune.
SCEP stands for Simple Certificate Enrollment Protocol (SCEP), it was originally developed by Cisco, documented on IETF website: RFC 8894.
Note
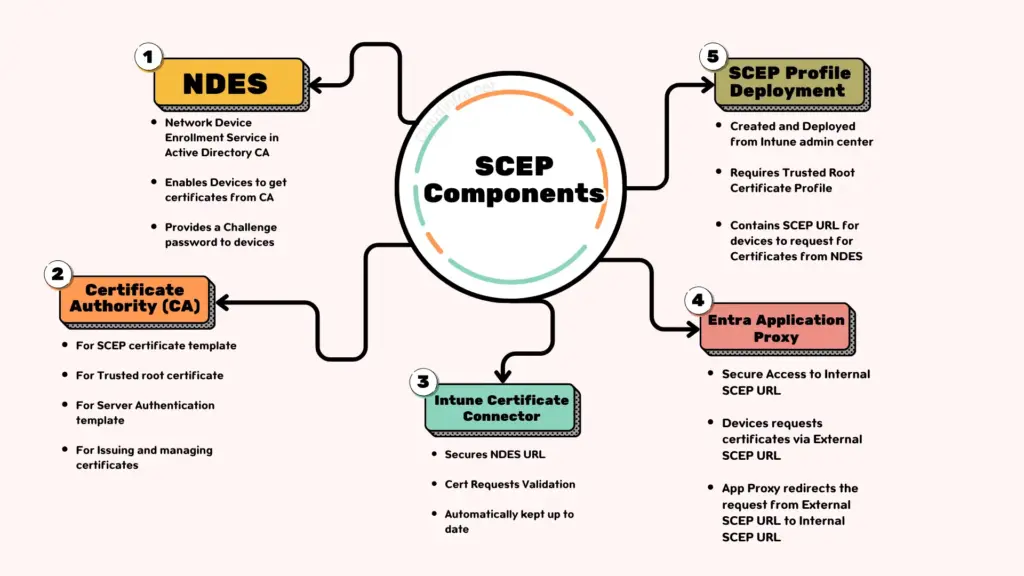
SCEP certificate deployment requires a Domain Controller, Certificate Authority (CA), NDES, Intune Certificate Connector and Entra Application Proxy. Except Entra Application Proxy, All other Infrastructure components must exist on your Internal On-Premises network.
If you do not have this Infrastructure and want to utilize a SaaS based solution for deployment of certificates via Intune, then you can use Cloud PKI. Cloud PKI is a Microsoft hosted cloud based solution for delivering and managing the complete lifecycle of certificates for Intune managed devices. Under the hood, Cloud PKI provisions and manages all components of SCEP including NDES (Registration Authority), CA etc.
There are two more methods of Certificate deployment using Intune: PKCS Certificate Deployment and PKCS Imported Certificate (PFX Certificate Deployment). Both PKCS and SCEP methods require Internal Certificate Authority (CA) for issuing certificates to MDM devices.
However, PKCS Imported certificate method requires a password protected certificate exported in .pfx file which can be generated by using Internal CA or by using third party certificate vendors. A Self-signed certificate can also be generated in a pfx file and deployed using this method. Before we start with the Infrastructure setup, let’s first understand the difference between PKCS and SCEP certificate deployment methods.
Contents
PKCS Certificate Vs. SCEP Certificate
| Feature | PKCS Certificate | SCEP Certificate |
|---|---|---|
| User Affinity | Requires user affinity (except for device-based certificates). | Does not require user affinity; can be used for userless devices like kiosks. |
| Setup Complexity | Less complex; requires only the Intune Connector, which communicates directly with the CA. | More complex; requires NDES, IIS, Entra Application Proxy, and the Intune Connector. |
| Use Cases | Authentication (VPN, Wi-Fi, etc.) and S/MIME. | Authentication (VPN, Wi-Fi, etc.) and S/MIME. |
| Private Key Security | Private key generated on the Intune Connector server; transmitted over the network (less secure). | Private key generated on the MDM device; never transmitted over the network (more secure). |
| Certificate Template Requirement | Requires private key export to be enabled. | Does not require private key export to be enabled. |
| RFC Details | PKCS RFC | SCEP RFC |
Components Required for SCEP Infrastructure
- NDES (Network Device Enrollment Service):
- Provides certificate enrollment service to users and devices.
- Must be domain joined and in the same forest as Enterprise CA.
- Must not be installed on a domain controller.
- Best practice is to not install on the same server as CA.
- On-Premises Enterprise Certificate Authority:
- For SCEP certificate template
- For Trusted root certificate
- For Server Authentication template
- For Issuing and managing certificates
- Intune Certificate Connector:
- Intune connector installs a Policy module which secures NDES URL by not allowing requests for certificates other than from Intune enrolled devices.
- NDES forwards the Certificate request to Intune connector for validation, After the validation completes, it notifies NDES with the result.
- Automatically kept up to date
- Entra Application Proxy:
- Publish NDES/SCEP URL to Internet.
Provides Secure Access to NDES URL from devices requesting for certificates from Internal CA. - Entra application proxy service requires Entra ID P1 or Entra ID P2 license
- Publish NDES/SCEP URL to Internet.
- Active Directory Domain controller.
- SCEP Certificate Deployment on Intune.
- Devices enrolled with Intune.
- Trusted Root Certificate Profile on Intune.
Best Practices
- Deploy NDES on a dedicated server (do not install it on Certificate Authority (CA) or DC).
- Optionally, load balance NDES by adding additional NDES servers for high availability in case of failure.
- Configure NDES with a Group Managed Service Account (gMSA).
- Limit the NDES service account privileges to the minimum necessary for its function.
- Disable/Uncheck Allow private key to be exported option on certificate templates.
- Create a trusted certificate profile in Intune for the target users/devices. The SCEP certificate profile will reference this for deployment.
- Use the same Entra security group to target both the SCEP certificate profile and the trusted certificate profile.
Step 1: Create a Group Managed Service Account (gMSA)
To configure and provide necessary permissions to NDES server for its operations, A service account is required. You can create a standard service account or a gMSA.
I would recommend using a gMSA as this is more secure and less overhead for IT administrator to manage its password. Domain controller automatically handles its password rotation and complexity. When you use a standard service account, you would be responsible for rotating its password and keeping it secure.
Please note that NDES can be configured to run using a gMSA, but you cannot use a gMSA with Intune certificate connector, as it’s not a supported configuration. For Intune certificate connector, you can either use a SYSTEM account or a standard user account.
Note
You can refer to the blog post: Configure NDES with gMSA for Intune for a detailed step by step guide on creating, Installing and configuring gMSA for NDES. I have also provided high level steps below for quick access.
Create a gMSA on Domain Controller
Add-KdsRootKey -EffectiveTime ((get-date).addhours(-10))

New-ADServiceAccount -Name NDES_gMSA -PrincipalsAllowedToRetrieveManagedPassword CLOUDINFRA-NDES$ -DNSHostName NDES_gMSA.corp.cloudinfra.net
Install gMSA on NDES Server
Add-WindowsFeature RSAT-AD-PowerShell
Install-ADServiceAccount NDES_gMSA
Test-ADServiceAccount NDES_gMSA
Step 2: Configure Certificate Templates
We will require two certificate templates. One for securing NDES/SCEP URL and another one for issuing certificates to end-users/devices.
- Web Server Certificate template: This certificate template will be used to issue the certificate to NDES server(s) and configured in IIS for securing NDES/SCEP URL. The primary usage of the certificate issued via this template is Server Authentication.
- SCEP Certificate template: This certificate template is used when a user or device requests SCEP certificate from NDES server. NDES server will use this template to request for the certificate from CA. The primary usage of the certificate issued via this template is Client Authentication.
Web Server Certificate template
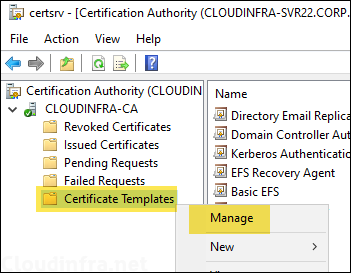
- Sign in to the Certificate Authority (CA) server and open Certificate Authority management console.
- Right-click on Certificate Templates > Manage.
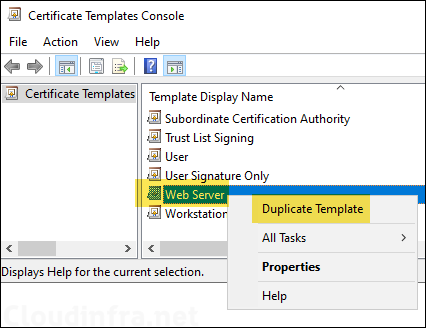
- Right-click on Web Server certificate template and select Duplicate Template.
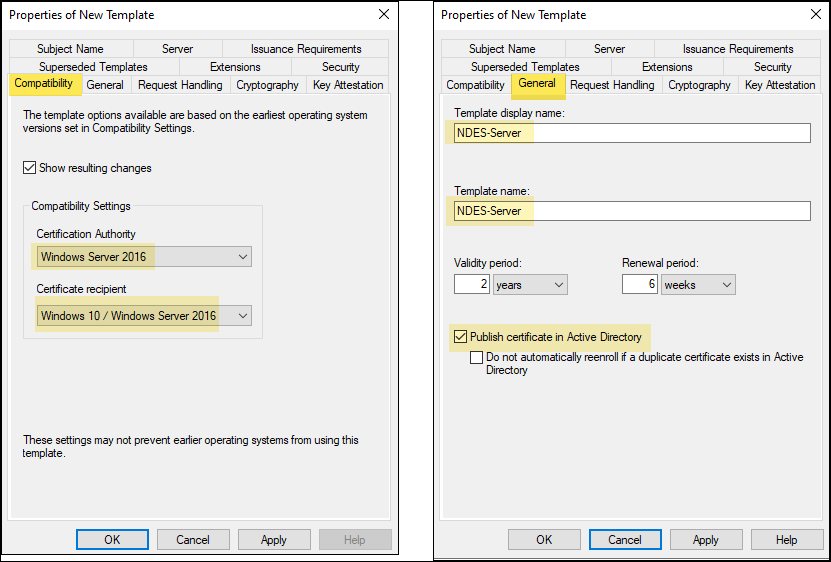
- Compatibility tab: Select the Certificate Authority and Certificate recipient as per your PKI Infrastructure and target client.
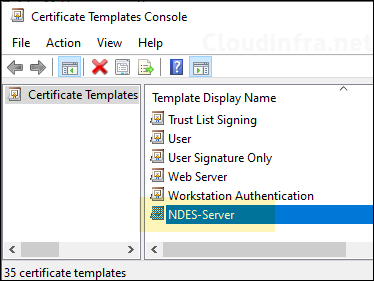
- General tab: Provide the display name of the certificate template (e.g., NDES-Server). Best practice is not to use any spaces in the name of the template. Select Validity period and select Publish certificate in Active Directory.
- Extensions Tab: Ensure that the Application Policies includes Server Authentication.
- Security Tab: Add the NDES server’s computer account and grant Read and Enroll permission. If you are using multiple NDES servers, add the computer account of each NDES server and grant them Read and Enroll permissions.
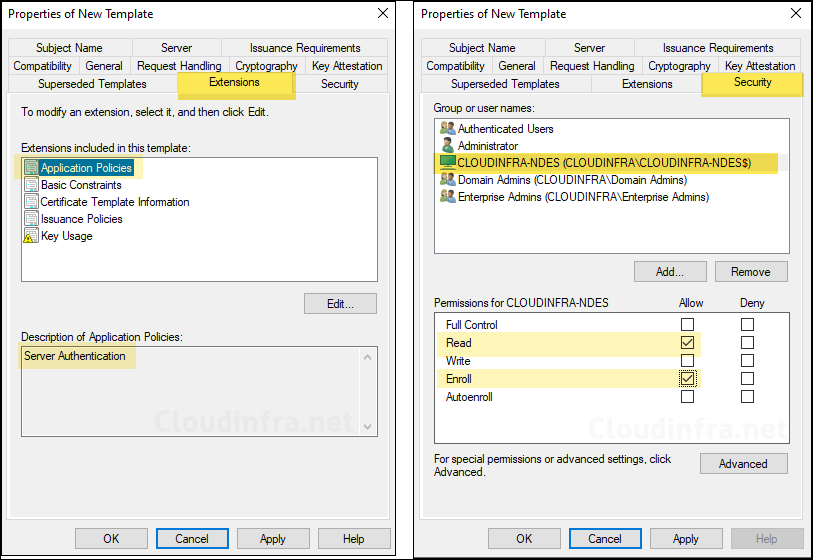
- Keep the settings for other tabs at their default settings, then click Apply to save the template.
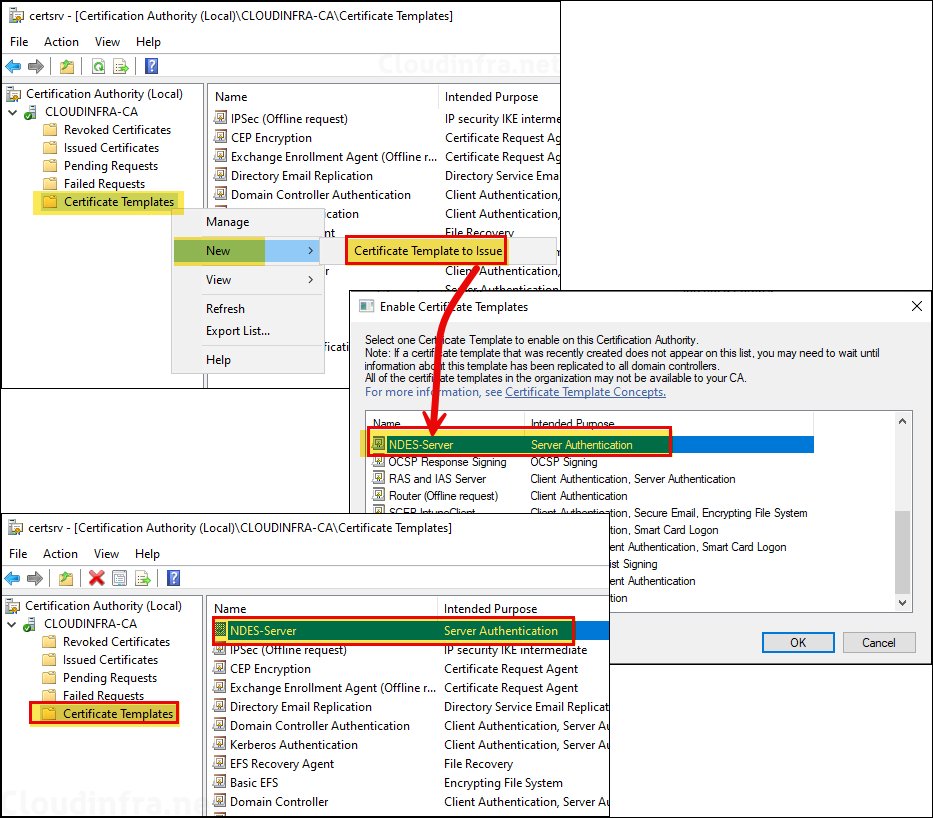
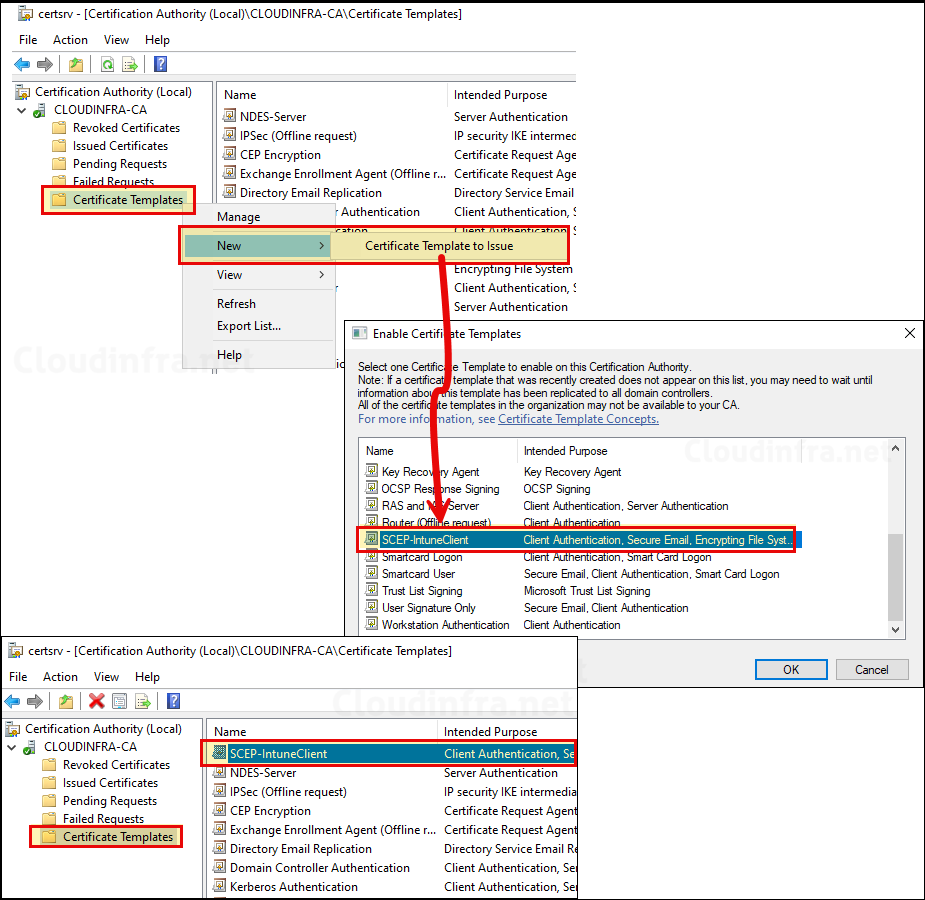
- After the template has been created, It needs to be issued. Right-click on Certificate Templates > New > Certificate Template to Issue > Select the template NDES-Server and click OK.
SCEP Certificate template
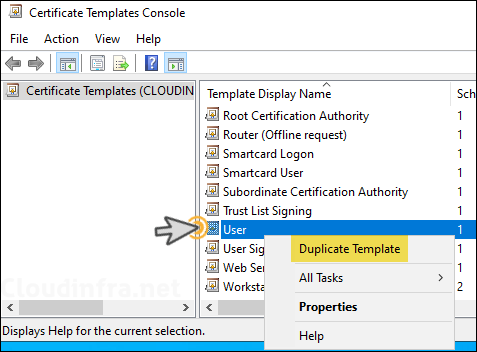
SCEP Certificate template is a certificate template which will be use to issue certificates to requesting users or devices. Enhanced key usage (EKU) or intended usage for this template must have Client Authentication. The most suitable template certificate template for this purpose is User template, which we will duplicate.
- Right-click on User certificate template > Duplicate Template.
- Compatibility: Select the Certificate Authority and Certificate recipient as per your PKI Infrastructure and target client.
- General tab: Provide the display name of the certificate template (e.g., SCEP-IntuneClient). Best practice is not to use any spaces in the name of the template. Select Validity period and uncheck Publish certificate in Active Directory.
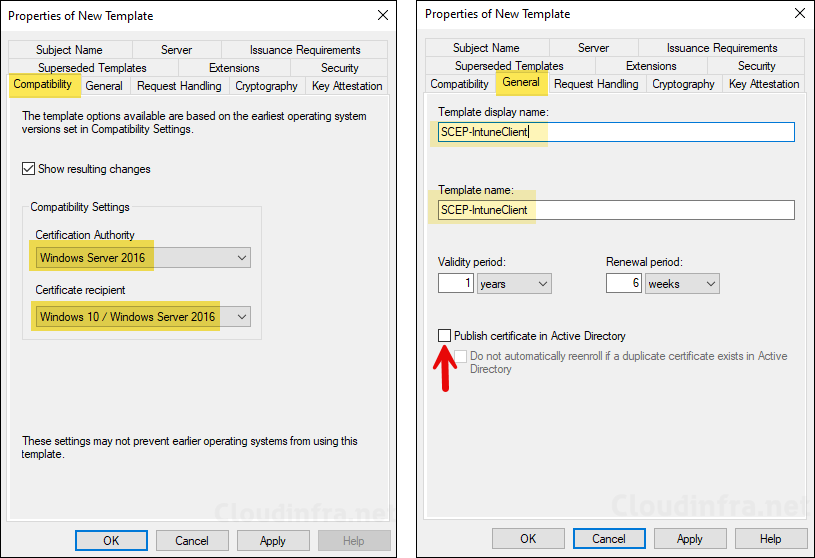
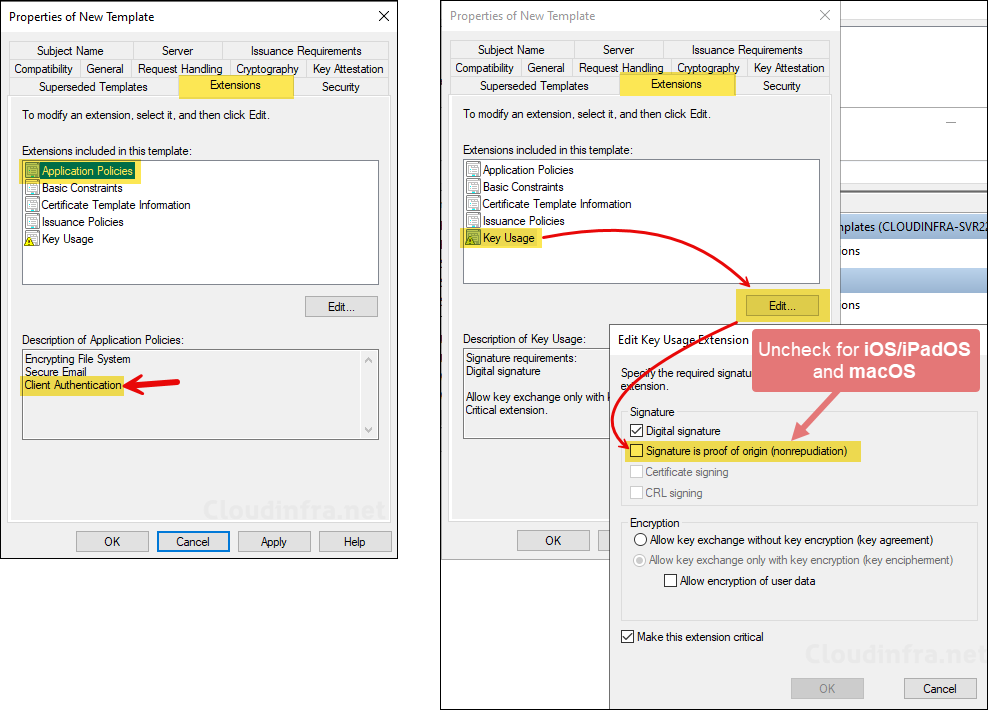
- Extensions Tab: Ensure that the Application Policies includes Client Authentication.
- Extensions tab: Key Usage > Edit > Uncheck Signature is proof of origin (nonrepudiation) if you are deploying certificates to iOS/iPadOS and macOS devices as well.
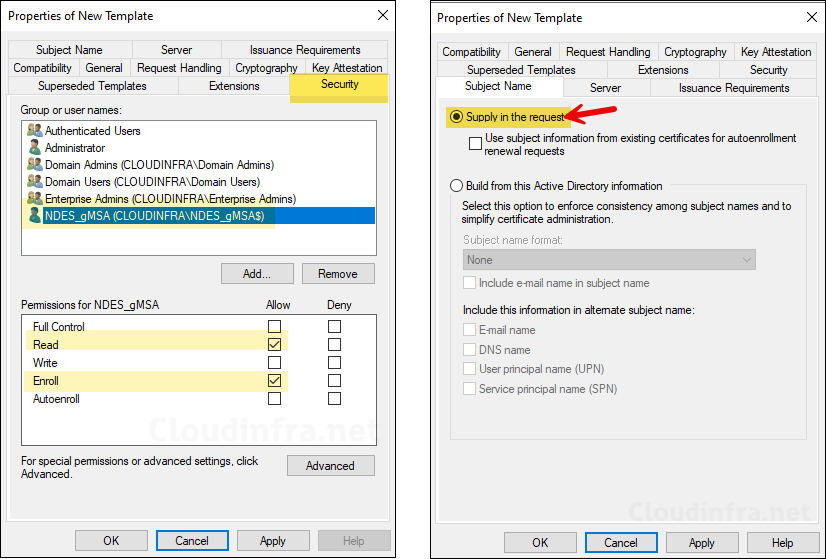
- Security tab: Add the NDES service account and provide Read and Enroll permission.
- Subject Name: Select Supply in the request.
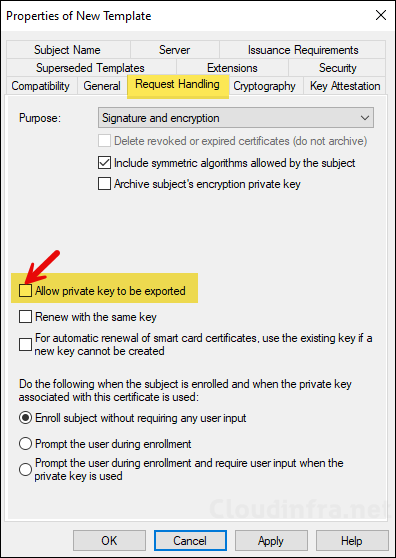
- Request Handling: Uncheck Allow private key to be exported.
- After the template has been created, It needs to be issued. Right-click on Certificate Templates > New > Certificate Template to Issue > Select the template SCEP-IntuneClient and click OK.
Step 3: NDES Server Setup
NDES server role which is a part of Active directory certificate services needs to be installed on a dedicated windows server. In the next steps, we will install this role and configure it for this deployment.
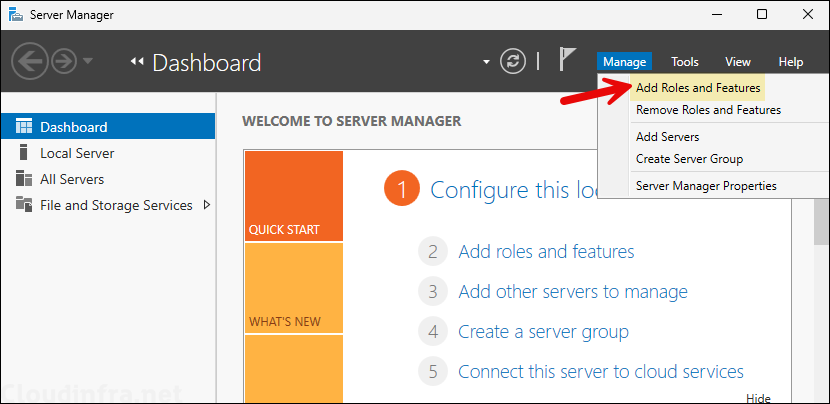
- Server Manager > Manage > Add Roles and Features.
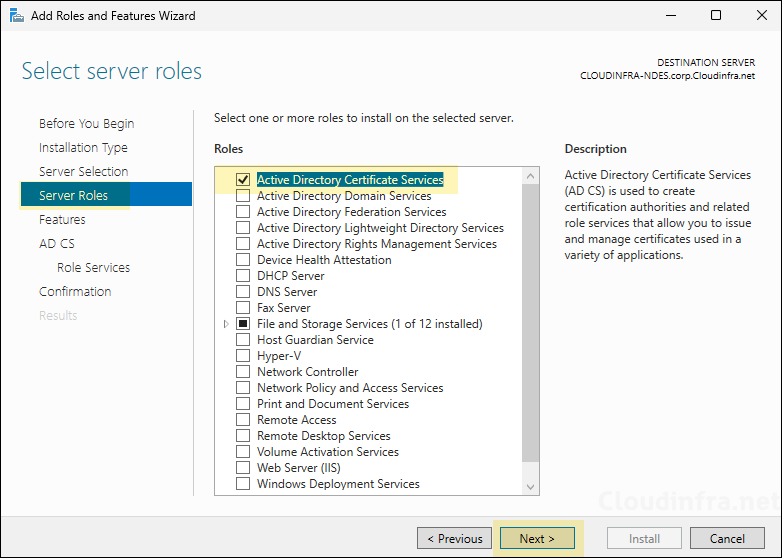
- Select Active Directory Certificate Services.
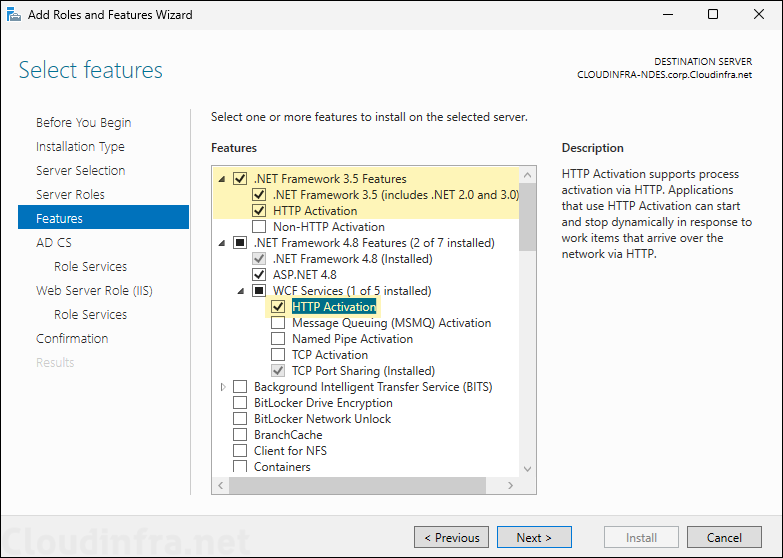
- Select .NET Framework 3.5 features and .NET Framework 4.8 Features as shown below screenshot. Ensure HTTP Activation is also selected.
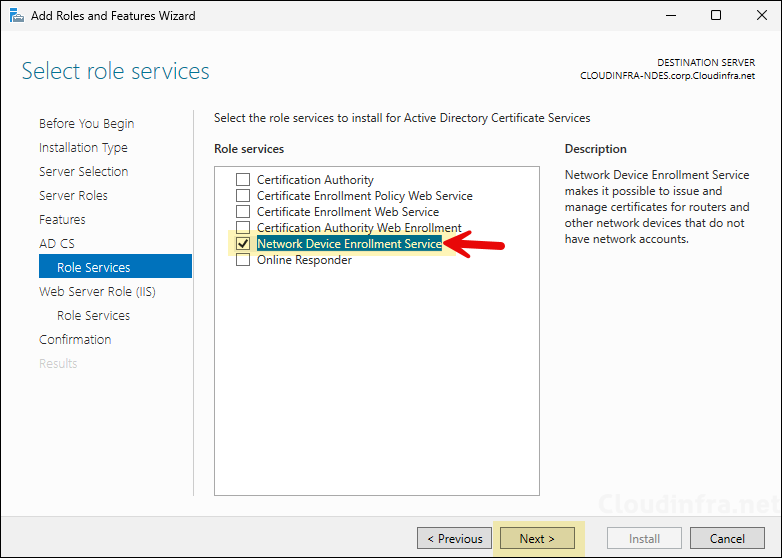
- Select Network Device Enrollment Service and click Next.
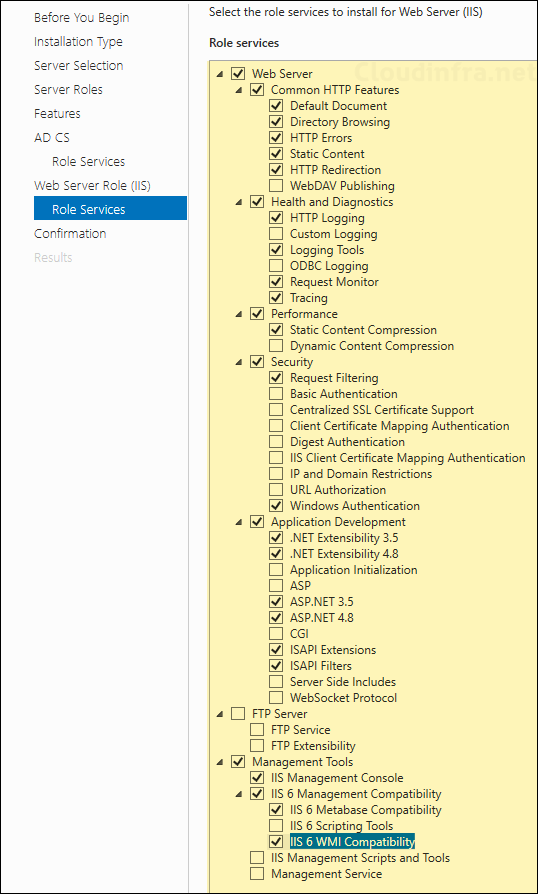
- Select below features and click Next.
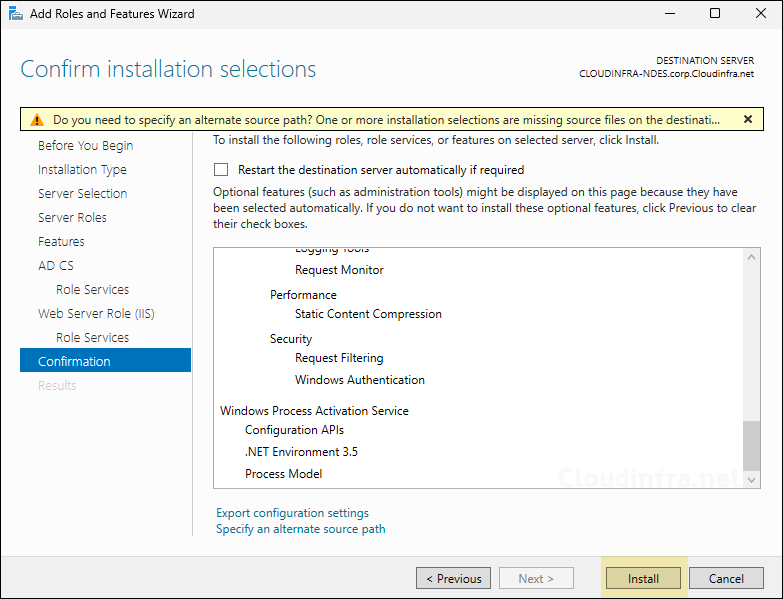
- Click on Install.
- Feature Installation completed successfully. Click on Close.
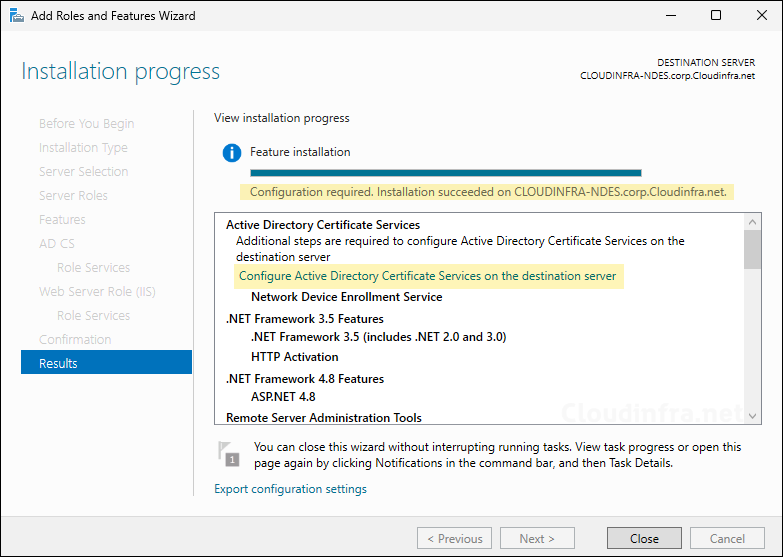
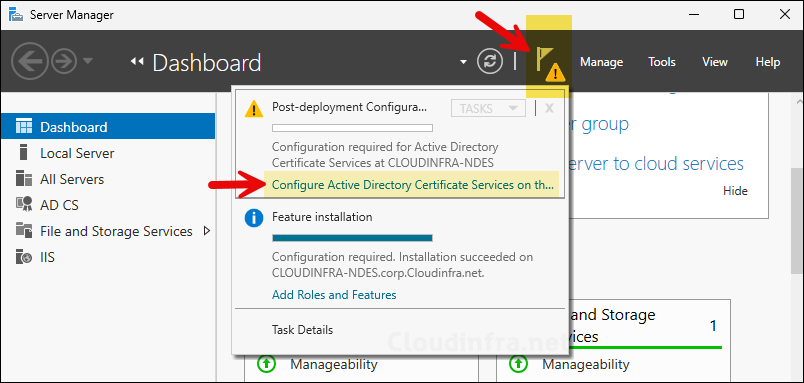
- Server Manager > Click on Configure Active Directory Certificate Services.
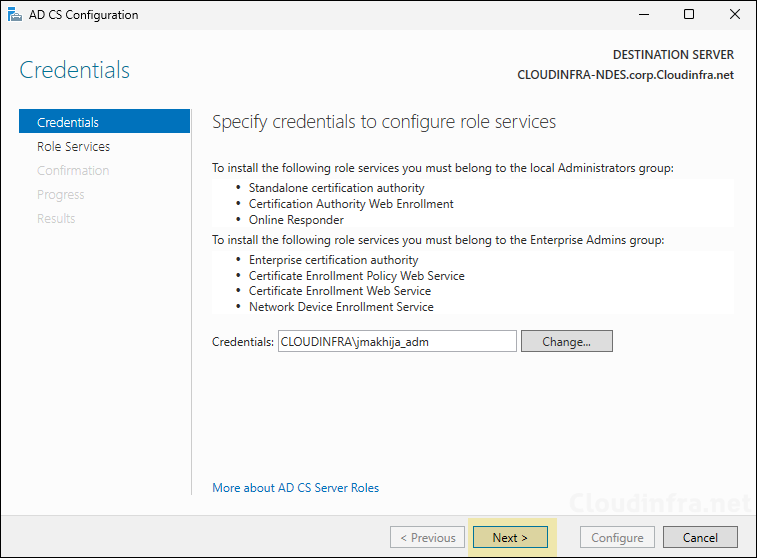
- Click on Next on Credentials screen.
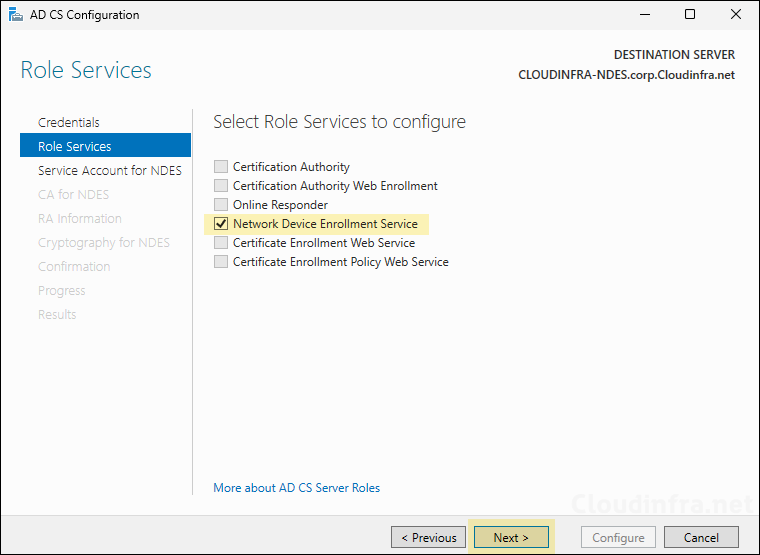
- Under Role Services, Select Network Device Enrollment Service.
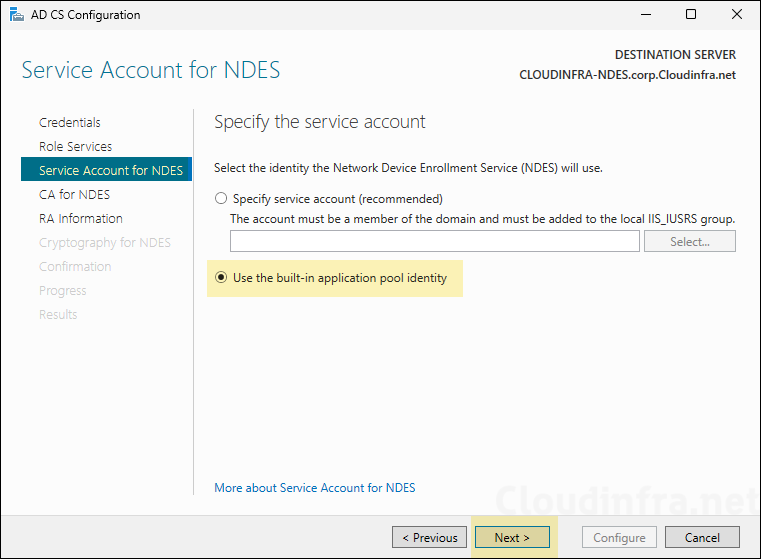
- Select Use the built-in application pool identity and click Next.
You can also specify a standard service account and use it with NDES. However, the best practice is to use a gMSA (Group Managed Service Account). A gMSA cannot be specified during NDES configuration wizard.
When you click Select, it will prompt you for a username and password, but for a gMSA, we dont have the password as its automatically managed by the domain controller. Therefore, for now, select Use the built-in application pool identity, and once the configuration is complete, we will replace it with a gMSA later.
Note
When using a Standard service account, adding the service account to IIS_IUSRS local group is a prerequisite and has to be done first before starting NDES configuration wizard. If NDES service account is not a part of the IIS_IUSRS group, wizard will not proceed to the next step.
When using gMSA, we still need to add it to IIS_IUSRS. As we are selecting application pool identity for now, we will add gMSA to IIS_IUSRS local group later.
Tip
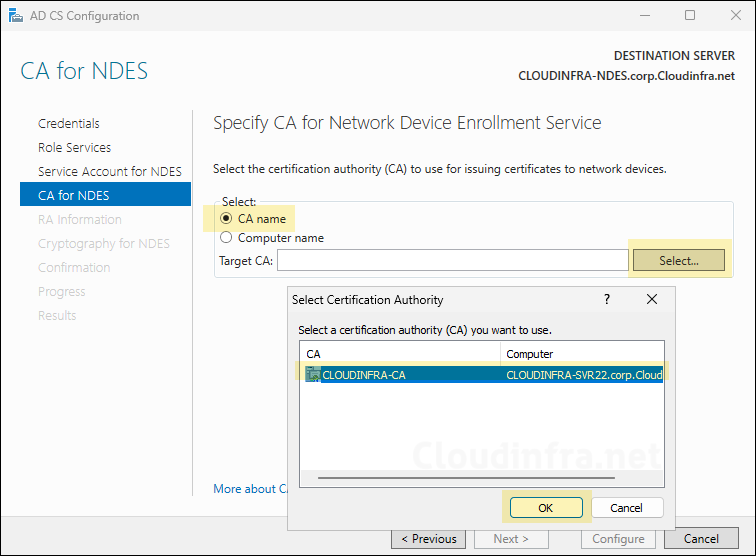
- Connect NDES server with CA. Select CA name and click ok OK.
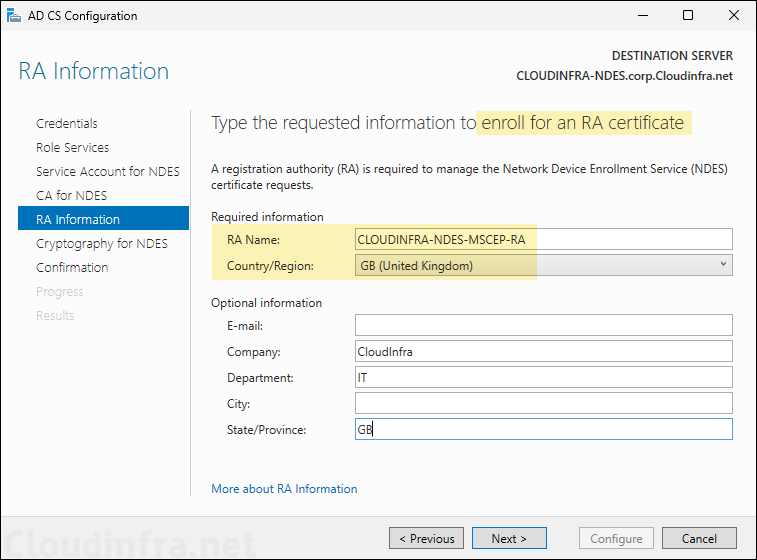
- RA Information: Keep default for RA name and update the Country/Region.
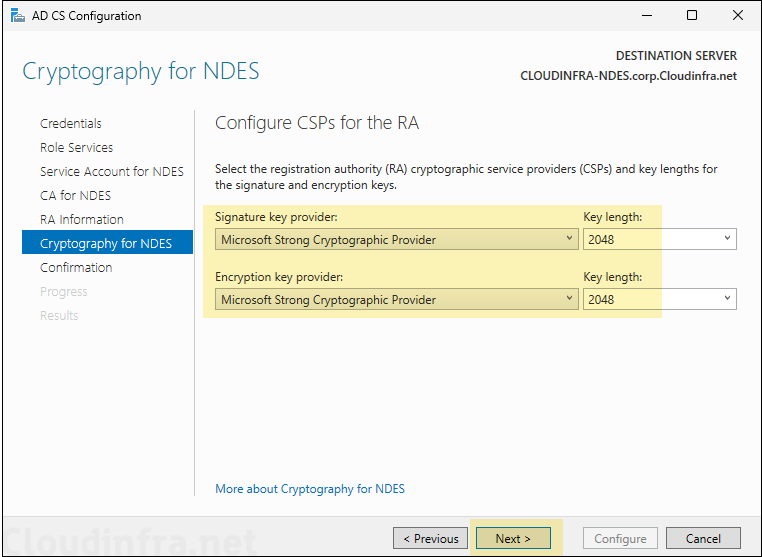
- Cryptography for NDES: Select the Signature key provider and key length. Minimum recommended key length is 2048.
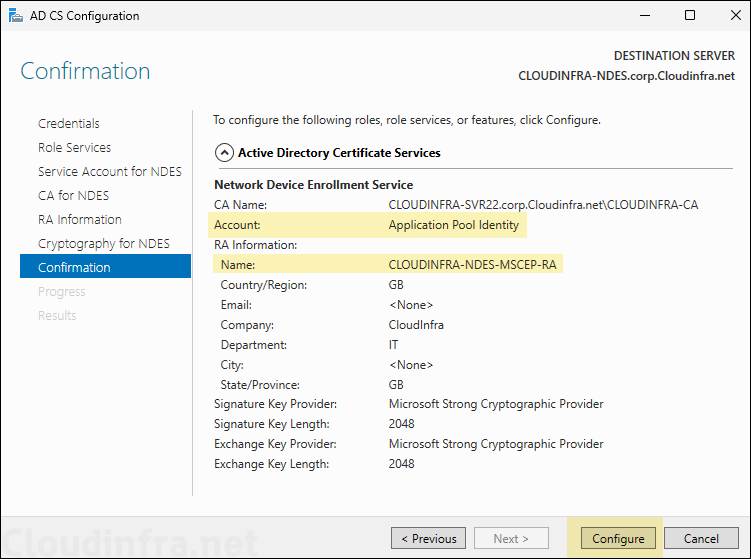
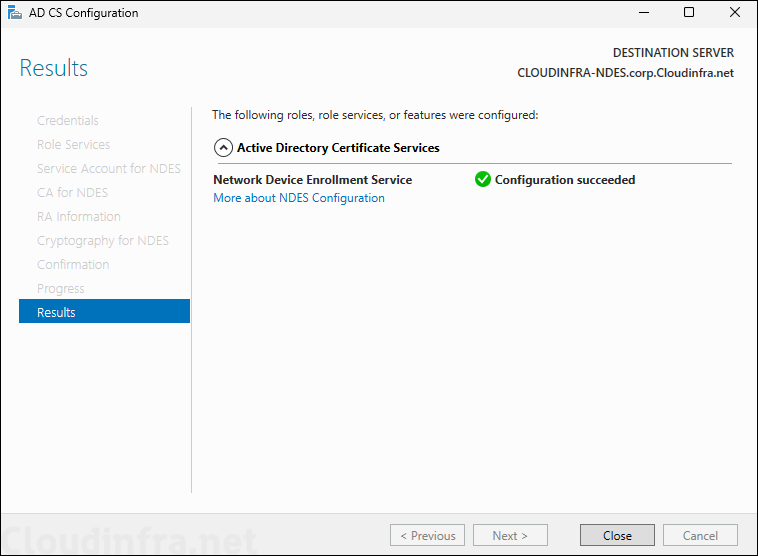
- Review the configuration and click on Configure.
- NDES configuration completed successfully.
Test NDES server configuration
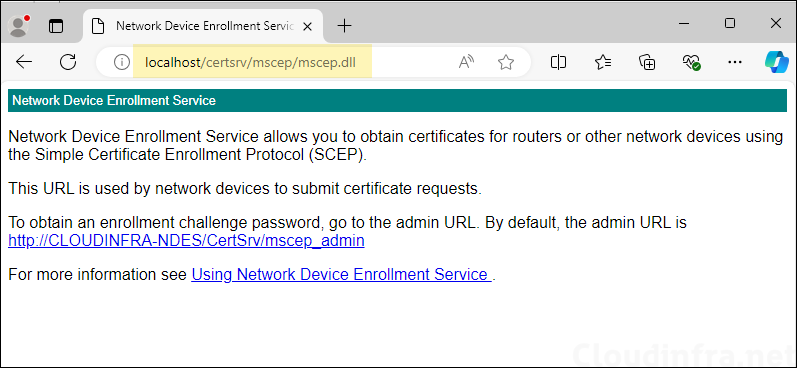
After NDES role is installed and configured, test the configuration by browsing to the URL: http://localhost/certsrv/mscep/mscep.dll. You will see below page which confirms that the NDES role has been installed and configured successfully. In the next part we will secure this URL and ensure that its accessible by using HTTPS protocol only.
Reboot NDES Server
Restart NDES server after making the changes. This will ensure that the key NDES services are restarted and changes are applied.

Great stuff. The best write-up I have seen on the web to date.
Thank you for your many contributions.
In the config of the SCEP-IntuneClient certificate it seems that allowing the Domain Users group to have the enrol permission is a significant privilege escalation flaw as any user could request the certificate for any other user since the SN is supplied in the request.
I’ve had a look through a bunch of step-by-steps to setup SCEP and removing the enrol permission from Domain Users is never mentioned. Can the enrol permission be removed from Domain Users? Or is that a required configuration for SCEP?
Nice stuff! Is the certificate is supposed to be shown in “Personal” on local device ? I see the issued certificate in Intune, configuration profile is success on device but I do not see the certificate in local certificate manager.