In this blog post, we will explore the steps to block USB drives using group policy on Windows 10/11 devices. There is always a security risk when USB storage drive access is allowed on corporate devices. Users can download sensitive data on external drives, which, if misused, could affect the organization’s reputation.
Blocking removable storage devices on company-owned devices is essential for preventing potential security breaches. By doing so, you can ensure that confidential information is not saved or copied to personal storage devices, thereby safeguarding sensitive data and maintaining a secure working environment.
Contents
Create a GPO to Block USB Drive Access
Let’s check the steps to create a GPO in Active directory for blocking USB drive access. We will be first creating an OU and add devices on which we need to block USB drive access.
Step 1: Create an Organizational Unit (OU)
- Login to the domain controller using domain administrator rights.
- Press Windows + R to open the Run dialog box.
- Type
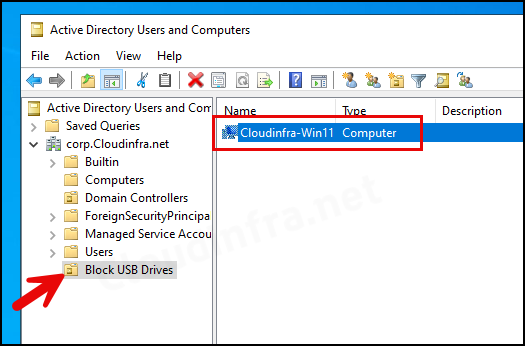
dsa.mscPress Enter to open Active Directory Users and computers. - Create a new Organizational Unit (OU) and move your Windows 10/11 devices into It.
Please note that you can also use an existing Organizational Unit (OU) that contains the devices on which you want to apply this policy to block USB drives. The creation of a new OU is not mandatory.
We are creating a new OU and moving test computers into this OU to ensure that this policy gets applied only to the test devices. Once the testing is completed successfully, you can link the GPO with an OU containing production devices.
Note
Step 2: Create a Group Policy Object (GPO)
- Login to the domain controller using domain administrator rights.
- Press Windows + R to open the Run dialog box.
- Type
gpmc.mscPress Enter to open the Group Policy Management Console. - Right-click on the Group Policy Objects folder and select New.
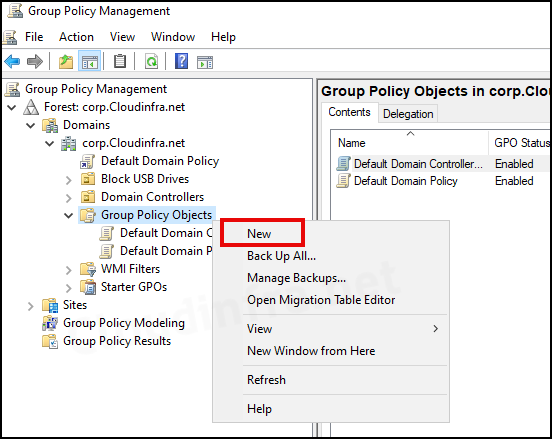
- Provide a name for the Group Policy Object; for example, Block USB Drives, and press OK.
- Right-click on the GPO and select Edit.
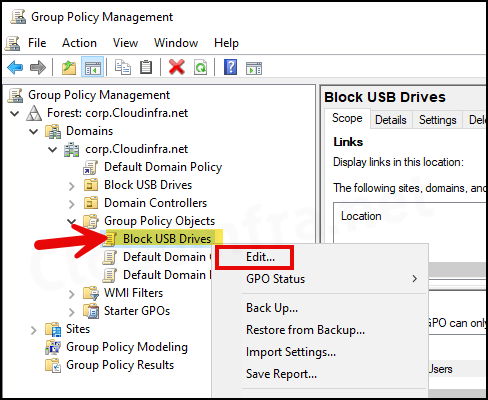
- Navigate to Computer Configuration\Policies\Administrative Templates\System\Removable Storage Access. You will find the following Policies on the right-hand side:
- Set time (in seconds) to force reboot
- CD and DVD: Deny execute access
- CD and DVD: Deny read access
- CD and DVD: Deny write access
- Custom Classes: Deny read access
- Custom Classes: Deny write access
- Floppy Drives: Deny execute access
- Floppy Drives: Deny read access
- Floppy Drives: Deny write access
- Removable Disks: Deny execute access
- Removable Disks: Deny read access
- Removable Disks: Deny write access
- All Removable Storage classes: Deny all access
- All Removable Storage: Allow direct access in remote sessions
- Tape Drives: Deny execute access
- Tape Drives: Deny read access
- Tape Drives: Deny write access
- WPD Devices: Deny read access
- WPD Devices: Deny write access
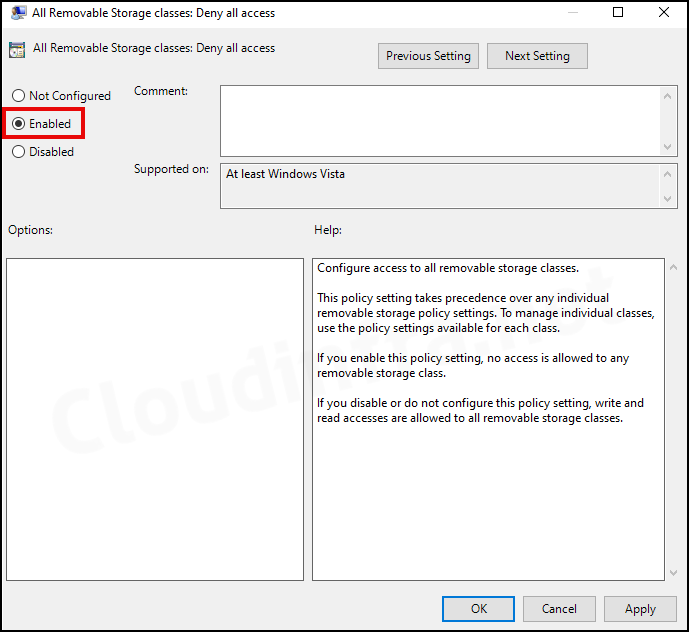
- We will choose All Removable Storage classes: Deny all access to deny Read and Write access to all removable storage classes, including the USB storage class.
- However, if you want to allow Read access to the USB drive then use Removable Disks: Deny write access policy.
- Right-click on All Removable Storage classes: Deny all access policy and select Edit.
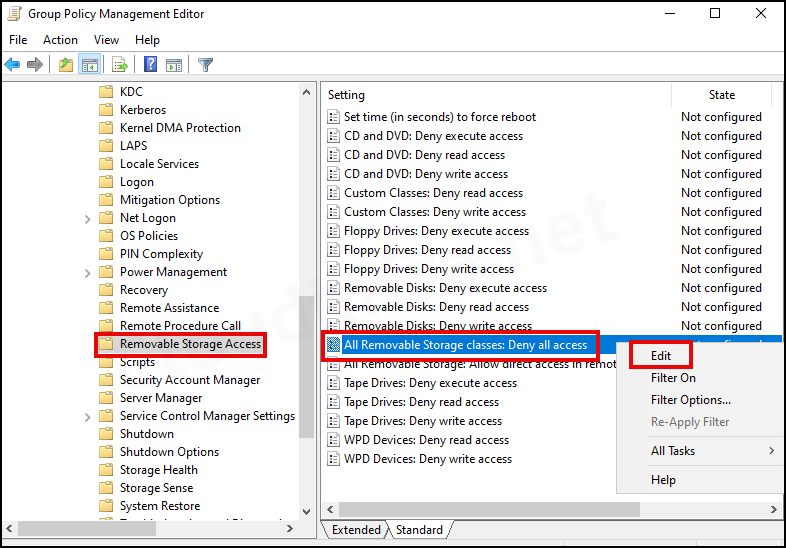
- Select Enable to block any removable Storage classes, including USB drives. Click on the OK button to save the changes. Close the Group Policy Management Editor.
Step 3: Link Block USB Drives GPO with Block USB Drives OU
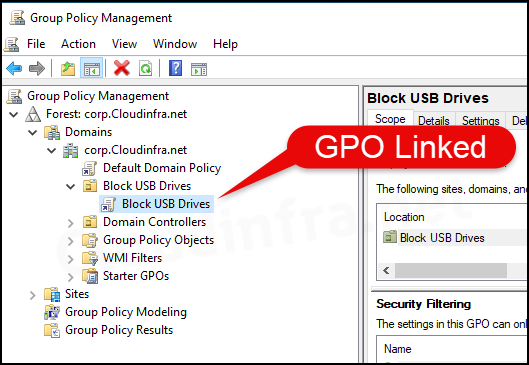
Now that our Group Policy Object has been created successfully, it will not apply until it’s linked to an Organizational Unit (OU) that contains Windows devices. We had previously created an OU called Block USB Drives, including the Cloudinfra-Win11 computer. Let’s link the Block USB Drives GPO with this OU.
- Login to the domain controller using domain administrator rights.
- Press Windows + R to open the Run dialog box.
- Type
gpmc.mscPress Enter to open the Group Policy Management Console. - Right-click on the Block USB Drives GPO and select Link an Existing GPO…

- Select Block USB Drives GPO and press OK to link this GPO with Block USB Drives OU.
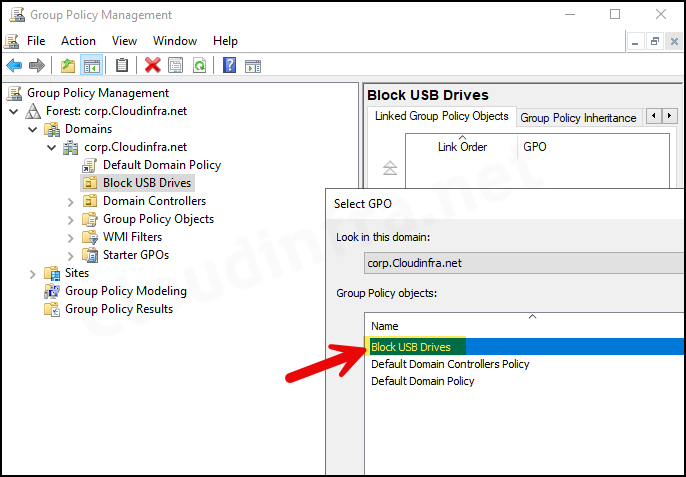
- Now that the Group Policy Object (GPO) has been linked successfully with an Organizational Unit (OU) that contains Windows devices let’s test this policy and confirm if it has been applied successfully.
End User Experience
Group Policy updates happen regularly on client devices. However, if you want to speed up the testing and apply this Group Policy more quickly, you can open a command prompt as an administrator and run the command gpupdate /force.
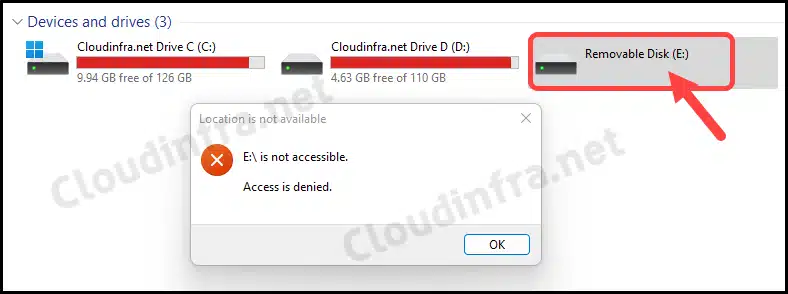
After that, you can try to plug any USB drive into one of the devices on which you have applied this GPO. Try to access this USB drive, and you will see a pop-up message <Drive:> is not accessible. Access is denied. This concludes our blog post and confirms the successful application of the GPO on Windows devices to block USB drive access.
Other Ways to Block USB Drives on Windows Devices
There are multiple methods to block USB drives on Windows devices.
- Block USB Drives using a Group Policy Object (GPO): The steps given in this blog post.
- Block USB Drives using Group Policy Preferences (GPP): You can use GPP to create necessary Registry Entries that block USB drive access. For details about which registry entries to create, refer to the post: Registry Key Information.
- Block USB Drives using Intune: If your Windows 10 or Windows 11 devices are Entra hybrid joined or Entra Joined, you can use Intune Policies to block USB drives. Here are three ways to do so.
- Block USB Drives using Intune Remediations: This method also utilizes Intune but involves using PowerShell scripts to create the necessary registry keys and entries, effectively blocking USB drives. For more details, refer to the step-by-step guide: Block USB Drives access on Windows using Intune remediations.
- Block USB Drives using PowerShell script: You can create and deploy a PowerShell script using Group Policy or Intune to block USB drives. I have created PowerShell scripts that generate registry entries to block USB access. For more details, refer to the post: PowerShell scripts.
- Block USB Drives using Registry: The Windows registry editor can create necessary registry entries to block USB Drive access. Refer to the link: Registry Key Information.

How can we have Block usb drives with conditional access like –> we have to enable read only USB drives. Files can be taken inside, but not allowed to take out.
Thanks
Please use only this policy “Removable Disks: Deny write access”