In this post, I will show you how to allow or block Chrome extensions using Intune. Browser extensions can introduce material risk because they execute code in the browser context and can access sensitive data. A standard enterprise pattern is default-deny: block all extensions, then allow only extensions that have been risk-assessed and approved.
I will use Microsoft’s recommended approach, which is to use the Settings catalog policy in Intune to allow or block extensions in the Google Chrome browser. For allowing/whitelisting or blocking an extension, we will require the app’s extension ID. Let’s check the steps to first get the extension ID and then move to the steps for creating a settings catalog policy.
Contents
Prerequisites
Before configuring extension governance, confirm the basics. This prevents “policy deployed but not enforced” outcomes and reduces troubleshooting time later.
- Windows devices are enrolled in Intune and receiving configuration profiles.
- Google Chrome is installed and managed.
- You have permission to create and assign Intune configuration profiles.
- You have the Chrome Web Store extension IDs for any extensions you plan to allow/block or force-install. Extension IDs are 32 characters and can be collected from the Chrome Web Store URL.
How Chrome extension control works
Chrome supports multiple extension governance policies:
- ExtensionInstallBlocklist (Intune setting: Configure extension installation blocklist): blocks specified extensions. Extensions already installed are disabled if blocklisted.
- ExtensionInstallAllowlist (Intune setting: Configure extension installation allow list): exempts extension IDs from the blocklist model, enabling an allow-only posture.
- ExtensionSettings (recommended for advanced and consolidated control): extensionSettings overrides other extension-related policies when also set and supports using
*as a default rule for all extensions.
Step 1: Collect the Extension IDs
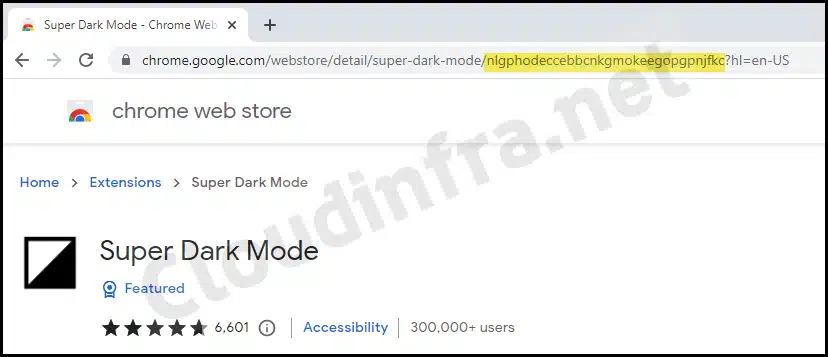
You must use the correct extension ID to allow, block, or force-install an extension. Retrieve the ID from the Chrome Web Store URL.
- Open Google Webstore.
- Search for the extension that you want to manage, and then from the address bar of the browser, copy the 32-character ID from the end of the URL.
- Repeat for all extensions you want to control.
Step 2: Block All Extensions and Allow Only Approved Ones
This is the most controlled approach, as users can install only the extensions that you explicitly approve. In the next steps, I will create an Intune policy that blocks all extensions in the Chrome browser and whitelists, or allows only specific extensions.
- Sign in to the Intune admin center > Devices > Configuration > + Create > New Policy.
- Select Platform as Windows 10 and later. Profile type as Settings catalog.
- Click on Create.
- On the Basics tab, provide a name and description of the policy. Click Next.
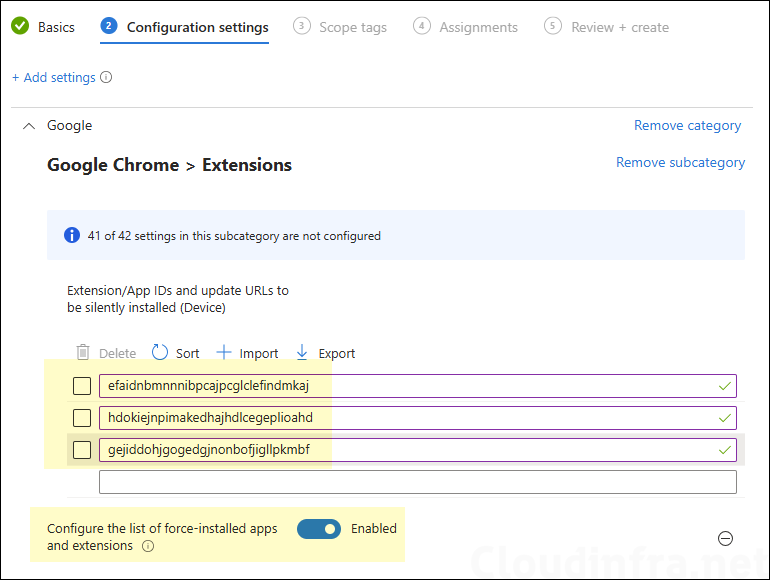
- Configuration Settings: Click on Add Settings and use the Settings picker to search using the keyword chrome. Click on the category Google Google Chrome Extensions and select Configure extension installation blocklist and Configure extension installation allow list.
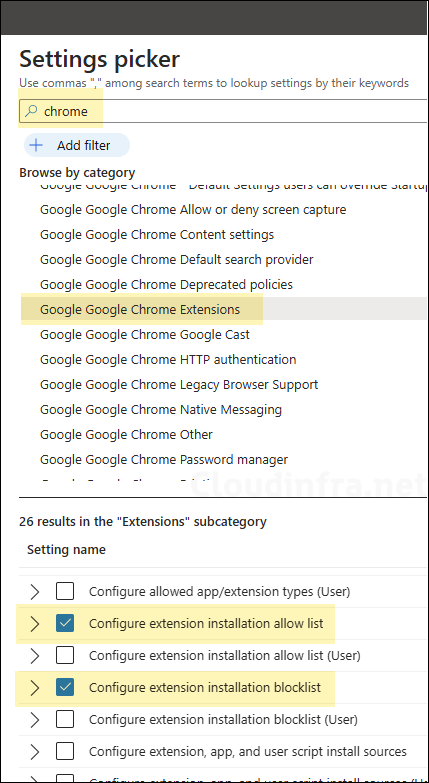
- Configure extension installation blocklist: Enable this setting, add
*in the text box, and click OK to save. This will block all extensions in Chrome.
Instead of blocking all extensions using a wildcard character *. Provide the extension IDs to block only specific extensions in Chrome.
- Configure extension installation allow list: Enable this setting and add each approved extension ID (one per entry). As an example, we want to whitelist Super Dark Mode extension; therefore, we have provided its extension ID. [Skip this setting if you do not want to whitelist any extensions].

- Scope tags (optional): A scope tag in Intune is an RBAC label that you assign to resources such as policies, apps, and devices to control which administrators can view and manage them. For more information, see How to use scope tags in Intune.
- Assignments: Assign the policy to Microsoft Entra security groups that include the target users or devices. As a best practice, start with a small pilot group, and once validated, expand the assignment more broadly. For guidance on assignment strategy, see Intune assignments: User groups vs. device groups.
- Review + create: Review the deployment summary and click Create.
If you want to use a single policy to manage extensions in Chrome, use the ExtensionSettings Settings Catalog policy, which requires the value to be provided in JSON format. This policy can block, whitelist, force-install, and remove extensions from Chrome (all-in-one policy). The ExtensionSettings policy takes precedence over the ExtensionInstallAllowlist and ExtensionInstallBlocklist policies. I have provided more details about this policy at the end of the post.
Example JSON
{
  "*": { "installation_mode": "blocked" },

  "gejiddohjgogedgjnonbofjigllpkmbf": { "installation_mode": "allowed" },
  "nngceckbapebfimnlniiiahkandclblb": { "installation_mode": "allowed" },

  "hdokiejnpimakedhajhdlcegeplioahd": {
    "installation_mode": "force_installed",
    "update_url": "https://clients2.google.com/service/update2/crx"
  },

  "gmlfjgdhpplebamgacpndimkmohbjpad": { "installation_mode": "removed" }
}
Step 3: Force-install required extensions (optional)
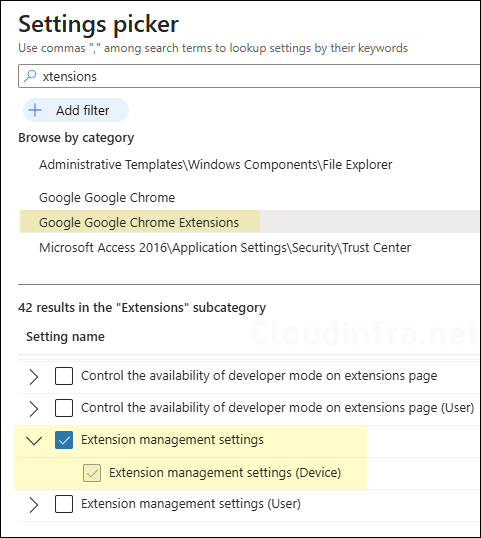
Force-install is used for extensions that must always be present. There are two options to force-install required extensions in the Chrome browser via Intune. The first option is to use JSON code that specifies which extensions must be force-installed. This JSON data can be entered in Extension management settings policy available in the settings catalog.
An important point to note is that when you use the ExtensionSettings policy for Chrome, it overrides the following policies if they are already configured. For more information, refer to the link: Set Chrome app and extension policies (Windows) – Chrome Enterprise and Education Help.
- ExtensionAllowedTypes
- ExtensionInstallBlocklist
- ExtensionInstallForcelist
- ExtensionInstallSources
- ExtensionInstallAllowlist
The second option is to use a Settings Catalog policy setting called Configure the list of force-installed apps and extensions, where you specify the extension IDs along with the update URLs you want to force-install. Let’s explore both options.
Option 1: Use ExtensionSettings Policy
Use the JSON data below and replace aaaaaaaaaaaaaaaaaaaaaaaaaaaaaaaa with the actual extension ID you want to force-install. Keep installation_mode set to force_installed and update_url set to https://clients2.google.com/service/update2/crx. Enter the JSON data into the Extension management settings settings catalog policy for chrome.
JSON
{
  "aaaaaaaaaaaaaaaaaaaaaaaaaaaaaaaa": {
    "installation_mode": "force_installed",
    "update_url": "https://clients2.google.com/service/update2/crx"
  }
}
You can also block all extensions in Chrome by using the ExtensionSettings policy. To achieve this, add the line “*”: { “installation_mode”: “blocked” } to the JSON as shown below, in addition to the force-install configuration for the required extension.
Even if you have already used the Configure extension installation blocklist policy to block all extensions, you can still block them through the ExtensionSettings policy. This is because the ExtensionSettings policy can override the ExtensionInstallBlocklist policy.
If you are managing extensions using the JSON-based approach, either avoid configuring the Configure extension installation blocklist policy and use ExtensionSettings instead, or do not use ExtensionSettings to force-install extensions and use Option 2 (shown next).
{
  "*": { "installation_mode": "blocked" },
  "aaaaaaaaaaaaaaaaaaaaaaaaaaaaaaaa": {
    "installation_mode": "force_installed",
    "update_url": "https://clients2.google.com/service/update2/crx"
  }
}
Option 2: Configure the list of force-installed apps and extensions
This is the second option to force-install extensions in the Chrome browser. Use the Settings Catalog policy named Configure the list of force-installed apps and extensions and specify the extension IDs you want to force-install.
This option is preferable when you want to keep your existing blocklist (*) and allowlist design and simply add a separate force-install mechanism for a few business-critical extensions.
Sync Intune Policies
The device check-in process might not begin immediately. If you’re testing this policy on a test device, you can manually kickstart the Intune sync from the device itself or remotely through the Intune admin center.
Alternatively, you can use PowerShell to force the Intune sync on Windows devices. Restarting the device is another way to trigger the Intune device check-in process.
End User Experience
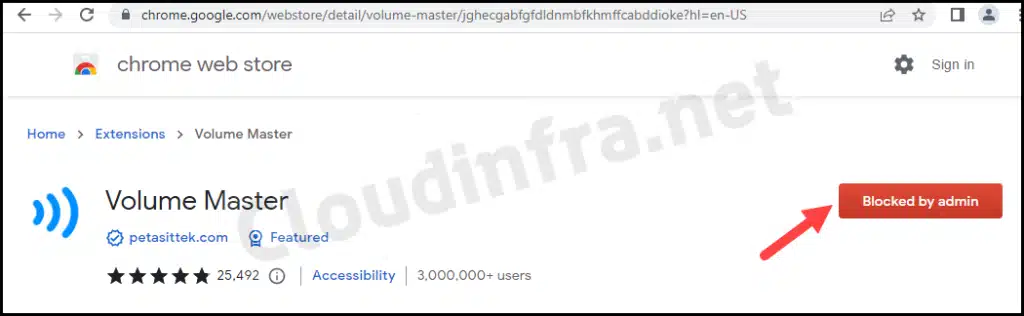
Let’s see how this policy affects the end user’s device. After successfully deploying this policy, open the Chrome browser to test whether the installation of all extensions is blocked and whether only the specific extension (in this case, Super Dark Mode) is allowed according to the whitelist.
If any existing extensions were installed when this policy was applied, they will also be blocked. Only the extensions that you whitelist from Intune will be allowed. An error may show up on Chrome: Blocked by admin. When you click this button, you will receive a pop-up message: Your admin has blocked <extension name> – App ID <app ID>.
Remove/Uninstall extensions from Chrome using Intune
If your goal is to uninstall an extension (not just block new and existing installs), you should use Chrome’s ExtensionSettings policy with installation_mode: “removed”. This is the most reliable and vendor-supported way to remove extensions at scale.
Use ExtensionSettings (JSON)
Chrome’s ExtensionSettings lets you centrally define what happens to extensions, including setting a default rule for all extensions (*) and per-extension rules. When you set an extension to “removed“, Chrome removes it from the device.
Step 1: Get the extension ID
- Open Google Webstore.
- Search for the extension that you want to remove, and then from the address bar of the browser, copy the 32-character ID from the end of the URL.
- Repeat for all extensions you want to remove.
Step 2: Create an Intune Policy
- Sign in to the Intune Admin Center > Devices > Configuration > + Create > New Policy.
- Select Platform type as Windows 10 and later. Select Profile type as Settings Catalog.
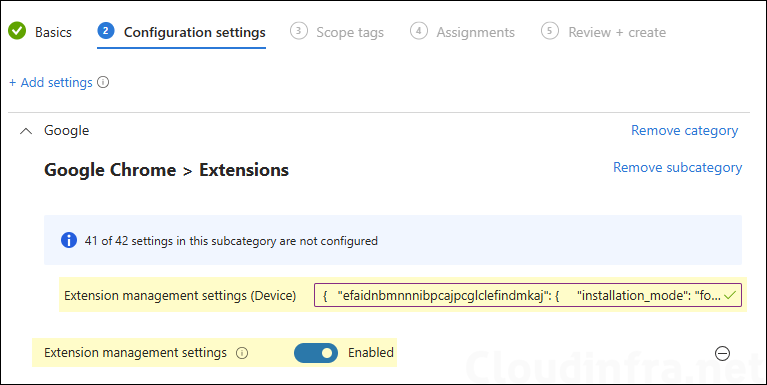
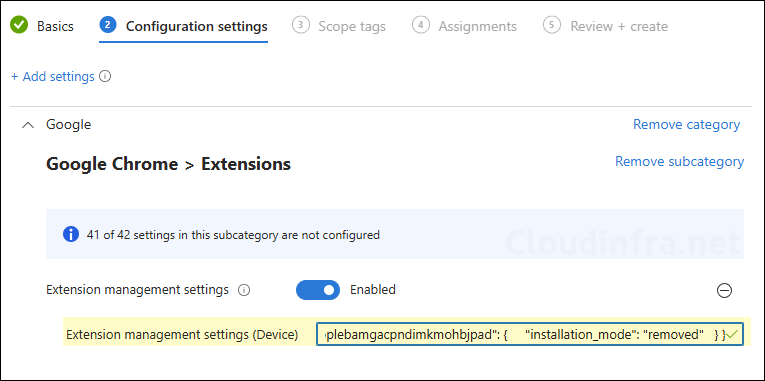
- Add a settings catalog policy called extension management settings (ExtensionSettings).
Step 3: Paste JSON to remove the extension
Use this JSON template and replace EXTENSION_ID_HERE with your extension ID. Copy and paste the JSON data in the ExtensionSettings policy. Then assign the policy to a user or device group.
{
  "EXTENSION_ID_HERE": {
    "installation_mode": "removed"
  }
}
You can also create a single ExtensionSettings policy that does the following:
- Blocks all extensions in Chrome
- Whitelists or allows specific extensions in Chrome
- Force-installs specific extensions in Chrome
- Removes specified extensions from Chrome
If you configure ExtensionSettings, it can override other extension policies (blocklist/allowlist) and should be treated as the authoritative extension control policy.
JSON
{
  "*": { "installation_mode": "blocked" },

  "gejiddohjgogedgjnonbofjigllpkmbf": { "installation_mode": "allowed" },
  "nngceckbapebfimnlniiiahkandclblb": { "installation_mode": "allowed" },

  "hdokiejnpimakedhajhdlcegeplioahd": {
    "installation_mode": "force_installed",
    "update_url": "https://clients2.google.com/service/update2/crx"
  },

  "gmlfjgdhpplebamgacpndimkmohbjpad": { "installation_mode": "removed" }
}
Conclusion
In summary, managing Google Chrome extensions with Intune is most effective when you adopt a default-deny model and keep the configuration centralized and verifiable. Use Settings catalog to block all extensions with *, allow only approved extension IDs, and force-install any business-critical extensions to ensure consistency across devices.
When you need a true uninstall (not just a disable), implement Chrome’s ExtensionSettings policy with installation_mode: “removed” so the extension is actively removed during policy enforcement, then confirm results with chrome://policy and chrome://extensions.
You can also use a single all-in-one ExtensionSettings policy by defining a single JSON file for all your extensions you want to manage. In this case, you do not need to use the Configure extension installation blocklist and Configure extension installation allow list Settings Catalog policies.
Chrome becomes total crap browser. Google has on New Chrome Web Store began to block all extensions install on chrome based browser (update to the last browser doesn’t help). Naked Chrome browser is USELESS (try to browse without any extensions installed).
Hi,
First thanks for all your posts ! Very usefull !
About browser extensions it can be interesting to first get from devices the list of current extensions that are installed… Do you know how to pull these informations from devices managed by intune ?
All the best
T.