In this blog post, I will show you the steps to bypass Spam filtering in Microsoft 365/Office 365.
Exchange Online Protection (EOP) is a cloud-based email filtering service part of Microsoft 365. Using EOP, organizations can protect against spam, malware, phishing attacks, and other email threats by scanning inbound and outbound emails. EOP is included in all Microsoft 365 organizations with Exchange Online mailboxes.
Microsoft 365 email protection uses its built-in algorithm and artificial intelligence to identify whether an email is categorized as spam, phishing, or contains malware.
Whitelisting an email address or domain involves adding that specific email address or domain to the Allow list, often called a Safe Senders list.
There are several methods for whitelisting a sender or domain in Office 365. However, it’s important to note that Microsoft recommends none of these options, as they can override the judgments made by Microsoft 365 threat protection. Creating rules bypassing the threat protection filters may inadvertently allow potentially harmful messages to pass through.
If you find it necessary to temporarily bypass a sender or domain from threat protection checks, it’s advisable to do so on a short-term basis.
You can Whitelist a sender or domain in Office 365 using any of the following methods:
- Using Tenant Allow/Block List.
- Create a Transport rule in Exchange Online.
- Outlook Safe Senders list.
- IP Allow List in Anti-spam policy.
- Allow or Block List of Anti-Spam or Anti-Phishing Policies.
Contents
Option 1: Using Tenant Allow/Block List
To exempt a sender or domain from threat protection checks, you can utilize the Tenant Allow/Block list from the Microsoft 365 Defender portal.
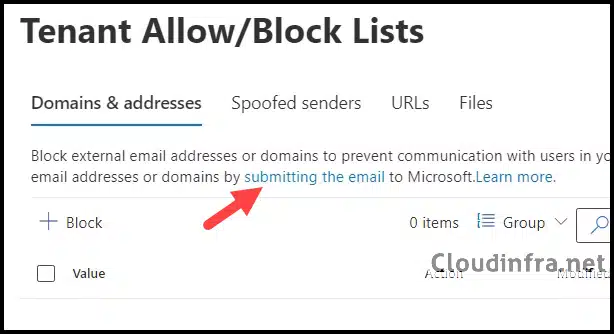
You can add any domain or email address to the Block list without submitting a sample email message to Microsoft. However, when adding a sender to the Allow list, you’ll need to submit a copy of the email message to the Microsoft team.
Microsoft will analyze the email header information and other attributes to determine whether it’s a false positive or negative. Depending on the options selected during sample submission, the email will be allowed for a specified number of days.
You cannot keep a sender or domain on the Tenant Allow list for an unlimited duration. The allowed sender will be removed from the rule when the deadline expires.
Add a Sender to the Office 365 Tenant Allow List
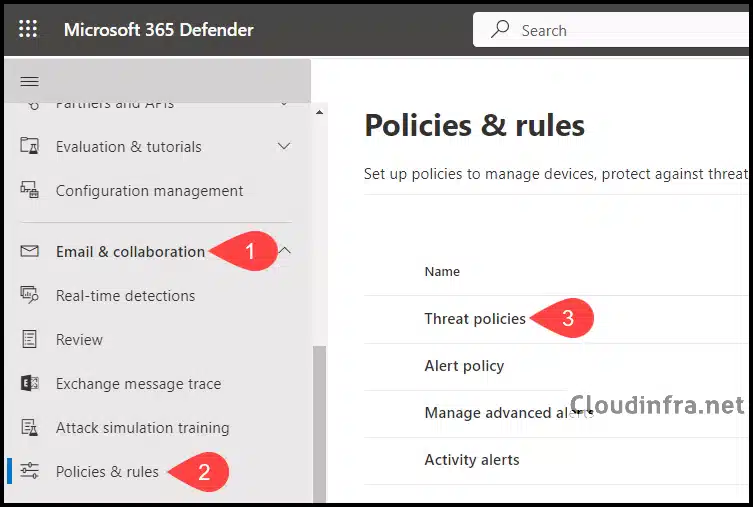
- Sign in to the Microsoft 365 Defender portal as a Security Administrator or a Global administrator.
- Under Email & collaboration > Policies & rules.
- Click on Threat policies.
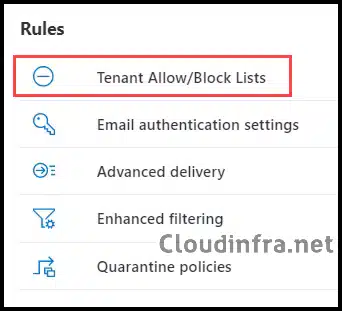
- Under Rules > Tenant Allow/Block Lists.
- Click on Submitting to the email link, which will open the Submissions Page.
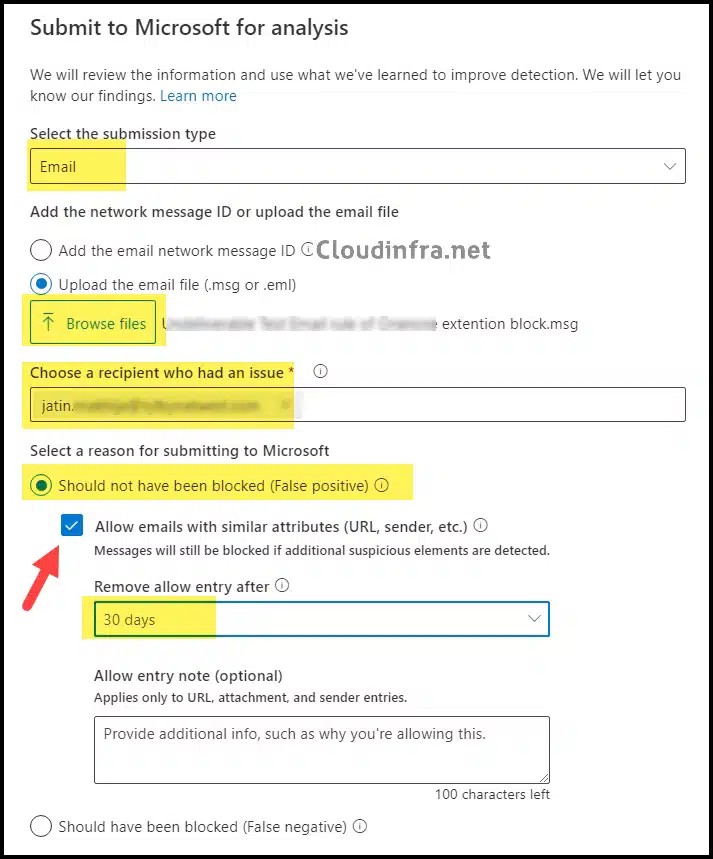
- On the Submissions page, click on + Submit to Microsoft for analysis.
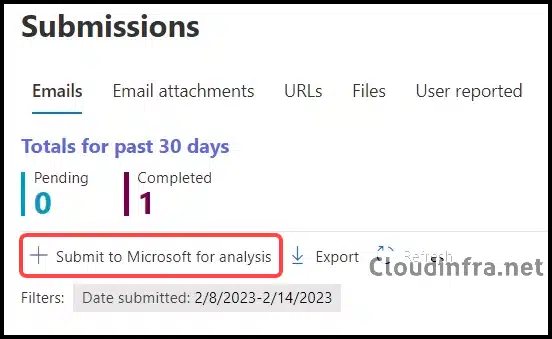
- On Submit to Microsoft for analysis page. Select below information:
- Select the submission type: Email
- Click on Browse files and select the saved email .msg file
- Choose a recipient who had an issue: Provide the email address of the recipient who reported this issue
- Select Should not have been blocked (False positive)
- Check the box Allow emails with similar attributes (URL, sender, etc.)
- Remove allow entry after: From the drop-down, Select the number of days after the whitelisting should be removed.
- Wait for Microsoft’s verdict. Once the analysis has been completed, you will see that the sender has been added to the Tenant Allow/Block list. You can check the status from Email & collaboration > Policies & rules > Threat policies > Tenant Allow/Block Lists.
Option 2: Create a Transport rule in Exchange Online
I understand that setting up a Tenant Allow list may not be straightforward or quick, although Microsoft recommends the approach. If you prefer not to use Option 1, you can alternatively create a Transport rule in Exchange Online to bypass SPAM filtering checks for a specific sender or domain.
To create a Transport rule in Exchange Online, follow these steps:
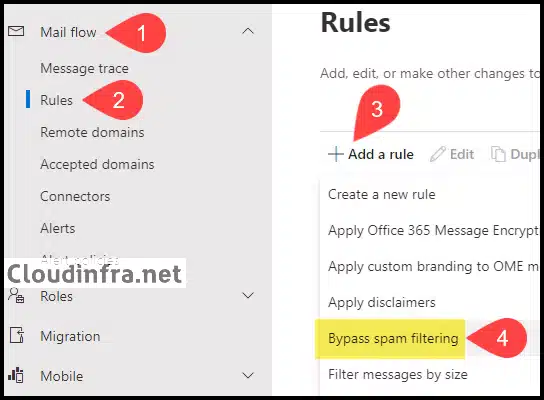
- Sign in to the Microsoft Exchange admin center as either an Exchange Administrator or a Global administrator.
- Go to Mail flow > Rules > click on + Add a rule.
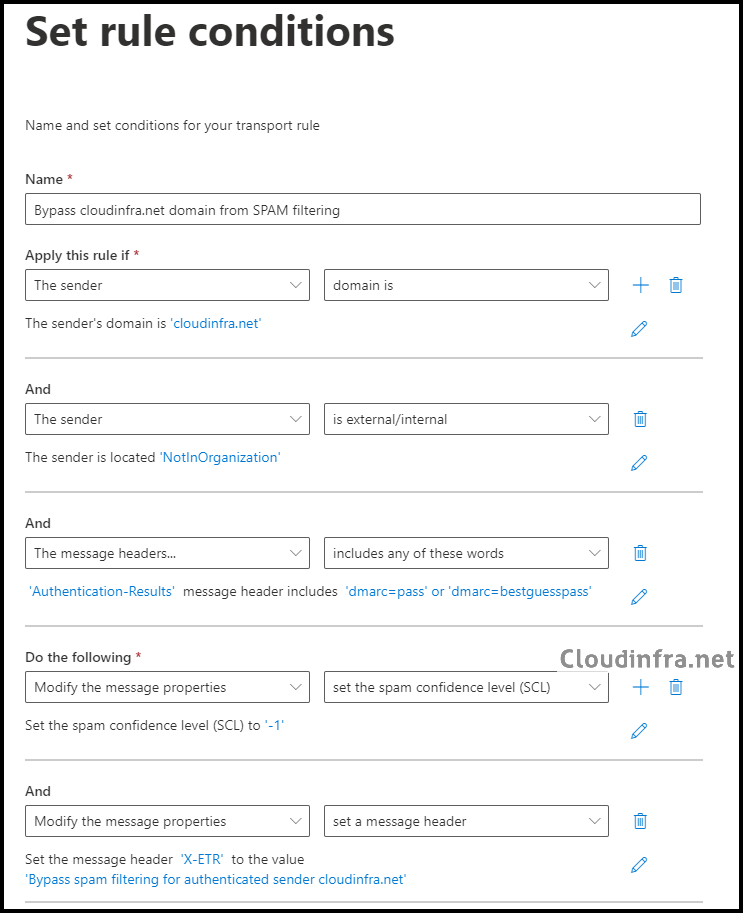
- Configure the rule conditions below and click Next. If necessary, include additional rule conditions to enhance strictness. For instance, if you know the source email server’s IP address, you can add an extra condition in Apply this rule if and specify it. This will ensure that the bypass SPAM filtering rule is exclusively applied to a specific email server.
- Name: Bypass <domainname> domain from SPAM filtering
- Apply this rule if: The sender domain is <provide the domain name value>
- AND The Sender is Outside the organization.
- AND The message headers .. Include any of these words: Header name: Authentication-Results and Words: ‘dmarc=pass’ or ‘dmarc=bestguesspass’
- Do the following: Modify the message properties to Set the spam confidence level (SCL) to -1.
- AND Modify the message properties to set a message header: X-ETR and value as ‘Bypass spam filtering for authenticated sender <domain name>’
| Header name: Authentication-Results and Words: ‘dmarc=pass’ or ‘dmarc=bestguesspass’ |
|---|
| This condition checks the email authentication status of the sending email domain to ensure that the sending domain is not being spoofed. |
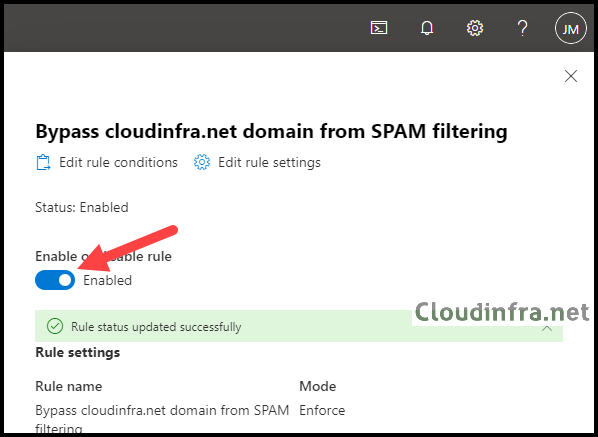
- Set the rule settings below and Click on Next.
- Rule mode: Enforce.
- Keep the rest of the settings as default.
- Review and click on Finish to create the rule.
- When you create a Transport rule in Exchange Online, it’s disabled by default. To enable it, select the rule and switch the toggle to Enable it.
Option 3: Using Outlook Safe Senders list
Users can create a safe sender list using Outlook for Desktop or Outlook on the web (Outlook Web App). When a safe sender list is created, emails or domains on that list bypass content filtering and are delivered directly to the user’s inbox.
Administrators can also configure the Safe Sender list using PowerShell cmdlets. The cmdlet which can be used for this purpose is Set-MailboxJunkEmailConfiguration.
You can use the following cmdlet to verify the blocked or allowed senders configured for any user mailbox.
Get-MailboxJunkEmailConfiguration -Identity "<MailboxIdentity>" | Format-List trusted*,contacts*,blocked*
Option 4: Using IP Allow List
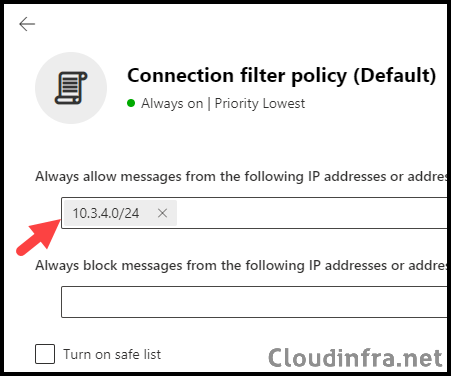
Adding the IP addresses of specific email server (s) to the Allow IP list allows you to bypass spam filtering for all inbound emails originating from them. Additionally, you can specify a range of IP addresses in CIDR format, such as 10.2.4.1/24.
To add an IP address to the Allow IP list using the default connection filter policy in the Microsoft 365 Defender portal under Anti-spam policies, you’ll need to have Security Administrator rights or be a member of the Organization Management group to access and edit the policy.
Here are the steps to add an IP address to the Allow list:
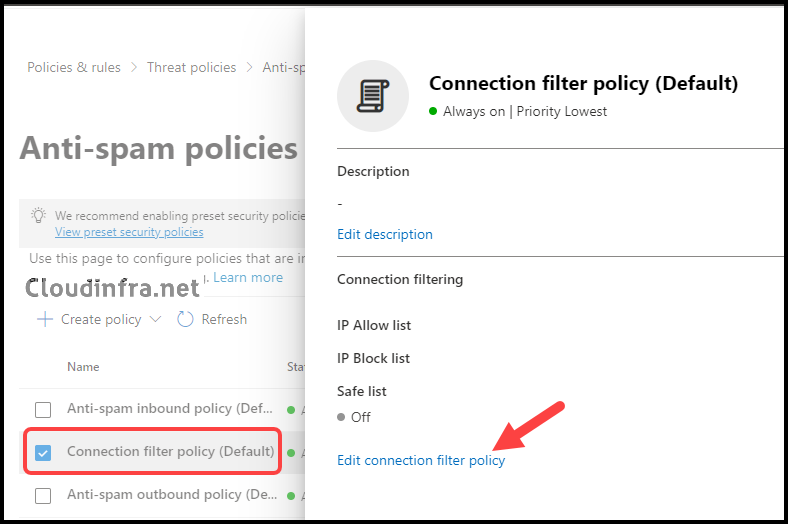
- Sign in to the Microsoft 365 Defender portal as a Security administrator or Global administrator
- Under Email & collaboration > Policies & rules.
- Click on Threat policies.
- Click on Anti-spam under Policies.
- Select the Connection filter policy (Default) and click Edit connection filter policy.
- Add the IP address or IP address range to the Always allow messages from the following IP addresses or address range section. Then, click Save to finalize the configuration.
Option 5: Allow or Block List of Anti-Spam Policies
According to Microsoft, this is the least recommended option because the sender will bypass all spam checks, spoofing checks, and phishing protection, except for sender authentication checks (SPF, DKIM, DMARC). Sender authentication checks must be successfully passed to skip anti-spam filtering.
You should use this option temporarily or while testing email flow. The maximum number of entries that can be added here is 1000; if it’s more than 30, it can only be done using PowerShell.
When adding a domain or sender to the Allow list in the Anti-Spam Inbound (default) policy, it’s important to regularly review and reassess this list every few weeks. The system may learn and adapt to the sender or domain’s behavior, potentially reducing the need to bypass them from content filtering. Periodic reviews help ensure that your email security settings remain effective and up-to-date.
Note
Let’s explore the process of whitelisting a domain or sender in the Anti-Spam Inbound policy:
- Sign in to the Microsoft 365 Defender portal as a Security Administrator or Global Administrator.
- Under Email & collaboration > Policies & rules.
- Click on Threat policies.
- Click on Anti-spam under Policies.
- Select the Anti-spam inbound policy (Default) and scroll down to the bottom of the policy to Select Edit Allowed and blocked senders and domains.
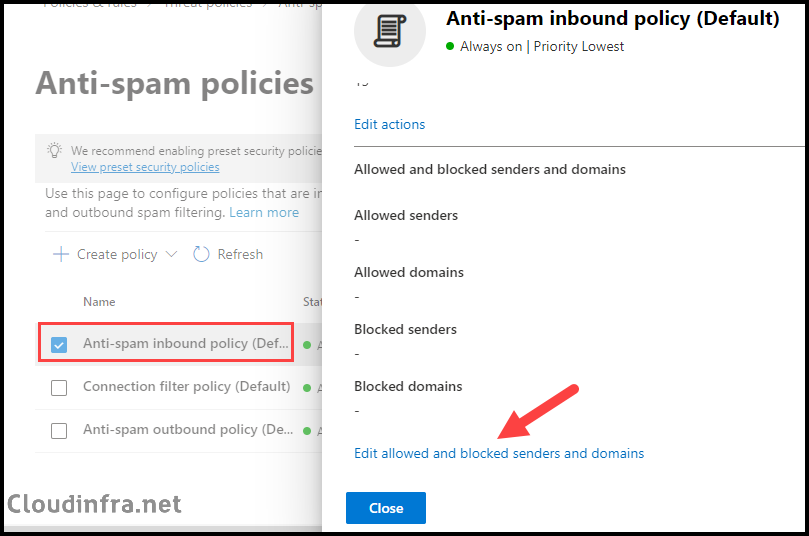
- Under the Allowed section, you will find the Manage Senders and Allow domains link.
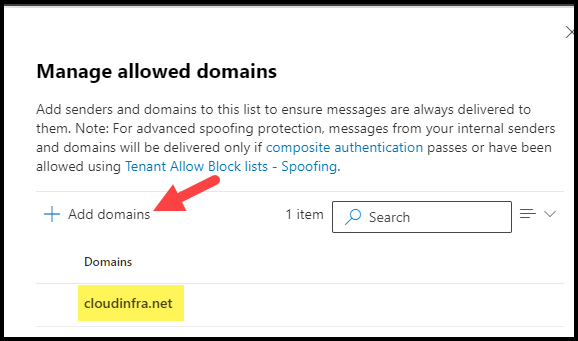
- Manage senders – Add the sender’s email address to the whitelist.
- Allow Domains – Add a domain to whitelist.

- I have clicked on Allow domains link and then clicked on + Add domains to add a domain , for example: cloudinfra.net.
FAQs
1. Allow or Block List of Anti-Phishing Policies
If you wish to exempt a trusted sender or domain from Anti-phishing protection, you can utilize the Allow list within the Anti-phishing policy. Let’s proceed to review the steps for doing so:
- Sign in to the Microsoft 365 Defender portal as a Security administrator or Global administrator.
- Under Email & collaboration > Policies & rules.
- Click on Threat policies.
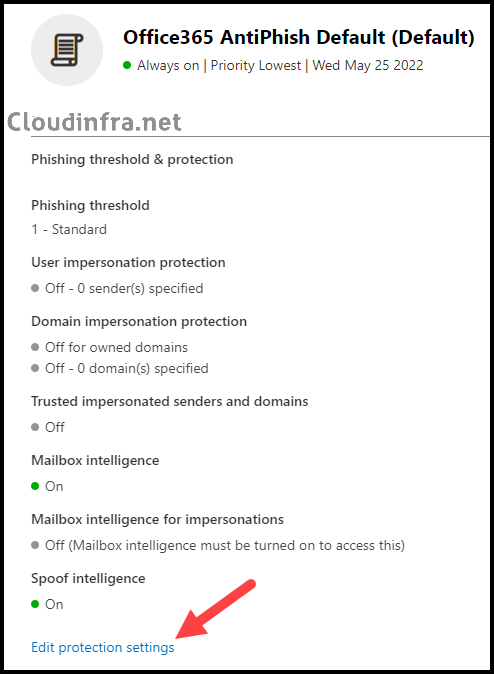
- Click on Anti-phishing under Policies.
- Select the Office365 AntiPhish Default (Default), or if you have created a custom policy that protects all users, select that policy.
- Click on Edit Protection settings.
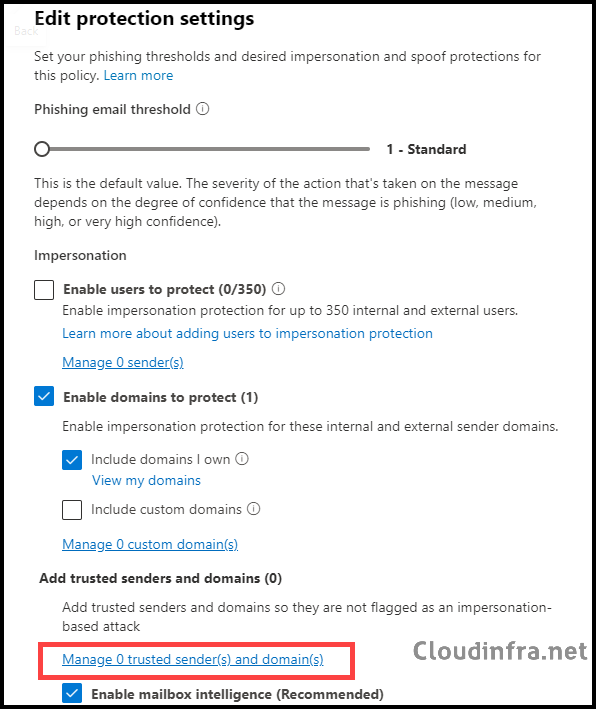
- Under Edit protection settings, click on “Manage trusted sender(s) and domain(s)” to whitelist a sender or domain.
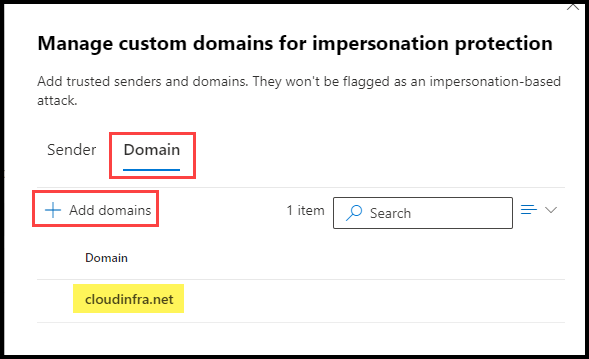
- Click on the Sender tab to whitelist a sender email address or the Domain tab to add a domain.
Conclusion
In this blog post, we’ve explored various methods for whitelisting a sender or domain in Office 365 to bypass SPAM filtering. Additionally, you have the option to bypass Phishing protection alongside SPAM filtering.
If there’s no need to bypass content filtering for an entire domain, only adding the specific sender who reported the issue is advisable. Furthermore, it’s crucial to regularly monitor your allowed list and promptly remove any sender or domain when whitelisting is no longer necessary. This practice helps maintain a secure and up-to-date email environment.