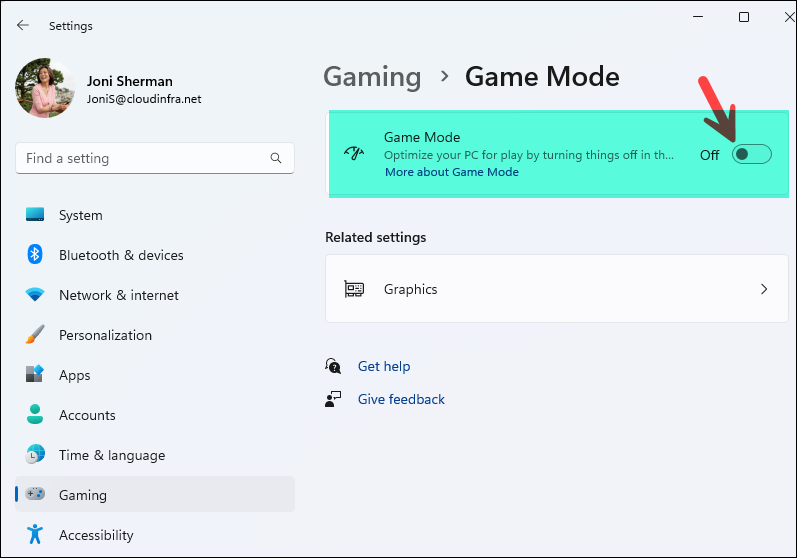
Game Mode is designed for consumer performance tuning, but in enterprise environments it might not be required because it changes how Windows prioritizes workloads during “game-like” sessions. Intune does not provide a first-class “Disable Game Mode” setting in Settings catalog, so the most practical approach is to enforce the user-level Game Mode registry values under HKCU.
Several background actions occur when you enable Game Mode. First, it prevents Windows updates from installing drivers and displaying restart notifications. Additionally, it adjusts the frame rate to optimize gaming performance. It’s often best to keep this setting turned off in an enterprise environment.
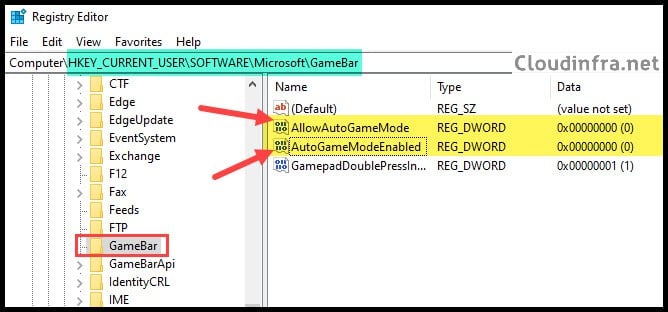
To disable Game Mode on Windows 10 and Windows 11 devices, I will use two registry entries called AllowAutoGameMode and AutoGameModeEnabled, which can be found under the HKEY_CURRENT_USER\SOFTWARE\Microsoft\GameBar registry key. I will set both of these registry entries to 0 to disable Game Mode.
HKCU\Software\Microsoft\GameBar\AllowAutoGameMode = 0 (DWORD)

HKCU\Software\Microsoft\GameBar\AutoGameModeEnabled = 0 (DWORD)
There are below three ways to accomplish this task and configure the required registry entries. All methods use PowerShell scripts. I recommend using either the Win32 app deployment or device remediation approach, as both offer greater flexibility and improved reporting.
- Win32 app deployment: Create a Win32 app in Intune and run PowerShell scripts to set the registry entries.
- Platform scripts: Use a standalone PowerShell script and deploy using Intune that configures the registry entries. It’s a simple and quick way to set the registry entries.
- Device remediations: Use Intune device remediation scripts, which require an Enterprise license. If you want to check an example, I have many posts on remediations; you can refer to those. One of the post link you can use is Create HKCU Registry Keys Using Intune Remediations.
Instead of disabling the Game Mode toggle switch, you also have the option to hide Gaming settings entirely from the Settings app. For more details, refer to the post Hide Gaming Under Settings on Windows via Intune (3 Ways).
Contents
Method 1: Disable Game Mode Using Win32 App Method
Follow below steps to disable Game mode using Win32 app method:
1. Create PowerShell Scripts
Create Disable-GameMode.ps1 and Enable-GameMode.ps1 scripts using the code below and place them in a separate folder. Ensure that there are no other files or folders that exist under this folder apart from these two scripts.
Disable-GameMode.ps1
$path = "HKCU:\Software\Microsoft\GameBar"
New-Item -Path $path -Force | Out-Null
New-ItemProperty -Path $path -Name "AllowAutoGameMode"   -PropertyType DWord -Value 0 -Force | Out-Null
New-ItemProperty -Path $path -Name "AutoGameModeEnabled" -PropertyType DWord -Value 0 -Force | Out-Null
Enable-GameMode.ps1
$path = "HKCU:\Software\Microsoft\GameBar"
Remove-ItemProperty -Path $path -Name "AllowAutoGameMode"   -ErrorAction SilentlyContinue
Remove-ItemProperty -Path $path -Name "AutoGameModeEnabled" -ErrorAction SilentlyContinue
2. Create an IntuneWin File
- Download the Microsoft Win32 Content Prep Tool (IntuneWinAppUtil.exe) from official Microsoft GitHub repository.
- Change to the folder where IntuneWinAppUtil.exe is located. Run IntunewinAppUtil.exe from an elevated command prompt window, and enter the following information:
- Source Folder: C:\Temp\Disable Game Mode
- Setup File: Disable-GameMode.ps1
- Output folder: C:\output
- Catalog folder: Type N and press Enter.

- Check the folder c:\output; you should find a file with the .intunewin extension.
3. Create Win32 app in Intune
- Sign in to the Intune admin center at https://intune.microsoft.com.
- Go to Apps > All apps.
- Select + Create, then in App type choose Windows app (Win32).
- Click on the Select app package file to select Disable-GameMode.intunewin file. Click OK.
- On the App information page, provide below details:
- Name: Disable Game Mode
- Description: Brief description of the app and version or keep default
- Publisher: Microsoft
- Any optional information (category, logo, etc.) to match your requirements.
Click Next.
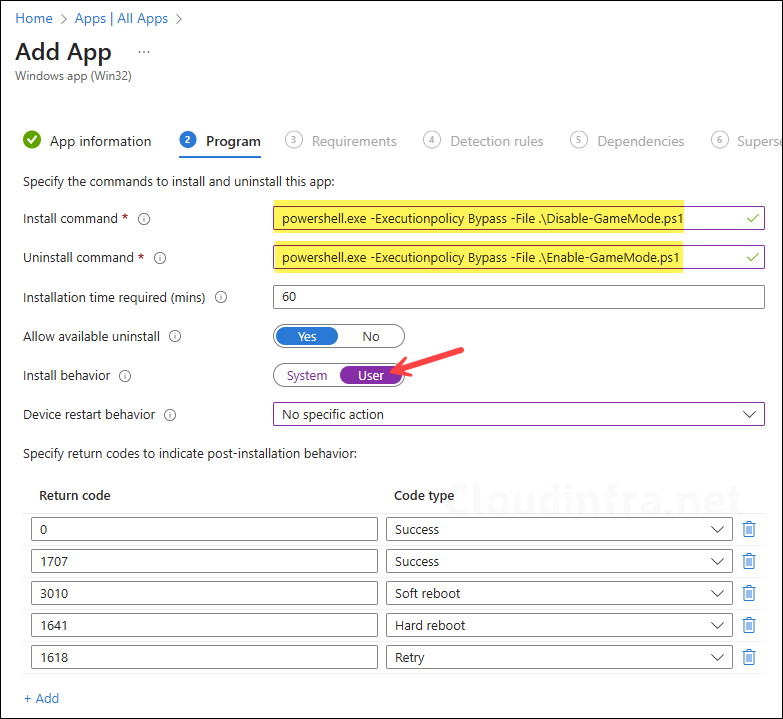
- Program Tab:
- Install command: powershell.exe -Executionpolicy Bypass -File .\Disable-GameMode.ps1
- Uninstall command: powershell.exe -Executionpolicy Bypass -File .\Enable-GameMode.ps1
- Installation time required (mins): Keep default
- Allow available uninstall: Keep default
- Install behavior: User
- Device restart behavior: No specific Action
- Specify return codes to indicate post-installation behavior: Keep default
- Requirements:
- Check operating system architecture: Select Yes. Specify the systems the app can be installed on and check Install on x64 system.
- Minimum operating system: Choose the minimum Windows 10/11 version you support.
Click Next.
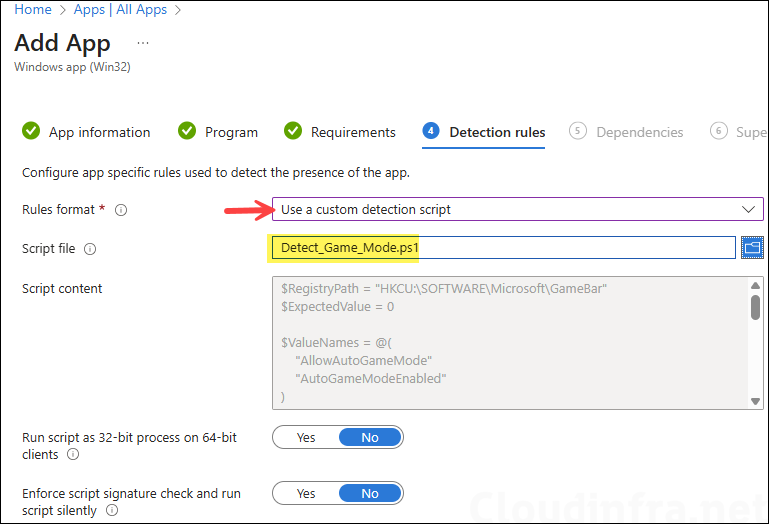
- Detection Rules: For detection rules, we will use a custom PowerShell script called Detect_Game_Mode.ps1. Copy below code into a file and save it as Detect_Game_Mode.ps1.
- Rule format: Use a custom detection script.
- Script file: Browse to Detect_Game_Mode.ps1.
- Run script as 32-bit process on 64-bit clients: No
- Enforce script signature check and run script silently: No
Detect_Game_Mode.ps1
$RegistryPath = "HKCU:\SOFTWARE\Microsoft\GameBar"
$ExpectedValue = 0

$ValueNames = @(
    "AllowAutoGameMode"
    "AutoGameModeEnabled"
)

try {
    # Read both registry values in a single call
    $RegistryValues = Get-ItemProperty -Path $RegistryPath -Name $ValueNames -ErrorAction Stop

    foreach ($ValueName in $ValueNames) {
        $CurrentValue = [int]$RegistryValues.$ValueName

        if ($CurrentValue -ne $ExpectedValue) {
            Exit 1
        }
    }

    Write-Output "Detected"
    Exit 0
}
catch {
    # Any error (missing key/value, access issue, etc.) means "Not detected"
    Exit 1
}
- Dependencies: Click Next.
- Supersedence: Click Next.
- Scope tags (optional): A scope tag in Intune is an RBAC label that you assign to resources such as policies, apps, and devices to control which administrators can view and manage them. For more information, see How to use scope tags in Intune.
- Assignments: Assign the app to Microsoft Entra security groups that include the target users or devices. As a best practice, start with a small pilot group, and once validated, expand the assignment more broadly. For guidance on assignment strategy, see Intune assignments: User groups vs. Device groups.
- Review + create: Review the deployment summary and click Create.
Monitoring Deployment Progress
- From the Intune admin center, go to Apps > All apps.
- Search for the app deployment (e.g., Disable Game Mode) you have created.
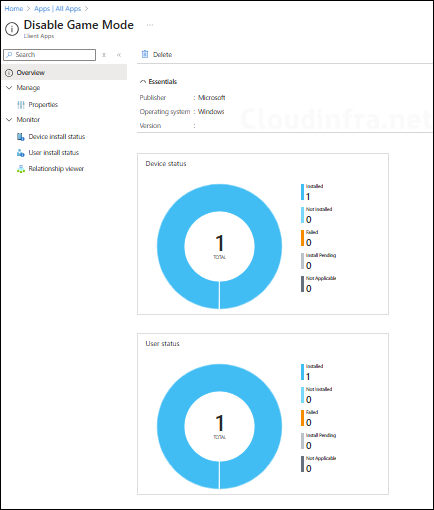
- Check the app status from the Overview page or for more and Device install Status or User install status.
Sync Intune Policies
The device check-in process might not begin immediately. If you’re testing this policy on a test device, you can manually kickstart Intune sync from the device itself or remotely through the Intune admin center.
Alternatively, you can use PowerShell to force the Intune sync on Windows devices. Restarting the device is another way to trigger the Intune device check-in process.
End User Experience
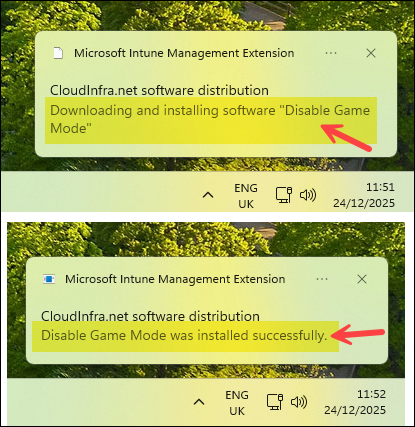
The following toast notifications appear on the user’s device when the app starts downloading and installing, and again once the installation either completes successfully or fails.
Once the script execution completes, two REG_DWORD registry entries, AllowAutoGameMode and AutoGameModeEnabled, are created under HKEY_CURRENT_USER\SOFTWARE\Microsoft\GameBar, with both values set to 0.
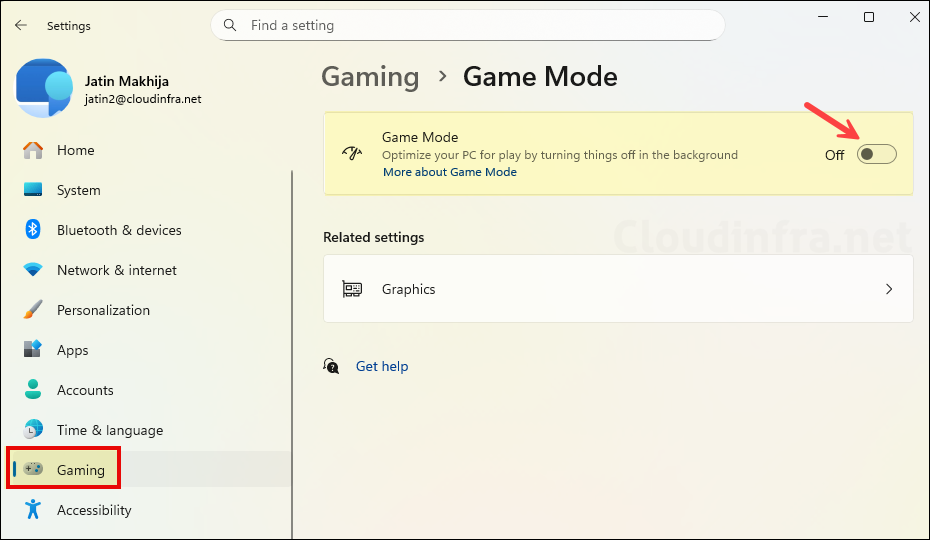
Go to Settings > Gaming > Game Mode to check and confirm if the toggle is off.
Disable Game DVR (Recording/Broadcasting)
If your real requirement is to disable recording/streaming features, use below CSP:
./Device/Vendor/MSFT/Policy/Config/ApplicationManagement/AllowGameDVR = 0 (Not allowed)
Method 2: Disable Game Mode Using PowerShell Script
You can use the Disable-GameMode.ps1 and Enable-GameMode.ps1 PowerShell scripts that I provided for the Win32 app deployment method and deploy them by following the steps outlined in the post How To Deploy A PowerShell Script Using Intune.
Method 3: Disable Game Mode Using Intune Remediations
This method uses detection and remediation scripts to ensure that Game Mode remains disabled. If you prefer this approach, use the detection and remediation scripts below and deploy them via Intune admin center > Devices > Scripts and remediations > Remediations.
GameMode-Detect.ps1
$path = "HKCU:\Software\Microsoft\GameBar"
$names = @("AllowAutoGameMode","AutoGameModeEnabled")

try {
    foreach ($n in $names) {
        $v = (Get-ItemProperty -Path $path -Name $n -ErrorAction Stop).$n
        if ([int]$v -ne 0) { exit 1 }
    }
    exit 0
} catch {
    exit 1
}
GameMode-Remediate.ps1
$path = "HKCU:\Software\Microsoft\GameBar"
New-Item -Path $path -Force | Out-Null

New-ItemProperty -Path $path -Name "AllowAutoGameMode" -PropertyType DWord -Value 0 -Force | Out-Null
New-ItemProperty -Path $path -Name "AutoGameModeEnabled" -PropertyType DWord -Value 0 -Force | Out-Null
I used this to successfully disable Gamebar under a specific user but I am getting failure errors under the bulk of the users. Any idea why this would occur? The error code given is 0x800704EC