In this blog post, I will show you the steps to disable TLS 1.0 and TLS 1.1 on an Nginx server. TLS (Transport Layer Security) provides privacy and data integrity between two communicating applications. SSL (SSL 2.0 / 3.0) and the earliest TLS versions are no longer considered secure enough. The IETF has formally deprecated TLS 1.0 and TLS 1.1 in RFC 8996 and moved them to historic status. RFC 8996: Deprecating TLS 1.0 and TLS 1.1.
TLS versions were released in the following order:
- TLS 1.0 – 1999
- TLS 1.1 – 2006
- TLS 1.2 – 2008
- TLS 1.3 – 2018
Current guidance from security bodies (for example, NCSC in the UK) is to use only TLS 1.2 and TLS 1.3 on public-facing services. Using Transport Layer Security to protect data – NCSC.GOV.UK.
Depending on your Linux distribution and Nginx package version, the default nginx.conf may still allow TLS 1.0 and 1.1, or it may already be restricted to 1.2 and 1.3. In this post, I will show you how to explicitly disable TLS 1.0 and 1.1 in the Nginx configuration, then test and confirm the change using OpenSSL.
Contents
Steps to Disable TLS 1.0 and TLS 1.1 on Nginx
Before you modify the Nginx configuration, take a backup of the file so you can roll back if needed:
Taking a backup of nginx.conf
sudo cp /etc/nginx/nginx.conf /etc/nginx/nginx.conf.bak
1. Open Nginx configuration file
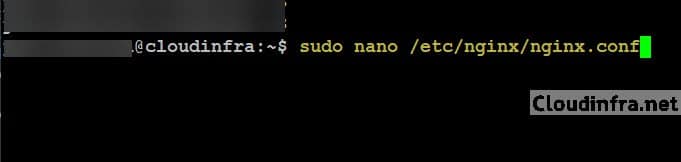
Connect to your server over SSH and open the main Nginx configuration file:
sudo nano /etc/nginx/nginx.conf
Depending on your setup, the TLS configuration might also be in /etc/nginx/conf.d/*.conf or in site-specific files under /etc/nginx/sites-available and /etc/nginx/sites-enabled. We will check those after we change the main file.
2. Find the ssl_protocols line
In nginx.conf, look for the HTTPS server block or a common http block that contains the ssl_protocols directive. On some default installations, you may see something like below. This means the server still allows TLS 1.0 and 1.1 alongside 1.2 and 1.3.
ssl_protocols TLSv1 TLSv1.1 TLSv1.2 TLSv1.3; # Dropping SSLv3, ref: POODLE
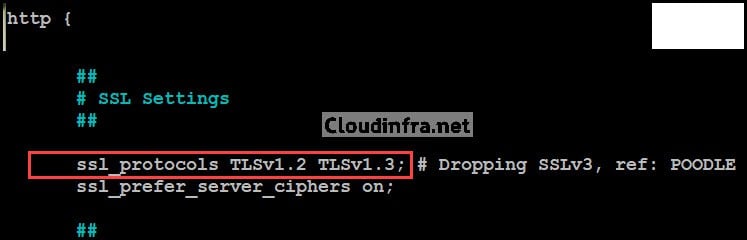
3. Restrict protocols to TLS 1.2 and TLS 1.3 only
Edit the line and remove TLSv1 and TLSv1.1 so that it looks like this:
ssl_protocols TLSv1.2 TLSv1.3; # Dropping SSLv3, TLSv1, TLSv1.1Make sure you use the TLSv1.3 syntax (with the v), which is what Nginx expects for TLS 1.3.
This configuration now restricts inbound HTTPS connections to TLS 1.2 and TLS 1.3 only. This approach is consistent with modern Nginx guidance and SSL hardening practices from vendors and security organizations.
Use Mozilla SSL Configuration Generator to generate a full recommended TLS configuration (protocols, ciphers, HSTS, OCSP stapling, etc.). Select nginx and choose an “Intermediate” or “Modern” profile based on your client support needs, then copy the relevant ssl_protocols and ssl_ciphers lines into your Nginx config.
Optional best practice
4. Check Site specific configuration files
If you are using multiple server blocks (virtual hosts), some of them might override ssl_protocols at the server level.
Check your site configuration, for example:
sudo nano /etc/nginx/sites-available/xyz.comor any other .conf files in:
/etc/nginx/sites-available
/etc/nginx/sites-enabled
/etc/nginx/conf.d
If you find any ssl_protocols directives under those server blocks, update them to:
ssl_protocols TLSv1.2 TLSv1.3;The final effective configuration is the combination of all ssl_protocols directives, so it is important that no site level config still references TLS 1.0 or 1.1.
5. Validate and reload Nginx
After editing the configuration, always validate the Nginx syntax before reloading:
sudo nginx -tIf the output looks like below, you can safely reload and restart Nginx service.
nginx: the configuration file /etc/nginx/nginx.conf syntax is ok
nginx: configuration file /etc/nginx/nginx.conf test is successful
Reload and restart the nginx service
sudo service nginx reload
sudo service nginx restart
# or
sudo systemctl restart nginx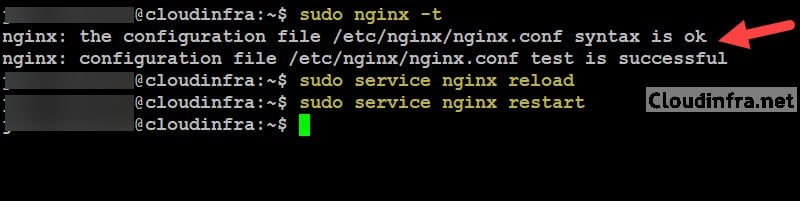
Verify the Nginx service status. You should see active (running) in the output.
systemctl status nginx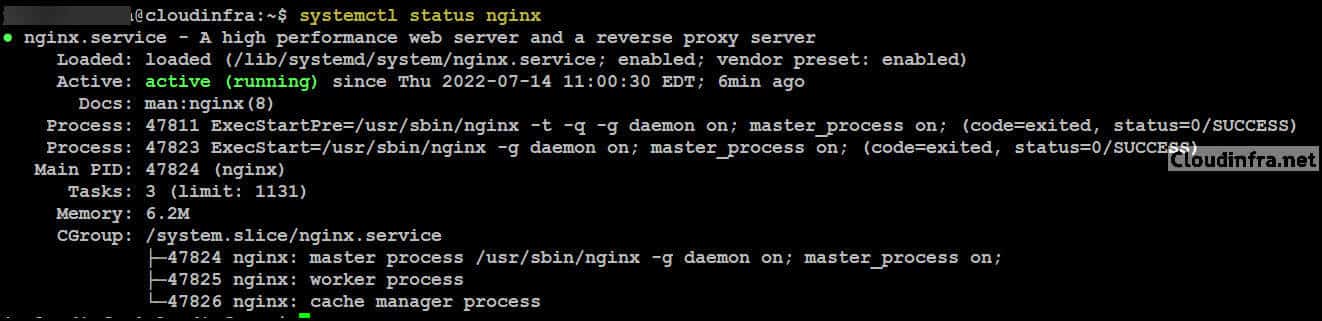
Test and Confirm if TLS 1.0 and TLS 1.1 are Disabled
There are several ways to verify your TLS configuration:
- openssl s_client from a client machine.
- Online scanners such as SSL Labs.
- Nmap or other protocol scanners.
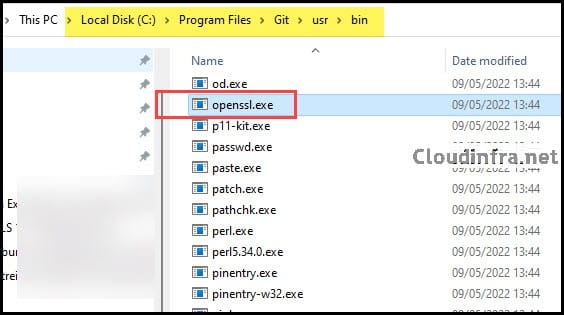
In this example, we will use OpenSSL (https://www.openssl.org/source/). On Windows, an easy way to get OpenSSL is to install Git for Windows, which includes openssl.exe under the below path.
C:\Program Files\Git\usr\bin
- Open a Command Prompt or PowerShell window on your client machine and change directory:
cd "C:\Program Files\Git\usr\bin"
- We will execute the below commands to test TLS 1.0, TLS 1.1, TLS1.2 and TLS1.3. Replace cloudinfra.net with your domain in the tests below.
OpenSSL commands to test TLS
openssl s_client -connect cloudinfra.net:443 -tls1
openssl s_client -connect cloudinfra.net:443 -tls1_1
openssl s_client -connect cloudinfra.net:443 -tls1_2
openssl s_client -connect cloudinfra.net:443 -tls1_3
Test and confirm TLS 1.0 status using OpenSSL
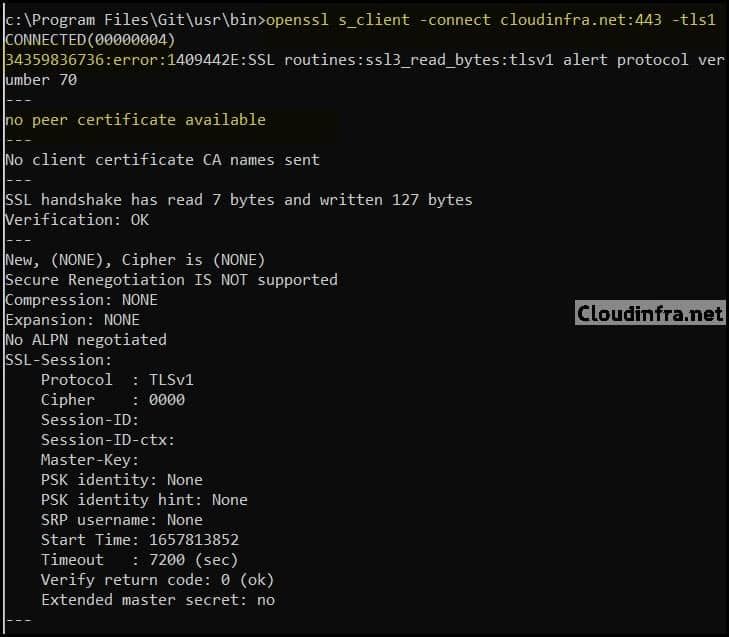
Execute the below command to test TLS 1.0 on the Nginx server via OpenSSL:
Test TLS 1.0
openssl s_client -connect cloudinfra.net:443 -tls1
If TLS 1.0 is disabled on your server, this command should fail to establish a handshake, and you will see an error as shown below:
CONNECTED(00000004)
34359836736:error:1409442E:SSL routines:ssl3_read_bytes:sslv3 alert protocol failure:ssl/record/rec_layer_s3.c:1544:SSL alert number 70
Test and confirm TLS 1.1 status using OpenSSL
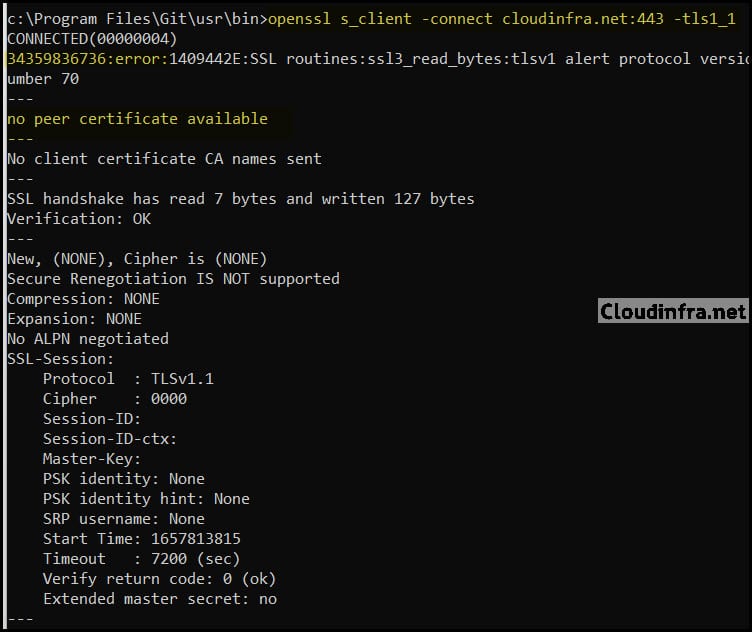
Execute the below command to test TLS 1.1 on the Nginx server via OpenSSL:
Test TLS 1.1
openssl s_client -connect cloudinfra.net:443 -tls1_1If TLS 1.1 is disabled, you should again see a handshake failure or connection error.
Note: Some modern OpenSSL builds may have TLS 1.0 and 1.1 support disabled at compile time, in which case these switches can fail locally even before connecting. That is fine and indicates that your client also no longer supports these versions.
Test and confirm TLS 1.2 status using OpenSSL
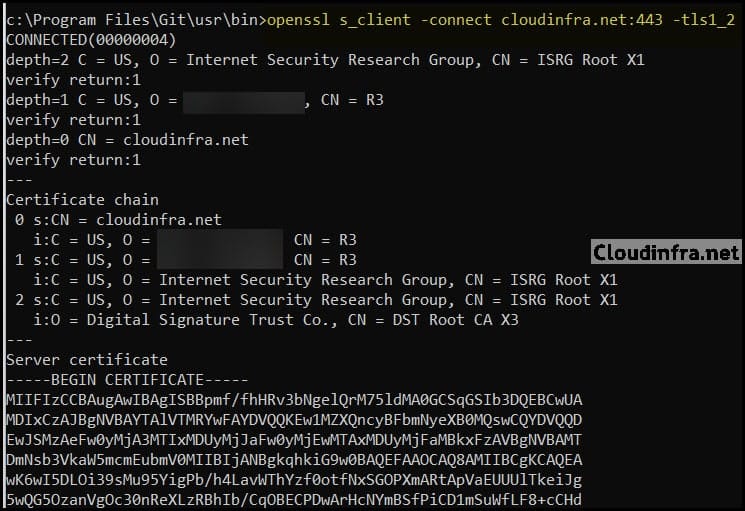
Execute the below command to test TLS 1.2 on the Nginx server via OpenSSL:
Test TLS 1.2
openssl s_client -connect cloudinfra.net:443 -tls1_2
You should see a successful TLS handshake, with output similar to what is shown in the screenshot below.
Test and confirm TLS 1.3 status using OpenSSL
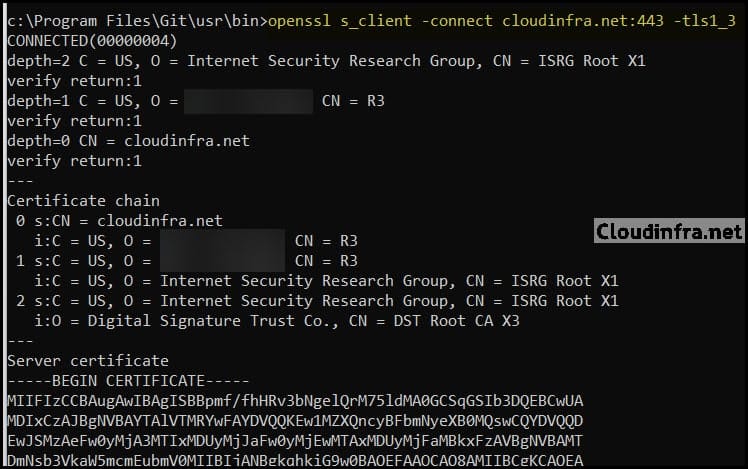
Execute the below command to test TLS 1.3 on the Nginx server via OpenSSL:
TLS 1.3
openssl s_client -connect cloudinfra.net:443 -tls1_2
You should see a successful TLS handshake, with output similar to what is shown in the screenshot below.
Additional Validation with Online Tools (Optional)
As an extra check, you can scan your site using an external TLS checker such as:
- Qualys SSL Labs SSL Server Test
- Other SSL/TLS server configuration scanners.
These tools will show you:
- Which protocol versions are enabled on your server.
- Which cipher suites are used.
- Overall grading and recommendations.
This is useful to confirm there is no other configuration file still enabling TLS 1.0 or 1.1.
Conclusion
To improve the security of your Nginx-based websites or APIs, you should:
- Disable TLS 1.0 and TLS 1.1 and only allow TLS 1.2 and TLS 1.3 in your Nginx configuration.
- Validate and reload Nginx using
nginx -tandsystemctl restart nginx. - Confirm the change using
openssl s_clientor an external TLS scanner.
Once you have TLS 1.2 and 1.3 configured correctly, you can further harden your SSL configuration using recommended cipher suites and options from tools like the Mozilla SSL Configuration Generator.
If you also need to disable TLS 1.0 and TLS 1.1 on Windows servers or Windows 10/11 client machines, you can follow this article: Disable TLS 1.0 and TLS 1.1 on Windows 10/11 machines through GPO.