In this guide, I will cover the steps to create Microsoft Defender Antivirus exclusions using Intune. With Intune, you can centrally exclude specific files, folders, file extensions, or processes from Microsoft Defender Antivirus scanning.
Custom exclusions apply to:
- Always-on real-time protection and monitoring
- Scheduled scans
- On-demand scans
Microsoft Defender Antivirus includes many built-in automatic exclusions for Windows and common workloads. In general, you should avoid adding exclusions unless you have a clear reason. Every exclusion reduces protection, so you should only exclude locations or processes that you fully trust and have assessed for security risk.
If you’ve decided that an exclusion is required (for example, to reduce Defender impact on a specific SQL data folder or a build tool), Intune gives you a few options:
- Endpoint security > Antivirus policies (recommended).
- Device configuration profiles using the Device restrictions template (legacy but still supported).
- PowerShell, GPO, or manual configuration on the device.
In this post we will:
- Check existing Defender exclusions on a device.
- Create Microsoft Defender Antivirus exclusions using Intune.
- Sync the policy to the device.
- Confirm the exclusions via PowerShell and via the GUI.
- Look at manual exclusions and how they interact with Intune policy.
Contents
Check Defender Exclusions on your device
Before configuring anything in Intune, you can check the existing exclusions on a Windows device using below PowerShell command. This returns the current Defender AV exclusions configured on the device (from Intune, GPO, local admin, or other management). You can run this command again after deploying your Intune policy to confirm your changes.
PowerShell
Get-MpPreference | Select-Object -Property ExclusionPath, ExclusionExtension, ExclusionProcess

Method 1 (Recommended): Create Defender AV Exclusions via Endpoint Security
Microsoft now provides a dedicated Endpoint security > Antivirus experience in Intune, with a Microsoft Defender Antivirus exclusions profile that is purpose-built for exclusions. This is the recommended way to configure Defender AV exclusions for Windows devices.
Create the Antivirus exclusions policy
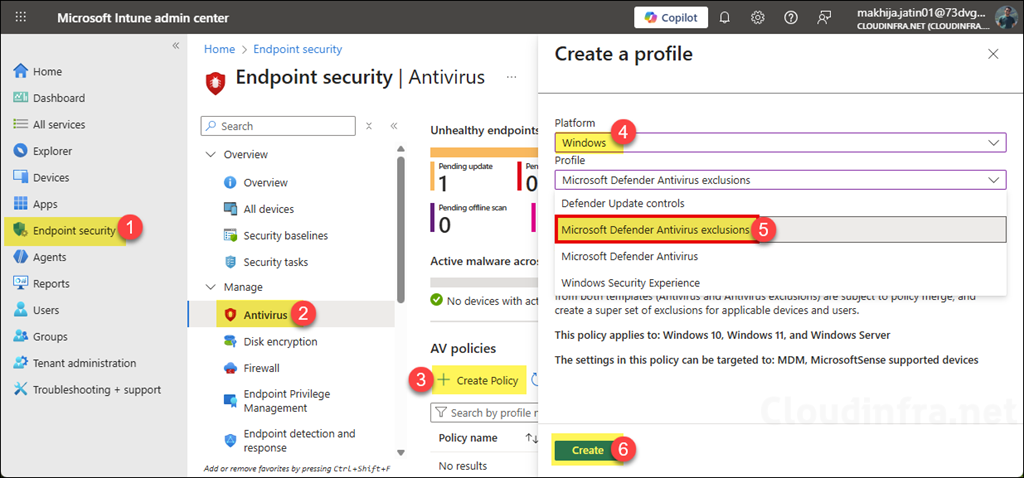
- Sign in to the Intune admin center at https://intune.microsoft.com.
- Go to Endpoint security > Antivirus.
- Click + Create Policy.
- For Platform, select Windows.
- For Profile, select Microsoft Defender Antivirus exclusions, then click Create.
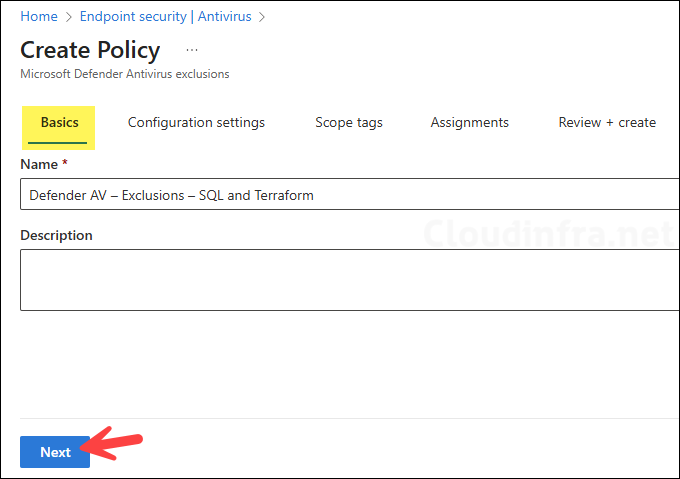
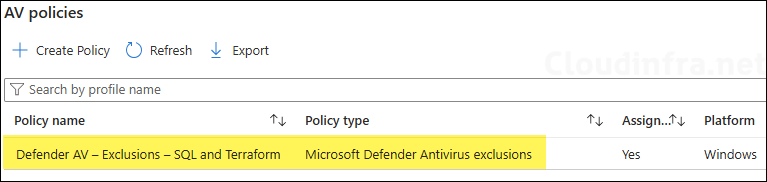
- On the Basics tab, enter a name and description, for example, Defender AV – Exclusions – SQL and Terraform, then click Next.
Configure exclusions
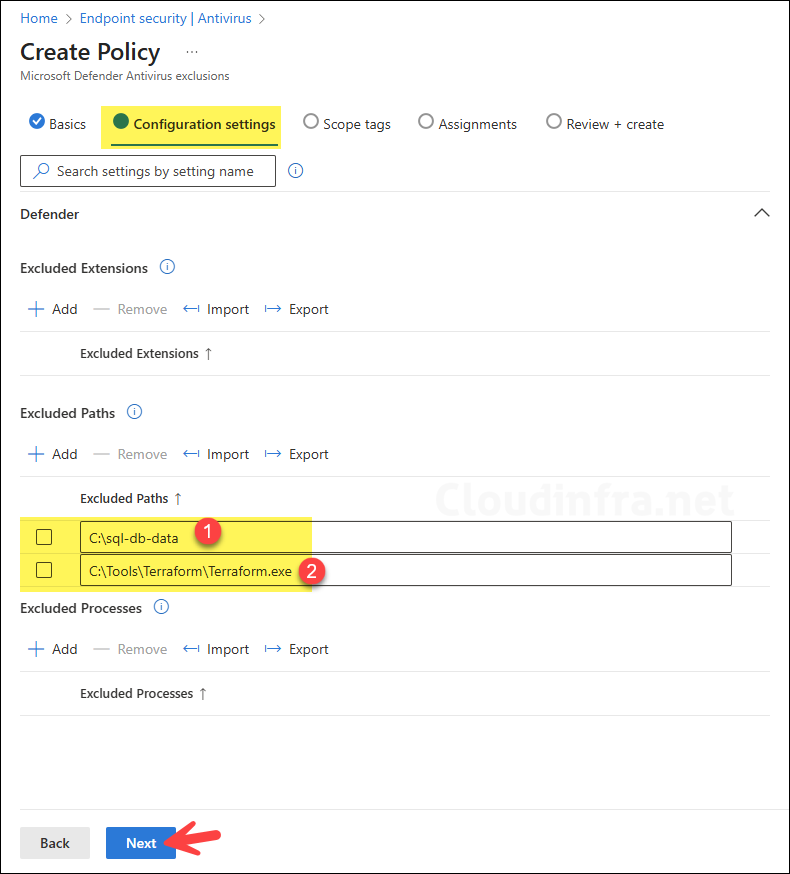
On the Configuration Settings tab, you will see exclusion settings mapped to the Defender CSP:
- Defender/ExcludedPaths: Allows an administrator to specify a list of directory paths to ignore during a scan. Each path in the list must be on a new line.
- Defender/ExcludedExtensions: Allows an administrator to specify a list of file type extensions to ignore during a scan. Each file type in the list must be separated by a |. For example, lib|obj.
- Defender/ExcludedProcesses: Specify full paths to trusted executables. Files opened by these processes won’t be scanned by Defender, which can reduce overhead for backup, indexing, or packaging tools. The process EXE itself is still scanned; if you also want to exclude the executable file, add its path under Defender/ExcludedPaths. Multiple process paths are stored as a
|-separated list (for example, C:\Tool1.exe|C:\Tool2.exe).
ExcludedProcesses Example
C:\Program Files\Veeam\Endpoint Backup\Veeam.EndPoint.Manager.exe|C:\Program Files\RedGate\SQLBackup\SQLBackupAgent.exe|C:\Program Files\7-Zip\7zG.exeAs we want to exclude the C:\sql-db-data path and C:\Tools\Terraform\Terraform.exe file from Defender scanning. We will include these paths under Excluded paths. Use explicit paths where possible; environment variables such as %USERPROFILE% are not interpreted in these exclusion settings. When you have added the necessary exclusions, click Next.
- Scope tags (optional): A scope tag in Intune is an RBAC label you add to resources (policies, apps, devices) to limit which admins can see and manage them. For more information, read: How to use Scope tags in Intune.
- Assignments: Assign the policy to Entra security groups that contain the target users or devices. As a best practice, pilot with a small set first; once validated, roll it out more broadly. For guidance on assignment strategy, see Intune assignments: User groups vs. Device groups. Using device groups is usually preferable for AV exclusions because the configuration should follow the device/workload rather than the user.
- Review + create: Review the deployment summary and click Create.
Sync Intune Policies
The device check-in process might not begin immediately. If you’re testing this policy on a test device, you can manually kickstart Intune sync from the device itself or remotely through the Intune admin center.
Alternatively, you can use PowerShell to force the Intune sync on Windows devices. Restarting the device is another way to trigger the Intune device check-in process.
Confirm Defender AV Exclusions
Once the policy is applied, you can confirm the exclusions on the client by using any of the below methods:
Confirm Defender AV Exclusions using PowerShell
Open PowerShell as an administrator and execute below command:
Get-MpPreference | Select-Object -Property ExclusionPath, ExclusionExtension, ExclusionProcessYou should now see:
- C:\sql-db-data and the Terraform.exe path under ExclusionPath.
- Any configured ExclusionExtension and ExclusionProcess values.
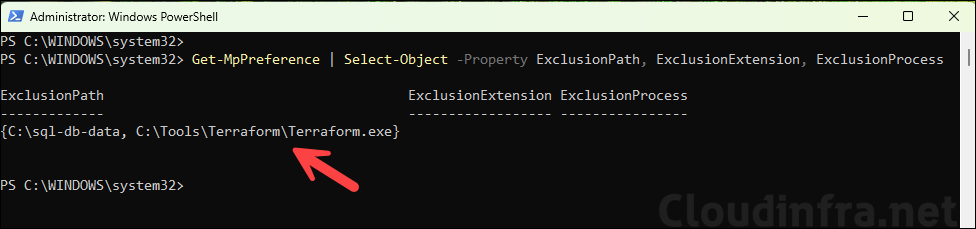
This confirms that the Defender Antivirus engine has received the exclusions from Intune.
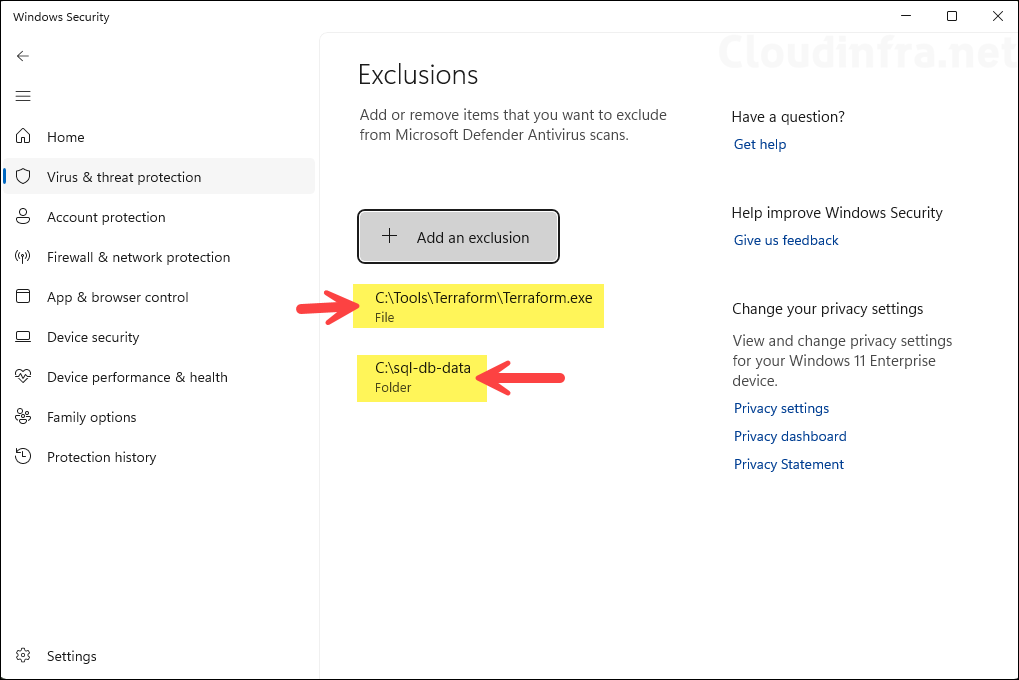
Confirm Defender AV Exclusions using GUI
You can also confirm via the Windows Security app:
- Open Settings > Update & Security > Windows Security, and click Virus & threat protection.
Press Win + R, type
windowsdefender:and press Enter.Shortcut
- Under Virus & threat protection settings, click Manage settings.
- Scroll down to Exclusions and click Add or remove exclusions.
You should see the same exclusions that Intune has configured, for example:
- Folder: C:\sql-db-data
- File: C:\Tools\Terraform\Terraform.exe
Local Exclusions vs. Exclusions from Intune
Local administrators can manually add exclusions directly on the device:
- Add an exclusion that supports the same types as Intune:
- File
- Folder
- File type (extension)
- Process
By default, Defender merges local admin exclusions with managed exclusions from Intune. You can control this behavior using the Defender local admin merge setting in Intune’s Antivirus policy:
- Not configured / No (default): Local admin exclusion lists merge with Intune settings; if there is a conflict, Intune settings win.
- Yes: Only exclusions defined by management are used; local admin exclusions are ignored.
For high-security environments, you will typically:
- Enable Tamper protection to prevent local changes to Defender settings.
- Set Defender local admin merge to Yes so that only Intune-managed exclusions are effective.
Monitoring and Auditing Exclusions (optional)
Once you start using exclusions, you should regularly review and audit them:
- Use Intune reports and exported policy for a configuration-level view.
- Use Defender for Endpoint advanced hunting and the guidance in “Managing exclusions reference” to understand where exclusions are defined and how they impact protection.
- Consider using Intune Device Remediations to discover local, unmanaged Defender exclusions on devices and migrate only the ones you really need into policy.
Method 2 (Legacy): Create Defender AV Exclusions using Device Restrictions
If your environment is already using a Device restrictions configuration profile for Defender settings, you can continue to manage exclusions there. Microsoft has kept these profiles editable, but new profiles should generally use Endpoint security > Antivirus templates instead.
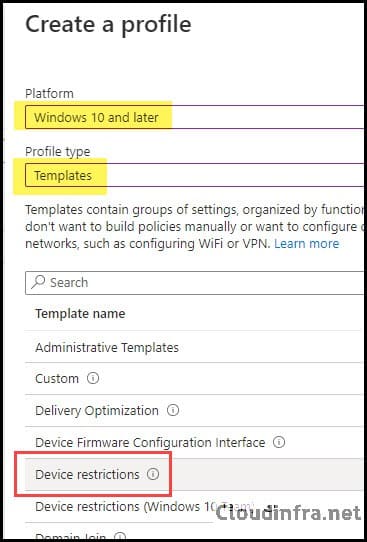
- Sign in to the Intune admin center > Click on Devices > Configuration > + Create > New Policy.
- Select Platform as Windows 10 and later and Profile Type as Templates.
- Select Device restrictions from the list of templates and click Create.
- Basics Tab: Provide the name and description of the policy and click on Next.
Configuration Settings
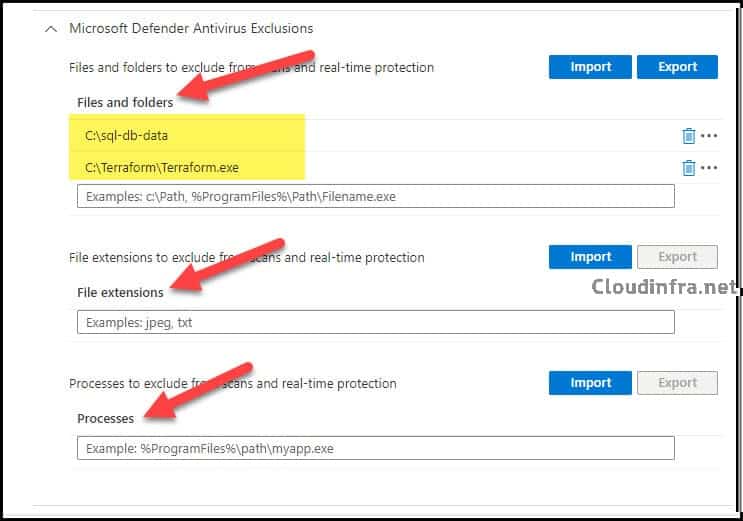
Scroll down on the page to find the Microsoft Defender Antivirus category and expand it. Scroll down further to find Microsoft Defender Antivirus Exclusions. You can provide the file name or folder path that you want to exclude from AV scanning under Files and folders.
I would be excluding C:\sql-db-data and a file named Terraform.exe from scanning and monitoring by Defender. You also have the option to exclude certain file extensions or processes from scanning and real-time protection.
- Assignments: Assign the policy to Entra security groups that contain the target users or devices. As a best practice, pilot with a small set first; once validated, roll it out more broadly. For guidance on assignment strategy, see Intune assignments: User groups vs. Device groups. Using device groups is usually preferable for AV exclusions because the configuration should follow the device/workload rather than the user.
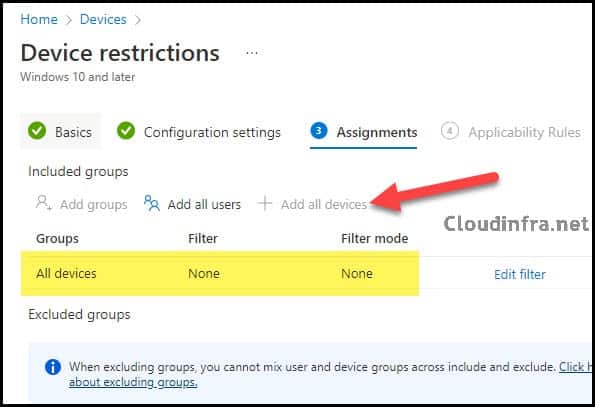
- Review + create: Review the configuration and click on Create.
End User Experience
After the policy is applied on the target devices, you can check and confirm using below PowerShell command if the exclusions are applied in Microsoft Defender AV.
Confirm Defender AV Exclusions using PowerShell
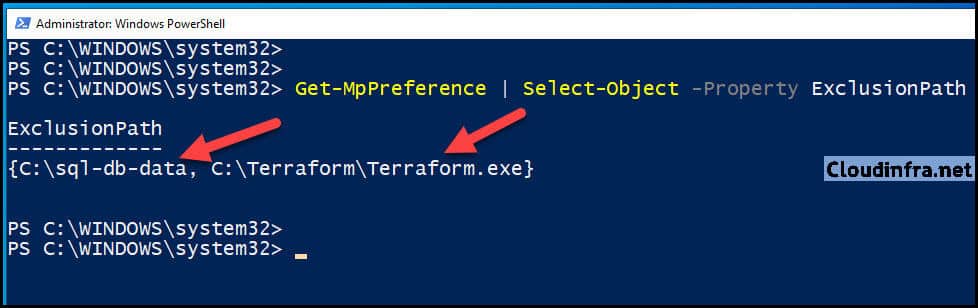
Check and Confirm Defender Exclusions using PowerShell
Get-MpPreference | Select-Object -Property ExclusionPath
Confirm Defender AV Exclusions using GUI
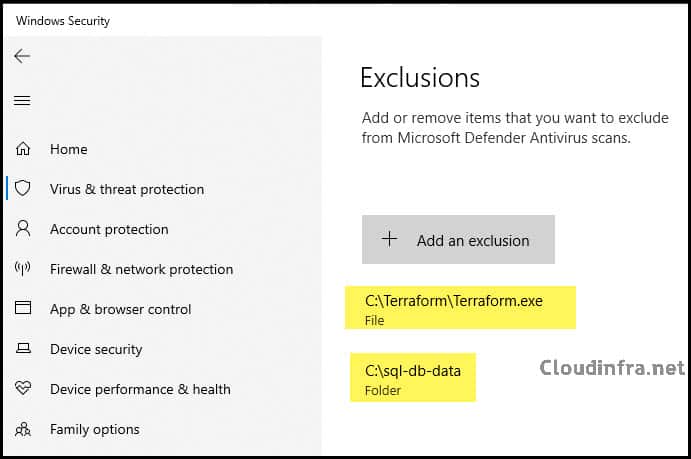
Open Settings > Update & Security > Windows Security > Virus & Threat Protection > Virus & Threat Protection Settings > Click on Manage Settings > Scroll down to find Exclusions > Click on Add or remove exclusions.
You will see the two exclusions we implemented: one for the SQL-db-data folder and another for the Terraform.exe file.
| Shortcut to Open Windows Security |
|---|
You can also go to Start > Run and then type windowsdefender: to open the Windows Security window directly. Then click on Virus & Threat Protection > Virus & Threat Protection settings > Click on Manage Settings > Scroll down to find Exclusions > Click on Add or remove exclusions to manage the Exclusion List. |
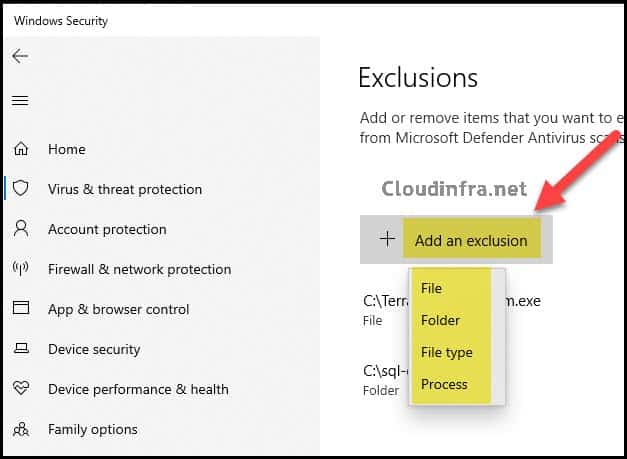
Add Microsoft Defender Antivirus Exclusions Manually
You can also manually click + Add an exclusion to add an exclusion on your PC. You will notice the same options we configured through the Intune Device Restriction Configuration Profile, including file, folder, file type, or process-based exclusions.
Conclusion
In this post, we walked through how to:
- Check existing Defender Antivirus exclusions on a device with
Get-MpPreference. - Create centralized AV exclusions using Intune:
- Preferably via Endpoint security > Antivirus > Microsoft Defender Antivirus exclusions.
- Alternatively, via a Device restrictions configuration profile.
- Sync policies and confirm the resulting exclusions via PowerShell and the Windows Security GUI.
- Understand how manual exclusions and local admin merge behave alongside Intune policy.
Always remember:
- Exclusions should be minimized and justified.
- Use explicit paths and only exclude trusted, well-understood workloads.
- Regularly review and clean up old exclusions using Defender and Intune reporting.
And where i can See the report or monitoring about for example audit only exclusions? With advanced hunting,?