In this blog post, we will demonstrate how to Reprovision a Windows 365 Cloud PC using Intune admin center. We will also discuss the scenarios in which you can reprovision a Cloud PC and how long this process takes.
When you initiate Reprovision of a Cloud PC, the user is signed off from the PC. After that, Cloud PC is deleted, and a new one is created. This process also removes all user data, apps, and customizations. Cloud PC is then reprovisioned based on the provisioning policy assigned to the user.
Please note that to reprovision a Cloud PC, it must be in a Failed or Provisioned Status. To know more details about the steps to check the provisioning status of a Cloud PC, refer to the guide: How to Setup Windows 365 #Step 4.
Reprovisioning a Cloud PC is similar to the Windows Autopilot Reset process or Windows reset process, which restores a user’s device to a business-ready state, enabling the next user to sign in and become productive quickly.
Contents
Why Reprovision a Cloud PC?
Reprovision remote action allows administrators to delete and re-create a Cloud PC for the user. When you take this action, it affects user data stored on the device and any customizations/theme settings and applications installed by the user or administrator, all of which will be removed.
Therefore, you have to be careful before performing this action. It is recommended to take backup of users important data and send communication in advance. Consider the following points before reprovisioning a Cloud PC, and Initiate reprovision action When:
- Provisioned Cloud PC is not working correctly.
- You want to assign a new provisioning policy to the Cloud PC.
- Provisioning state is showing as failed. You can reprovision Cloud PC to fix provisioning issues.
- Users want to restore their Cloud PC to a clean or factory default state.
Steps to Reprovision a Cloud PC
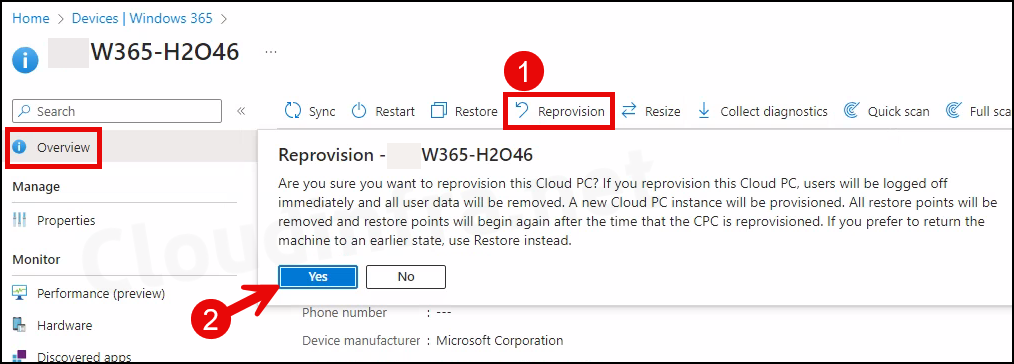
- Sign in to the Intune admin center > Devices > Windows 365 > All Cloud PCs.
- From the Cloud PC list, click on the one you want to reprovision.
- Click on Reprovision > Select Yes.
Are you sure you want to Reprovision this Cloud PC? Users will be logged off immediately, and all user data will be removed. A new Cloud PC instance will be provisioned. All restore points will be removed and restore points will begin again after the time that the CPC is reprovisioned. If you prefer to return the machine to an earlier state, use Restore instead.
Click Yes on this prompt to proceed with Reprovisioning process
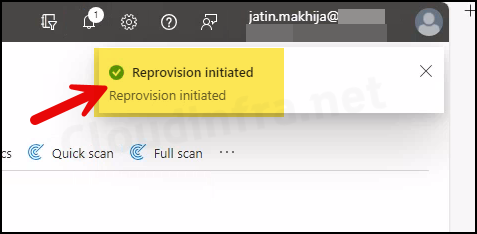
- You will see a notification pop-up in the top right-hand corner confirming the Reprovision has been initiated.
Monitor Cloud PC Reprovisioning
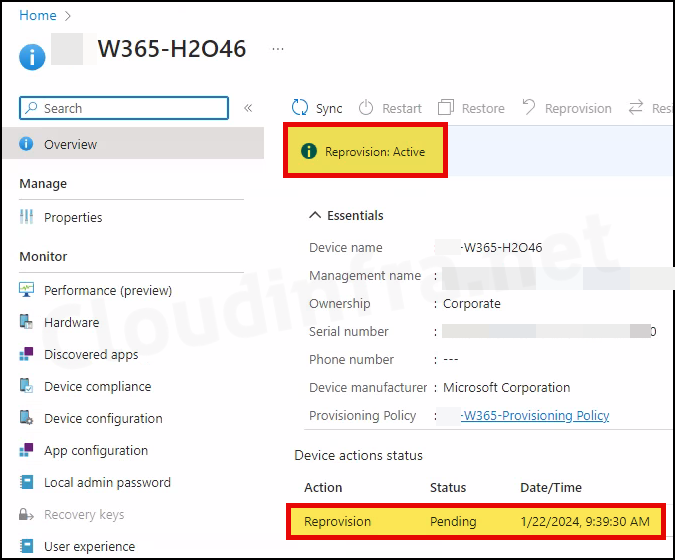
After initiating Cloud PC re-provisioning, Windows 365 service will delete the Cloud PC and create a new one. You can monitor its progress from Intune admin center. Let’s check the re-provisioning process:
- You will notice that the status will display Reprovision: Active with date and time stamp to confirm that the reprovisioning of the device has been initiated.
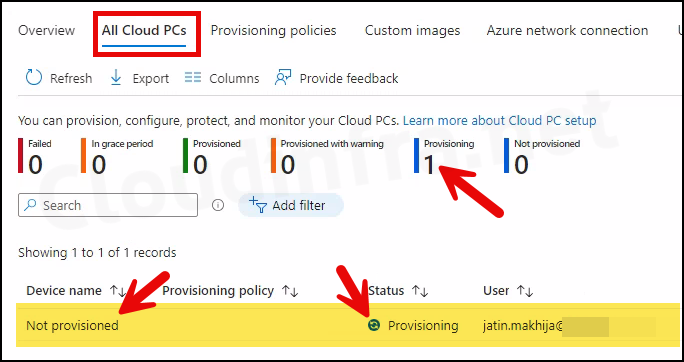
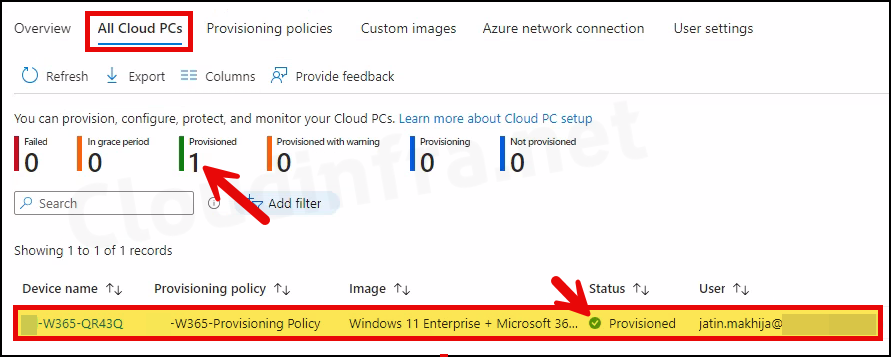
- If you check Cloud PC status under Intune admin center > Devices > Windows 365 > All Cloud PCs, you will find that the device Status shows as Provisioning.

- As the Cloud PC device object is deleted, it will also disappear from under the Device name column and change to Not provisioned.
- It may take between 30–40 minutes to reprovision the Cloud PC. Once the device is provisioned successfully, Status will be displayed as Provisioned.
- Please note that previous Cloud PC Entra device object will be deleted, and a new one will be created. Cloud PC name will be changed according to the provisioning policy’s device template settings (if configured).
More Information
| Cloud PC Provisioning Status | About the Status |
|---|---|
| Pending | The status will show just after initiating Reprovisioning |
| Provisioning | When Cloud PC reprovisioning is in progress |
| Provisioned | When Cloud PC reprovisioning has been completed |
| Failed | Cloud PC provisioning has failed. |
| Warning | There are a few warnings that may require troubleshooting. |
Access the Reprovisioned Cloud PC
You can access the reprovisioned Cloud PC using different methods. Best ways to connect are using Windows App or Windows 365 web client. To learn about different ways to connect to Windows 365, refer to the link: 4 Ways to Connect to Windows 365 Cloud PC.