In this blog post, we will explore the process to upload files to Sharepoint by sending an email. For On-premise SharePoint sites, you can upload a file to a SharePoint document library via email using the Incoming email support feature, available in the Document Library Settings, Picture Library Settings, or Form Library Settings. This feature is currently not supported in SharePoint Online.
One alternative solution to address this limitation in SharePoint Online is to use Power Automate flows. This allows you to achieve similar functionality to uploading files via email by creating custom automated processes using Power Automate.
Background
A third-party vendor has asked you to set up a dedicated SharePoint site for uploading and sharing documents. To facilitate secure external collaboration, you must configure External Access settings in the SharePoint Admin Center and Azure B2B collaboration settings.
Once you’ve configured External Access in SharePoint and Azure B2B, you can invite a guest user to your Entra ID tenant. This step will enable you to grant access to the SharePoint site, allowing the external vendor to upload and download files securely.
In some organizations, stringent security policies prohibit External Access to SharePoint and may disable Azure B2B collaboration. While these settings provide a high level of security and protect the organization from potential external threats, they can be less flexible. The balance between security and collaboration must be carefully considered, meeting the organization’s specific requirements.
One alternative approach is to use Power automate flows to upload files to a SharePoint Online document library without changing the External Access or Azure B2B collaboration settings.
Before proceeding with this, it’s important to ensure that you have the correct type of Power Automate license assigned to you, as it’s required to create and work with power automate.
I’ll begin from scratch by creating a SharePoint site and setting up a document library. Any files sent as attachments to a particular email address will be automatically placed in this SharePoint document library. Let’s check the steps:
Contents
Step 1: Create a Sharepoint Site
You can skip this step if you already have a SharePoint site and a document library where you intend to upload files via email. Let’s move on to the steps for creating a SharePoint site.
- Sign in to the Microsoft 365 admin center > Click on Sharepoint under Admin centers.
- Go to Sites > Active Sites.
- Click on the + Create link.
- Select the Team Site option on the Create a Site pane.
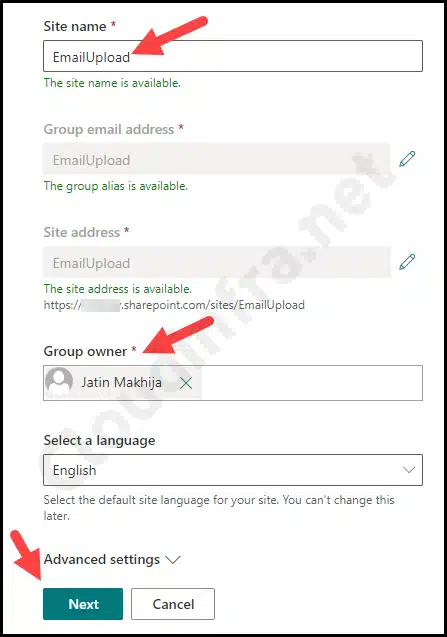
- Provide a Site name, Group Owner information.
- Click on Next and then Click on Finish.
Step 2: Create a Document Library
Document libraries are versatile storage spaces for various file types, such as documents, spreadsheets, presentations, images, and videos. You can also create folders within these libraries, which can help you organize your files more efficiently.
To create a document library on the SharePoint site, follow the below steps:
- Sign in to the Microsoft 365 admin center > Click on Sharepoint under Admin centers.
- Go to Sites > Active Sites.
- Find your site under the Site Name Column and click on the URL under the URL column to launch the site.
- Click on New > Document Library while on the Site’s Home page.
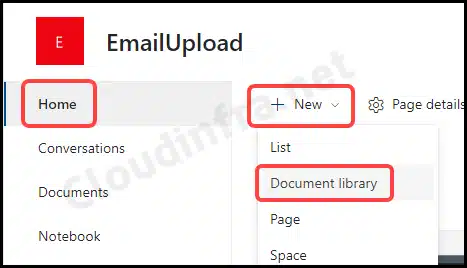
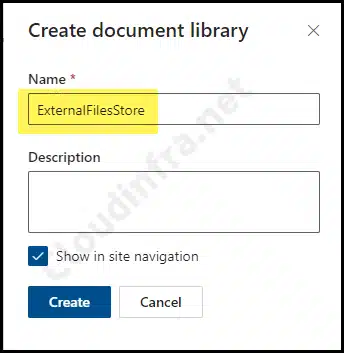
- Provide the Name of the library. Keep the checkbox ticked for Show in site navigation and click the Create button to create a Document library in this SharePoint site.
Step 3: Create Power Automate Flow
Now that we have our SharePoint site and document library set up, we can create a Power Automate flow to automate the file uploads to this document library via email. Please follow the steps below to create this flow:
- Go to the Sharepoint site we created in previous steps called EmailUpload and then Click on the ExternalFilesStore Document library created in the previous step.
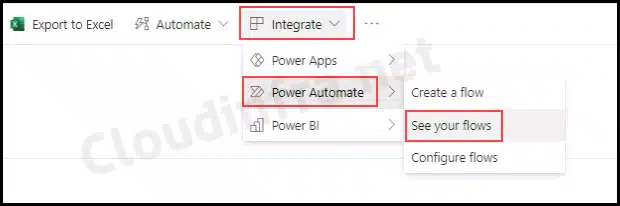
- From the Menu bar at the top of the document library, Click on Integrate > Power Automate > See your flows.
- This will automatically take you to the https://make.powerautomate.com/flows website, where you can create a new Power Automate flow. Please follow the steps below to create a new Power Automate Flow.
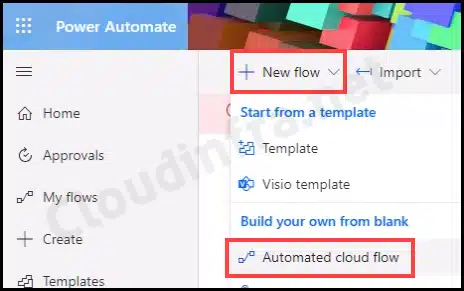
- Click on + New flow drop down and then select the Automated cloud flow option under Build your own from blank category.
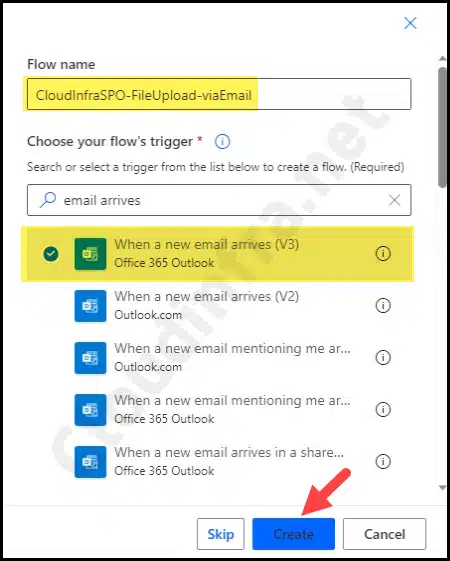
- A pop-up will appear for building an automated cloud flow. Provide a relevant Flow name and choose your flow’s trigger when a new email arrives (V3).
- Flow Name: CloudInfraSPO-FileUpload-viaEmail
- Flow’s trigger: When a new email arrives (V3)
- Click Create.
- A flow will be generated, and you’ll see a trigger form with a list of options. You must fill out this form with the information you require.
- Folder: By default, the Inbox option will be selected, but you can click the folder icon to select any other folder if needed. The cloud flow will trigger only when emails arrive in your selected folder. For now, we’ll keep it as the default Inbox.
- To: Automated cloud flow will trigger when emails are sent to this email address.
- CC: Automated cloud flow will trigger based on the CC email address.
- To or CC: If the email address is specified in the To or CC field, an automated cloud flow will trigger.
- From: Automated cloud flow will trigger based on the sender’s email address.
- Include Attachments: Select Yes to include attachment content bytes instead of null, as we will use the Sharepoint Create file action later to pull the attachment’s content. Keeping it at No will result in a 400 Bad request error.
- Subject Filter: If the words provided in this field match any of the words in the email subject, an automated cloud flow will trigger.
- Importance: The Automated cloud flow will trigger based on the importance of the Email, such as Low, Normal, or High Priority emails.
- Only with Attachments: If it’s set to Yes, Automated cloud flow will trigger only if the email contains an attachment
- Click on + New Step to add a new step in the flow.

- When a new email arrives (V3) trigger form
- Folder: Inbox
- To: Jatin.makhija@cloudinfra.net
- From: Jatin.makhija@gmail.com
- Include Attachments: Yes
- Importance: Any
- Only with Attachments: Yes
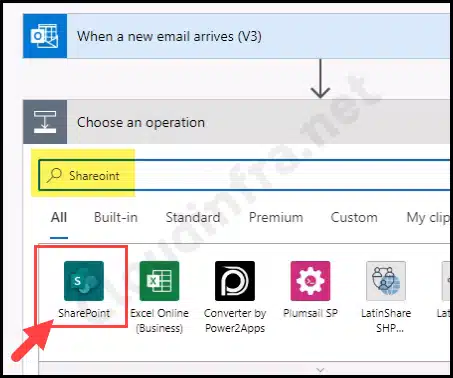
- Choose an operation: Sharepoint
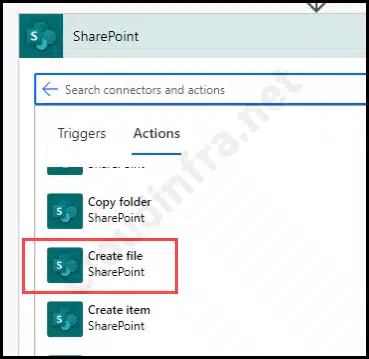
- Find Create file Action from the list of available Sharepoint actions.
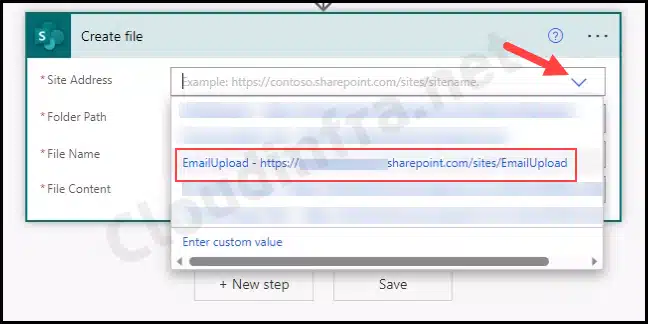
- In the Site Address field, click the drop-down to select the SharePoint site where the documents will be uploaded. If you don’t see the desired site in the list, ensure you have the necessary permissions to access that site. Alternatively, you can click Enter custom value to manually input the Site address if it’s not listed in the options.
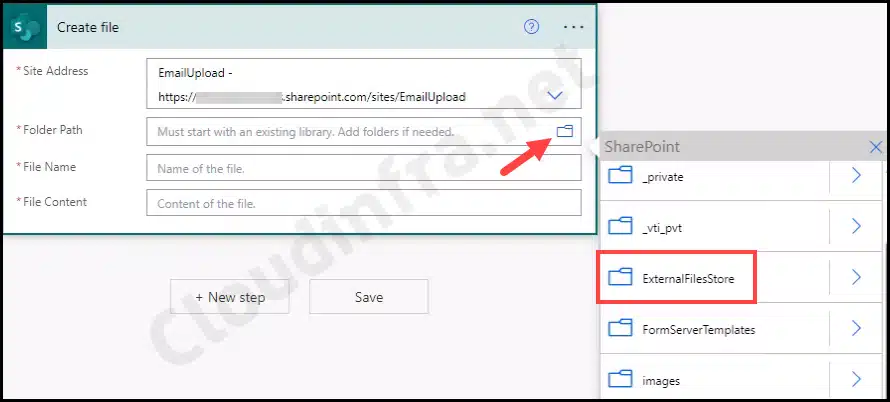
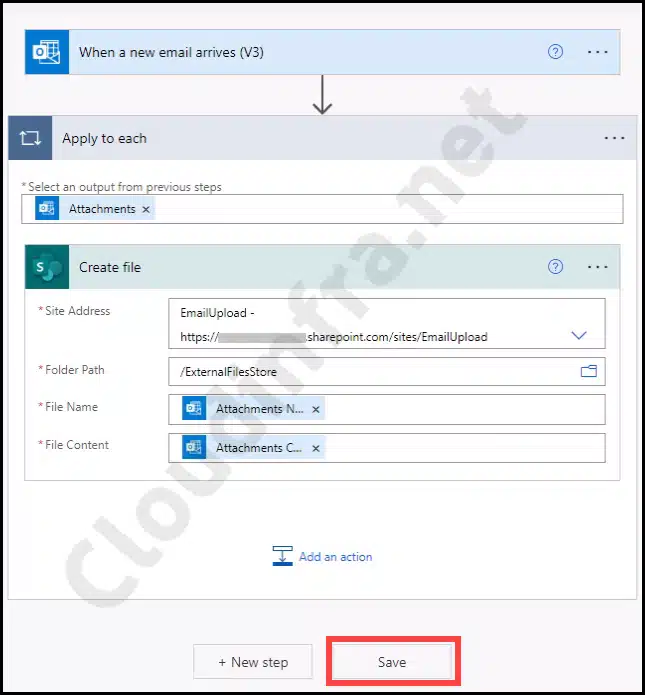
- Click on the folder icon within the Folder Path text field to choose the Document Library where the files will be uploaded. Since we created the ExternalFilesStore document library, select this folder as the destination.
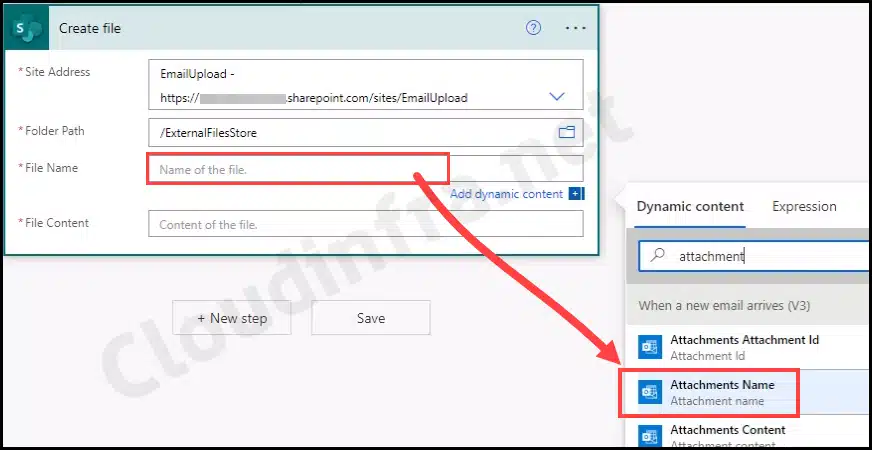
- In the File Name field, click on it and then search for Attachments Name under the Dynamic content tab. Click on it to add it under the File Name field.
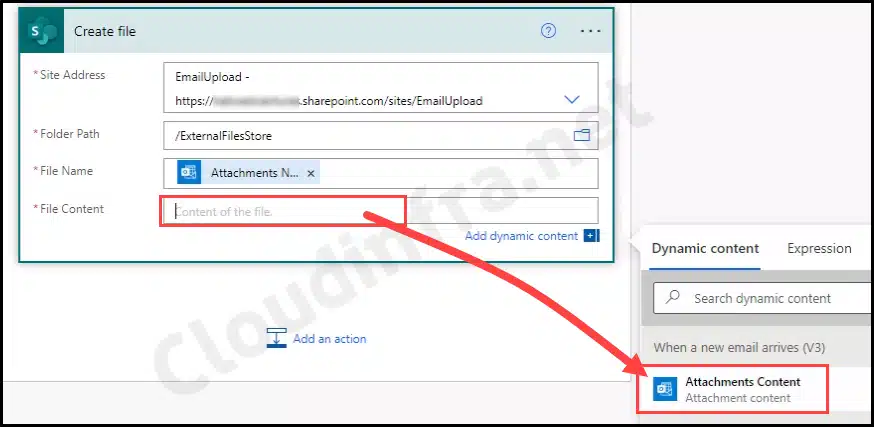
- Select the File Content field, then search for Attachment Content under the Dynamic content tab. Click Attachment Content to provide this value in the File Content field. This step links the content of the email attachments to the File Content field in your flow.
- Here’s the final Power Automate Flow with all the specified values. In the next steps, we will test this flow to observe when it triggers and to verify if it successfully creates and uploads email attachments to the SharePoint site document library, ExternalFilesStore. Don’t forget to click the Save button to save the flow before proceeding.
Step 4: Testing Power Automate Flow
Now, let’s test this Power Automate Flow. Please follow the steps below to initiate the test:
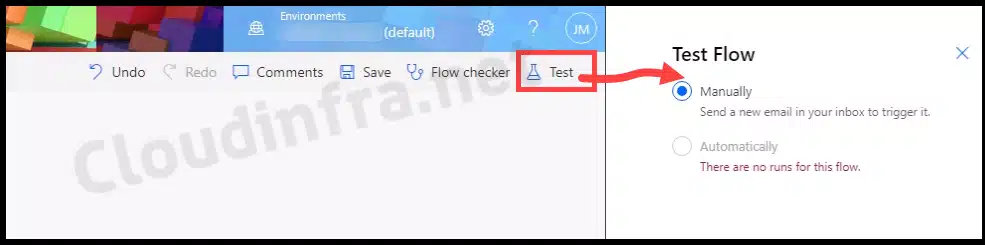
- While in the flow’s edit mode, locate the Test button in the top right-hand corner. Click on it, then choose Manually, and finally, click Test to initiate the test for the flow manually.
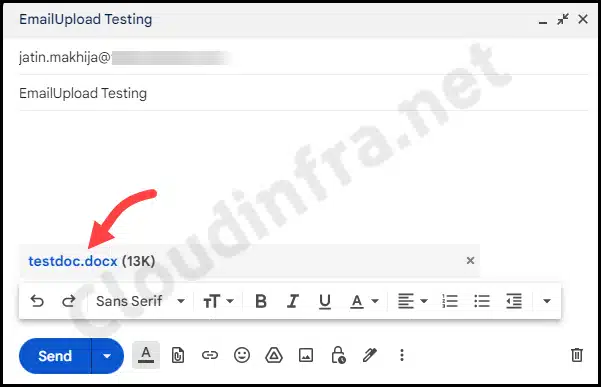
- After clicking the Test button, the flow will begin. You can now activate the trigger by sending an email to the email address specified in the When a new email arrives (V3) form, which, in our example, is jatin.makhija@cloudinfra.net. Consequently, you should send an email to this address with an attachment to initiate the test.
Please ensure that the email is sent from the Sender address listed in the From field of the Power Automate flow. Example: jatin.makhija@gmail.com.
Note
- When the recipient receives this email with an attachment in their Inbox folder, Power Automate cloud flow will be triggered. You’ll be able to confirm this in real-time, and once the test is complete, the flow testing results will be displayed on the screen.
- You’ll notice a message that says Your flow ran successfully and a green checkmark next to each flow operation.
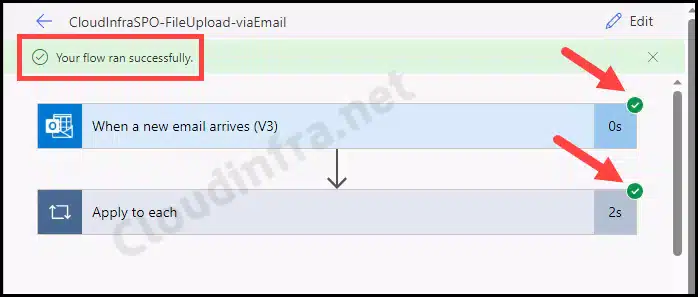
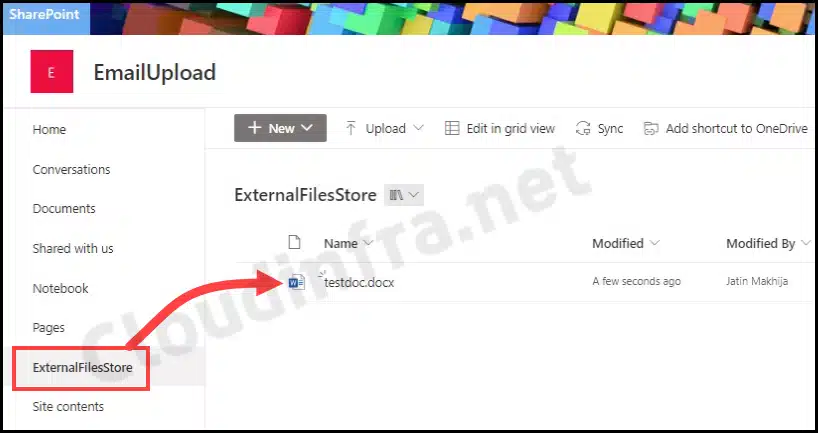
- Let’s verify whether the file we sent as an email attachment has been successfully uploaded to the SharePoint document library ExternalFilesStore. The screenshot below shows that the testdoc.docx file has been successfully uploaded into the ExternalFilesStore.
Conclusion
In this blog post, we’ve learnt the steps for uploading documents to a SharePoint document library by sending an email with an attachment. While several steps are involved, the effort pays off when everything functions smoothly. You can also include additional steps in the power automate flow like sending a notification on Slack or Teams or getting someone’s approval for the file upload process through Slack or Microsoft Teams.