In this blog post, I will show you the steps to set desktop & lock screen wallpaper using Intune Win32 app. Standardizing desktop and lock screen branding is a common enterprise requirement, but hosting wallpaper images on a public URL is sometimes not feasible due to security constraints. An alternative solution is to copy the wallpaper files to the target devices first and then use a settings catalog policy to point to those locally copied files and optionally configure wallpaper style.
There are several ways to copy wallpaper files to target devices using Intune. You can use standalone PowerShell scripts, Intune device remediations, or package the scripts and wallpaper files into an .intunewin file and deploy them as a Win32 app. Regardless of the method you choose, the goal is to ensure that the wallpaper files exist locally on the device.
Once the files are copied, use any of the below policies to configure the wallpapers. For more details about each of these options, refer to my other post: Set Desktop and Lock Screen Wallpaper Using Intune.
- [Settings Catalog]: Use ADMX template settings under Administrative Templates\Desktop\Desktop and Administrative Templates\Control Panel\Personalization.
- [Settings Catalog]: Use the Personalization category, which is based on PersonalizationCSP. PersonalizationCSP only works on Windows 10/11 Enterprise/Education editions and does not work on the Pro edition.
- [Device restrictions template]: Using device restrictions template to configure desktop and lock screen wallpaper. This policy also only works on Windows 10/11 Enterprise/Education editions and does not work on the Pro edition.
ADMX based desktop wallpaper setting (Desktop Wallpaper (User)) works with Windows 10/11 Pro, Enterprise, and Education, and Force a specific default lock screen and login image policy only with Windows 10/11 Enterprise and Education editions.
I will use the Win32 app approach to copy the wallpaper files to the devices and then use the ADMX-based approach to point Windows to these local paths for setting the wallpapers. However, you can use any of the above methods configure the wallpaper.
Contents
Step 1: Prepare PowerShell Scripts and Wallpaper Files
Since I am using the Win32 app deployment method, I will bundle the scripts and wallpaper files into an .intunewin file. The first step is to prepare the scripts and ensure that the wallpaper files are ready. Next, place both the scripts and the wallpaper files into a single folder, which will be used to create the .intunewin package.
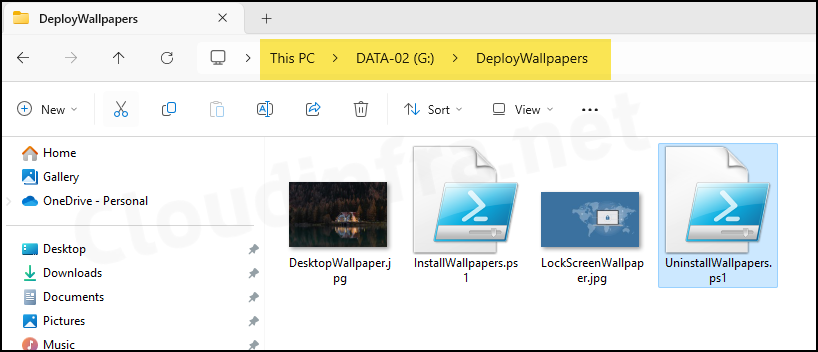
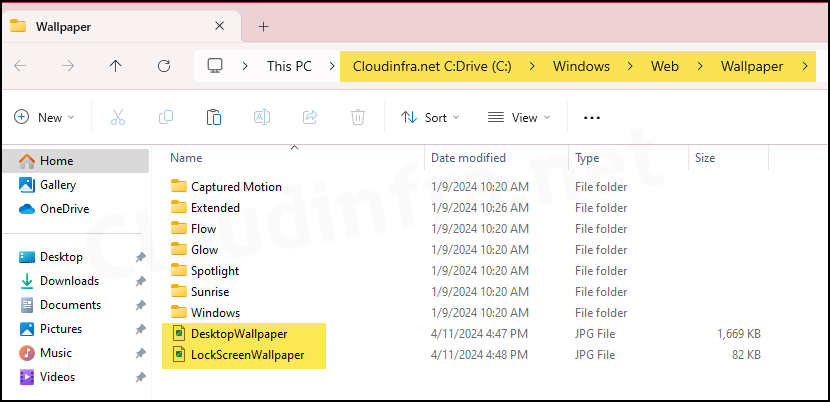
- Sign in to a Windows device and create a new folder. Then copy your desktop and lock screen wallpaper files into this folder. Wallpaper files must be in JPG, JPEG, PNG, or BMP format. As an example, I will create a new folder called DeployWallpapers and copy the DesktopWallpaper.jpg and LockScreenWallpaper.jpg files to this location.
- Create two PowerShell scripts called InstallWallpapers.ps1 and UninstallWallpapers.ps1 using the code below. If you have a different file name than the one I am using, then update wallpaper file names in the script to match those stored in the DeployWallpapers folder.
InstallWallpapers.ps1
Copy-Item -Path .\DesktopWallpaper.jpg -Destination C:\Windows\Web\Wallpaper -force
Copy-Item -Path .\LockScreenWallpaper.jpg -Destination C:\Windows\Web\Wallpaper -force
UninstallWallpapers.ps1
Remove-Item C:\Windows\Web\Wallpaper\DesktopWallpaper.jpg -force
Remove-Item C:\Windows\Web\Wallpaper\LockScreenWallpaper.jpg -force
Finally, the DeployWallpapers folder looks like as shown in the below screenshot. It contains below four files:
- InstallWallpapers.ps1
- UninstallWallpapers.ps1
- DesktopWallpaper.jpg
- LockScreenWallpaper.jpg
Step 2: Create IntuneWin File
The next step is to package DeployWallpaper folder into an Intunewin file. Once Intunewin file is created, we will deploy it using a Win32 app deployment on Intune.
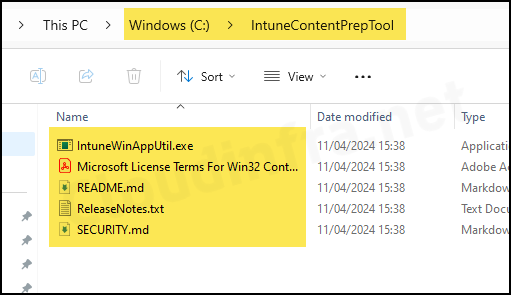
- Download the Microsoft Win32 Content Prep tool and extract its contents. I have extracted it to a folder called C:\IntuneContentPrepTool.
- We will need a folder where the Intunewin file will be generated. You can choose any existing folder or create a new folder. I have created a folder C:\Output.
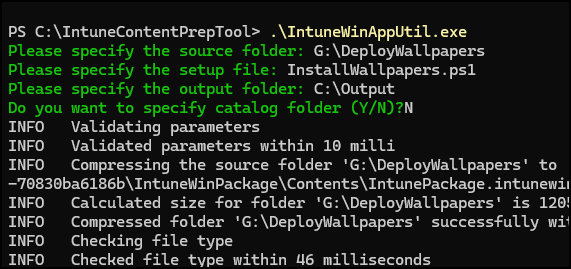
- Run IntunewinAppUtil.exe:
- Source Folder: G:\DeployWallpapers
- Setup File: InstallWallpapers.ps1
- Output folder: C:\output
- Catalog folder: Type N and press Enter.
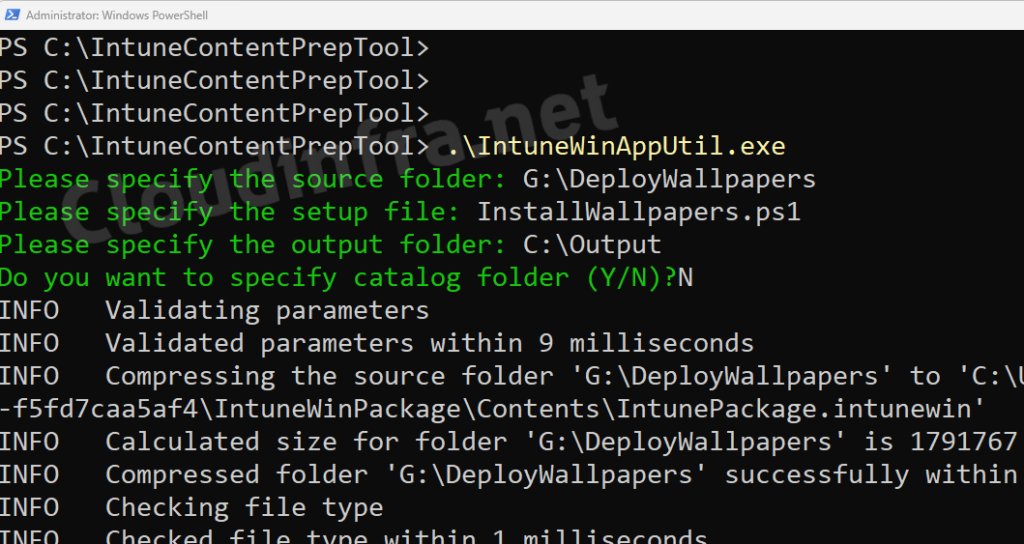
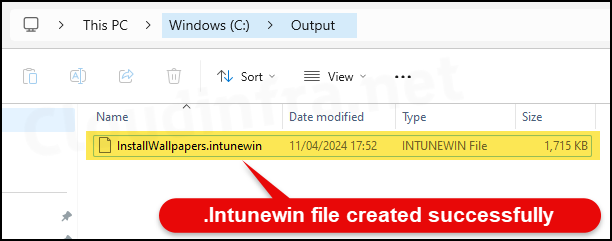
- IntuneWin file created successfully.
Step 3: Create Win32 App deployment
In this step, we will create Win32 app deployment on Intune admin center using the Intunewin file created in the previous step. This step will copy the wallpaper files on the target devices.
- Sign in to the Intune admin center at https://intune.microsoft.com.
- Go to Apps > All apps.
- Select + Create, then in App type select Windows app (Win32).
- Click on the Select app package file to select your .intunewin file.
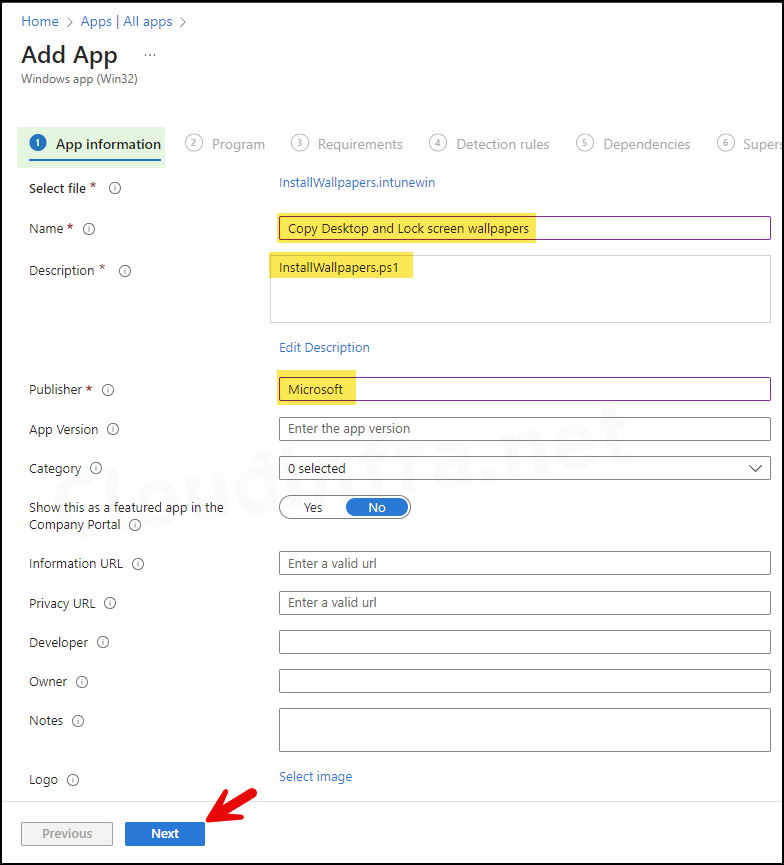
- On the App information page, provide below details:
- Name: Copy Desktop and Lock Screen wallpapers
- Description: Brief description of the app and version.
- Publisher: Microsoft
- Any optional information (category, logo, etc.) to match your requirements.
- Program:
- Install command: powershell.exe -Executionpolicy Bypass -File .\InstallWallpapers.ps1
- Uninstall command: powershell.exe -Executionpolicy Bypass -File .\UninstallWallpapers.ps1
- Installation time required (mins): Keep default
- Allow available uninstall: Keep default
- Install behavior: System
- Device restart behavior: No specific Action
- Specify return codes to indicate post-installation behavior: Keep default
If you encounter error code 0x80070002 for this app, verify that the Install and Uninstall commands are entered correctly. For more information about this error code, refer to the post: Fix Intune Win32 App Install Error 0x80070002.

- Requirements: Set requirements so Intune only targets applicable devices:
- OS architecture (x64 vs. x86).
- Minimum Windows version.
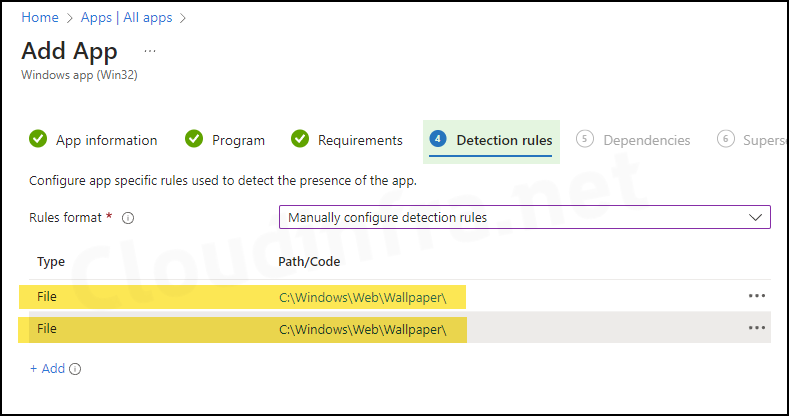
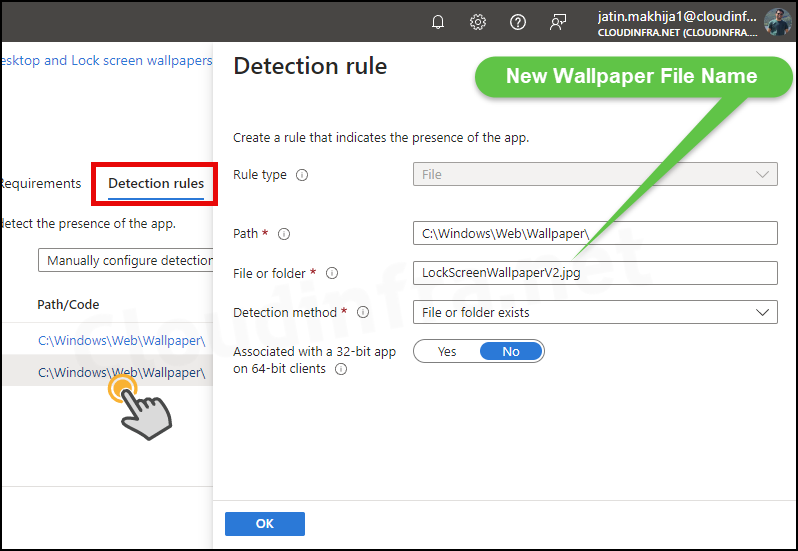
- Detection rules: Detection rules are critical because they determine whether Intune considers the app installed. You can use multiple detection rules, and all rules must be met. If the app is Required and Intune detects it is not present, Intune will attempt to offer it again (approximately within 24 hours). We will add two detection rules, one for the desktop wallpaper file and the second for the lock screen wallpaper file. If you are deploying only one of these wallpapers, create the detection rule accordingly.
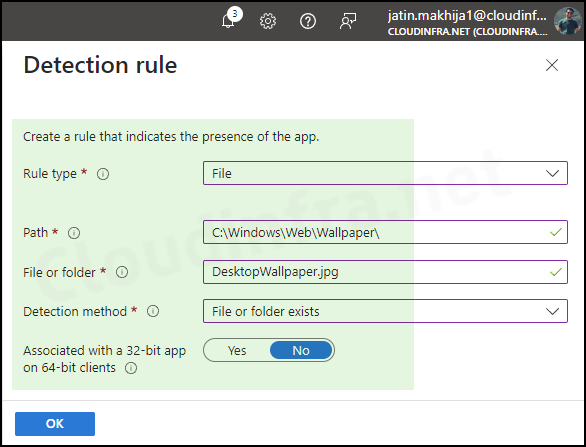
- Rule Type: File
- Path: C:\Windows\Web\Wallpaper\
- File or Folder: LockScreenWallpaper.jpg
- Detection Method: File or Folder Exits
- Associated with a 32-bit app on 64-bit clients: No

- Detection rules are created successfully. Click on Next.
- Dependencies: Click Next.
- Supersedence: Click Next.
- Scope tags (optional): A scope tag in Intune is an RBAC label that you assign to resources such as policies, apps, and devices to control which administrators can view and manage them. For more information, see How to use scope tags in Intune.
- Assignments: Assign the app to Microsoft Entra security groups that include the target users or devices. As a best practice, start with a small pilot group, and once validated, expand the assignment more broadly. For guidance on assignment strategy, see Intune assignments: User groups vs. Device groups.
- Review + create: Review the deployment summary and click Create.
Step 4: Create a Settings Catalog Policy
Once the wallpaper files are successfully copied to the target devices, create a Settings Catalog policy to configure the wallpaper locations. I will use ADMX-based policies, but you can also use PersonalizationCSP or Device Restrictions templates. Both PersonalizationCSP and Device Restrictions templates also support local file paths (file://) for configuring wallpapers. I have provided more details on these two options in my other post, Set Desktop and Lock Screen Wallpaper Using Intune.
- Sign in to the Intune admin center > Devices > Configuration > + Create > New Policy.
- Platform: Windows 10 and later. Profile type: Settings catalog.
- Basics: Provide a name and description of the profile.

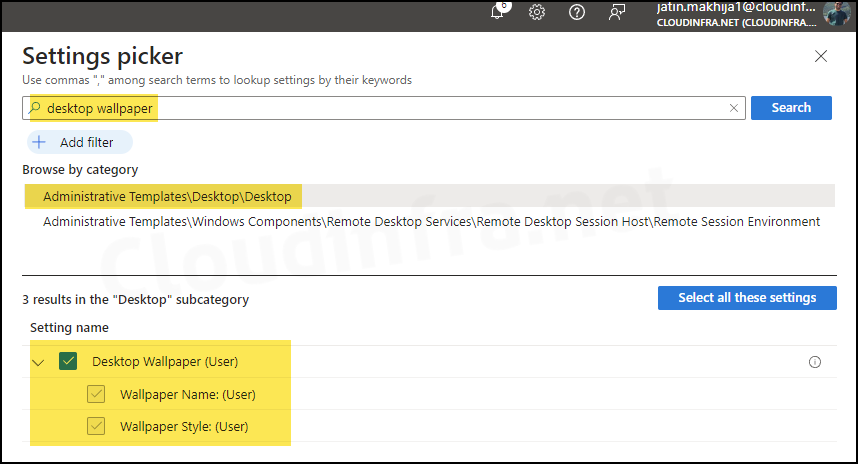
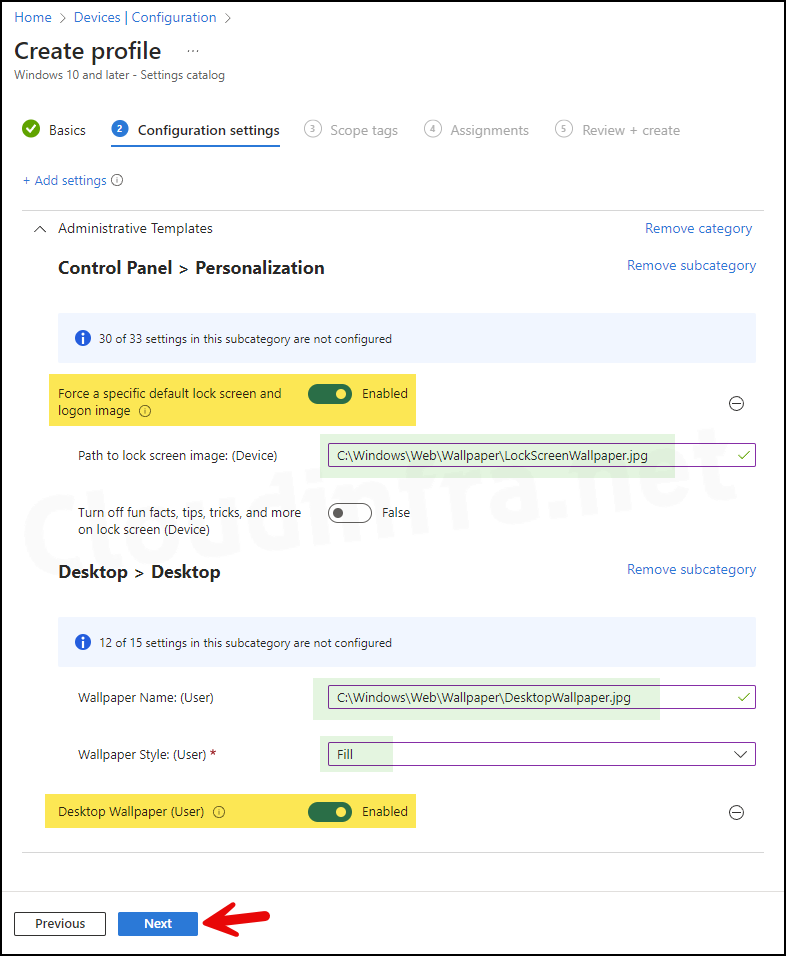
- Configuration settings: Click on + Add settings and search for desktop wallpaper in the settings picker. Under the Administrative Templates\Desktop\Desktop category, you will find Desktop Wallpaper (User). Select it to add it under Configuration settings. This setting works on Windows 10/11 Pro, Enterprise, and Education editions.
- Search for the default lock screen in the settings picker. Under the Administrative Templates\Control Panel\Personalization category, you will find the setting Force a specific default lock screen and login image. Select it to add it under Configuration settings. Close the settings picker. This setting works does not work on Pro edition.
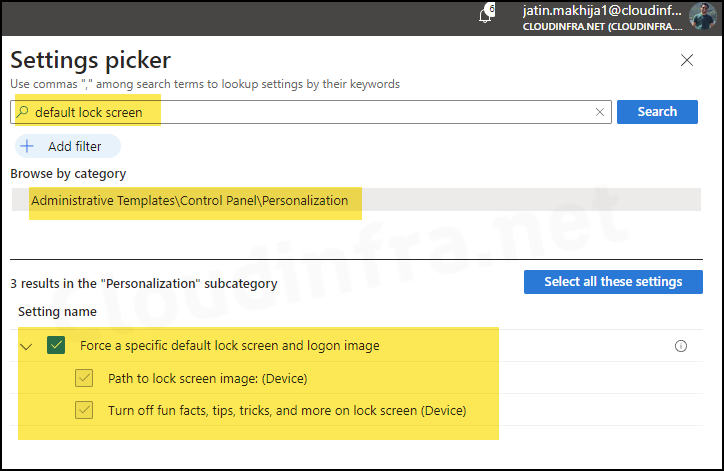
- Force a specific default lock screen and logon image: Enabled
- Path to lock screen image: (Device): C:\Windows\Web\Wallpaper\LockScreenWallpaper.jpg
- Turn off fun facts, tips, tricks, and more on lock screen (Device): As per requirement.
- Wallpaper Name: (User): C:\Windows\Web\Wallpaper\DesktopWallpaper.jpg
- Wallpaper Style: (User): As per requirement.
- Desktop Wallpaper (User): Enabled
- Scope tags (optional): A scope tag in Intune is an RBAC label that you assign to resources such as policies, apps, and devices to control which administrators can view and manage them. For more information, see How to use scope tags in Intune.
- Assignments: Assign the policy to Microsoft Entra security groups that include the target users or devices. As a best practice, start with a small pilot group, and once validated, expand the assignment more broadly. For guidance on assignment strategy, see Intune assignments: User groups vs. device groups.
- Review + create: Review the deployment summary and click Create.
Sync Intune Policies
The device check-in process might not begin immediately. If you’re testing this policy on a test device, you can manually kickstart Intune sync from the device itself or remotely through the Intune admin center.
Alternatively, you can use PowerShell to force the Intune sync on Windows devices. Restarting the device is another way to trigger the Intune device check-in process.
Monitor Intune Policy Deployment Progress
- Sign in to the Intune admin center > Devices > Configuration.
- Choose the Device Configuration profile you want to work with, and at the top of the page, you’ll see a quick view of the Success, Failure, Conflict, Not Applicable, and In Progress status.
- Click on View report to access more detailed information.
End User Experience
Win32 app deployment will copy the wallpaper files to C:\Windows\Web\Wallpaper.
Device configuration profile will configure the desktop and lock screen wallpapers on target devices. Below screenshot confirms that the desktop wallpaper has been successfully configured on the device.
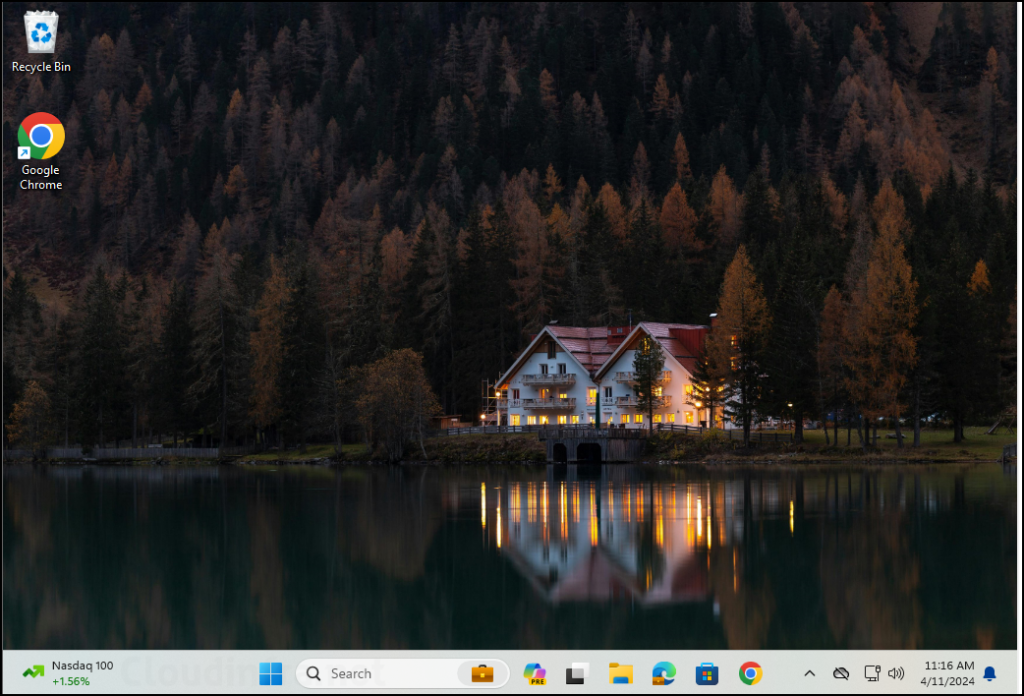
The screenshot below confirms that the lock screen and logon image wallpaper have been configured on the device successfully.
Can Users Change Desktop & Lock Screen Image after applying this policy?
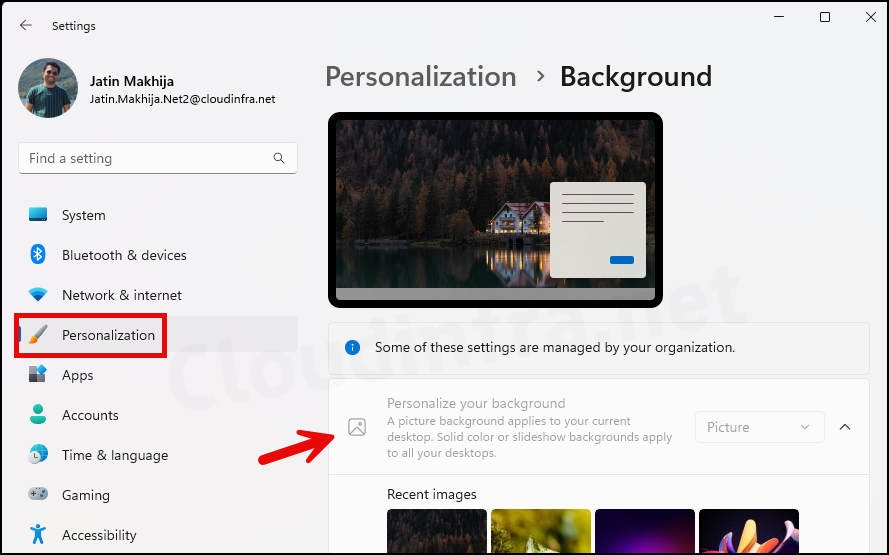
Users cannot change desktop and lock screen wallpaper after configuring it via Intune. When users go to the Settings app > Personalization, options for changing the background will be greyed out.
Updating Desktop and Lock Screen Wallpaper
After configuring desktop and lock screen wallpapers on the target devices, you may need to update or replace them with new images. Follow the steps below to update the wallpapers on the target devices.
Step 1: Copy New Wallpaper Files and Update PowerShell Scripts
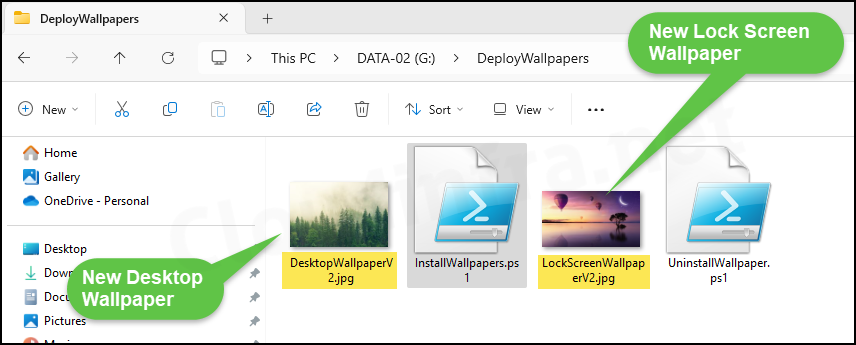
You can use the same folder for the previous deployment or create a new one. Copy the new desktop and lock screen wallpapers into this folder. I recommend appending a version number after the file names, such as V2, V3, V4, etc., for a consistent naming convention.
I have copied two new wallpaper files called DesktopWallpaperV2.jpg and LockScreenWallpaperV2.jpg. I have not tested the scenario to keep the same file names as the ones already deployed. Therefore, I will not be able to confirm if that will work. For now, I will keep a different file name than the one deployed before.
Update the names of the new wallpaper files in the PowerShell scripts. The new wallpaper file names are DesktopWallpaperV2.jpg and LockScreenWallpaperV2.jpg. Ensure that it’s updated in both the PowerShell scripts below:
InstallWallpapers.ps1
Copy-Item -Path .\DesktopWallpaperV2.jpg -Destination C:\Windows\Web\Wallpaper -force
Copy-Item -Path .\LockScreenWallpaperV2.jpg -Destination C:\Windows\Web\Wallpaper -force
UninstallWallpaper.ps1
Remove-Item C:\Windows\Web\Wallpaper\DesktopWallpaperV2.jpg -force
Remove-Item C:\Windows\Web\Wallpaper\LockScreenWallpaperV2.jpg -force
Step 2: Create a new IntuneWin File
Recreate .Intunewin file to deploy new desktop and lock screen wallpaper images on the target devices. Please refer to the previous section of this blog post for creating an Intunewin file. If you are facing any issues creating it, refer to the link: How to Create an IntuneWin file.
Step 3: Update Win32 App Deployment
Now that the Intunewin file has been created, which contains our new desktop and lock screen wallpaper files and updated Powershell scripts, let’s refresh the existing Win32 app deployment. You do not need to create a new Win32 app deployment; update the existing one we used for deploying the wallpaper files and replace the Intunewin file.
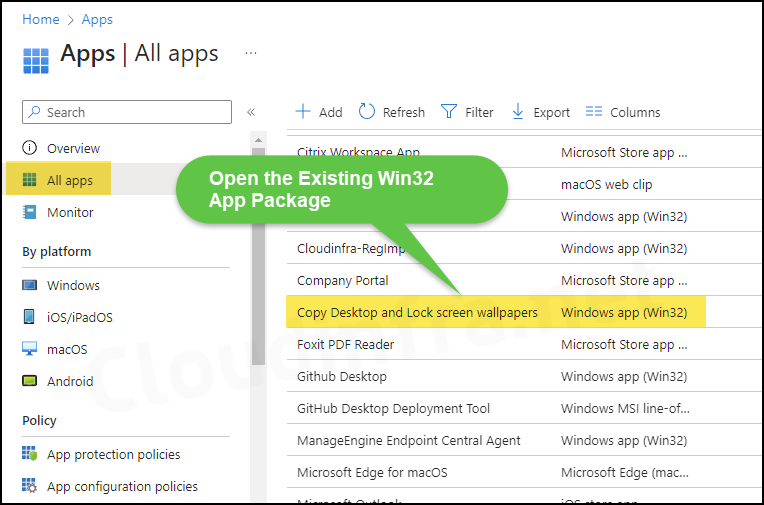
- Sign in to the Intune admin center > Apps > All Apps.
- Open the existing Win32 app package we created earlier.
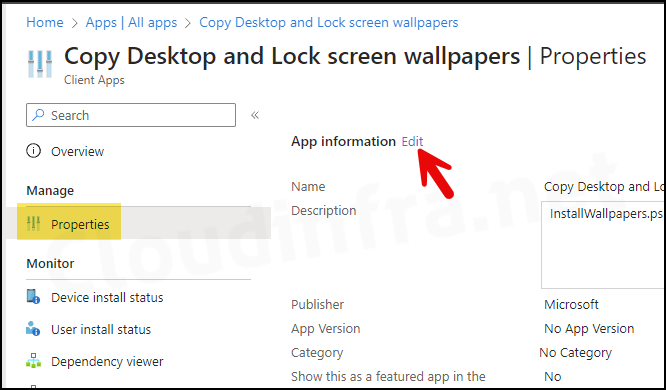
- Go to Properties and click on the Edit button next to App Information.
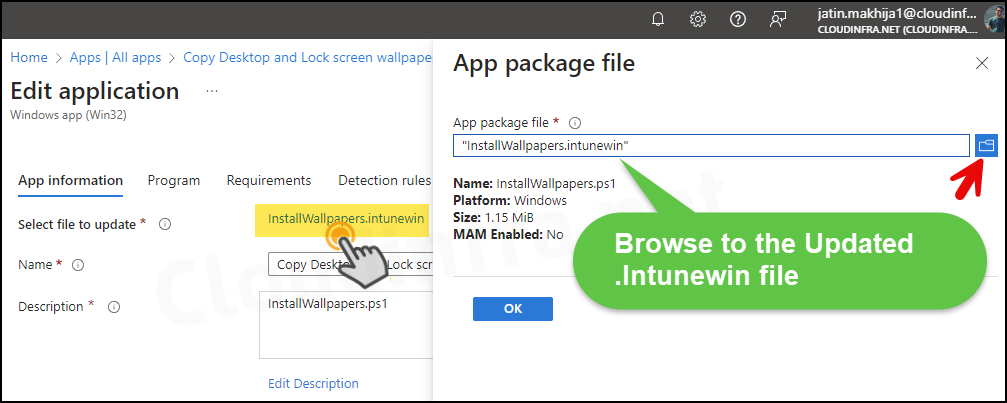
- Click on the existing Intunewin file link to upload the new one. Click on the OK button.
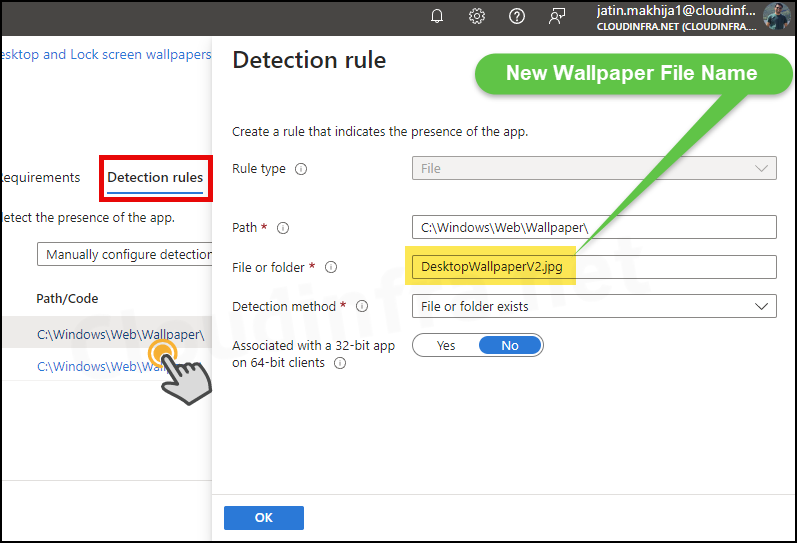
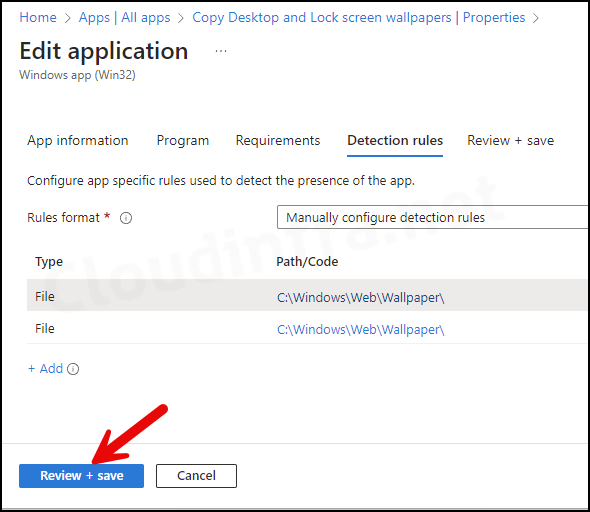
- Go to the Detection rules tab and update the new file names for desktop and lock screen wallpapers.
- After updating the Intunewin file and the detection rules, click the Review + Save button to save the deployment.
Step 4: Update Device Configuration Profile
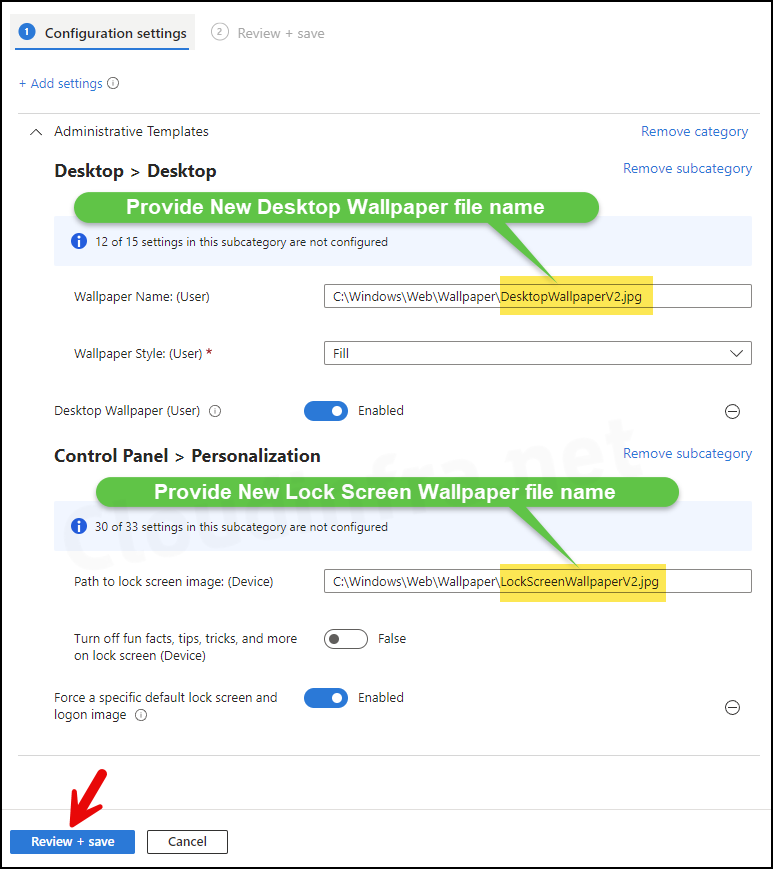
The final step is to update the desktop and lock screen wallpaper file names in the device configuration profile so that they point to the new wallpaper files.
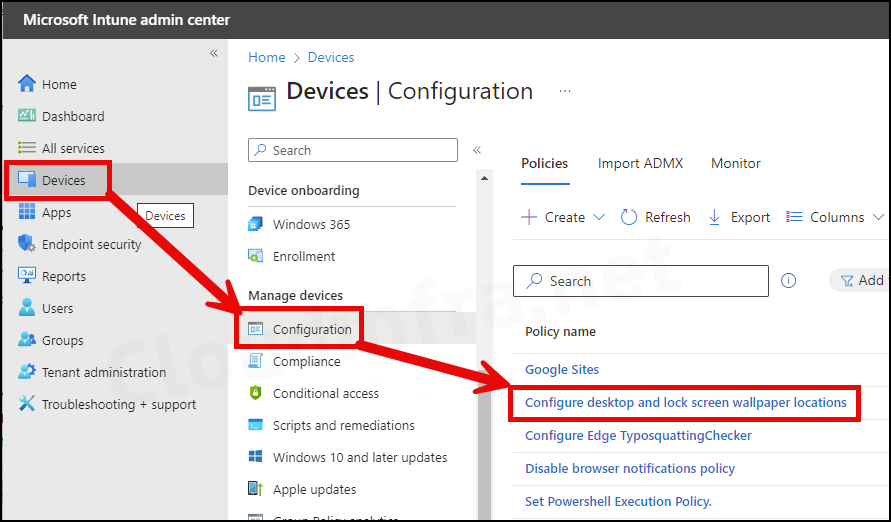
- Sign in to the Intune admin center > Devices > Configuration.
- Open the existing device configuration profile we created earlier.
- Click on Edit next to Configuration settings.
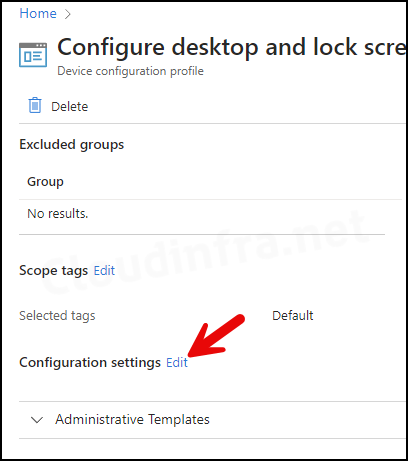
- Update the new desktop and lock screen wallpaper file names and click the Review + Save button.
End User Experience
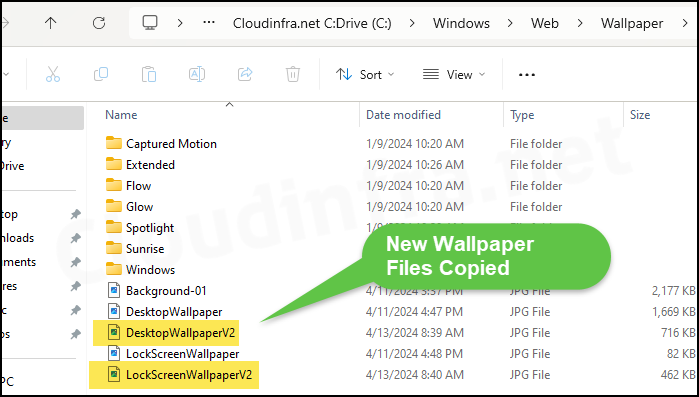
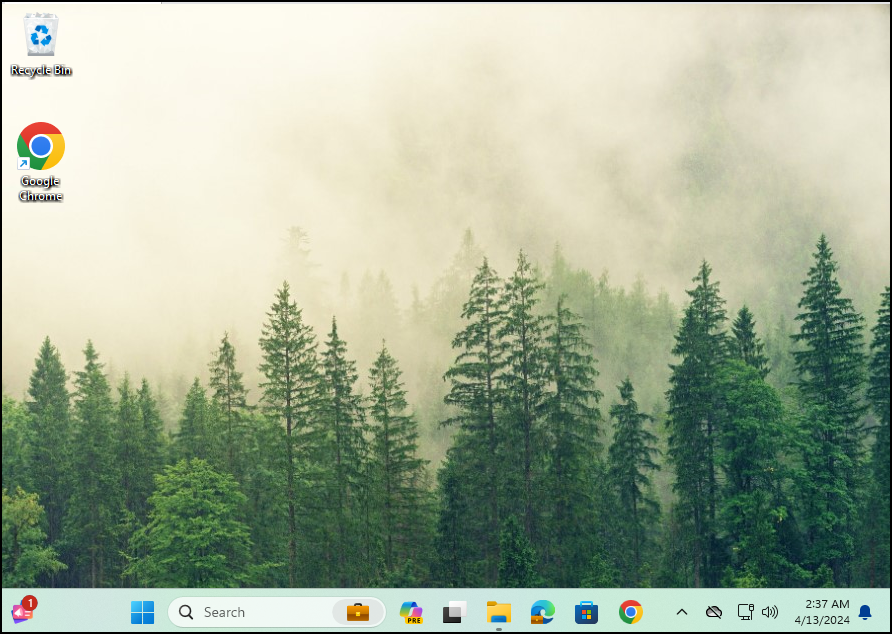
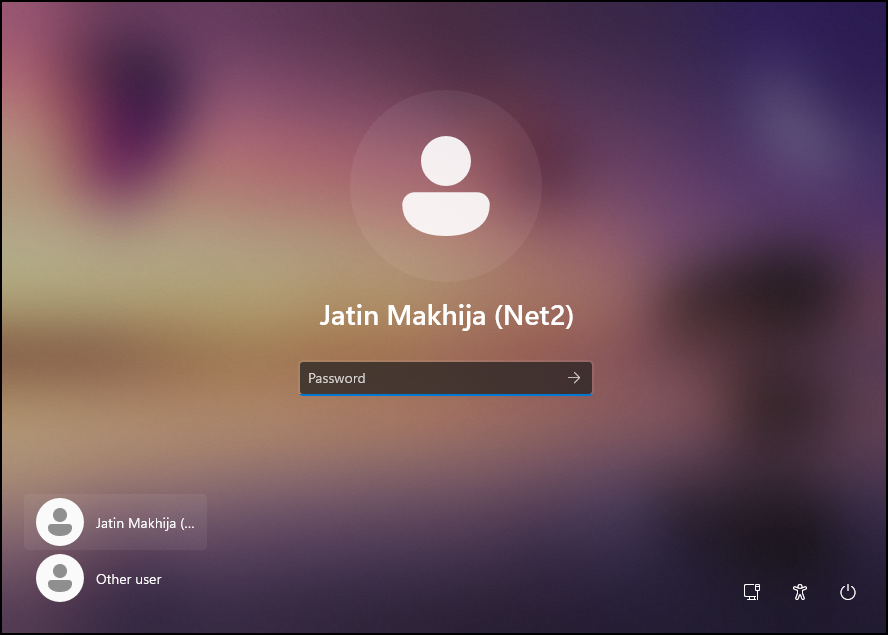
You can restart your device or wait for the next Intune device check-in process. As you can see from the screenshot below, our new desktop and lock screen wallpaper files are copied successfully to the C:\Windows\Web\Wallpaper folder.
New Desktop Wallpaper
New Lock Screen Wallpaper
Other Wallpaper Related Settings
You can also configure several optional wallpaper-related settings from the Settings Catalog. Depending on your requirements, you may choose to use these options. You can search for these settings in the settings picker to find additional details.
- Allow only bitmapped wallpaper (User).
- Do not display the lock screen.
- Prevent changing lock screen and logon image.
- Prevent enabling lock screen camera.
- Prevent enabling lock screen slide show.
- Turn off app notifications on the lock screen.
- Turn off toast notifications on the lock screen (User).
I followed the instructions you outlined in your blog post, but encountered an issue where, instead of applying the wallpaper as per the Intune policy, the device defaulted to a solid black color. This was tested on a Windows 10 Enterprise system. Could you provide any guidance on how to troubleshoot this? Thank you!
Same issue with me in windows 10 & 11 Enterprise or pro.
Please copy the wallpapers first and then configure wallpaper locations. This could be if the wallpapers are not copied on the target devices. Could you please check this and make sure the wallpaper files are there at C:\Windows\Web\Wallpaper.
same issue here, followed your exact steps and the images do not show up in C:\Windows\Web\Wallpaper.
Screen is set to a black screen now.
@John, its issue of Windows version, I have same issue with my all Microsoft Windows 10/11 Busineess Edition.
This only really works for Enterprise/Education SKUs.
Works really well when doing auto pilot with pre-provisioning.
Set the copy win32 app to the device group so the files are available on the device.
When the user eventually logs in the config profile find them and configures both lock screen and wallpaper.
Follow the instructions to the letter.
Well done Sir
Using same method. Anyone have issues with scaling with lock screen being zoomed regardless of resolution being used?
Edit the policy to “Fit” instead of Centered.
I have followed the step provided, and the images transferred, and the policy worked for the desktop background but not for the lock screen.
Here, in my customer, they have 365 Business Premium. Each user has Intune PLan 1 inside their SKU. All have W11 Pro and converted to Windows 11 Business because of 365 SKU. These 2 policies works!
interesting so you managed to get the script to copy the files into the location as mentioned ? I am not convinced
I followed the instructions you outlined in your blog post, but encountered an issue where, instead of applying the wallpaper as per the Intune policy, the device defaulted to a solid black color. This was tested on a Windows 10 Pro system. Could you provide any guidance on how to troubleshoot this? I checked the path multple time and all paths are correct but did not work and screen is all black now
Thank you!
Absolutely fantastic, after following numerous guides etc etc I now have it working with the “fit” option.
Superb post and work.
Well done 😎
Hi,
Like Craig, worked for the desktop background but not for the lock screen.
For Windows 10 /11 Pro, it is necessary to add parameter in register.
see => https://www.reddit.com/r/msp/comments/136uo6p/how_to_change_the_lock_screen_with_gpo_on_windows/
This works 100% on W11 Business Pro