In this blog post, we will see 3 ways to Identify Inactive users in Microsoft 365 and Entra ID. Onboarding and offboarding users are important aspects of managing M365 tenant. Users who stop using their accounts without informing IT, will still incur license cost.
You can classify a user as Inactive based on the criteria of not using any M365 service for an extended period ranging from 30 days to 365 days. This criteria for defining an inactive user can differ among organizations, A company might designate an employee inactive after 90 days, while others may use different timeframes.
You should regularly run a report to a) find inactive users, b) block sign-in, and c) remove any license associated with them. Let’s explore all these methods.
Contents
Method 1: Find Inactive Users using Microsoft Graph Explorer
Using Graph Explorer, you can run Graph API queries to retrieve, add, and update data from Microsoft 365 and Entra ID. We will use below query to get users display name and SignInActivity from Entra ID. SignInActivity provides lastSignInDateTime information that will help determine Inactive users.
Get all user’s displayName and sign-in activity information
https://graph.microsoft.com/beta/users?$select=displayName,signInActivity.
- Go to Microsoft Graph Explorer.
- Consent to AuditLog.Read.All and User.Read.All permissions to avoid any errors while executing a query on Graph Explorer.
- To Consent to these permissions, From the Microsoft Graph Explorer page > click on your SignIn Account > Click on Consent to Permissions > Search for AuditLog.Read.All and User.Read.All permissions and provide Consent.
- Execute the query: https://graph.microsoft.com/beta/users?$select=displayName,signInActivity to get the required Information.

Related Graph API Queries
1. Search the Last Sign-in date and time for a specific user
https://graph.microsoft.com/beta/users?$filter=startswith(displayName,'john')&$select=displayName,signInActivity
2. List users with LastSignIndateTime before a specified date
https://graph.microsoft.com/beta/users?$filter=signInActivity/lastSignInDateTime le 2022-09-01T00:00:00Z
Method 2: Find Inactive Users Using Powershell [Interactive way]
Using Method 1, which utilizes graph queries provides SignInActivity Information on Graph explorer. That report is useful but not very flexible as it uses GUI to get the Information and display it on the page.
We will now use a Powershell script which will use Graph API query to export the SignInActivity data in a CSV file. This method is an Interactive method as it involves using Connect-MgGraph to connect to Graph.
Prerequisites
- To read
lastSignInDateTimeattribute of a user, you will need AuditLog.Read.All and User.Read.All Microsoft Graph permissions. - Entra ID Premium License.
About the Script
Below PowerShell script will first establish a connection with Graph using Connect-MgGraph -Scopes “AuditLog.Read.All”, “User.Read.All” command.
Next, it will utilize Get-MgUser cmdlet to get UPN, displayname and SignInActivity Information of an Entra ID user using Get-MgUser -All -Property Userprincipalname, DisplayName, SignInactivity, AccountEnabled command. If you wish to include more properties, you can add them to the -Property parameter.
Below are the user account properties you can retrieve using Get-MgUSer cmdlet:
AboutMe
AccountEnabled
Activities
AgeGroup
AgreementAcceptances
Analytics
AppConsentRequestsForApproval
AppRoleAssignedResources
AppRoleAssignments
Approvals
AssignedLicenses
AssignedPlans
Authentication
AuthorizationInfo
Birthday
BusinessPhones
Calendar
CalendarGroups
CalendarView
Calendars
Chats
City
CloudPCs
CompanyName
ConsentProvidedForMinor
ContactFolders
Contacts
Country
CreatedDateTime
CreatedObjects
CreationType
CustomSecurityAttributes
DeletedDateTime
Department
DeviceEnrollmentConfigurations
DeviceEnrollmentLimit
DeviceKeys
DeviceManagementTroubleshootingEvents
Devices
DirectReports
DisplayName
Drive
Drives
EmployeeHireDate
EmployeeId
EmployeeLeaveDateTime
EmployeeOrgData
EmployeeType
Events
Extensions
ExternalUserState
ExternalUserStateChangeDateTime
FaxNumber
FollowedSites
GivenName
HireDate
Id
Identities
ImAddresses
InferenceClassification
InfoCatalogs
InformationProtection
Insights
Interests
IsManagementRestricted
IsResourceAccount
JobTitle
JoinedGroups
JoinedTeams
LastPasswordChangeDateTime
LegalAgeGroupClassification
LicenseAssignmentStates
LicenseDetails
Mail
MailFolders
MailNickname
MailboxSettings
ManagedAppRegistrations
ManagedDevices
Manager
MemberOf
Messages
MobileAppIntentAndStates
MobileAppTroubleshootingEvents
MobilePhone
MySite
Notifications
Oauth2PermissionGrants
OfficeLocation
OnPremisesDistinguishedName
OnPremisesDomainName
OnPremisesExtensionAttributes
OnPremisesImmutableId
OnPremisesLastSyncDateTime
OnPremisesProvisioningErrors
OnPremisesSamAccountName
OnPremisesSecurityIdentifier
OnPremisesSyncEnabled
OnPremisesUserPrincipalName
Onenote
OnlineMeetings
OtherMails
Outlook
OwnedDevices
OwnedObjects
PasswordPolicies
PasswordProfile
PastProjects
PendingAccessReviewInstances
People
Photo
Photos
Planner
PostalCode
PreferredDataLocation
PreferredLanguage
PreferredName
Presence
Print
Profile
ProvisionedPlans
ProxyAddresses
RefreshTokensValidFromDateTime
RegisteredDevices
Responsibilities
Schools
ScopedRoleMemberOf
Security
SecurityIdentifier
ServiceProvisioningErrors
Settings
ShowInAddressList
SignInActivity
SignInSessionsValidFromDateTime
Skills
State
StreetAddress
Surname
Teamwork
Todo
TransitiveMemberOf
TransitiveReports
UsageLocation
UsageRights
UserPrincipalName
UserType
WindowsInformationProtectionDeviceRegistrations
AdditionalProperties
Export Last Sign-in date and time of All Entra ID Users
Export-LastSigninDateTime.ps1
<#
.DESCRIPTION
This script Exports users DisplayName, UserprincipalName, Last Sign-in date and time
and Account Enabled status using Microsoft Graph API (Interactive) in a CSV file.
Author: Jatin Makhija
Site: cloudinfra.net
Version: 1.0.0
#>
$output = @()
#Connect to Microsoft Graph with required scopes
Connect-MgGraph -Scopes "AuditLog.Read.All", "User.Read.All"
#Fetch the required properties of a user account
$alluserdata = Get-MgUser -All -Property Userprincipalname, DisplayName, SignInactivity, AccountEnabled
ForEach ($User in $alluserdata)
{
#Get Last Sign-in date for this user into a variable
$signinactivity = $User.SignInActivity.LastSignInDateTime
If($signinactivity -eq $null){
#If user has never logged on then there will not be any logs
$LastSignInDate = "Sign In logs Not available"
}
Else{
#Assign signindatetime value to LastSignindate variable
$LastSignInDate = $signinactivity
}
#Create Powershell Custom Object
$output += [PSCustomObject]@{
UPN = $User.UserPrincipalName
DisplayName = $User.DisplayName
AccountEnabled = $User.AccountEnabled
LastSignInDate = $LastSignInDate
}
}
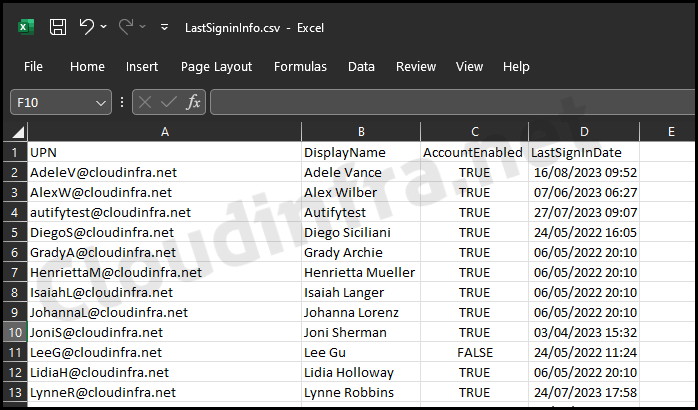
#Export object value into a CSV file
$output | Export-csv C:\temp\LastSigninInfo.csv -NoTypeInformation
Method 3: Find Inactive Users Using Powershell [Non-Interactive way]
In Method 2, we learnt how to export the SignInActivity Information of all Entra ID users in a CSV file in an Interactive way. Interactive method for exporting a user’s last sign-in data is effective, but it requires the user to authenticate using Connect-MgGraph each time the script is executed.
If you need to automate the script on a schedule via a CI/CD pipeline, such as generating a weekly report and sending it over the email, the non-interactive method is the ideal choice.
For non-interactive method, we will need to create an Entra ID application and configure necessary permissions. Let’s take a look:
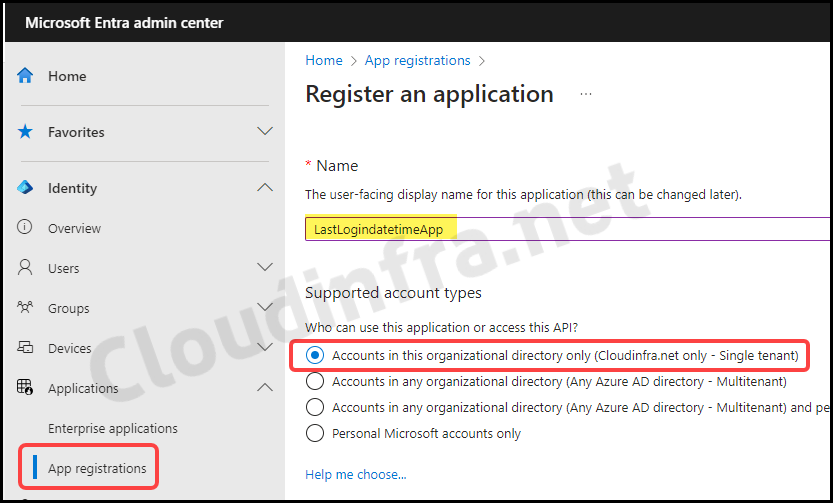
- Sign in to the Entra admin center > Applications > App registrations.
- Click on + New registration.
- Provide a Name for this application and select Supported account types.
- Click on Register to create a new application in Entra ID.
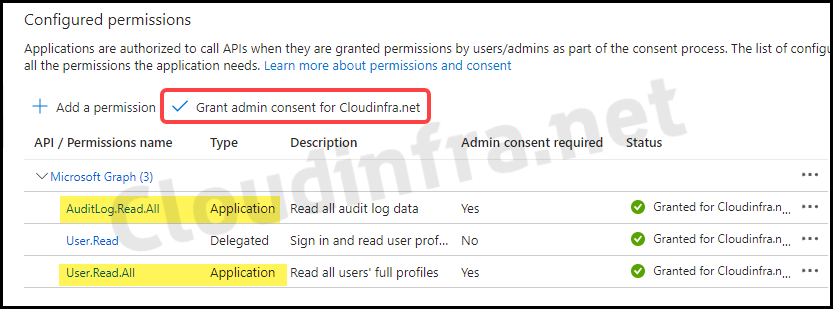
- After creating the application, Open it and click on API permissions under Manage.
- Click on + Add a permission.
- Click on Microsoft Graph > Application permissions.
- Search for and select Audit.Read.All and User.Read.All permissions.
- Click on Add permissions.
- Then click on Grant admin consent for <your org name>.
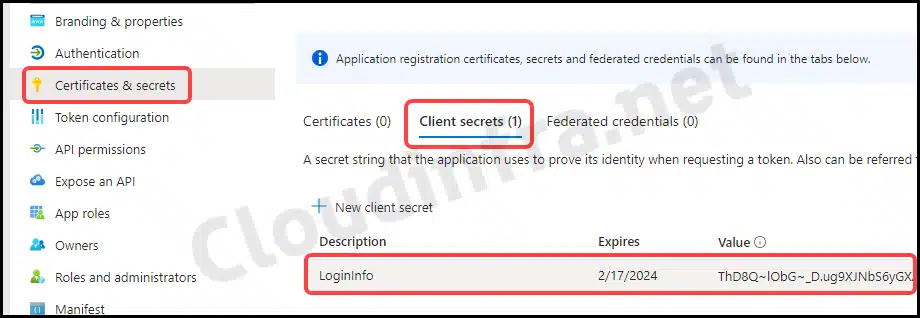
Once you’ve configured the API permissions, the next step is to create a Client secret for this application. Follow these steps to generate a client secret for your application:
- Click on Certificates & Secrets on the left-hand side.
- Go to the Client secrets tab.
- Click on + New client secret.
- Describe this secret and choose an Expiration date.
- Copy the Client secret located under the Value column. This value will only be visible for a limited time; after that, it won’t be available for copying. Therefore, ensure you copy the Client’s secret value as soon as you generate it.
Once you’ve configured the API permissions and created a client secret, you’ll require the following information to use in the PowerShell script:
- Client ID – Open the application, Click the Overview tab, and copy the Application (client) ID value.
- Client secret – Go to Certificates & secrets > Copy the value of secret.
- Tenant ID -Sign in to the Entra admin center. On the Overview page, Copy the tenant ID.
Once you’ve gathered all the necessary information, you must replace it in below powershell variables within the script.
ClientID, ClientSecret and TenantID variables
$ClientID = "2bc59a27-26dd-4e84-8410-6d5cb28e6010"
$ClientSecret = "VZD8Q~be11hbbKBCY~kEMXrKHBeQ5VZYR22UFaf8"
$TenantId = "7ccdb47d-f99c-44ss-a9ww-22487525559e"
Generate an access token
$body = @{
    client_id     = $clientId
    scope         = "https://graph.microsoft.com/.default"
    client_secret = $clientSecret
    grant_type    = "client_credentials"
}
$req = Invoke-RestMethod -Method Post -Uri https://login.microsoftonline.com/$TenantId/oauth2/v2.0/token -Body $Body
$token = $req.access_token
Connect to Microsoft Graph using the access token
Connect-MgGraph -AccessToken $token | Out-Null
Export Last Sign-in date and time of All Users into a CSV
Export-LastSigninDateTime.ps1
<#
.DESCRIPTION
    This script Export users DisplayName, UserprincipalName, Last Sign-in date and time
    and Account Enabled status using Microsoft Graph API (Non-Interactive)
    variable.
    Author:  Jatin Makhija
    Site:    cloudinfra.net
    Version: 1.0.0
#>
#Provide client ID of the Applicaton
$ClientID = "2bc59a27-26dd-4e84-8410-6d5cb28e6010"
#Provide client secret value of the Application
$ClientSecret = "VZD8Q~be11hbbKBCY~kEMXrKHBeQ5VZYR22UFaf8"
#Provide Entra ID tenant ID
$TenantId = "7ccdb47d-f99c-44ss-a9ww-22487525559e"
$body = @{
    client_id     = $clientId
    scope         = "https://graph.microsoft.com/.default"
    client_secret = $clientSecret
    grant_type    = "client_credentials"
}
$req = Invoke-RestMethod -Method Post -Uri https://login.microsoftonline.com/$TenantId/oauth2/v2.0/token -Body $Body
$token = $req.access_token
#Connect to Microsoft Graph using Access token
Connect-MgGraph -AccessToken $token | Out-Null
Select-MgProfile beta
# Get required user properties into a variable
$alluserdata = Get-MgUser -All -Property Userprincipalname, DisplayName, SignInactivity, AccountEnabled
ForEach ($User in $alluserdata)
{
    #get user's lastsignindatetime value into a variable
    $signinactivity = $User.SignInActivity.LastSignInDateTime
    If($signinactivity -eq $null){
        #If user has not logged in even once, No Sign-in Logs will be available
        $LastSignInDate = "Sign In logs Not available"
    }
    Else{
        $LastSignInDate = $signinactivity
    }
    #Create a Custom Powershell Object
    $output += [PSCustomObject]@{
            UPN             = $User.UserPrincipalName
            DisplayName     = $User.DisplayName
            AccountEnabled  = $User.AccountEnabled
            LastSignInDate  = $LastSignInDate
        }
    }
#Export PS object into a CSV file
$output | Export-csv C:\temp\LastSigninInfo.csv -NoTypeInformation
Export Active Users report from Microsoft 365 admin center
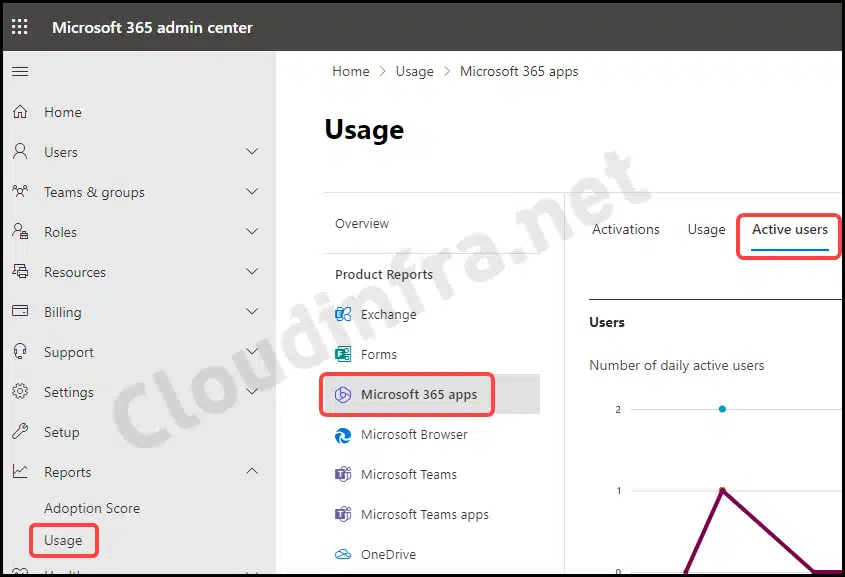
Built-in reports are also available in the Microsoft 365 admin center under Reports to identify active users of Microsoft 365 apps. To access these reports, please follow these steps:
- Sign in to the Microsoft 365 admin center > Reports > Usage.
- Under Product Reports > Click on Microsoft 365 apps.
- Click on the Active Users tab to find the Latest activity date for all Microsoft 365 apps.
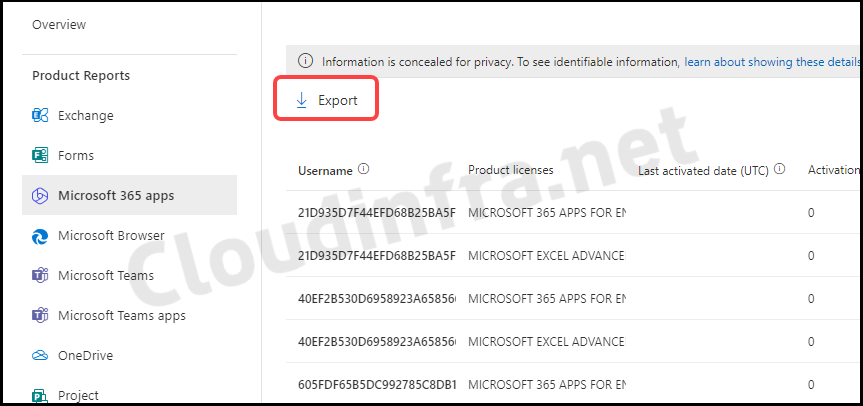
For each user, we can get the following information, which can also be exported into a CSV file using the Export link:
- Report Refresh Date
- User Principal Name
- Display Name
- Is Deleted
- Deleted Date
- Has Exchange License
- Has OneDrive License
- Has SharePoint License
- Has Skype For Business License
- Has Yammer License
- Has Teams License
- Exchange Last Activity Date
- OneDrive Last Activity Date
- SharePoint Last Activity Date
- Skype For Business Last Activity Date
- Yammer Last Activity Date
- Teams Last Activity Date
- Exchange License Assign Date
- OneDrive License Assign Date
- SharePoint License Assign Date
- Skype For Business License Assign Date
- Yammer License Assign Date
- Teams License Assign Date
- Assigned Products – This will show the licenses assigned to the user
- Click on Export to export the data into a CSV file.
Conclusion
Finding Inactive users in any organization is useful from a security and cost perspective. Inactive users can be identified based on when a user last Signed in date-time stamp.. You can get this data using any of the methods discussed in this blog post. Once you identify inactive users, you can take further action on it, like disable user account or remove any licenses assigned to them.
More Information
For more information about managing Inactive user accounts in Microsoft 365, you can refer to the link here. It provides Microsoft Graph API queries, which you can run through a Powershell script.