In this blog post, I will show you the steps to assign Custom security attributes using PowerShell. In my previous blog post, we discussed about Creating and Assigning Custom Security attributes to Entra ID users using Entra admin center. This post is about assigning custom security attributes to Entra ID users using PowerShell.
To get started on custom security attributes, I will recommend you to read the above blog post first. The post details about what are custom security attributes and advantages of using it.
Before assigning a custom security attribute, knowing the permissions necessary for setting up and managing security attributes is essential. To work with custom security attributes, you’ll need an Entra ID Premium P1 or P2 license.
Contents
Permissions Required for Managing Custom Security Attributes
To manage custom security attributes in Entra ID, you would require Attribute Definition Administrator or Attribute Assignment Administrator roles. By default, Global Administrator and any other administrator role do not have permission to read, define, or assign custom security attributes.
A Global Administrator can assign the roles of Attribute Definition Administrator or Attribute Assignment Administrator to a user responsible for managing custom security attributes, and this user could also be another Global Administrator.
- Attribute Definition Administrator – Manage all aspects of attribute sets and Manage all aspects of custom security attribute definitions
- Attribute Assignment Administrator – Read attribute sets, Read custom security attribute definitions, and Read and update custom security attribute keys and values for users and service principals.
Assign Custom security attributes to Entra ID Users using PowerShell
Let’s now check the steps to assign custom security attributes using PowerShell. First, you’ll need to connect to Microsoft Graph using the Connect-MgGraph cmdlet. Subsequently, you can use the Update-MgUser cmdlet to assign custom security attributes to the users. Below are the values you will require for the PowerShell script:
- Attribute Set Name: The name of the Attribute set you have created in Entra ID. For example, CostCenter.
- Attribute Name: Name of the Attribute you want to assign to the user. For Example: CloudInfra.
- Attribute Value: Value of the Attribute. For Example CloudInfra-1890C.
Let’s check the steps:
Connect to Microsoft Graph
Connect-Mggraph -scopes "User.ReadWrite.All,Directory.ReadWrite.All,CustomSecAttributeAssignment.ReadWrite.All,CustomSecAttributeDefinition.ReadWrite.All"

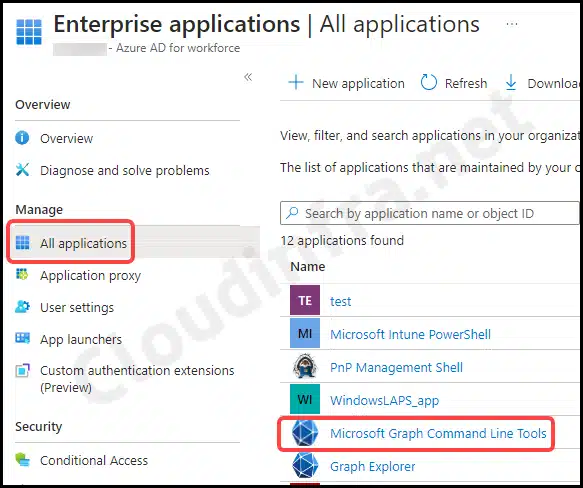
You might get a prompt to provide consent and accept the required permissions. Please consent and click on Accept. This action will create an Enterprise Application in Entra ID. To access it, navigate to the Entra Admin Center, then go to Identity > Applications > Enterprise applications.
- Click on Microsoft Graph Command Line Tools.
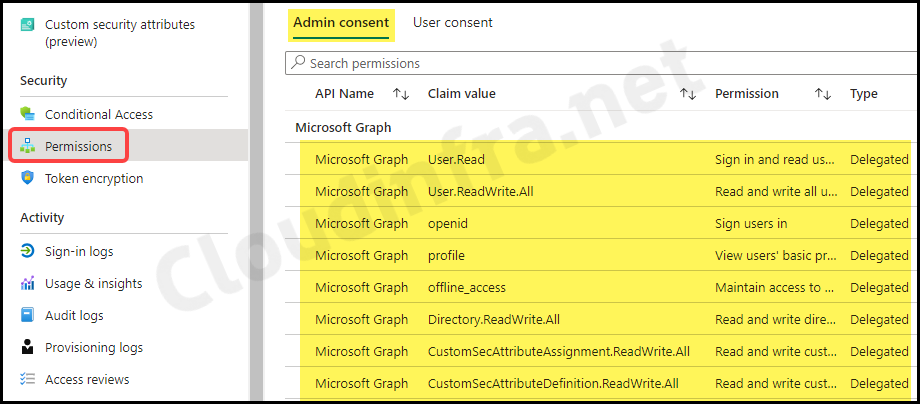
- After clicking on the application, scroll down to Permissions under the Security section. Here, you’ll find a list of all the permissions that you’ve consented to using
Connect-MgGraph.
- Use the below PowerShell script to assign custom security attributes to one Entra ID user. Swap out ObjectID with the specific Object ID of the user in your organization.
- Also, replace the Custom security Attribute Set, Attribute Name, and values in the script with specific ones created in your organization.
Assign Custom Security Attribute to One User
Assign Custom Security Attribute to One User
<#
.DESCRIPTION
    This script Export the users having CostCenter Attribute
    Author: Jatin Makhija
    Site: cloudinfra.net
    Version: 1.0.0
#>
#ObjectID of the Entra ID user
$userId = "98a20e37-7f44-4cae-af6f-aff35e74a0ae"
Select-MgProfile -Name "beta"
$customSecurityAttributes = @{
    "CostCenter" = @{
        "@odata.type" = "#Microsoft.DirectoryServices.CustomSecurityAttributeValue"
        "CloudInfra" = "CloudInfra-1890C"
    }
}
#Update Custom Security Attribute for the userId
Update-MgUser -UserId $userId -CustomSecurityAttributes $customSecurityAttributes
Assign Custom Security Attribute to Users in a CSV file
Example:
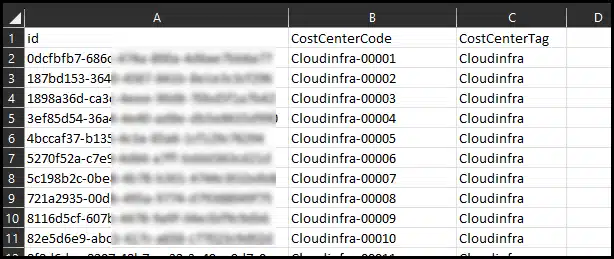
- Begin by creating a CSV file named CustomSecurity_v2.csv. The first column should be for Object ID, the second for CostcenterCode, and the third for CostCenterTag [Update the names as per your environment]
- Update the variable
$CSVto specify the path to this newly created file.
- Establish a connection to Microsoft Graph using the Connect-MgGraph command, including the following scopes: User.ReadWrite.All, Directory.ReadWrite.All, CustomSecAttributeAssignment.ReadWrite.All, and CustomSecAttributeDefinition.ReadWrite.All.
- Execute the PowerShell script to update the custom security attributes for all user Object IDs in the CSV file.
Assign Custom Security Attribute to Users in a CSV file
$CSV = "C:\Temp\CustomSecurity_v2.csv"
Import-Csv $CSV -Header id, CostCenterCode, CostCenterTag | ForEach-Object{
                                                $Objectid = $_.id
                                                $CostCenterValue = $_.CostCenterCode
                                                $CostCenterTag = $_.CostCenterTag
Write-Host "$objectid"
Select-MgProfile -Name "beta"
$customSecurityAttributes = @{
    "CostCenter" = @{
        "@odata.type" = "#Microsoft.DirectoryServices.CustomSecurityAttributeValue"
        "$CostCenterTag"   = "$CostCenterValue"
    }
}
#Update Custom Security Attribute for the userId
Update-MgUser -UserId $Objectid -CustomSecurityAttributes $customSecurityAttributes
}
Export Custom Security Attributes Report using Entra admin center
While using the Entra Admin Center, you can apply a filter to sort users based on their custom security attributes. You can click Download users to export into a CSV file.
However, it’s important to note that the export process from the Entra admin center is not functioning as expected.
You can use a PowerShell script to workaround the Export process. Here’s a step-by-step guide: Export users with Custom security attributes using PowerShell.
Conclusion
In this blog post, we have seen how to assign custom security attributes to Entra ID users. Please use the Connect-MgGraph cmdlet to connect to Microsoft Graph before running the script. In another blog post, we will learn how to export the list of users based on a particular custom security attribute set in a CSV file.
Hi Jatin,
This is a great article as this is exactly what we are trying to achieve also.
This would be extremely handy to get working as we are trying to assign custom security attributes to approx. 750 from users in the CSV file.
However, I am struggling trying to get the Assign Custom Security Attribute to Users in a CSV file to work for me, I know it is just my limited knowledge/misunderstanding of the script.
I’m trying to get this working in our Entra ID tenant with the following custom attribute set details:
Attribute set name = DEV
Attribute name = UserAccountCategory
Values = There are 10 string values in this set
I’m getting confused where I should be replacing my values in the example you have provided – I’m pulling my hair out a bit!
Grateful for any advice.
Kind regards