In this blog post, we will explore the steps to setup calendar sharing between Office 365 tenants. Sharing calendar information between two Office 365 tenants facilitates convenient scheduling, improves collaboration, enhances communication, and contributes to more effective relationships between organizations.
The configuration of calendar sharing between two Office 365/Exchange Online tenants is achieved by creating an organizational relationship in Exchange Online.
You can establish an Organization Relationship from one Microsoft 365/Office 365 tenant to another external Microsoft 365/Office 365 tenant, or with a hybrid/on-premises Exchange organization.
An Organization relationship is a one-to-one connection between tenants, enabling calendar sharing and allowing users to view their calendar information in an external organization.
The extent of calendar information shared with another organization is at the discretion of the tenant admin. For example, organizations can select from the following options when it comes to calendar sharing:
- No access.
- Access to availability (free/busy) time only.
- Access to free/busy, including time, subject, and location.
For Example, When establishing an organizational relationship between two tenants, such as cloudinfra.net and techpress.net, the configuration of the organization relationship must be completed on both sides. Let’s explore how to configure this relationship for calendar information sharing.
Contents
Prerequisites
Exchange administrator or Global administrator rights are required to set up an organizational relationship.
You can create an organization relationship using the Exchange Online Admin Center or PowerShell. In the following sections, we will explore both methods and establish the relationship between cloudinfra.net and techpress.net.
Since this relationship needs to be configured on both sides of the tenants, here is a summary of the steps we will be performing in the upcoming sections of this post:
- The first step is to log in to the Exchange Admin Center of techpress.net (the First tenant) and Add the Organization relationship.
- The second step is to log in to the Exchange Admin Center of cloudinfra.net (the Second tenant) and Add the Organization relationship.
- Finally, we’ll conduct testing to confirm if users can view the calendar free/busy information of external tenant users.
Step 1: Create an organizational relationship on First Tenant (Techpress.net)
- Sign in to the Exchange admin center.
- Click on Organization > Sharing.
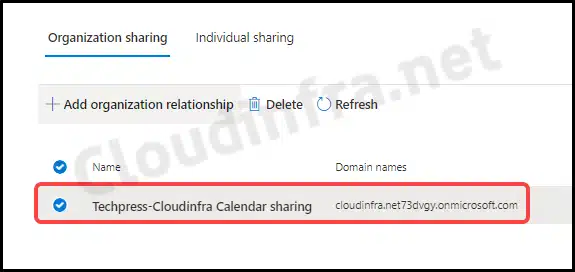
- Under the Organization sharing tab. Click on + Add organization relationship.
- Provide Relationship Name: Techpress-Cloudinfra Calendar sharing.
- Domain to share with: cloudinfra.net.
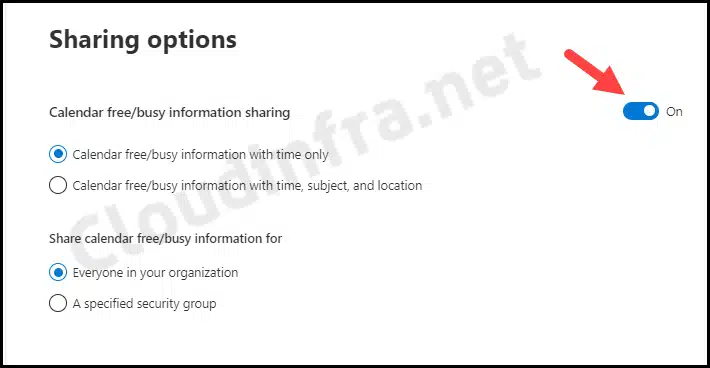
Now, on the Sharing options page, Enable Calendar free/busy information sharing and choose the level of information you want to share from your organization with cloudinfra.net.
Sharing Options
- Calendar free/busy information with time only: This option will provide information about when a user is available (free) or occupied (busy).
- Calendar free/busy information with time, subject, and location: This option will share more information about a user’s calendar, including their meeting subject and location details.
- Everyone in your organization: Select this to apply to everyone.
- A specified security group: Select this to provide an Azure AD group containing users to target this configuration.
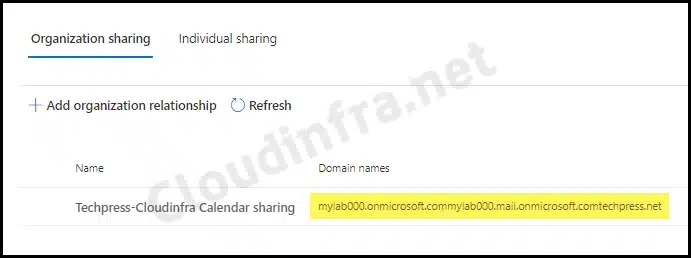
- Review the organization relationship settings and click on Create. Once it’s in place, you can find it in the Organization Sharing tab within the Exchange Online Admin Center.
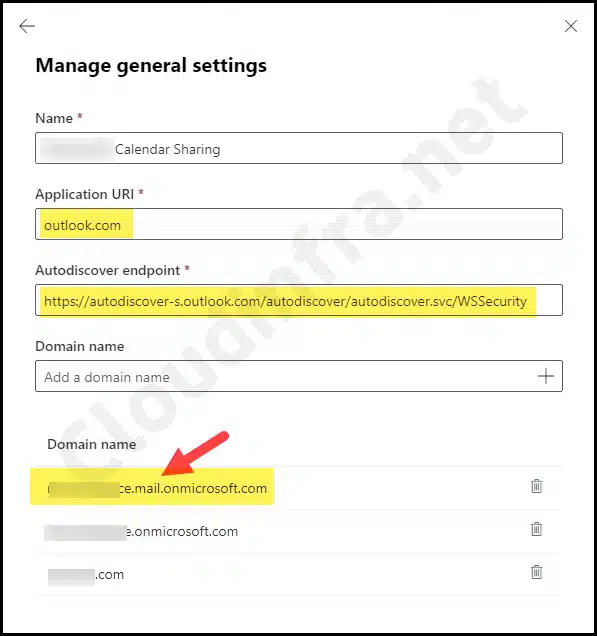
- Click on the relationship to access more details, then click on Manage general settings.
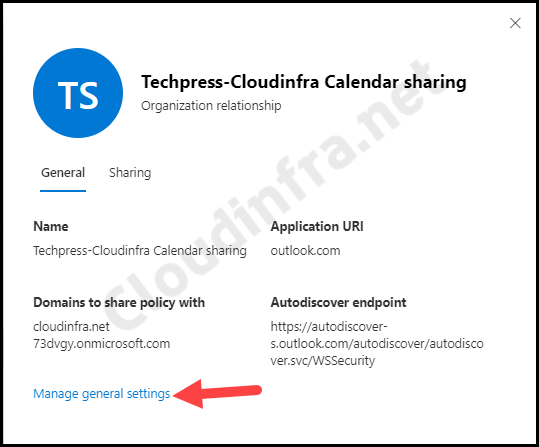
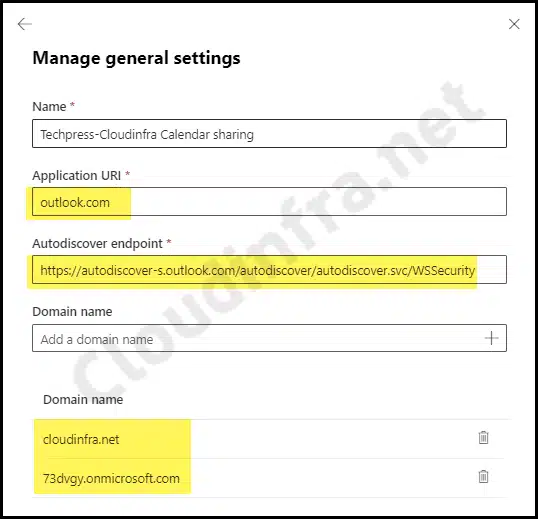
- On the Manage general settings page, you’ll find details about the Application URI and Autodiscover endpoint and the list of domains added to the organization relationship. You’ll also notice that the 73dvgy.onmicrosoft.com domain is automatically discovered and added to the list.
- Name: Techpress-Cloudinfra Calendar sharing
- Application URI: outlook.com
- Autodiscover endpoint: https://autodiscover-s.outlook.com/autodiscover/autodiscover.svc/WSSecurity
- Domain name: Name of the domains you are sharing Calendar Information with.
Step 2: Create an organizational relationship on Second Tenant (Cloudinfra.net)
We must follow the same steps on the cloudinfra.net tenant and add an organization relationship with the techpress.net domain.
- Sign in to the Exchange admin center.
- Click on Organization > Sharing.
- Under the Organization sharing tab. Click on + Add organization relationship.
- Provide Relationship Name: Techpress-Cloudinfra Calendar sharing.
- Domain to share with: techpress.net.
The remaining steps are the same as those followed previously when we created the organizational relationship with the techpress.net tenant. Please follow the same steps to complete this configuration.
Add Organizational Relationship Using PowerShell
You can also add a new organizational relationship to Exchange Online using PowerShell. Here are the steps for doing so:
1. Install the Exchange Online PowerShell module
Install-Module -Name ExchangeOnlineManagement
2. Connect to Exchange Online
Connect-ExchangeOnline -UserPrincipalName <Admin UPN>

Example:
Connect-ExchangeOnline -UserPrincipalName jatin.makhija@cloudinfra.net
3. Use New-OrganizationRelationship cmdlet
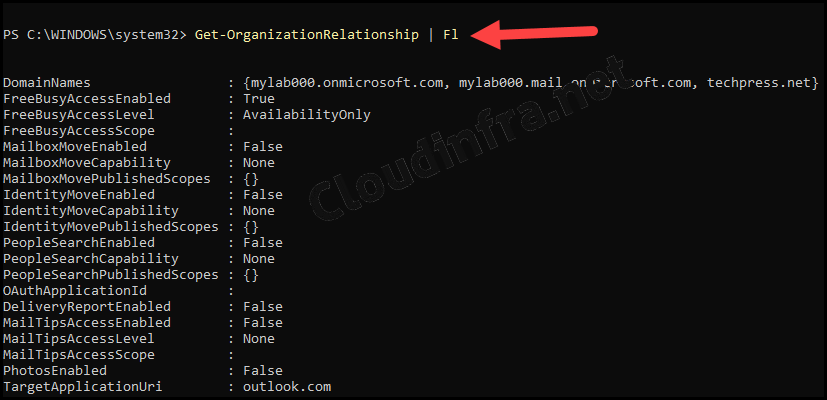
New-OrganizationRelationship -Name "Techpress-Cloudinfra Calendar sharing" -DomainNames "cloudinfra.net" -FreeBusyAccessEnabled $true -FreeBusyAccessLevel AvailabilityOnly -TargetApplicationUri outlook.com -TargetAutodiscoverEpr https://autodiscover-s.outlook.com/autodiscover/autodiscover.svc/WSSecurity
4. Get-OrganizationRelationship | Fl
Get-OrganizationRelationship | Fl
End User Experience
Users can open their Outlook calendar and add users from another organization to view their free/busy information. This feature can be particularly helpful when scheduling meetings with users from partner organizations. Now, let’s examine the results of the relationship between the two organizations.
Example:
I opened Adelev@cloudinfra.net’s Outlook Calendar and used the Scheduling Assistant to check if gradyA@techpress.net was available before scheduling a meeting.
As you can see from the screenshot, when gradyA@techpress.net is added as a Required Attendee, the user is busy from 11:00 to 11:30 and from 13:30 to 14:00, while the rest of the calendar appears to be free.

FAQs
1. No Information: No free/busy information could be retrieved
If you have recently created an organizational relationship with both tenants and are testing it immediately, you may not be able to see the calendar information of the external Office 365 user just yet. When checking an external user’s calendar information, you may encounter the following message.
- No Information – No free/busy information could be retrieved.
- The external recipient’s server could not be determined. Contact your administrator
The screenshot below displays the error message encountered when attempting to check the calendar of an external user immediately after configuring the Organization relationship. After waiting for approximately 24 hours and checking again, I could view an external user’s calendar information successfully.

2. Calendar Free/busy info is available from the First tenant but not from the Second tenant
After configuring the organization relationship, you might observe that from the first tenant, you can see the calendar free/busy information of the second tenant, but not the other way around. I encountered this issue recently and resolved it using the following steps:
If you are attempting to configure an organization relationship between one Office 365 tenant and another organization that is either hybrid or has an on-premise Exchange server environment. You must ensure to add the mail.onmicrosoft.com domain address of the on-premise Exchange server in the organization relationship of the second tenant, which is a fully cloud-based Office 365/Exchange environment.
- Make sure to add the xxx.mail.onmicrosoft.com domain address to the list of domains.
- Application URI: outlook.com
- Autodiscover endpoint: https://autodiscover-s.outlook.com/autodiscover/autodiscover.svc/WSSecurity
Conclusion
In this blog post, we’ve explored the steps to configure calendar sharing between two Office 365 tenants and discussed various issues you might encounter after configuring the organization relationship.
If you have one Office 365 tenant and another is in a hybrid Exchange server environment, it’s important to ensure that you add the mail.onmicrosoft.com domain of the on-premises Exchange server to the second tenant. Failing to do so will result in users being unable to view the free/busy calendar information of users in the hybrid or on-premises Exchange server environment.