In this guide, I will show you how to create an Intunewin file. Intune supports several native app types (MSI line-of-business apps, Microsoft Store apps, etc.), but for EXE installers, scripts, and more complex deployments, the recommended approach is to package the installer into the .intunewin format and deploy it as a Windows app (Win32).
Microsoft provides Microsoft Win32 Content Prep Tool (IntuneWinAppUtil.exe) to convert your application source folder into a single .intunewin package that can be uploaded and deployed via Intune.
Contents
Requirements
Below are the basic requirements before you can start creating an Intunewin file.
- Application installer files (EXE/MSI) plus any supporting files (MST, CAB, scripts, config files).
- Microsoft Win32 Content Prep Tool (downloaded from Microsoft’s GitHub release ZIP): Microsoft Win32 Content Prep tool.
- A clean packaging workstation (recommended), so you do not accidentally wrap unrelated files.
Step 1: Create 3 folders on your device
Create three folders (the names are examples and can be changed as needed). For demonstration purposes, I will use the Notepad++ application to show how to create an .intunewin file.
- C:\Notepad Setup: Put only the installer and its supporting files here.
- C:\IntuneContentPrepTool: Extract Microsoft Win32 Content Prep tool here.
- C:\Output\: This is where your .intunewin file will be generated.
I have also published several posts that walk through the steps to create an .intunewin file for Win32 app deployments. If you encounter any issues, you can refer to any of those app deployment guides on my site that use Win32 app deployment method.
Step 2: Download/Extract Microsoft Win32 Content Prep Tool
- Download the ZIP from Microsoft’s GitHub release: Microsoft Win32 Content Prep tool.
- Extract the contents to C:\IntuneContentPrepTool.
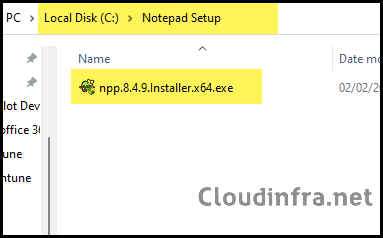
Step 3: Copy the Installer Files
Copy the application binaries and any supporting files into the source folder. In this example, the folder is C:\Notepad Setup. Ensure that this folder contains only the application installer and its supporting files, and no additional files or folders.
Step 4: Create an IntuneWin File
- Open PowerShell (or Command Prompt).
- Change directory to the tool folder (e.g., C:\IntuneContentPrepTool).
- Run IntunewinAppUtil.exe:
- Source Folder: C:\Notepad Setup
- Setup File: npp.8.4.9.Installer.x64.exe
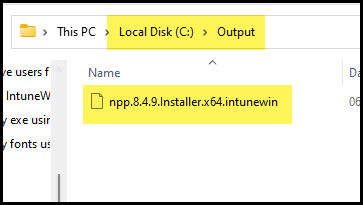
- Output folder: C:\output
- Catalog folder: Type N and press Enter.
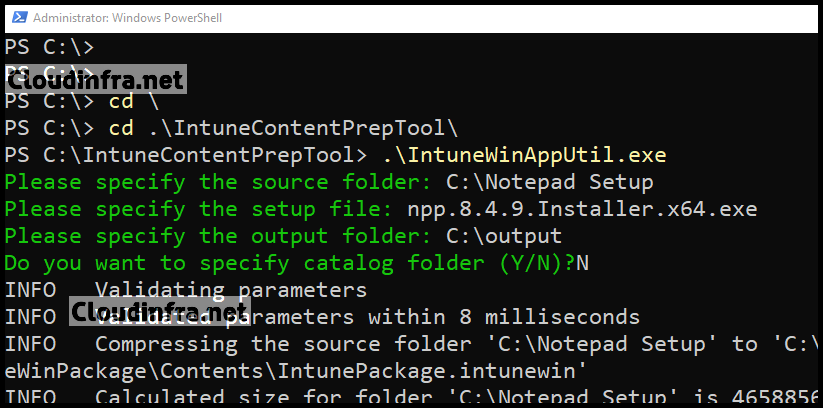
- Once the command is executed successfully, you can check the c:\output folder where the .intunewin file is created.
Create an .intunewin File (One Liner Command)
Another way to create an Intunewin file is by using a single command and providing all the required information through switches.
Syntax
.\IntuneWinAppUtil.exe -c <setup_folder> -s <setup_file> -o <output_folder>
- <setup_folder> = Provide C:\Notepad Setup\ folder path; this is where all application installer and supporting files are copied.
- <setup_file> = npp.8.4.9.Installer.x64.exe (Intune will launch this file on target devices)
- <output_folder> = C:\output (this is where the Intunewin file will be generated)
Example:
.\IntuneWinAppUtil.exe -c "C:\Notepad Setup\" -s npp.8.4.9.Installer.x64.exe -o C:\output
Optionally, you can add a
-qswitch to the command for quiet mode:.\IntuneWinAppUtil.exe -c <setup_folder> -s <setup_file> -o <output_folder> -q
Best Practices
- Ensure the setup file is inside the application source folder: Ensure that all the application installer and its supporting files are already copied to the source folder before providing the location to the IntuneWinAppUtil.exe tool.
- Keep the application source folder clean: Everything inside the source folder is packaged into the .intunewin file. Ensure the folder contains only the required installer and supporting files, and remove any unnecessary items. This helps keep the .intunewin file size minimal and avoids packaging unwanted content.
- Maximum file size allowed is 30 GB per app for Win32 app deployment.
What’s Next After Creating .IntuneWin File
After creating the .intunewin file, sign in to the Microsoft Intune admin center and create an app deployment using the Windows app (Win32) option to deploy the file. If you need more detailed guidance on Win32 app deployments in Intune, refer to the following posts for additional information.